Advertisement
Available languages
Available languages
Quick Links
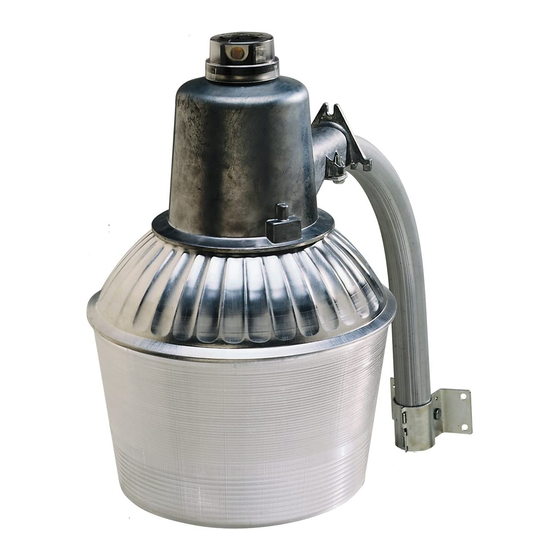
Model SL-5666
Installation Instructions With Two Piece Arm
READ ALL INSTRUCTIONS CAREFULLY BEFORE BEGINNING INSTALLATION.
NOTE: All wiring must be run in accordance with the National Electrical Code (Canadian Electrical Code in Canada) through
conduit or another acceptable means. Contact a qualified electrician if there is any question as to the suitability of
the system.
Lamp in Fixture Contains Mercury. Dispose According
to Local, State, or Federal Laws.
WARNING: Turn power off at the circuit breaker or
fuse.
1. Select a location on a flat wall with structurally sound wood and
from 10 to 25 feet (3 to 7.6 m) from the ground. The wood should
be at least one inch thick to safely secure the fixture.
2. Slide the curved section of the mounting arm into the mounting
bracket. Tighten the bolts on the mounting bracket evenly.
3. Using the mounting arm and bracket as a guide mark four mount-
ing holes. We suggest drilling 3/16" (4.8 mm) pilot holes for the
lag screws.
4. Mount the arm and bracket using four lag screws and washers
provided.
5. Place a ring of silicone caulk around mounting arm (see illustra-
tion). Slide the straight section of the mounting arm on to the
curved section aligning the predrilled holes.
6. Secure the two sections with two bolts, nuts and four washers
provided. Place silicone caulk on top of the bolts and washers
to prevent water from entering.
7. Thread your outdoor cable or flexible conduit through the mount-
ing arm.
8. Loosely connect the mounting strap to the fixture using two bolts
provided.
9. Slide the fixture on to the mounting arm until the fixture comes
to a stop. Secure the fixture to the mounting arm by tightening
the two mounting strap bolts.
10. Connect the fixture wires to the service wires using the wire nuts
provided (black to black and white to white). Push the connec-
tions as far as possible into the straight arm.
11. This fixture must be grounded. Connect the service ground under
the head of the green ground screw and secure to the mounting
strap.
12. Install the lens/reflector assembly with two screws and washers
provided.
13. Screw in the 100 watt H.P. Sodium type S54 lamp provided.
14. Loosen the screw in the center of the photocontrol socket two
turns. Twist the socket so that the arrow points north. Note: There
is a stop to prevent the socket from turning all the way around. If
you have trouble turning the socket, try turning it the other direc-
tion. Retighten the screw in the center of the socket.
© 2008 HeathCo LLC
100 Watt H.P.S.
Dusk-to-Dawn Security Light
15. Align the photocontrol (it will only plug-in one way). Plug it in
and twist clockwise until it stops.
To test operation during daylight, cover the photocontrol with a
small box. Turn on the power. Not all photocontrols are alike. Some
may have a time delay of a few minutes, others will turn on as soon
as power is applied. The light will take up to ten minutes to reach
full brightness. Uncover the photocontrol and your unit will operate
automatically—on at dusk, off at dawn.
Mounting Strap
Lens/Reflector
Assembly
Photocontrol
Mounting
Arm
Silicone
Caulk
Ground
Screw
Lag Screw (4)
Mounting
Flat Washer (10)
598-1054-04
Bracket
Advertisement

Related Manuals for Heath Zenith Energy Star SL-5666


Summary of Contents for Heath Zenith Energy Star SL-5666
- Page 1 Model SL-5666 Installation Instructions With Two Piece Arm READ ALL INSTRUCTIONS CAREFULLY BEFORE BEGINNING INSTALLATION. NOTE: All wiring must be run in accordance with the National Electrical Code (Canadian Electrical Code in Canada) through conduit or another acceptable means. Contact a qualified electrician if there is any question as to the suitability of the system.
- Page 2 Installation Instructions Without Two Piece Arm READ ALL INSTRUCTIONS CAREFULLY BEFORE BEGINNING INSTALLATION. NOTE: All wiring must be run in accordance with the National Electrical Code (Canadian Electrical Code in Canada) through conduit or another acceptable means. Contact a qualified electrician if there is any question as to the suitability of the system.
- Page 3 Ballast Assembly Replacement Instructions Ballast assembly can be replaced without the cutting of any wires. Use of a qualified electrician is recom- mended. WARNING: Turn power off at the circuit breaker or fuse. 1. Remove bulb. 2. Loosen two screws holding plastic/aluminum reflector and remove reflector.
-
Page 4: Technical Service
Please call 1-800-858-8501 (English speaking only) for assistance before returning product to store. If you experience a problem, follow this guide. You may also want to visit our Web site at: www.hzsupport.com. If the problem persists, call* for assistance at 1-800-858-8501 (English speaking only), 7:30 AM to 4:30 PM CST (M-F). You may also write* to: HeathCo LLC P.O. Box 90045, Bowling Green, KY 42102-9045 ATTN: Technical Service * If contacting Technical Service, please have the following information available: Model Number, Date of Purchase, and Place of Pur- chase. This is a “Limited Warranty” which gives you specific legal rights. You may also have other rights which vary from state to state or province to province. For a period of five years from the date of purchase, any malfunction caused by factory defective parts or workmanship will be cor- rected at no charge to you. Not Covered - Repair service, adjustment and calibration due to misuse, abuse or negligence, light bulbs, batteries, and other expend- able items are not covered by this warranty. Unauthorized service or modification of the product or of any furnished component will void this warranty in its entirety. This warranty does not include reimbursement for inconvenience, installation, setup time, loss of use, unauthorized service, or return shipping charges. This warranty covers only HeathCo LLC assembled products and is not extended to other equipment and components that a customer uses in conjunction with our products. THIS WARRANTY IS EXPRESSLY IN LIEU OF ALL OTHER WARRANTIES, EXPRESS OR IMPLIED, INCLUDING ANY WARRANTY, REPRESENTATION OR CONDITION OF MERCHANT ABILITY OR THAT THE PRODUCTS ARE FIT FOR ANY PARTICULAR PURPOSE OR USE, AND SPECIFICALLY IN LIEU OF ALL SPECIAL, INDIRECT, INCIDENTAL, OR CONSEQUENTIAL DAMAGES. REPAIR OR REPLACEMENT SHALL BE THE SOLE REMEDY OF THE CUSTOMER AND THERE SHALL BE NO LIABIL- ITY ON THE PART OF HEATHCO LLC FOR ANY SPECIAL, INDIRECT, INCIDENTAL, OR CONSEQUENTIAL DAMAGES, INCLUDING BUT NOT LIMITED TO ANY LOSS OF BUSINESS OR PROFITS, WHETHER OR NOT FORESEEABLE. Some states or provinces do not allow the exclusion or limitation of incidental or consequential damages, so the above limitation or exclu- sion may not apply to you. Please keep your dated sales receipt, it is required for all warranty requests. - Page 5 Modelo SL-5666 Instrucciones para instalación con brazo de dos piezas ANTES DE EMPEZAR LA INSTALACIÓN LEA CUIDADOSAMENTE TODAS LAS INSTRUCCIONES NOTA: Todo el cableado debe realizarse de acuerdo con el Código Nacional Eléctrico (Código Eléctrico Canadiense en Canadá) usando tubería u otro medio aceptable. Contáctese con un electricista calificado si tiene alguna pregunta respecto a la adaptabilidad del sistema.
- Page 6 Instrucciones para instalación sin brazo de dos piezas ANTES DE EMPEZAR LA INSTALACIÓN LEA CUIDADOSAMENTE TODAS LAS INSTRUCCIONES NOTA: Todo el cableado debe realizarse de acuerdo con el Código Nacional Eléctrico (Código Eléctrico Canadiense en Canadá) usando tubería u otro medio aceptable. Contáctese con un electricista calificado si tiene alguna pregunta respecto a la adaptabilidad del sistema.
- Page 7 Instrucciones para el cambio del conjunto estabilizador El conjunto estabilizador puede cambiarse sin nece- sidad de cortar ningún alambre. Se recomienda que lo haga un electricista calificado. ADVERTENCIA: Desconecte la energía en el cort- acircuito. 1. Retire la bombilla. 2. Afloje los dos tornillos que sostienen el reflector plástico/alu- minio y retire el reflector. 3. Retire los dos tornillos que conectan el conjunto estabilizador a la caja de aluminio.
-
Page 8: Servicio Técnico
Favor de llamar al 1-800-858-8501 (sólo para hablar en inglés) para pedir ayuda antes de devolver el producto a la Si tiene algún problema, siga esta guía. Usted puede también visitar nuestro sitio Web: www.hzsupport.com. Si el problema continúa, llame al 1-800-858-8501 (sólo para hablar en inglés), de 7:30 AM a 4:30 PM CST (L-V). Usted puede también escribir a: HeathCo LLC P.O. Box 90045, Bowling Green, KY 42102-9045 ATTN: Technical Service (Servicio Técnic) * Si se llama al Servicio Técnico, por favor tener lista la siguiente información: Número de Modelo, Fecha de compra y Lugar de compra. No hay piezas de servicio disponibles para este producto. Esta es una “Garantía Limitada” que le da a Ud. derechos legales específicos. Usted puede también tener otros derechos que varían de estado a estado o de provincia a provincia. Por un período de 5 años desde la fecha de compra, cualquier mal funcionamiento ocasionado por partes defectuosas de fábrica o mano de obra será corregido sin cargo para Ud. No cubierto - Servicio de reparación, ajuste y calibración debido al mal uso, abuso o negligencia, bombillas, baterías, u otras partes fungibles no están cubiertas por esta garantía. Los Servicios no autorizados o modificaciones del producto o de cualquier componente que se provee invalidarán esta garantía en su totalidad. Esta garantía no incluye reembolso por inconveniencia, instalación, tiempo de instalación, perdida de uso, servicio no autorizado, o costos de transporte de retorno. - Page 9 Modèle SL-5666 Mode d’installation du modèle avec bras en deux pièces LIRE SOIGNEUSEMENT LES DIRECTIVES AVANT D'ENTREPRENDRE L’INSTALLATION. NOTE : Le câblage doit être conforme aux exigences du Code canadien de l’électricité et être installé dans des canalisations ou autres dispositifs acceptables. Si vous avez des doutes concernant la convenance du système, consultez un électricien reconnu.
- Page 10 Mode d’installation du modèle sans bras LIRE SOIGNEUSEMENT LES DIRECTIVES AVANT D’ENTREPRENDRE L’INSTALLATION. NOTE : Le câblage doit être conforme aux exigences du Code canadien de l’électricité et être installé dans des canalisations ou autres dispositifs acceptables. Si vous avez des doutes concernant la convenance du système, consultez un électricien reconnu.
- Page 11 Directives de remplacement du ballast Il est possible de remplacer le ballast sans couper de fils. Nous recommandons de recourir aux services d’un électricien qualifié. AVERTISSEMENT: Coupez l'alimentation au dis- joncteur ou au fusible. 1. Retirez l’ampoule. 2. Desserrez les deux vis qui retiennent le réflecteur de plastique et d’aluminium, puis enlevez le réflecteur. 3. Retirez les deux vis qui fixent le ballast au boîtier d’alumi- nium.
-
Page 12: Service Technique
Veuillez faire le 1 800 858-8501 (service en anglais seulement) pour obtenir de l’aide avant de retourner l’article au En cas de problème, suivez ce guide. Vous pouvez aussi visiter notre site Web à www.hzsupport.com. Si le problème persiste, composez* le 1 800 858-8501 (service en anglais seulement), entre 7 h 30 et 16 h 30, HNC, du lundi au vendredi. Vous pouvez aussi écrire au : HeathCo LLC P.O. Box 90045, Bowling Green, KY 42102-9045 ATTN: Technical Service (Service technique) * Lors d’un appel au service technique, veuillez avoir les renseignements suivants à portée de main : numéro du modèle, date d’achat et endroit de l’achat. Aucune pièce de rechange n’est disponible pour ce produit. Il s’agit d’une « Garantie limitée » qui vous confère des droits juridiques spécifiques. Vous pouvez également jouir d’autres droits, variables d’une province à l’autre. Pendant une période de 5 ans à compter de la date d’achat, toute anomalie de fonctionnement imputable à un vice de matériau ou de main- d’oeuvre sera corrigée gratuitement.
Need help?
Do you have a question about the Energy Star SL-5666 and is the answer not in the manual?
Questions and answers