Table of Contents
Advertisement
Available languages
Available languages
Quick Links
Operating Instructions & Parts Manual
Please read and save these instructions. Read carefully before attempting to assemble, install, operate or main-
tain the product described. Protect yourself and others by observing all safety information. Failure to comply
could result in personal injury and/or property damage! Save these instructions for future reference.
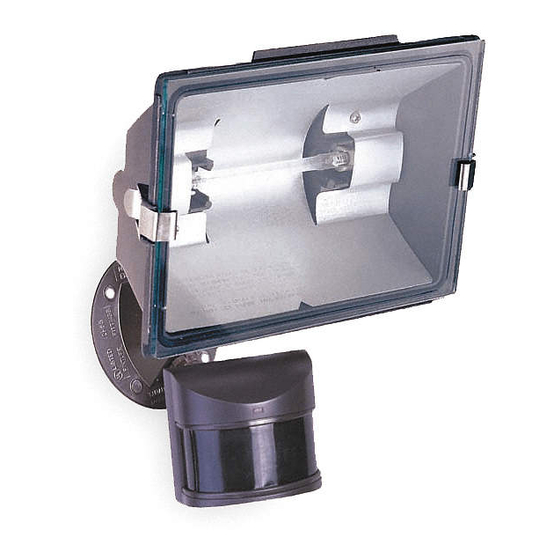
SPECIFICATIONS
Range . . . . . . . . . . . . Up to 70 ft. (21 m); 100 ft.
Vertical Range . . . . . . Up to 15 ft. (4.6 m)
Sensing Angle . . . . . . Up to 240° horizontal. Up to 80°
Electrical Load . . . . . . Up to 500 Watts Maximum In-
Power Requirements . 120 VAC, 60 Hz
Operating Modes . . . . TEST, AUTO, and MANUAL
Time Delay . . . . . . . . 1, 5, 20 minutes
Replacement Lamp . . T3 500 Watt (or less) halogen
D
B
Timer . . . . OFF, 3, 6 hours, Dusk-to-Dawn
®
ual
rite
This package includes:
1 Light control
1 Gasket
1 Halogen Bulb
1 S-hook
6 Screws (3 sizes)
3 Wire connectors
Additional Items needed:
• Screwdriver
• Pliers to tighten locknut
• Ladder
HEA 010
Printed in China
09/07
(30.5 m) with Range Boost.
[var ies with surrounding
temperature]
Vertical
candescent
MODE
120 VAC
Motion Sensor Quartz
®
Security Light
• The light control requires 120-volts AC.
• This fixture is designed for wall mounting only.
• If you want to use Manual Mode, the control must be
wired through a switch.
• Some codes require installation by a qualified
electrician.
• This product is intended for use with the enclosed
gasket and with a junction box marked for use in wet
locations.
• The backplate has knockouts so the sensor can be
mounted on most junction boxes.
• In some applications a universal adaptor plate may
be needed. Adaptors are available at Home Centers
and Electrical Supply Stores.
NOTE: D
Z
ual
one
the motion sensor. D
adjustment and operates in conjuction with the for-
ward-looking sensor.
Requirements
™ adds a zone of detection under
Z
™ requires no additional
ual
one
2LBN2
598-1114-04
LPG-5311
Advertisement
Table of Contents

Related Manuals for Heath Zenith Motion Sensor Quartz Security Light 2LBN2


Summary of Contents for Heath Zenith Motion Sensor Quartz Security Light 2LBN2
-
Page 1: Specifications
Operating Instructions & Parts Manual Please read and save these instructions. Read carefully before attempting to assemble, install, operate or main- tain the product described. Protect yourself and others by observing all safety information. Failure to comply could result in personal injury and/or property damage! Save these instructions for future reference. SPECIFICATIONS Range . -
Page 2: Installation
INSTALLATION For easy installation, select an existing light with a wall switch for replacement. For best performance, mount the fixture about 8 ft. (2.4 m) above the ground. NOTE: If fixture is mounted higher than 8 ft. (2.4 m), aiming the sensor down will reduce coverage distance. ❒ Attach the lamp arm to the backplate arm and secure with the long bolt. Note: When tightening the arm screw, pull on the wires to make sure the wires are not pinched by the joint. ❒ Drill out the holes if needed to mount the backplate to the junction box. Wire the Light Control WARNING: Turn power off at the fuse or circuit breaker. 1. Remove the existing light fixture. 2. The S-hook can be used to hold the fixture while wiring. The small end of the hook can be inserted into a hole in the junction box. The large end goes around the “neck” of the fixture. -
Page 3: Operation
OPERATION Mode: On-Time Test 5 Seconds Auto 1, 5, or 20 Min Manual To Dawn* Accent 3, 6 Hr, to Dawn * resets to Auto Mode at dawn. TEST ON-TIME Put ON-TIME switch on the sensor bottom to TEST and the D TEST 1 5 20 switch OFF. ® rite AUTO Put ON-TIME switch in the 1, 5, or 20 minute position. MANUAL MODE Manual mode only works at night because daylight returns the sensor to AUTO. Flip the light switch off for one second then back on to toggle between AUTO and MANUAL MODE. Manual mode works only with the ON-TIME switch in the 1, 5, or 20 position. -
Page 4: Final Settings
NOTE: If fixture is mounted higher than 8 ft. (2.4 m), aiming the sensor down will reduce coverage distance. The detector is less sensitive to motion directly towards it. Motion Sensor ™ Least Sensitive 3. Loosen the clamp screw in the sensor ball joint and gently rotate the sensor. 4. Walk through the coverage area noting where you are when the lights turn on. Move the sensor head up, down, or sideways to change the coverage area. 1. Secure the sensor head's aim by tightening the clamp screw. Do not overtighten the screw. Motion 2. Adjust the RANGE as needed. RANGE set too high may increase false triggering. -
Page 5: Troubleshooting Guide
SYMPTOM POSSIBLE CAUSE Light will not come on. 1. Light switch is turned off. 2. Flood lamp is loose or burned out. 3. Fuse is blown or circuit breaker is turned off. 4. Daylight turn-off is in effect. 5. Incorrect circuit wiring, if this is a new installation. 6. Sensor does not detect objects in desired area. Light comes on in day- 1. Light control may be installed in a relatively dark light. location. 2. Light control is in TEST. Light comes on for no 1. Light control may be sensing small animals or auto- apparent reason. mobile traffic. 2. Range is set too high. -
Page 6: Especificaciones
Manual de Instrucciones y Partes Por favor lea y guarde estas instrucciones. Léalas cuidadosamente antes de intentar armar, instalar, operar o dar mantenimiento al producto descrito. Protéjase Ud. y los otros observando toda la informa- ción de seguridad. ¡Si no lo hace podría ocasionar lesión al personal y/o daño al equipo! Guarde estas instrucciones para referencia futura. -
Page 7: Instalación
INSTALACIÓN Para una fácil instalación escoja una luz con un interruptor de pared. Para un mejor funcionamiento, instale el aparato a casi 2.4 m del suelo. NOTA: Si el aparato está instalado a más de 8 pies (2,4 m), si se apunta el detector hacia abajo se reducirá la distancia de cobertura. ❒ Acople el brazo de la lám- para a la placa posterior y asegúrelo con el perno largo. Nota: Cuando ajuste el tornillo del brazo, hale los alambres para asegurarse que no se pinchen en la junta. ❒ Taladre orificios si se necesita montar la placa posterior a la caja de em- palme. -
Page 8: Prueba Y Ajuste
FUNCIONAMIENTO Modalidad: A tiempo: Trabaja: Prueba 5 seg. Autom. 1, 5 ó 20 min. Manual Hasta el amanecer* Adorno 3, 6 hrs, hasta el amanecer * Reponga en el Modo Automático al amanecer. PRUEBA Ponga el selector de ON-TIME duración(on-time) de la base sensora en PRUEBA y el se- TEST 1 5 20 lector D en rite APAGADO(OFF). AUTOMÁTICO Coloque el selector de duración (on- time) en la posición 1, 5 ó 20. MODO MANUAL El modo manual trabaja sólo por las noches porque con la luz diurna el sensor vuelve a AUTOMÁTICO. - Page 9 NOTA: Si el aparato está instalado a más de 8 pies (2,4 m), si se apunta el detector hacia abajo se reducirá la distancia de cobertura. El detector es menos sensible del movimiento que se dirige hacia él. Movimiento Detector ™ Lo menos sensible 3. Afloje el tornillo sujetador en la articulación de bola del sensor y gire suavemente al sensor. 4. Camine por el área de co- bertura y tome en cuenta su posición cuando las luces se enciendan. Mueva la cabeza del sensor arriba, abajo o a los lados para cambiar el área de cobertura. 598-1114-04 1. Asegure la po- sición de la ca- beza del sensor ajustando el tor- nillo No sobreajuste Movimiento...
- Page 10 SíNTOMA POSIBLE CAUSA La Luz no se enciende. 1. El interruptor de luz está apagado. 2. El faro está flojo o quemado. 3. El fusible está quemado o el cortacircuitos está apagado. 4. La desconexión de luz del día está en efecto. 5. Alambrado incorrecto, si ésta es una nueva instala- ción. 6. El sensor no detecta objetos en la área deseada. La luz se prende durante 1. El Control de Luz puede estar instalado en un lugar el día. relativamente oscuro. 2. El Control de Luz está en fase de Prueba. La luz se prende sin 1. El Control de Luz puede estar detectando animales ninguna razón apa- pequeños o el trásito de automóviles.
- Page 11 Mode d’emploi et guide des pièces Veuillez lire et conserver ces directives. Lisez-les attentivement avant de commencer à assembler, installer, utiliser ou entretenir le produit qui y est décrit. Assurez en outre votre protection et celle des autres personnes qui vous entourent en respectant toutes les consignes de sécurité. Le fait de ne pas le faire pourrait entraîner de graves blessures ou des dommages.
- Page 12 INSTALLATION Pour faciliter l’installation, choisir un appareil d’éclairage devant être remplacé et qui est déjà commandé par un interrupteur. Pour assurer un rendement optimum, monter le luminaire à environ 2,4 m au-dessus du sol. NOTE : Lorsque le luminaire est installé à une hauteur supérieure à 8 pi (2,4 m), le fait de diriger le détecteur vers le bas réduit la portée de la couverture. ❒ Attacher le bras de la lampe au bras de la plaque de fixation et fixer avec le boulon long. Note: Lorsque vous serrez la vis du bras, tirez sur les fils pour vous assurer que ceux-ci ne sont pas coincés dans le joint. ❒ Percez les trous néces- saires au montage de la plaque arrière à la boîte de jonction. Câblage De La Commande D’Éclairage AVERTISSEMENT : Coupez l’alimentation au disjoncteur ou au fusible.
-
Page 13: Essais Et Réglages
FONCTIONNEMENT Mode: Temps en circuit : En fonction : jour nuit Essai 5 Secondes Auto 1, 5 ou 20 Min Manuel au choix, amanecer* Accen- 3, 6 h jusqu’à l’aurore tuation * Revient au mode automatique au lever du soleil. ESSAI Placer l’interrupteur de ON-TIME D temps en dircuit (ON- TIME) à la base du cap- teur à TEST et l’interrup- TEST 1 5 20 Off 3 6 Dusk to teur D à OFF. ® rite AUTOMATIQUE Amener l’interrupteur de temps en circuit (ON-TIME) à la position cor- respondant à 1, 5 ou 20 minutes. - Page 14 NOTE : Lorsque le luminaire est installé à une hauteur supérieure à 8 pi (2,4 m), le fait de diriger le détecteur vers le bas réduit la portée de la couverture. Le détecteur est moins sensible au mouvement dans sa direction. Mouvement Détecteur Le moins sensible 3. Desserrer la vis de blocage de la rotule et faire pivoter le détecteur pour pointer. 4. Marcher dans la zone de cou- verture et noter à quel endroit l’éclairage se déclenche. Dépla- cer la tête du détecteur vers le haut, le bas ou le côté pour mo- difier la zone de couverture. 1. Fixer la tête du détecteur en position en serrant la vis de blocage. Éviter de trop serrer la vis.
-
Page 15: Guide De Dépannage
SYMPTÔME CAUSE POSSIBLE L’éclairage ne s’allume 1. L’interrupteur d’éclairage est hors tension. pas. 2. Le projecteur n’est pas bien vissé ou est grillé. 3. Le fusible a sauté ou le disjoncteur a été déclen- ché. 4. Le dispositif de coupure pendant le jour fonction- 5. Mauvais câblage du circuit, dans le cas d’une nouvelle installation. 6. Le détecteur ne décèle pas les objets dans la zone souhaitée. L’éclairage s’allume en 1. La commande peut être installée dans un endroit plein jour. - Page 16 Notes / Notas ____________ ________________________ ________________________ ________________________ ________________________ ________________________ ________________________ ________________________ ________________________ ________________________ ________________________ ________________________ ________________________ ________________________ ________________________ -16- 598-1114-04...
Need help?
Do you have a question about the Motion Sensor Quartz Security Light 2LBN2 and is the answer not in the manual?
Questions and answers