Table of Contents
Advertisement
Available languages
Available languages
Quick Links
Operating Instructions & Parts Manual
Please read and save these instructions. Read carefully before attempting to assemble, install, operate or main-
tain the product described. Protect yourself and others by observing all safety information. Failure to comply
could result in personal injury and/or property damage! Save these instructions for future reference.
D
B
Motion Sensor
®
ual
rite
Light Control
Features
• D
Z
™ Technology.
ual
one
• Turns on lighting when motion is detected.
• Automatically turns lighting off.
• D
B
Timer.
®
ual
rite
• Photocell keeps the lighting off during daylight hours.
• LED indicates motion was sensed (day or night).
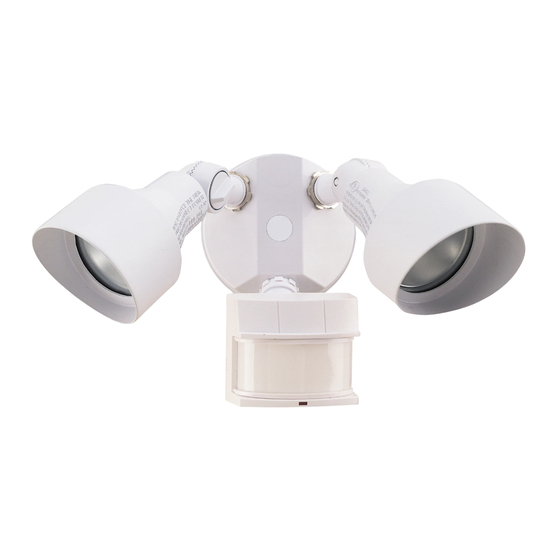
This package includes:
Lamp Holders
Cover Plate
Light Control
Mounting Bolt
Mounting Strap
2 Lamps
(installed)
(3 sizes included)
HEA 009
Printed in China
09/07
®
Rubber Plug
Plastic Hanger
Sensor
2 Wire
Connectors
Gasket
6 Screws
Requirements
• The light control requires 120-volts AC.
• If you want to use Manual Mode, the control must be
wired through a switch.
• Some codes require installation by a
qualified electrician.
• This product is intended for use with the enclosed
gasket and with a junction box marked for use in wet
locations.
OPERATION
Mode:
On-Time
Test
5 Seconds
Auto
1, 5, or 20 Min
Manual
To Dawn*
Accent
3, 6 Hr, to Dawn
* resets to Auto Mode at dawn.
Note: When first turned on wait about 1
the circuitry to calibrate.
TEST
Put ON-TIME switch
on the sensor bottom
to TEST and the D
-
ual
B
switch OFF.
®
rite
AUTO
Put the ON-TIME switch in the 1, 5,
or 20 minute position.
MANUAL MODE
Manual mode only works at night
because daylight returns the sensor
to AUTO.
Flip the light switch off for one second
then back on to toggle between AUTO
and MANUAL MODE.
Manual mode works only with the
ON-TIME switch in the 1, 5, or 20
position.
2LBL3, 2LBL4
Works: Day Night
x
x
x
x
x
/
minutes for
1
2
ON-TIME
D
B
®
ual
rite
TEST 1 5 20
Off 3 6 Dusk to
Dawn
ON-TIME
TEST 1 5 20
1 Second OFF
then...
... back on.
598-1325-00
LPG-5597
Advertisement
Table of Contents

Related Manuals for Heath Zenith DualBrite Motion Sensor Light Control 2LBL3


Summary of Contents for Heath Zenith DualBrite Motion Sensor Light Control 2LBL3
- Page 1 Operating Instructions & Parts Manual Please read and save these instructions. Read carefully before attempting to assemble, install, operate or main- tain the product described. Protect yourself and others by observing all safety information. Failure to comply could result in personal injury and/or property damage! Save these instructions for future reference. Motion Sensor ®...
-
Page 2: Mode Switching Summary
Mode Switching Summary TEST Move ON-TIME Switch to 1, 5, or 20 minutes AUTO MANUAL MODE * If you get confused while switching modes, turn the power off for one minute, then back on. After the cali- bration time the control will be in the AUTO mode. Timer ®... -
Page 3: Wire The Light Control
Bulb Installation NOTE: When re-lamping, turn power off and let the fixture cool. ❒ To remove lamp shade, loosen set screw 2 full turns with a small flat-head screwdriver. Turn shade counterclockwise and remove. ❒ To remove bulb, pull straight out of fixture. ❒... -
Page 4: Test And Adjustment
TEST AND ADJUSTMENT ❒ Turn on the circuit breaker and light switch. NOTE: Sensor has a 1 minute warm up period before it will detect motion. When first turned on, wait 1 minutes. ❒ Turn the RANGE control to the medium position (halfway between MIN and MAX), D and the ON-TIME control to the TEST position. -
Page 5: Specifications
SPECIFICATIONS Horizontal Range ..Up to 70 ft. (21 m); 100 ft. (30.5 m) with Range Boost. [var ies with surrounding temperature] Vertical Range ..Up to 15 ft. (4.6 m) Sensing Angle ..Up to 240° horizontal. Up to 80° Vertical Electrical Load . -
Page 6: Funcionamiento
Manual de Instrucciones y Partes Por favor lea y guarde estas instrucciones. Léalas cuidadosamente antes de intentar armar, instalar, operar o dar mantenimiento al producto descrito. Protéjase Ud. y los otros observando toda la informa- ción de seguridad. ¡Si no lo hace podría ocasionar lesión al personal y/o daño al equipo! Guarde estas instrucciones para referencia futura. - Page 7 Resumen de las modalidades del interruptor PRUEBA Mueva el interruptor de tiempo (ON-TIME) a 1, 5 AUTOM. Apague el interruptor por un segundo y préndalo de nuevo* MODO MANUAL * Si se confunde mientras cambia de fases, apague la electricidad por un minuto y préndala de nuevo. Después del tiempo de calibración el control estará...
- Page 8 Instalación de bombilla NOTA: Cuando cambie la bombilla, apague la energía y deje que el aparato se enfríe. ❒ Para quitar la pantalla de la lámpara afloje el tornillo prisionero dando 2 giros completos con un pequeño destornillador de cabeza plana. Gire la pantalla hacia la izquierda y quítela.
-
Page 9: Prueba Y Ajuste
PRUEBA Y AJUSTE ❒ Prenda el cortacircuitos y el interruptor de luz. NOTA: El detector tiene un período de cerca de 1 minutos de calentamiento antes de detectar movimiento. Cuando lo prenda por primera vez, espere 1 minutos. ❒ Gire el control de ALCANCE (RANGE) a la posición media (entre MIN y MAX), D control de DURACIÓN (ON-TIME) a la posición de PRUEBA (TEST). -
Page 10: Especificaciones
ESPECIFICACIONES Alcance horizontal ..Hasta 70 pies (21 m), Aumento de Distancia prendido. Hasta 100 pies (30.5 m), Aumento de Distancia apagado. (varía con la temperatura del medio ambiente). Alcance vertical ..Hasta 15 pies (4,6 m) Angulo de detección . -
Page 11: Caractéristiques
Mode d’emploi et guide des pièces Veuillez lire et conserver ces directives. Lisez-les attentivement avant de commencer à assembler, installer, utiliser ou entretenir le produit qui y est décrit. Assurez en outre votre protection et celle des autres personnes qui vous entourent en respectant toutes les consignes de sécurité. Le fait de ne pas le faire pourrait entraîner de graves blessures ou des dommages. - Page 12 PRIORITÉ MANUELLE Le mode manuel ne fonctionne que la nuit parce que la lumière du jour remet le capteur en mode AUTO. Mettre l’interrupteur hors circuit pendant une seconde, plus en circuit pour alterner entre les modes AUTO et MANUEL. Le mode manuel ne fonctionne qu’avec l’interrupteur ON-TIME, aux positions 1, 5 ou 20.
- Page 13 Installation de l’ampoule NOTE: Avant de remplacer une ampoule, couper l'ali- mentation et attendre que l'appareil refroidisse. ❒ Pour enlever l’abat-jour, desserrer la vis de blocage sur 2 tours complets avec un petit tournevis à tête plate. Tourner l’abat-jour dans le sens antihoraire et l’enlever.
-
Page 14: Essais Et Réglages
ESSAIS ET RÉGLAGES ❒ Mettre en circuit le disjoncteur et l’interrupteur d’éclairage. NOTE: Le capteur doit se réchauffer 1 de pouvoir détecter le mouvement. Lorsque l’appareil est mis en circuit, attendre 1 minute. ❒ Placez le bouton RANGE en position médiane (à mi-chemin entre MIN et MAX), le bouton D à... -
Page 15: Fiche Technique
FICHE TECHNIQUE Portée ... 21 m avec amplification de portée hors circuit et de 30,5 m losqu’en circuit (varie selon la température environnante). Portée verticale ..Jusqu'à 4,6 m Angle de détection . - Page 16 NOTES / NOTAS _____________ ___________________________ ___________________________ ___________________________ ___________________________ ___________________________ ___________________________ ___________________________ ___________________________ ___________________________ ___________________________ ___________________________ ___________________________ ___________________________ ___________________________ ___________________________ ___________________________ ___________________________ 598-1325-00...
Need help?
Do you have a question about the DualBrite Motion Sensor Light Control 2LBL3 and is the answer not in the manual?
Questions and answers