Table of Contents
Advertisement
Quick Links
Thank you for using the EDIROL F-1 Video Field Recorder. This document describes operations of the Net Control
software for the EDIROL F-1.
This software is used for remote control of up to four units from a local computer.
For details on installation, refer to the separately downloaded "Installation" PDF.
Roland Corporation and its affiliates assume no responsibility for any loss or damage (loss of profits, loss of data or other economical
losses) caused by use of this software. This is applicable even in case uses were notified from Roland Corporation or its affiliates about
possibility of such losses.
Copyright
2009 ROLAND CORPORATION
All rights reserved. No part of this publication may be reproduced in any form without the written permission of ROLAND CORPORATION.
F-1 Net Control
Owner's Manual
1PS
Advertisement
Table of Contents

Related Manuals for Edirol F-1


Summary of Contents for Edirol F-1
- Page 1 Roland Corporation and its affiliates assume no responsibility for any loss or damage (loss of profits, loss of data or other economical losses) caused by use of this software. This is applicable even in case uses were notified from Roland Corporation or its affiliates about possibility of such losses.
-
Page 2: Table Of Contents
Using F-1 Net Control ................4 Starting F-1 Net Control ..........................4 Names of Things and What They Do ...................... 5 Making the Settings to Match the Connected F-1.................. 6 Controlling a Single Remote F-1....................... 7 Controlling Multiple Remote F-1 Units....................8 Copying Material from F-1 over Network.................... -
Page 3: Main Features
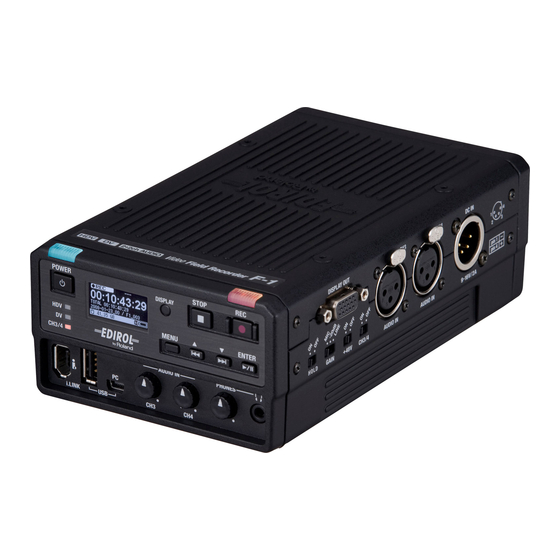
Checking the Operation Status of the F-1 The display of the connected F-1 is shown in the software. This lets you check, from a remote location, how much battery power you have left, or how much free space remains on the removable storage. It’s also possible to change the settings on the F-1 from the computer. -
Page 4: Using F-1 Net Control
Using F-1 Net Control This is a program for starting and stopping recording on the F-1 from a remote location. It is installed and set up at the same time as the F-1 Utility (Browser or Editor). Starting F-1 Net Control With the F-1 Utility Browser and Editor, starting one program enables you to switch to and use the other one at any time, but F-1 Net Control must be started separately. -
Page 5: Names Of Things And What They Do
This displays the status of the connected F-1. “POWER” lights good idea to lock operation while recording is in progress to in blue when the F-1 is powered up. “REC” lights in red when prevent inadvertent stops during an actual performance. -
Page 6: Making The Settings To Match The Connected F-1
At the window shown below, choose the port number. Set the port number that the program uses to match the port number of the F-1. fig.port-setup-screen.eps * The port number of the F-1 is set to 50000 by default. If the number on the unit hasn’t been changed from this, you can use the same setting unchanged. -
Page 7: Controlling A Single Remote F-1
Decide on the number of units to control remotely. By default, this program is set to control six F-1 units. Click the button shown below and decide on the number of units to control. To control just one unit, click the button once. This changes to a panel display for only a single unit. -
Page 8: Controlling Multiple Remote F-1 Units
Determine the number of units to control remotely. Click the button shown below to determine the number of units to control. The default setting is for control of six F-1 units. Click the button repeatedly to cycle through the available choices for the number of units, which are: 1 > 2 > 3 > 4 >5>6> 1. -
Page 9: Copying Material From F-1 Over Network
* Note : Before you start recording, put the connected F-1 units in the same state. Click the DISPLAY button in each of the panels to make them all display the recording time. Also, make sure that all of the F-1 units are in recording standby. -
Page 10: Quitting F-1 Net Control
Using F-1 Net Control Quitting F-1 Net Control To quit this program, click the Close button at the upper right. fig.close-box.eps...
Need help?
Do you have a question about the F-1 and is the answer not in the manual?
Questions and answers