Table of Contents
Advertisement
Quick Links
Advertisement
Table of Contents

Related Manuals for Onyx BOOX A62


Summary of Contents for Onyx BOOX A62
- Page 1 BOOX A62 User Manual VERSION 1.6 ©2008 – 2011 Onyx International Inc.
-
Page 2: Table Of Contents
Table of Contents Preface ........................4 Guidelines........................ 5 Precautions......................6 Components ......................6 Boox A62 View...................... 7 Key Function ......................9 Basic Operations ....................10 Reading Books ....................13 Internal Storage ....................18 Internal Storage Menu ................. 19 Reading a Book..................19 SD Card ........................ - Page 3 Music ........................27 Play Interface.................... 27 Scribble ........................28 Notes........................29 Web Sites....................... 30 Wi-Fi Configuration ................30 Web Browser ..................... 31 Browser Menu ................... 31 Applications......................33 Settings........................34 Technical Specifications ................36 Connect to PC .................... 36 Charge ......................36 Firmware Update ....................
-
Page 4: Preface
Preface oox is presented by Onyx International, which has a group of professionals who dedicate themselves in designing state-of-the-art reading terminal. The beauty of the Boox is embodied in both its simplicity and its power. As we are going to show you, Boox is an open and flexible platform for both consumers and content providers. -
Page 5: Guidelines
Do not attempt to repair or take the product apart. This will void your warranty. Only qualified personnel from Onyx International Inc. or an authorized Boox maintenance centre can repair the product. Do not use the rechargeable battery if it is damaged in any way. -
Page 6: Precautions
Never open the device as this will invalidate any warranty or manufacturer’s responsibility. Please contact your Onyx retailer when you have any technical difficulties. Do NOT expose the device to excessive moisture, rain or heat sources caused by heating equipment. -
Page 7: Boox A62 View
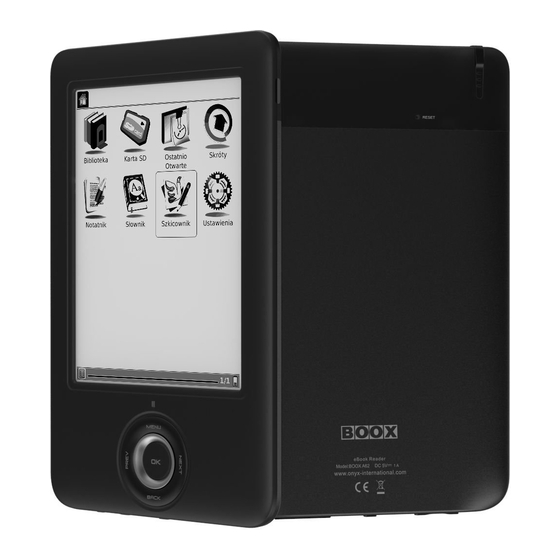
Boox A62 View Front View Indicator Light 5-way MENU button Navigation button OK button PREV button NEXT button BACK button 7 / 37... -
Page 8: Back View
Bottom and Side View Power On/Off button USB Connector Headphone Jack Volume Control button SD Card Slot Back View Reset Styles Slot 8 / 37... -
Page 9: Key Function
Key Function • Press the power key to turn device on • Press the power key and hold for 2 seconds to turn device off, similar as selecting showdown item in Power menu On/Off button • Press the power key and release it immediately, device turns into sleep mode •... -
Page 10: Basic Operations
bottom Headphone • Diameter of the headphone jack is 3.5mm Jack SD Card Slot • Insert SD card to read the content on SD card • Reset the device by small pin through the hole, and Reset then press the power button to restart device. •... -
Page 11: Recent Reading
Recent Reading 4 most recent files will be displayed on Recent Reading widget. Press the Navigation Button to select the file and press the OK Button to confirm. 11 / 37... -
Page 12: Date And Time
Date and Time This widget display current time. Press the Navigation Button to select this widget and to confirm, time and date will be showed on the screen as a screen saver. Press the BACK Button to exit. 12 / 37... -
Page 13: Reading Books
Reading Books Press the Navigation Button to select the desired book and to enter reading. Press the PREV/NEXT PAGE Button to turn pages. Press the BACK Button to exit reading. Press the MENU Button to popup menu and choose an item to enter the submenu detailed as follows. Submenu will be different according to file format. - Page 14 Rotate the screen by clicking this button. The Rotate Screen screen rotates between 0° and 360° (counterclockwise). Set screen status. You can turn on/off full Full Screen Screen while reading. Safely Safely remove SD card from device clicking this button. Remove SD Launch the music player by clicking this Music...
- Page 15 • Selection Zoom Scale up the current screen by selecting a Adjust the zoom of current box. The content in the selected box is enlarged to fill the whole drawing area. screen. The screen can be • By Ratio To zoom the current page/image by ratio. scaled by fixed value.
- Page 16 Select the color of sketches. Now black and white are supported. • Sketch Shapes Select the shape (line width) of sketches. Now five levels of line widths are supported. • Single Page Layout Only one page is displayed on screen. •...
- Page 17 • Delete Bookmark Delete the bookmark of current page. • Show Bookmarks Show all bookmarks in a list view. The front text portion as well as the number of the bookmarked page is displayed in an item. You can jump to the target page by selecting the bookmark item.
-
Page 18: Internal Storage
speed and style. • Hand Tool Select the hand tool item in the menu to enable browsing through document by stylus. • Mark & Copy Press mark icon to select a word and press copy icon to copy what you mark. Internal Storage The device supports more than 18 types of file formats, including EPUB, PDF, FB2, MOBI, TXT, RTF, PDB, HTM, HTML, CHM, DJVU, DJV,... -
Page 19: Internal Storage Menu
Internal Storage Menu In the Internal Storage list, press the Menu Button to popup Internal Storage Menu. Press the Navigation Button to select the option and to confirm. Press the BACK Button to exit. • Details View Display the contents in details. The details View includes name, last access time, read count and reading progress. -
Page 20: Sd Card
SD Card All the files on SD card are displayed in the list. The device supports expansion storage of SD card up to 32GB. Files no need to store in corresponding file folders; you can put them in anywhere of SD Card. -
Page 21: Recent Documents
Press the PREV/NEXT Page Buttons to turn pages. Press BACK to return to main menu. Press the MENU Button to enter Books Menu. The folder is for note template files storage, notes_template you can add more PNG formats file to this folder. -
Page 22: Dictionary
Dictionary StarDict-compatible programs are available for the device. It supports dictionary format in StarDict. Dictionaries Select Dictionaries to show the dictionary list. Similar Select Similar Words to show the similar words group. Words Explanation Select Explanation to show the translation content. Input letters by software keyboard and then select Lookup Lookup to show the translation. -
Page 23: Installing Dictionaries
Installing Dictionaries Create a new folder named dicts in root directory of the memory card. Download the desired dictionary files in dicts folder. The dictionary will be installed automatically. NOTE: User can download these free dictionaries from: http://xdxf.revdanica.com/down/index.php Make sure download them in the StarDict format. -
Page 24: Consult The Dictionary
Consult the Dictionary Input the keyword in the text box. Press the Navigation Button upward/downward to select the desired word in the list. Press the Navigation Button rightward/leftward to move the cursor. Press the Dictionaries icon to select the desired dictionary. Press the Navigation Button to confirm the option and press the BACK Button to exit. -
Page 25: Pictures
Pictures Photos saved on SD card are auto displayed in the list. The device supports picture formats such as TIFF, JPEG, GIF, BMP, and PNG. Pictures Menu At the Pictures list, press the Menu Button to enter the Pictures Menu. Press the Navigation Button to select the option and to confirm. - Page 26 • Details View Display the contents in details. The View details includes name, last access time, read count and reading progress. • Thumbnail View To view the books in 4 thumbnails View means the way of view. displaying and arranging •...
-
Page 27: Music
Music Music files saved on SD card or Internal Storage are displayed in the list. The device supports MP3 and WAV files formats. Play Interface Press the function button to play the desired track. On the Play Interface screen the following operations can be performed. 1. -
Page 28: Scribble
Scribble - Select Scribble icon, enter the Create Scribble interface. - Select Create Scribble icon to choose a template for scribble. - User can add templates to SD card in notes_template folder. 28 / 37... -
Page 29: Notes
Notes Create Notes - Highlight new notes and press the Navigation Button to create a new note. - Click on the keypad to input characters. - Press the BACK Button to pop up the notes dialog box. Highlight YES to save the new notes. -
Page 30: Web Sites
Web Sites Before browse website you need to access network through Wi-Fi Configuration. Wi-Fi Configuration At the Wi-Fi configuration interface, follow the steps below to enable the function. • Make sure the Wi-Fi switch is turned on (slide upward) • The Hardware Address is displayed after Wi-Fi switch is turned on. -
Page 31: Web Browser
Web Browser Upon the successful Wi-Fi connection, select the icon and press the Navigation Button to enter Browser mode. It will automatically enter the preset homepage. Browser Menu Press the Menu Button to browse a web page detailed as follows: Tool Bar Tool bar provides four functions: going back to the previous website, going forward to the next... - Page 32 Select this refresh icon to refresh the web page Refresh display. Select this website icon, you can input website Website icon address and go to the website directly. Select the Power Manage icon, you can set the time of standby and automatically shut down for the device.
-
Page 33: Applications
Applications In this Application, you can find the Calendar, Clock and Games such apps. More applications will be added later. 33 / 37... -
Page 34: Settings
Settings Press the Settings icon to enter the Settings mode directly. In the Settings mode, the following settings can be performed. Language Select the desired language. 31 kinds of languages are available. Date To adjust the value, press the Navigation Button to move the cursor. -
Page 35: Power Management
Power Management Select the Power Management icon; you can set the time of standby and automatically shut down for the device. If the time of shutdown is set, the device won’t enter standby status anymore; in the other side, if set the time of standby, the device won’t shutdown automatically. -
Page 36: Technical Specifications
Technical Specifications Display 6” Resolution 800 x 600, 16 Grey scale Book:EPUB,PDF,FB2,MOBI,TXT,RTF,HTML,HTM, CHM,PDB,DJVU,DJV,DOC, DOCX,XLS, XLSX,PPT, Supported File PPTX,ZIP Formats Music: MP3 Picture: JPG, BMP, GIF, PNG, TIFF Adobe DRM DRM for EPUB/PDF, built-in Adobe Reader Mobile Expansion Slots SD card, up to 32GB Battery Lithium Battery, 1600 mAh Other Interfaces... -
Page 37: Firmware Update
We make every effort to ensure that the information and procedures in this user manual are accurate and complete. No liability can and will be accepted for any errors or omissions. ONYX reserves the right to make any changes without further notice to any products herein.
Need help?
Do you have a question about the BOOX A62 and is the answer not in the manual?
Questions and answers