Table of Contents
Advertisement
Quick Links
Advertisement
Table of Contents

Related Manuals for Ryobi ECO2437


Summary of Contents for Ryobi ECO2437
- Page 1 ECO2437 355mm(14") CUT-OFF SAW OWNER’S OPERATION MANUAL...
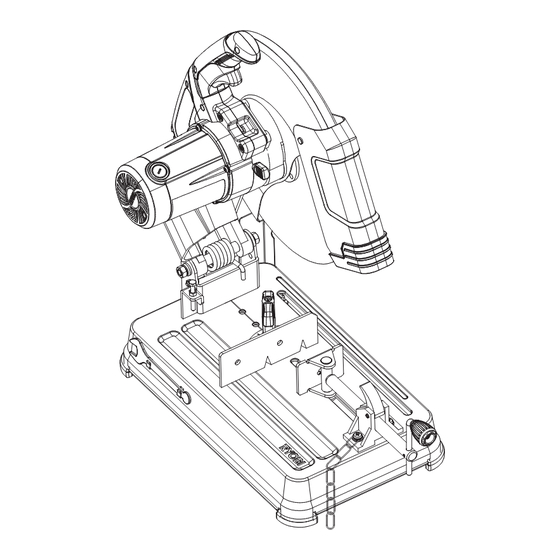
- Page 2 Fig.1 Fig.2...
- Page 3 Fig.3 Fig.4 Fig.5 Fig.6...
- Page 4 Fig.7 Fig.8 Fig.9 Fig.10 Fig.11...
- Page 5 Fig.12 Fig.13 Fig.14...
-
Page 6: Rules For Safe Operation
ENGLISH ■ PROTECT YOUR HEARING. Wear hearing protection RULES FOR SAFE OPERATION during extended periods of operation. ■ USE SAFETY GLASSES ■ DO NOT OVERREACH. Keep proper footing and balance Use face or dust mask if the cutting at all times. operation is dusty. - Page 7 ■ INSPECT TOOL CORDS PERIODICALLY and if ■ REPLACEMENT PARTS. All repairs, whether electrical or damaged, have repaired at your nearest Ryobi Authorized mechanical, should be made at a Ryobi Authorized Service Service Centre. Stay constantly aware of cord location and Centre.
- Page 8 ENGLISH RULES FOR SAFE OPERATION DESCRIPTION (Fig 1&2&3) 1 Lower Guard 18 Protection Guard ■ STAY ALERT AND EXERCISE CONTROL. Watch what 2 Abrasive Wheel 19 Carry Handle you are doing and use common sense. Do not operate 3 Fence Quick Lock 20 Rubber Foot tool when you are tired.
- Page 9 ENGLISH FEATURES WARNING: ADJUSTABLE FENCE A 355 mm wheel is the maximum wheel capacity of your The fence on your cut-off machine has been provided to cut-off machine. Never use a wheel that is too thick to allow support the workpiece and provide clamping support to outer flange to engage with the flats on the spindle.
- Page 10 ENGLISH ■ This will secure the fence in place at desired angle. ADJUSTMENTS ADJUSTING WIDTH OF CUT (Fig. 5-6) ■ Inspect the replacement wheel for defects such as cracks, ■ Unplug your cut-off machine. chipping, and correct speed rating. If defects are found or the speed rating is not greater than 4800min ,stop using the wheel.
-
Page 11: Operation
ENGLISH ■ The depth stop is lowered by turning the depth stop bolt ADJUSTMENTS clockwise and raised by turning the bolt counterclockwise. ■ By pressing down on the machine arm, lower the wheel and check clearance and maximum cutting distance (distance from adjustable stationary vice where wheel WARNING: enters) to front of machine base slot. -
Page 12: Cutting With Your Cut-Off Machine
ENGLISH ■ Loosen the fence quick lock and fence bolts securing the OPERATION fence. ■ Rotate the adjustable fence to the angle needed. CUTTING WITH YOUR CUT-OFF MACHINE (Fig. ■ Retighten fence quick lock and fence bolt to secure the 10-11) fence. -
Page 13: Maintenance
WARNING: To ensure safety and reliability, all repairs (with the exception of the externally accessible brushes ) should be performed by a Ryobi Authorized Service Centre. BRUSH REPLACEMENT (Fig. 14) Your cut-off machine has externally accessible brush assemblies that should be periodically checked for wear. -
Page 14: Troubleshooting
ENGLISH TROUBLESHOOTING PROBLEM CAUSE SOLUTION Machine does not start 1. Power cord not plugged in. 1. Plug in cord. 2. Power cord is damaged. 2. Have the cord replaced at your nearest authorized service centre. 3. Circuit breaker is tripped. 3. - Page 15 ENGLISH TROUBLESHOOTING PROBLEM CAUSE SOLUTION Wheel does not cut through workpiece. 1. Depth stop setting incorrect. 1. Adjust the depth stop. See “Depth Stop” section. 2. Wheel worn too much. 2. Replace with a new 355mm (14”) abrasive cut off wheel. 3.
Need help?
Do you have a question about the ECO2437 and is the answer not in the manual?
Questions and answers