
Related Manuals for Sharp R-231F


Summary of Contents for Sharp R-231F
-
Page 1: Microwave Oven
MICROWAVE OVEN ◊Êß∑˝ § Ê fl fl •Ê fl Ÿ R-231F OPERATION MANUAL ‚¢ ø Ê‹Ÿ ∑§Ê ◊Ò ã ÿÈ ‹ SHARP CORPORATION... -
Page 2: Table Of Contents
CONTENTS Pages Áfl·ÿ‚Í ø Ë ¬Î c ∆U Warning ..........E-1 Hi-1 ø à ÊflŸË ............Special Notes ........E-2 Hi-2 Áfl‡Ê · Á≈U å ¬ÁáÊÿÊ ..........Installation Instructions ...... E-3 Hi-3 ߢ S ≈U Ê Ú ‹ ‡ ÊŸ ‚ê’¢ œ Ë ÁŸŒ ¸ ‡ Ê........Oven Diagram ........ -
Page 3: Warning
5. Do not try to adjust or repair the oven yourself. It is hazardous for anyone other than a qualified service technician trained by SHARP to carry out any service or repair operation which involves the removal of a cover which gives protection against exposure to microwave energy. -
Page 4: Special Notes
SPECIAL NOTES DON’T Eggs, fruits, * Puncture egg yolks and whites and * Cook eggs in shells. This prevents nuts, seeds oysters before cooking to prevent “explosion”, which may damage the vegetables, “explosion”. oven or injure yourself. sausages and * Pierce skins of potatoes, apples, * Reheat whole eggs. -
Page 5: Installation Instructions
If there is any damage, please do not operate the oven until it has been checked by a SERVICE CENTRE APPROVED BY SHARP and repaired, if necessary. 2. Accessories provided... -
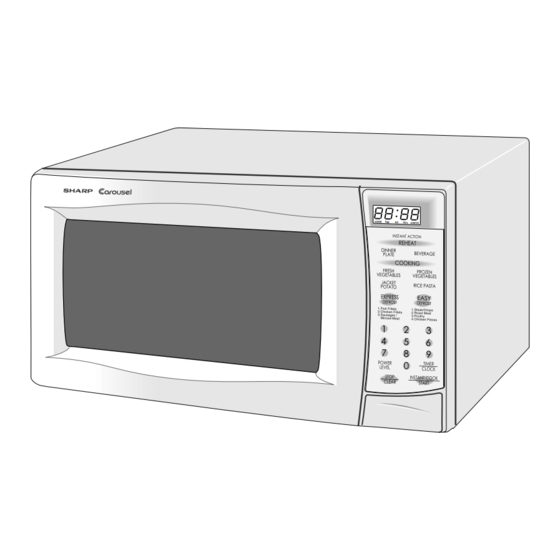
Page 6: Oven Diagram
OVEN DIAGRAM 8. Control panel (See page E-5) 1. Door open button 9. Liquid crystal display 2. Oven lamp 10. Waveguide cover 3. Door hinges 11. Power supply cord 4. Door safety latches 12. Ventilation openings 5. See through door 13. -
Page 7: Operation Of Touch Control Panel
OPERATION OF CONTROL PANEL The operation of the oven is controlled by pressing the appropriate pads arranged on the surface of the control panel. An entry signal tone should be heard each time you press the control panel to make a correct entry. In addition the oven will beep for approximately 2 seconds at the end of the cooking cycle, or 4 times when a cooking procedure is required. -
Page 8: Microwave Cooking Techniques
MICROWAVE COOKING TECHNIQUES Arrange food carefully Place thickest areas toward outside of dish. Cook for the shortest amount of time indicated and add more time Watch cooking time as needed. Food severely over-cooked can smoke or ignite. Check recipe for suggestions: paper towels, microwave plastic wrap or a lid. -
Page 9: Before Operating
BEFORE OPERATING Getting Started Step Procedure Pad Order Display Ensure the oven door is closed. Plug the oven into a power point and switch on the power. Flashing eights Press the STOP/CLEAR pad so that the STOP oven beeps. CLEAR Only the dots will remain. -
Page 10: Manual Operations
MANUAL OPERATIONS Microwave Time Cooking This is a manual cooking feature, first enter the cooking time then the power level. There are five different power levels. – – – – – – – – – – – – 100% – – –... -
Page 11: Sequence Cooking
Instant Cook™ For your convenience Sharp’s Instant Cook allows you to easily cook for one minute on 100% power. Step Procedure Pad Order Display Press the INSTANT COOK/START pad. -
Page 12: Increasing Time During A Cooking Programme
Increasing Time During a Cooking Programme Microwave time can be added during a cooking programme using the INSTANT COOK/START pad. * Suppose you want to increase the cooking time by 2 minutes during 5 minutes on 50% power cooking. (at the moment the remaining cooking time is 1 min. 30 sec.) Step Procedure Pad Order... -
Page 13: Automatic Operations
AUTOMATIC OPERATIONS Notes for Automatic Operations 1. When using the automatic features, carefully follow the details provided in each MENU GUIDE to achieve the best result. If the details are not followed carefully, the food may be overcooked or undercooked or may be displayed. -
Page 14: Instant Action Menu Guide
Instant Action Menu Guide The final cooking result will vary according to the food condition (e,g. initial temperature, shape, quality). Check the food after cooking and if necessary continue cooking manually. Quantity Initial Standing (Unit per pressing Menu Temperature Procedure Time each INSTANT (minutes) -
Page 15: Express Defrost
Express Defrost EXPRESS DEFROST rapidly defrosts 0.5 kg specific 1.Fish Fillets foods. 2.Chicken Fillets Follow the details provided in EXPRESS DEFROST 3.Sausages / MENU GUIDE on page E-14. Minced Meat * Suppose you want to defrost 0.5 kg of Chicken Fillets. Step Procedure Pad Order... -
Page 16: Express Defrost Menu Guide
Express Defrost Menu Guide Standing Quantity Time Procedure Menu (kg’s) (minutes) Fish Fillets • Place fish fillets on the defrost rack. • The oven will "beep" and stop, CHECK will flash on and off. Turn over and separate into pieces. •... -
Page 17: Easy Defrost
Easy Defrost EASY DEFROST will automatically compute the 1.Steak / Chops microwave power and defrosting time. 2.Roast Meat Follow the details provided in EASY DEFROST MENU 3.Poultry GUIDE on page E-16. 4.Chicken Pieces * Suppose you want to defrost 1.0 kg of Chicken Pieces. Step Procedure Pad Order... -
Page 18: Easy Defrost Menu Guide
Easy Defrost Menu Guide Standing Quantity Time min-max Menu Procedure (kg's) (minutes) • Shield thin end of chops or steaks with foil. Steak 0.1-1.5 • Position the food with thinner parts in the Chops centre in a single layer on the defrost rack. If pieces are stuck together, try to separate as soon as possible. -
Page 19: Other Convenient Features
OTHER CONVENIENT FEATURES Less/More Setting The cooking times programmed into the automatic menus are tailored to the most popular tastes. To adjust the cooking time to your individual preference use the "more" or "less" feature to either add (more) or reduce (less) cooking time. -
Page 20: Timer
Timer Use this feature as a general purpose timer. Example include: timing boiled eggs cooked on the stove top. timing the recommended standing time of food. You can enter any time up to 99 minutes, 99 seconds. If you want to cancel the timer during the count down phase simply press STOP/CLEAR and the display will return to showing time of day. -
Page 21: Care And Cleaning
If “NO” is the answer to any of the above questions, please check your wall socket and the fuse in your meter box. If both the wall socket and the fuse are functioning properly, CONTACT YOUR NEAREST SERVICE CENTRE APPROVED BY SHARP. NOTE: 1. If time in the display is counting down rapidly, check Demonstration Mode. (See page E-18 for detail.) 2.
Need help?
Do you have a question about the R-231F and is the answer not in the manual?
Questions and answers