
Related Manuals for Xblue Networks WiOS


Summary of Contents for Xblue Networks WiOS
-
Page 1: Setup Guide
WiOS WiOS Wireless Office Speakerphone Setup Guide 2.4 GHz Wireless Handset www.xbluenetworks.com Copyright © 2007 XBLUE Networks, LLC™ All rights reserved Part Number: WIOSSG - 44 -... - Page 2 WiOS WiOS Notes: Notes: Revision Table Revision Description of Changes Date Released Release – PAL Initial release 4/2007 Labels on the Picture Page 5/2008 - 2 - 43 -...
-
Page 3: Table Of Contents
WiOS WiOS Table of Contents Talk Button ......................9 TABLE OF CONTENTS .................. 3 Telephone Callouts ....................6 Terminate a Call ....................38 INTRODUCTION ..................... 5 Tone Ring Mode ....................26 INTRODUCTION ..................... 5 Transfer ........................ 9 Troubleshooting ....................29 FEATURES ...................... - Page 4 WiOS WiOS Battery ...................... 17 Out of Range ..................... 18 Operation ......................16 No Link to Base ..................18 Out of Range ...................... 18 Registration ....................18 Key Lock (Flash / Transfer) ..............18 Key Unlock ....................19 Part Numbers ....................... 8 Power Button .......................
- Page 5 (to increase or decrease the volume) and speaker buttons Handsfree ......................26 which are found on the sides. And to make the most of WiOS, is also comes Headset Jack ...................... 10 equipped with a 1/8 inch (2.5 mm) headset jack and it can be programmed to ring, Hold ........................
-
Page 6: Talk Button
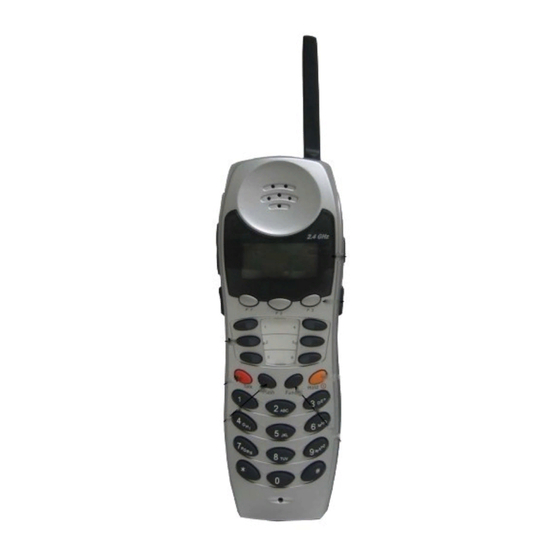
WiOS WiOS INDEX Telephone Callouts Answer a Call ..................... 38 Auto Pick up ...................... 26 Background Music ..................... 17 Base Unit LED Cadence ....................14 Belt Clip ......................37 Comparison Table ....................7 Default Button Layout ..................8 De-Register Volume Bar Back lit, 3 line LCD Handset 1 ...................... -
Page 7: Terminate A Call
WiOS WiOS Comparison Table Answer a Call Digital Display telephone (wired) and the Wireless Key Telephone Handset Feature Wired Intercom calls can be answered in hands free mode, allowing you to converse with Battery Charge Indicator Yes (On LCD) the calling party without pressing any buttons. If the handset rings, press either the... -
Page 8: Default Button Layout
Part Numbers Description WiOS takes the place of a digital key telephone; it has an easy to read 3-line LCD, 3 2.4 GHz Wireless Key Telephone with Charging Base and Base interactive soft buttons and a Hot Keypad. 6-programmable buttons can be assigned... -
Page 9: Talk Button
WiOS WiOS Dial Keypad Base Unit The dial keypad is used to dial telephone numbers. Line Jack Two port digital (2-wire) to the telephone system, using a standard RJ11C Port Jack The voltage for the base unit is supplied by the telephone Talk system over the digital port, connected through port 1. -
Page 10: Volume
WiOS WiOS (Left Side) Volume The volume bar is used to increase or decrease the receiver, ringer, speaker and Specifications headset volumes. Frequency Range (Left Side) Headset Jack Frequency Range 2.4 to 2.4835 GHz The headset becomes active when it is plugged in. However, for proper operation the feature code f [9] + [#] may be required. -
Page 11: Quick Setup Guide
Installation switches 2 and 3 in the up position (Off). WiOS is actually a full function key set without wires. Therefore, each unit requires its own digital extension in the telephone system. The digital extensions are plugged into the back of the base station, which is connected wirelessly with up to two (2) handsets. -
Page 12: Wireless Key Telephone Handset
WiOS WiOS Base Unit The Dip Switches are used to de-register one, or both, handsets from the base unit. Wireless Key Telephone Handset To de-register a handset, it must be idle. Unpack the wireless handset and charging base unit The charging base requires electricity and it should be plugged De-register All Handsets into a 117 + 10% AC outlet. -
Page 13: Wall Mount
WiOS WiOS Wall Mount De-registering a Handset The Wireless Base Unit can be surface or wall mounted. The wall mount kit is a standard wall place mounting bracket and the antenna can be kept straight for wall ON occasion a handset needs to be de-registered. This would happen if the handset mount, or bent at a 90 degree angle for surface mounting were going to be used on the different base unit. - Page 14 WiOS WiOS Unpack the Wireless Base Unit To provide the best possible signal the unit should be located at Before proceeding remember to place the dipswitches in the “Normal” position (All an optimum height and location for the coverage area. Like all switches up, in the off position) as seen below.
-
Page 15: Operation
125 milliseconds on, 125 milliseconds off below: Handset Registration WiOS comes with a Base Unit is factory registered and should be operational right out of the box. If the handset does not become operational, please see the troubleshooting section for directions to manually register the handset. -
Page 16: Power On / Off
WiOS WiOS Operation Registration and Troubleshooting The Wireless keyset is designed for people on the go. The interactive display and The Wireless Handset will be pre-register to a base unit, if they are purchased as a soft buttons make it easy to program and operate. This section is to help you package. -
Page 17: Display Icons
> RESET HANDSET The Display ICONS are pictures that are designed to help the user understand the LANGUAGE status of WiOS. Press (F1) or (F2) to toggle between “No” and “Yes”, press “OK” (F3) when the Ring desired answer is in the display. -
Page 18: Out Of Range
WiOS WiOS When set to “Hands free” the user can converse with intercom callers without pressing any buttons or taking the handset out of the charging base. Central Office Out of Range calls still require the handset to be taken out of the base unit, press the Talk or When the handset is carried out of signal range from the base unit, a warning tone Speaker Button. -
Page 19: Key Unlock
WiOS WiOS Auto Pick up Key Unlock Auto pick up allows the user to select how calls will be answered. There are three (3) ways that a call can be answered, Hands free, Receiver and Disabled. In Hands To Unlock the Handset, Press the “Flash/Transfer” button for three (3) seconds the... -
Page 20: Handset Programming
WiOS WiOS Ring Mode Handset Programming The Handset has three different ring modes. Ring, Vibrate, and Ring and Vibrate. To enter the Handset programming mode, press and hold the first soft button (F1) for The Default setting is Ring only. -
Page 21: Programming Fields
WiOS WiOS Programming Fields De-Registration There are six (6) programming fields that can be customized for each Wireless Occasionally it may be necessary to de-register a handset. Once de-registered, the Handset. handset is no longer considered part of the system. To de-register a handset, select “De-register”... -
Page 22: R Egistration
WiOS WiOS Language Registration The Wireless Handset can be personalized to display the prompts in three (3) Each Wireless Handset becomes an extension on the system after it has been different languages: English, French, and Spanish. The default language is English.
Need help?
Do you have a question about the WiOS and is the answer not in the manual?
Questions and answers