Table of Contents
Advertisement
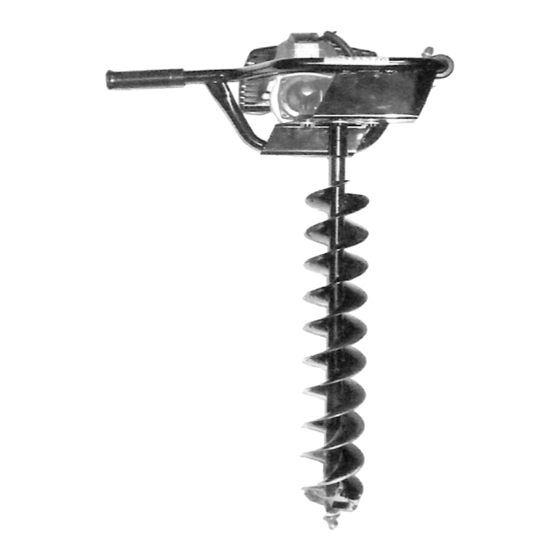
GASOLINE AUGER DRILL
ASSEMbLy AND OPERAtION INStRUctIONS
Due to continuing improvements, actual product may differ slightly from the product described herein.
you do not operate the Auger Drill with the proper 25:1 unleaded fuel/2-cycle oil mix in its fuel tank. Do not
run the Engine with an improper fuel mix, low or no fuel mix. Running the Engine with an improper fuel mix,
low or no fuel mix, will permanently damage the unit.
you do not operate the Auger Drill with the proper amount of SAE 80-90 gear oil in its Gearbox. Do not run the
Auger Drill with low or no gear oil. Running the Auger Drill with low or no gear oil will permanently damage
the unit.
Visit our website at: http://www.harborfreight.com
tO PREVENt SERIOUS INjURy, READ AND UNDERStAND
ALL WARNINGS AND INStRUctIONS bEfORE USE.
Copyright
2006 by Harbor Freight Tools
©
manual or any artwork contained herein may be reproduced in any shape or form
without the express written consent of Harbor Freight Tools.
for technical questions or replacement parts, please call 1-800-444-3353.
1.5 HP
Model
cAUtION!
your Warranty Is Voided If:
Distributed exclusively by
Harbor Freight Tools
3491 Mission Oaks Blvd., Camarillo, CA 93011
Manual Revised 07b, 07e
95346
®
.
. All rights reserved. No portion of this
®
Advertisement
Table of Contents

Related Manuals for Central Machinery 95346


Summary of Contents for Central Machinery 95346
- Page 1 Auger Drill with the proper amount of SAE 80-90 gear oil in its Gearbox. Do not run the Auger Drill with low or no gear oil. Running the Auger Drill with low or no gear oil will permanently damage the unit.
-
Page 2: Specifications
WILL ruin the Engine and void the warranty. This product requires the proper amount of SAE 80-90 gear oil in its Gear Case before starting. Attempting to start the Auger Drill with low or no gear oil WILL ruin the Gear Case and void the warranty. -
Page 3: Personal Safety
Avoid accidental starting. Make sure to remove the Spark Plug before per- forming any service, maintenance, or cleaning procedures on the unit. Remove adjusting keys or wrenches before turning the Auger Drill on. wrench or a key that is left attached to a rotating part of the machine may result in personal injury. -
Page 4: Specific Safety Rules And Precautions
Auger Drill with the proper amount of SAE 80-90 gear oil in its Gearbox. Do not run the Auger Drill with low or no gear oil. Run- ning the Auger Drill with low or no gear oil will permanently damage the unit. - Page 5 Auger Drill. Do not leave the drill unattended in an area accessible to children. Maintain a firm grip on the Auger Drill with both hands and be aware of the strong start-up torque of the tool. Keep your thumb near the Kill Switch in the event the Auger Drill must be turned off immediately.
-
Page 6: Mechanical Precautions
Prior to performing service, maintenance, or cleaning procedures, allow the Engine to completely cool. then, remove the spark plug from the Engine. Do not alter or adjust any part of the Auger Drill or Engine that is assembled and supplied by the manufacturer. -
Page 7: Additional Precautions
Insert the shank of the Auger (33a) fully upward into the Transmission Shaft (15a). Align the mounting holes in the Auger and Transmission Shaft. Then secure the Auger to the Auger Drill, using the Pin (34a) and Safety Pin (35a). (See figure A.) -
Page 8: Pre-Start Instructions
Auger Drill with the proper amount of SAE 80-90 gear oil in its Gearbox (8a). Do not run the Auger Drill with low or no gear oil. Running the unit with low or no gear oil will permanently damage the unit. -
Page 9: Operation
ANSI-approved safety impact eye goggles, hearing protection, heavy duty work gloves, sturdy work boots, and head protection. Place the Auger Drill on its side with its Auger (33a) resting upon the ground surface location that is to be drilled. Make sure that no debris, clothing, or other objects are near the auger bit. - Page 10 Engine to idle. (See figures c and D.) To stop the Auger Drill, release pressure on the Speed Control (10b). Then, press down on the Kill Switch (5b). Keep your thumb near the Kill Switch in the event the Auger Drill must be stopped immediately.
- Page 11 Allow the Auger (33a) to drill for you. Exert only light downward pressure. If you attempt to force the drill, damage to the Auger Drill and Auger (33a) can result. be aware of the strong twisting forces produced by the drill during operation.
-
Page 12: Inspection, Maintenance, And Cleaning
50 hours of tool use. Gearbox (8a) maintenance: of the Auger Drill for proper quantity. If necessary, fill the Gearbox with SAE 80-90 weight gear oil. The Gearbox should be filled with clean, new gear oil every three months or 50 hours of tool use. -
Page 13: Troubleshooting
Then, fill gearbox with SAE 80-90 gear oil. Immediately remove spark plug cap from spark plug to stop engine. Discontinue using Auger Drill until the tool is repaired by a qualified service technician. Possible Solution REV 07e... -
Page 14: Parts List - Engine
Piston Pin Piston Pin Circlip Piston Piston Pin Crankcase Gasket Piston Ring Cylinder Gasket Cylinder Cover SKU 95346 for technical questions, please call 1-800-444-3353 PARtS LISt - ENGINE Qty. Part Bolt (M5 x 18) Cylinder Cover Spark Plug Spark Plug Clip Reed... -
Page 15: Assembly Diagram - Engine
ASSEMbLy DIAGRAM - ENGINE SKU 95346 for technical questions, please call 1-800-444-3353 PAGE 15... - Page 16 Lining Transmission Shaft Washer Gasket Gearbox Cover Oil Seal (20 x 35 x 7) Oil Fill Plug ASSEMbLy DIAGRAM - GEARbOX UNIt SKU 95346 for technical questions, please call 1-800-444-3353 Qty. Part Description Bolt (M6 x 12) Washer Paper Underlay...
- Page 17 PARtS LISt & ASSEMbLy DIAGRAM - fRAME Part Description Frame (Complete) Handle Tie Strip Handle Kill Switch SKU 95346 for technical questions, please call 1-800-444-3353 Qty. Part Description Kill Switch Bracket Screw (M12 x 20) Accelerator Cable Bushing Speed Control Qty.
- Page 18 Service department at the number below to make shipping arrangements. The warranty repairs should be completed in a reason- able amount of time, not to exceed 30 days. If you have any questions regarding your warranty rights and responsibilities, you should contact the Harbor Freight Tools Customer Service Department at 1-800-444-3353.
-
Page 19: Limited 1 Year / 90 Day Warranty
(if so equipped), and the blades (if so equipped) are free of defects in materials and workmanship. Harbor Freight Tools also warrants to the original purchaser, for a period of one year from date of purchase, that all other parts and components of the product are free from defects in materials and workmanship (90 days if used by a professional contractor or if used as rental equipment).
Need help?
Do you have a question about the 95346 and is the answer not in the manual?
Questions and answers