Table of Contents
Advertisement
Advertisement
Table of Contents

Related Manuals for Marantz PMD660


Summary of Contents for Marantz PMD660
- Page 1 Model PMD660 User Guide Portable Solid State Recorder...
- Page 2 WARNINGS CAUTION Do not expose the equipment to rain or moisture. RISK OF ELECTRIC SHOCK Do not remove the cover from the equipment. DO NOT OPEN Do not insert anything into the equipment through the ventilation holes. CAUTION: TO REDUCE THE RISK OF ELECTRIC SHOCK, Do not cover the ventilation with any items such as tablecloths, DO NOT REMOVE COVER (OR BACK).
-
Page 3: Important Safety Instructions
IMPORTANT SAFETY 10. Ventilation – Slots and openings in the cabinet are provided for ventilation, to ensure reliable operation of the product, and to INSTRUCTIONS protect it from overheating. These openings must not be blocked or READ BEFORE OPERATING EQUIPMENT covered. - Page 4 17. Servicing – Do not attempt to service this product yourself as NOTE TO CATV SYSTEM INSTALLER: opening or removing covers may expose you to dangerous voltage This reminder is provided to call the CATV (Cable-TV) system installer’s attention to Section 820-40 of the NEC which provides guidelines for or other hazards.
- Page 5 CE marking (only EU version) English This product is in conformity with the EMC directive and low-voltage directive. Français Cet appareil est conforme á la directive EMC et á la de directive sur les basses tensions. Deutsch Dieses Gerät entspricht den EMC-Richtlinien und den Richtlinien für Niederspannungsgeräte. Nederlands Dit apparaat voldoet aan de EMC-richtlijnene en de richtlijnen voor apparatuur met laag voltage.
- Page 6 SI DICHIARA CHE L'APPARECCHIO SINTO-AMPLIFACATORE SR-39 RISPONDE ALLE PRESCRIZIONI DELL'ART. 2 COMMA 1 DEL D.M. 28 AGOSTO 1995 N° 548. FATTO A EINDHOVEN, IL 1/1/1997. MARANTZ EUROPE B.V. 5600 EINDHOVEN THE NETHERLANDS "Este aparato lleva elementos antiparasitarios necesarios para cumplir con...
-
Page 7: Table Of Contents
Table of Contents Package contents ........ 3 Recording Format parameters ......21 Recording time chart ......... 21 Introduction .......... 4 Recording Level Control ........22 Features .............. 4 Microphone Attenuator ........22 Pre Record ............22 Preparation ........... 6 Silent Skip (Automatic Pause Recording) ..22 Installing the carry strap ........ - Page 8 Virtual Track and Copy Segment ..29 Additional Functions ......38 Virtual Track ............29 Battery ............... 38 Copy Segment ...........29 Auto power off ........... 38 Virtual Track Edit Mode ........29 Beep Alarm ............38 Key lock ............. 39 Creating a Virtual Track .....30 Set Date and Time ..........
-
Page 9: Package Contents
Package contents • Carry strap • PMD660 • Security screws (2) ISO 3x10 (3mm x 10mm long) For CF card door. • Plastic pin and retainer • 64MB CF card (US only) (spare - for Memory compartment door) (shipped formatted and installed) •... -
Page 10: Introduction
• condenser or dynamic microphone(s) connected to • Automatic recording the MIC IN jacks, or The PMD660 can be set to stop recording when there is • line level audio sources connected to the LINE IN jack. silence (Silent Skip) and automatically start when sound resumes. - Page 11 REC button (if the "Manual Trk" preset is beginning of each track. turned On). • There are three ways to power the PMD660 ; • Included AC adapter. • EDL marks* • AA Alkaline batteries (~ 4 hours).
-
Page 12: Preparation
1. Remove the battery compartment. Installing the carry strap 1. Put the carry strap through the shaft of PMD660. 2. Insert the new batteries (AA type) with correct +/ -polarity. 2. Put the carry strap through the stopper of PMD660. -
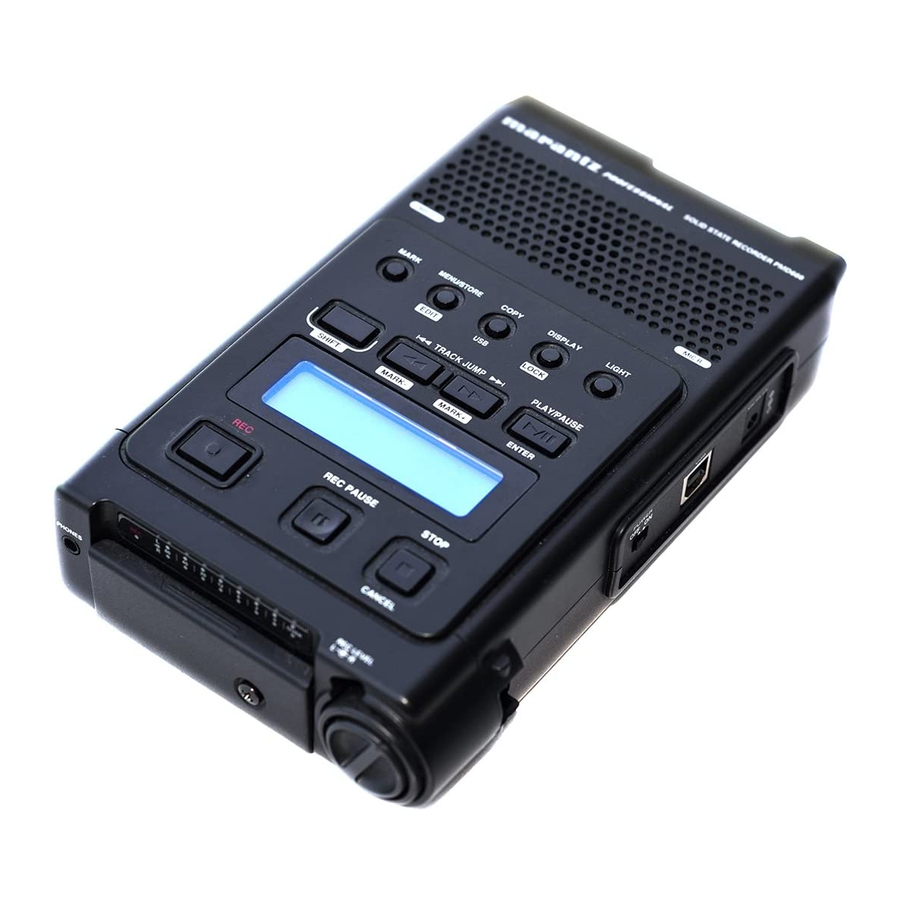
Page 13: Controls And Connections
Controls and Connections 1. Speaker When "Output" in the preset menu is set to SP/HP, the played back audio signal is output the internal speaker. Top side Headphones plugged into the PHONES jack mute the internal speaker. HP/SPK VOL controls the built-in Speaker and Headphone volume. - Page 14 • USB Push and hold the USB button while you turn on the PMD660's POWER switch. The CF card in the PMD660 appears as an external drive on a connected computer. It may also be removed for data transfer. See page 36, How to connect via the USB port.
- Page 15 7. LIGHT button 9. TRACK JUMP / MARK- button Push the LIGHT button to momentarily turn the Display • TRACK JUMP light on. During playback, push to jump to the previous track. Push and hold for one second to switch the Display light If pushed while playing, the first track jumps to the last on.
- Page 16 10. TRACK JUMP / MARK+ button • TRACK JUMP During playback, push to jump to the next track. If pushed while playing, the last track jumps to the first track on the CF card. • • During playback, push and hold the button to "fast forward"...
- Page 17 Push and hold the SHIFT button while you push other buttons (white labels) to activate alternate functions. 12. Display Labels, icons and alphanumeric messages on the display communicate the status of PMD660. 13. REC button From Stop, push to start recording. From Record - pause, push to resume recording.
-
Page 18: Front Side
Front side 16. Level meter The louder the sound input to the recorder on the Left/Right channel, the more LED lights are displayed. When the "Meter Mode" of preset menu is "Peak Only", only a peak level is displayed. (page 52) 17. -
Page 19: Left / Right Side
Plug the supplied AC adapter in this jack. The power supplied is 2.0A at 5V DC. The PMD660 automatically switches to adapter power if it was running on battery power. If AC power is interrupted by a power outage or unplugging the adapter, the PMD660 automatically switches to battery power. -
Page 20: Rear Side
Set “Output” of the preset menu to LINE (See Page 44). 27. REMOTE jack This jack accepts the optional wired remote Marantz model RC600PMD. Model RC600PMD connects via a TRRS (Tip Ring Ring Sleeve) connector. -
Page 21: Display
STEREO q. LOCK The STEREO label appears when the recording channel is The Lock symbol appears when the PMD660 is in key lock. stereo. r. Battery g. MP3 The Battery symbol appears in most displays to indicate The MP3 label appears when the audio file is MP3. -
Page 22: Basic Operation
These are settings for recording a meeting, not settings for recording a vocal performance. 1. Unpack the AC adapter and the PMD660. a. A full display will appear. Wait for the PMD660 to a. Plug AC adapter into 100 - 240VAC power. initialize. -
Page 23: Cf Cards
CF cards To eject a CF card a. Slide the POWER switch to turn off. The PMD660 records onto various types of CF (Compact POWER OFF ON Flash) cards. Please refer to the Marantz Professional web site at www.d-mpro.com for what kinds of media are recommended. -
Page 24: Cf Card Security
Formatting a CF card erases all audio files on the CF requires using a small Phillips screwdriver to open the CF card and prepares it for use in the PMD660. card compartment door. This reduces the possibility that If the CF card is formatted other than FAT16 or FAT32 the CF card will be misplaced or stolen. -
Page 25: Recording
Recording Recording Procedure 1. Slide the POWER switch to turn on. Connection Diagram POWER OFF ON 2. Push the REC button to begin recording. MIC IN LINE The Rec indicator will be lit and steady while recording. The display will show the information display of recording. (page 40) STEREO 44.1K... -
Page 26: Audio Input For Recording
3. Push the REC PAUSE button to pause recording. Audio inputs for recording Audio inputs for recording are selected using the Input Menu. Channel : Stereo Display Input Menu I. MIC Internal Mic Recording (Stereo, L/R ch) External Mic Recording (Stereo, L/R ch) LINE LINE Recording (Stereo, L/R ch) 4. -
Page 27: Recording Format Parameters
Recording Format parameters Recording time chart The PMD660 can record in several compression algorithms. All times are approximated record times. • Compressed recording using MPEG1 Layer III (MP3) Different media manufacturers allow more or less space for mono and stereo. -
Page 28: Recording Level Control
Recording Level Control Pre Record The recording level control lets you select the type of input When PreRecord is on and the PMD660 is in record pause, level control. it 'listens to' the selected audio input(s) and continuously buffers 2 seconds of audio. -
Page 29: Add A Track Automatically
Add a Track automatically Playback With Auto Trk(Automatic Track incrementing) on, a new track is begun automatically at specified intervals of Connection Diagram recording time. Automatic Track can be set to increment every 1, 5, 10, 15 or 30 minutes, or every 1, 2, 6, 8, 12 or 24 hours. Automatic Track makes finding a particular point in a recording easier. -
Page 30: Playback Procedure
Playback Procedure Track Access 1. Slide the POWER switch to ON. POWER OFF ON • TRACK JUMP During playback, push to jump to the previous track. If pushed while playing the first track, it jumps to the last 2. Push the PLAY/PAUSE button to begin playback. track on the CF card. -
Page 31: Audible Search
• During playback, push and hold the button • The EDL marking system is proprietary to Marantz. to "fast forward" and do a 2X speed audible • During playback, you can instantly locate EDL marks. search in the forward direction. Release to •... -
Page 32: Add An Edl Mark Automatically
• If Auto Mark is on and the machine is in record - pause, when recording is resumed a mark will be added. • If Auto Mark is on and the PMD660 is recording audio below the sound threshold for more than three seconds, audio that crosses the threshold will cause a mark to be added. -
Page 33: Trk Erase (How To Erase Tracks)
1. Trk Erase (How to erase tracks) 2. TrkMkErase (How to erase all EDL marks within one track) TrkErase lets you erase a selected track. After identifying the track number you want to erase. TrkMkErase lets you erase all of a track's EDL marks. Decide on which track’s EDL marks you want to erase. -
Page 34: Allmkerase (How To Erase All Edl Marks)
"Executing" will be displayed until AllMkErase is finished. Then "Completed" will be displayed. 4. Push the ENTER button. The PMD660 and display return to stop mode. "Executing" will be displayed until Format is finished. Then "Completed" will be displayed. 5. Push the STOP/CANCEL button to cancel. -
Page 35: Virtual Track And Copy Segment
(or across multiple files of the same RecFormat and RecChannel) for later, immediate access. Files marked as Virtual Tracks are stored in the PMD660 and can be accessed quickly by entering the PMD660 in Virtual Playback mode. -
Page 36: Creating A Virtual Track
Virtual Track. “Executing” will be displayed momentarily, and then the display will read “Completed.” To playback your created Virtual Track, see page 32, Entering Virtual Playback. 3. Continue to let the PMD660 play to your desired Out point, or use the standard transport controls like the STEREO 44.1K... -
Page 37: Using Copy Segment To Create A New File
000 : 00 : 08 LOCK SEG?” IN - STEREO 44.1K I.MIC 3. Continue to let the PMD660 play to your desired Out point, LOCK Copy SEG? or use the standard transport controls like the buttons to span greater time lengths. -
Page 38: Entering Virtual Playback Mode
• When copying an MP3 segment, processing time is at 8X speed. 3. To exit Virtual Track Playback mode: If a Virtual Track is playing press the STOP button twice. If the PMD660 is in Virtual Track Playback mode and stopped, simply push the STOP button once. -
Page 39: Virtual Track Edit Mode
Virtual Track EDIT mode Copy SEG? [How to convert a Virtual Track to a new file] When in Virtual Track EDIT mode, “Copy SEG?” lets you Just like regular playback mode, Virtual track has its own copy a single Virtual Track to a new file. EDIT mode. -
Page 40: Copy Seg A
“Executing” will be displayed while the copy process works. Then “Completed” will be displayed for one second. 5. Push the ENTER button. The PMD660 and display returns to stop mode. “Executing” will be displayed while the copy process works. Then “Completed” will be displayed for one second. -
Page 41: Avt Erase
The display switches to the “All” blinking in the upper numeric display. 4. Push the ENTER button. “Executing” will be displayed while the copy process works. Then “Completed” will be displayed for one second. The PMD660 and display returns to stop mode. 5. Push the STOP/CANCEL button to cancel. -
Page 42: Usb Mode
USB mode How to connect via the USB port The CF card in the PMD660 appears as an external drive on a connected computer. The PMD660 records directly onto CF cards. Recordings can then be transferred to your desktop or 1. -
Page 43: Diagram Of File Structure
• The PMD660 cannot be used while in USB mode. Diagram of file structure • The CF card in the PMD660 appears as a removable A file titled PMD660 will appear on your computer. device on your computer. EDL,Virtual Track and a folder (directory) titled MPGLANG1 •... -
Page 44: Additional Functions
When battery charge can provide no more Power and Beep Record or playback time is available. is set to On, the battery indicator will flash and the PMD660 will beep and power off. indicates that the battery charge is getting Setup the "Beep"... -
Page 45: Key Lock
Key lock Phantom Power The key lock secures the PMD660 in the state it is in Switch Phantom to ON to provide +48V of power for a during Record, Playback or Stop. condenser microphone(s). Push and hold the SHIFT button while pushing the DISPLAY/ LOCK button to turn KEY LOCK on. -
Page 46: Display
Display • During Record: • Elapsed record time of the current track Push the DISPLAY / LOCK button to alternate (Default display) information displays. ↓ • Remaining record time for the CF card ↓ • Recording date information ↓ • Recording time information ↓... -
Page 47: Preset Setup
Preset Setup General Menu procedure 1. With the PMD660 at Stop, Push the MENU/STORE EDIT button. Presets lets you set or change recording and playback parameters, such as changing inputs and setting the Date 2. Push the button to choose the Preset number. -
Page 48: Table Of Preset Defaults (Usa)
Table of Preset defaults (USA) Display Selection range Default Setting Preset1 Preset2 Preset3 1. Input INT MIC/ MIC/ LINE INT MIC 2. Output LINE, SP/HP SP/HP SP/HP SP/HP 3. Date/Time 2004 - 2099 Jan - Dec 1 - 31 AM/PM 00:00 - 11:59 4. -
Page 49: Table Of Preset Defaults (Europe)
Table of Preset defaults (Europe) Display Selection range Default Setting Preset1 Preset2 Preset3 Input INT MIC/ MIC/ LINE INT MIC INT MIC Output LINE, SP/HP SP/HP SP/HP SP/HP Data/Time 2004 - 2099 Jan - Dec 1 - 31 00:00 - 23:59 RecFormat MP3-44.1K/ MP3-48K/ PCM-44.1K... - Page 50 The PMD660 records only from the selected input. For example, if the input selected is LINE and no input source is connected to the LINE IN jacks, the PMD660 will record silence. Watch the level meters while in record pause. If the level stays at one display bar,...
- Page 51 The Date/Time setting will remain for about 5 years if 4. Push the button so Date/Time is the PMD660 is not plugged in. displayed. Date/Time setting applies to all three presets. 5. Push the ENTER button while Date/Time is displayed.
- Page 52 Menu (How to set or change the Rec Format parameters) choices for editing. When editing the Preset is The PMD660 can record in several compression algorithms. complete, push the MENU/STORE EDIT button to See explanation and chart below.
- Page 53 6. PreRecord 7. Manual Trk When PreRecord is on and the PMD660 is in record When Manual Trk incrementing is On during recording, pause, it 'listens to' the selected audio input(s) and push the REC button to increment the track. A new track is continuously buffers 2 seconds of audio.
- Page 54 • You can go directly to the beginning of the 10th minute by selecting track 10, etc. Note: If you intend to transfer your PMD660 audio recording Track Recording time to a CD, the Auto Track function makes the CD easily...
- Page 55 5. Push the ENTER button while Auto Mark is displayed. • If Auto Mark is on and the PMD660 is recording audio The On or Off will be flashing. below the sound threshold for more than three seconds, 6.
- Page 56 5. Push the ENTER button while Silent Skip is displayed. seconds time. The On or Off will be flashing. When that occurs, the PMD660 switches to record pause. 6. Push the button to toggle between On and Off. When a signal above the preset level is input, recording 7.
- Page 57 4. Push the button so LevelCont is displayed. LEVEL controls. 5. Push the ENTER button while LevelCont is displayed. • At ALC, the PMD660 automatically responds to changes The LevelCont choice (Manual or ALC) is flashing. in input level. 6. Push the...
- Page 58 12. Meter Mode 13. Mic Atten. The Meter Mode lets you select the type of level meters. The Mic Atten. let you select the direct use of microphones • At Normal, all the level meters are displayed. that differ in sensitivity. •...
- Page 59 14. AutoPowOff 15. Battery If the PMD660 is not used for 15 minutes during stop or play The PMD660 operates on 4 standard AA size Alkaline, or - pause, power can be automatically shut off to conserve Ni-MH batteries. battery life.
- Page 60 PMD660 will beep. This information is included in the file name. If the PMD660 is not used for 15 minutes during stop or For example, if the Machine ID is "aaaaa", the first file is play - pause, power can be automatically shut off to numbered "aaaaa001.wav"...
-
Page 61: Troubleshooting
• Install fresh batteries. 4. Push the button until Default is displayed. 5. Push the ENTER button while Default is displayed. The PMD660 seems to record, but there is no sound The OK? is flashing. on playback. 6. Push the ENTER button. - Page 62 AC power and removing batteries. • Check that the PMD660 acknowledges the CF card. Care and Maintenance No signal from microphone input. Use a soft cloth slightly moistened with mild detergent •...
-
Page 63: Error Message
Mark of track file is not detected. Can not... Invalid operation. LowBattery Battery voltage is low. Need DC IN AC adapter is not connected to PMD660. Bad File The menu setting of the file setting is not detected or file error. -
Page 64: Specifications
Specifications Inputs MIC IN L/R Type ........XLR (1:GND, 2:HOT, 3:COLD) Digital audio system Input sensitivity (MIC) ....1.2 mVrms/6.5 kohms System ..........Solid State Recorder Usable media ........CF memory cards LINE IN Microdrive Type ..............mini jack Input sensitivity ......300 mVrms/20 kohms Recording and media methods .mp3 ........ -
Page 65: Limited Warranty - Usa
AC adapter ................ 1 manufacturer defects in material and workmanship for a USB cable ................ 1 period of one year parts and labor. Marantz will pay for Audio cable ..............1 labor and material expenses for items covered by this Carry strap ................ - Page 66 Manufacturer shall not be liable for damage to other which service may be obtained. Please do not return products caused by any defects in Marantz products, the unit directly to us. damages based on inconvenience or loss of use of the product, or any other damages, whether incidental, 2.
- Page 67 Marantz is a registered trademark. Printed in Japan 2005/02 00M20BS851310 mzh-g...
Need help?
Do you have a question about the PMD660 and is the answer not in the manual?
Questions and answers