Panasonic SC-ZT2 Operating Instructions Manual
Home theater audio system model no. sc-zt2
Hide thumbs
Also See for SC-ZT2:
- Operating instructions manual (32 pages) ,
- Easy setting manual (1 page)
Table of Contents
Advertisement
Dear customer
Thank you for purchasing this product.
For optimum performance and safety, please read these instructions carefully.
Before connecting, operating or adjusting this product, please read the instructions completely.
Please keep this manual for future reference.
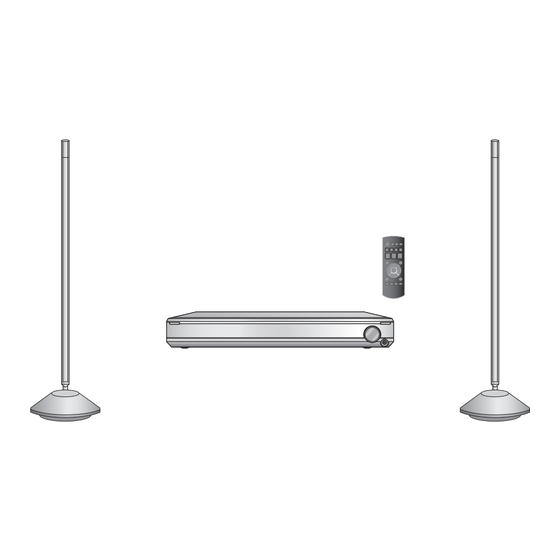
SC-ZT2 Components
Main unit (Control box)
Speakers
Note
"E", "GN" and "GS" are indicated on the packaging box.
E
GN GS
Home Theater Audio System
SU-ZT2
SB-ZT2
Operating Instructions
SC-ZT2
Model No.
VQT2R71
Advertisement
Table of Contents
Troubleshooting

Related Manuals for Panasonic SC-ZT2


Summary of Contents for Panasonic SC-ZT2
-
Page 1: Operating Instructions
Thank you for purchasing this product. For optimum performance and safety, please read these instructions carefully. Before connecting, operating or adjusting this product, please read the instructions completely. Please keep this manual for future reference. SC-ZT2 Components Main unit (Control box) SU-ZT2 Speakers... -
Page 2: Caution For Ac Mains Lead
Caution for AC Mains Lead Safety precautions (For the United Kingdom, Republic of Ireland, Saudi Arabia, Kuwait, Placement Malaysia and Hong Kong) For your safety, please read the following text carefully. Set the system up on an even surface away from direct sunlight, high This appliance is supplied with a moulded three pin mains plug for temperatures, high humidity, and excessive vibration. -
Page 3: Table Of Contents
What you can do with VIERA Link When other equipment (mini component system, “HDAVI Control” ..........20 AV amp, etc.) manufactured by Panasonic operates with the remote control operations of this system..26 Functions and settings ....22 Using “WHISPER-MODE SURROUND” ..22 Using “GAME”... -
Page 4: Setting Up Your Home Theater System
• Audio is transmitted wirelessly. You can enjoy more dynamic surround playback with this system by installing Panasonic surround speakers SB-ZT2. (➜ page 16) This system supports 3D images. By connecting with 3D compatible television or recorder etc., you can... -
Page 5: Supplied Accessories
Customer Care Centre • For customers within the UK: 0844 844 3852 • For customers within the Republic of Ireland: 01 289 8333 • Visit our website for product information www.panasonic.co.uk • E-mail: customer.care@panasonic.co.uk Direct Sales at Panasonic UK • For customers: 0844 844 3856 •... -
Page 6: Control Guide
Control guide Main unit (Control box) Front view For adjusting volume (➜ page 18) [INPUT SELECTOR] switch (➜ page 18) For connecting Standby/on switch (8) (➜ pages 15, 18) headphones (➜ page 27) Press to switch the unit from on to standby mode or vice versa. - Page 7 Speaker (with built-in amplifi er) Front view Side view Pole (mid-high part) TEST AC input terminal terminal (➜ page 14) TEST AC IN Base ID switch (woofer part) Unit on/off button (k I l ^) (➜ page 15) Use this button to turn the unit on and off. [WIRELESS LINK] indicator l (off): The unit is in standby mode.
-
Page 8: Remote Control Preparation
Remote control preparation Inserting the batteries • Do not mix old and new batteries. Press on the tab to open. • Do not use different types of batteries at the same time. • Do not take apart or short circuit. •... -
Page 9: Installation
There is no positional distinction for each speaker Setup example before setting. • Aim the front face (with Panasonic logo) of each Make sure to place the speakers on a fl at, stable speaker at the listening-viewing position for setting. -
Page 10: Home Theater Connections
TV. HDMI cable notes • It is recommended that you use Panasonic’s HDMI cables. • Please use High Speed HDMI Cables that have the HDMI logo (as shown on the cover). • Using the High Speed HDMI cable is recommended for viewing HD picture (1080p). -
Page 11: Connecting Stb Etc
Setting for automatically switching the input source to STB When you make the above connection and you use Panasonic TV (VIERA), you can automatically switch this system’s input by switching the input source of TV (VIERA) to STB in the following procedure. -
Page 12: Connecting Equipment Without Hdmi Terminal (Dvd Player, Vcr, Etc.)
Home Theater connections Connecting equipment without HDMI terminal (DVD player, VCR, etc.) Connection cable Optical fi bre cable (not supplied) Stereo phono cable (not supplied) • For the correct type of video cable, refer to the operating instructions for the equipment you are connecting. Audio out Digital audio AV IN... -
Page 13: Other Connections
• Turn off all equipment before making any connections. • To connect equipment, refer to the appropriate operating instructions. Other connections Connection cable HDMI cable (not supplied) Stereo phono cable (not supplied) To connect a second set of equipment that supports HDMI ✽... -
Page 14: Ac Mains Lead Connection
AC mains lead connection FOR THE UNITED KINGDOM, REPUBLIC OF IRELAND, SAUDI ARABIA, KUWAIT, MALAYSIA AND HONG KONG ONLY READ THE CAUTION FOR THE AC MAINS LEAD ON PAGE 2 BEFORE CONNECTION. To save power when the system is not to be used for a long time, unplug it from the household mains socket. Make sure to turn this system off before unplugging the AC mains lead. -
Page 15: Speaker Setting
Make sure that all equipment has been turned off. (When the VIERA Link “HDAVI Control” compatible Panasonic TV (VIERA) and Blu-ray Disc player/DVD recorder (DIGA) are connected, do not turn on TV (VIERA) and Blu-ray Disc player/DVD recorder (DIGA) until the setting is complete.) Connect AC mains leads of main unit and 2 speakers to household mains sockets. -
Page 16: Checking The Speaker Setting
Installing surround speakers The surround speakers are not supplied. You can enjoy more dynamic surround playback with this system by installing Panasonic surround speakers SB-ZT2. • Place them slightly at the back right and left of the listening-viewing Setup example position. -
Page 17: Setting Surround Speakers
• Make sure that all equipment has been turned off. (When the VIERA Link “HDAVI Control” compatible Panasonic TV (VIERA) and Blu-ray Disc player/DVD recorder (DIGA) are connected, do not turn on TV (VIERA) and Blu-ray Disc player/DVD recorder (DIGA) until the setting is complete.) •... -
Page 18: Enjoying Movies And Music
Enjoying movies and music • Turn on the TV and switch its input to match the connection (HDMI, for example) using the TV’s remote control. Preparations • Make sure that the speakers are on. (The following are operations when the unit on/off button is on in Wireless link standby.) Point the remote control at the signal sensor ( ➜... -
Page 19: Enjoying Sound Fi Eld Effects
Enjoying sound fi eld effects Sound fi eld effects differ depending on input sources. Cancelling sound fi eld effects Select the mode you prefer after listening to the actual sound. Press Dolby Virtual Speaker • The surround effects disappear for 2-channel sources such as You can enjoy surround effects as if you were listening to CD and TV. -
Page 20: Hdavi Control
(DIGA) also turns off. Note • When using with Panasonic TV (VIERA) supporting HDAVI Control 4 or later version, when the main unit is turned on, TV (VIERA) is set to “Home Cinema”. When using with Panasonic TV (VIERA) supporting HDAVI Control 3 and older version, when the main unit is turned on, “TV SPEAKER ”... - Page 21 • Using the High Speed HDMI cable is recommended for viewing HD picture (1080p). • It is recommended that you use Panasonic’s HDMI cables. (Non-HDMI-compliant cables cannot be utilised.) Recommended part number: RP-CDHS15 (1.5 m), RP-CDHS30 (3.0 m), RP-CDHS50 (5.0 m), etc.
-
Page 22: Functions And Settings
Functions and settings Using “WHISPER-MODE SURROUND” This function is effective during surround playback only. You can enjoy the dynamic effect even if the sound volume level is low during surround playback. Press [WHISPER-MODE SURROUND] to select “W.S. ON ”. • The current setting is displayed first. Each time you press, the setting switches between “W.S. -
Page 23: Adjusting The Surround Speaker Output
Setup menu items Adjusting the surround speaker output using the test signal “BASS” “TREBLE” “BALANCE” ✽ ✽ ✽ You can make this setting when using the surround speakers. “SPEAKERS” “DISTANCE” “7.1CH VS” ✽ You can adjust the surround speaker volume by outputting the test signal. -
Page 24: Setting Distances
Functions and settings Setting distances You can make this setting when using the surround speakers. This setting is not displayed under different conditions. By setting the distance from front/surround speakers to the listening-viewing position, the sound delay time is automatically calculated and adjusted so that sound reaches the listener at the same time. -
Page 25: Viera Link "Hdavi Control" Setting
3. Press [e][r] to select “ON ” and press • If delaying audio output is not necessary, select “OFF ”. [OK]. • “AUTO ” is effective only when connecting the Panasonic TV (VIERA) supporting HDAVI Control 3 and later versions. (Auto ON, OFF... -
Page 26: Switching The Input Signal Detection Setting
4” (➜ page 17) are reset. When other equipment (mini component system, AV amp, etc.) manufactured by Panasonic operates with the remote control operations of this system When using this system’s remote control, other equipment may operate. In this case, switch this system’s remote control code to “REMOTE 1 ”. -
Page 27: Error Messages
“2 ” on the remote control in step 4 of procedure “When other REMOTE 2 equipment (mini component system, AV amp, etc.) manufactured by Panasonic operates REMOTE 1 with the remote control operations of this system”. When “REMOTE 1 ” is displayed, set the code to “1 ”... -
Page 28: And Other Troubleshooting Guide
Troubleshooting guide Before requesting service, make the following checks. If you are in doubt about some of the check points, or if the remedies indicated in the chart do not solve the problem, consult your dealer for instructions. Problem Possible solution Pages No power. -
Page 29: Information Digital Audio Signals Supported By This System
Problem Possible solution Pages • Confirm “VIERA Link “HDAVI Control” setting” is set to “ON ” (when the operation is linked). When it is “OFF ”, change to “ON ”. • VIERA Link “HDAVI Control” does not function in standby condition (HDMI off mode) when this system is turned off. -
Page 30: Glossary
Glossary ARC (Audio Return Channel) Optical This function was added to HDMI Ver.1.4. Using optical fi bre cable for digital signal input/output from DVD, This sends digital audio signals from the HDMI input terminal of CD, etc., provides better sound quality for playback or recording the TV, etc. - Page 31 Equipment and used Batteries Declaration of Conformity (DoC) These symbols on the products, packaging, and/or Hereby, “Panasonic Corporation”, declares that this product is in accompanying documents mean that used electrical compliance with the essential requirements and other relevant and electronic products and batteries should not be provisions of Directive 1999/5/EC.
- Page 32 For GS THIS UNIT IS INTENDED FOR USE IN TROPICAL CLIMATES. Web Site: http://panasonic.net VQT2R71 H0210RT0 Pursuant to at the directive 2004/108/EC, article 9(2) Panasonic Testing Centre Panasonic Marketing Europe GmbH Winsbergring 15, 22525 Hamburg, Germany © Panasonic Corporation 2010...
Need help?
Do you have a question about the SC-ZT2 and is the answer not in the manual?
Questions and answers