
Related Manuals for Primera LP130e


Summary of Contents for Primera LP130e
- Page 1 042313-511351 User's Manual © 2013 All rights reserved For the most recent version of this manual please visit http://primeralabel.eu/europe/manuals.html...
- Page 2 Microsoft Corporation. All other trademarks are the property of their respective owners. Safety Standard: The LP130e complies with the following safety standard: International Standard IEC 60825-1, Second Edition, 2007/03 Printing History: Edition 2.0, #511351, Copyright 2013, All rights reserved.
-
Page 3: Table Of Contents
Table of Contents Section 1: Important Safety Information ..........1 Section 2: Getting Started ................3 A. Choosing a Good Location ............3 B. Unpacking and Inspection .............3 C. Indentifying the Parts ..............5 D. Computer Specifications ..............7 Section 3: Label Stock ...................8 A. Label and Roll Specifications ............8 B. -
Page 5: Section 1: Important Safety Information
DF-30e Filtration System. Hazardous smoke and fumes will be released. • When using the DF-30e Filtration System make sure the feet on the LP130e are resting inside the indentations on the top of the DF-30e. - Page 6 Safety Labels Safety labels are affixed to the printer in the following locations: WARNING: Class 4 invisible laser radiation with cover open and interlocks defeated. Avoid eye or skin exposure to direct or scattered radiation. WARNING: Sharp edge, keep fingers and other body parts away. Serial Number and ID information 2 Important Safety Information...
-
Page 7: Section 2: Getting Started
Section 2: Getting Started A. CHOOSING A GOOD LOCATION • Place the printer on a flat surface in a location with adequate air circulation to prevent internal heat build-up. • Do not place the printer near heat sources such as radiators or air ducts, or in a place subject to direct sun light, excessive dust, mechanical vibration or shock. • Allow for adequate clearance in front of the printer to accommodate the printed label stock as it is leaving the printer to avoid the possibility of binding or jamming of the label stock. - Page 8 The following items are inside the printer supply roll area: • Starter Roll of smokeless label stock Save the carton and packing materials. They will come in handy when transporting the printer. Getting Started...
-
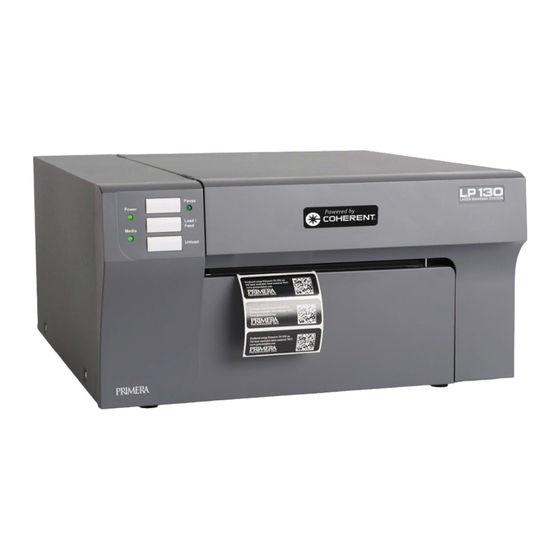
Page 9: Indentifying The Parts
C. IDENTIFYING THE PARTS Front View Top Cover Pause LED Pause Button Power LED Load/Feed Button Media LED Label Tear Bar Unload Button The Pause Button pauses the printer during a print job. If pressed when no print job is printing, it will prevent any new jobs from beginning. -
Page 10: Rear View
Rear View USB Port Power Input Port Power Switch Filtration Unit Communication Port (9-pin serial) Interior View, Label Roll Area Moveable Label Stock Hub Fixed Label Stock Hub Data Chip Contact Hub Engagement Lever Label Stock Hub Supports Getting Started... -
Page 11: Computer Specifications
Interior View, Carrier Laser Windows DO NOT TOUCH Carrier WARNING Safety Skirt Label Feed Exit Area Exhaust Duct Invisible Laser Path DO NOT BLOCK E. COMPUTER SPECIFICATIONS For optimal printing speed you must have a PC with the following recommended specifications: • Pentium Dual Core Processor • 2 GB of RAM • 10 GB of free hard drive space... -
Page 12: Section 3: Label Stock
A. LABEL AND ROLL SPECIFICATIONS Important Notes Regarding Label Stock • The LP130e can only be used with label stock manufactured or approved by Primera. All sizes must be custom ordered. This printer requires a custom plastic hub with an integrated data chip. • Both smoke and smokeless label types are available. Smoke labels require the use of an optional filtration system and the replacement of exhaust ducting. -
Page 13: Label Stock
Label Sensing Methods Label Width Liner Width Gap Between Labels Method 1: Label Gap Sensing Distance from Edge of Liner Width of Thru-Hole Method 2: Thru-Hole Sensing Distance from Label Height edge of Liner to edge of Label Method 3: Reflective Sensing (Black mark must be printed on back side of label stock.) Black Mark... - Page 14 Note: See table on next page for Max and Min values in inches and mm. Label Width 5.0" (127 mm) 0.75" (19 mm) Liner Width 5." (127 mm) 1.5" (38.1 mm) Label Height/Length 12" (305 mm) 0.75" (19 mm) Core Width 5.125"...
-
Page 15: Installing Label Stock
B. INSTALLING LABEL STOCK The following steps will guide you through loading label stock in your printer. 1. Open the Top Cover. Lift here. Lift Here 2. Find the label stock roll area near the back of the printer. Label Stock... - Page 16 3. Pull the Hub Engagement Lever down until it locks into position. Hub Engagement Lever 4. Locate the label stock roll. Remove the foam shipping spacer. Place the roll on the Hub Supports. Stock should be installed with the labels facing up and coming off the top of the roll.
- Page 17 5. Pull the Hub Engagement Lever up. The moveable hub will engage the label stock hub. 6. Pull the Movable Throat Guide outward to make room for the label stock. Moveable Throat Guide Fixed Throat Guide Label Stock...
- Page 18 7. Place the leading edge of the label stock under the "label stock" symbols on the Throat Guides. The label stock should be placed far enough into the throat of the printer to correctly position the Movable Throat Guide but not fully into the print mechanism. 8.
- Page 19 Caution: The gap between the Throat Guides should be narrow enough to accurately guide the label stock but not narrow enough to pinch the label stock. (The gap should be .016" - .032" [0.4 - .08mm] wider than the label stock.) If the label stock is pinched by the guides, poor print quality or feeding problems could result.
-
Page 20: Section 4: Setup Your Label And Print
Section 4: Setup Your Label and Print A. USING BARTENDER® BarTender PE is included with the LP130e. Other programs can be used to print. If printing from other programs please follow the guidelines in Section 4D. When you open BarTender you will be given the choice to select an existing label or create a new one using a wizard. - Page 21 2. Select "Blank Label Format". Click "Next". 3. Select "Laser Marking 130". Click "Next". Setup Your Label and Print...
- Page 22 4. Select "Specify Custom Settings". Click "Next". 5. Set the page size, width and height to match labels installed in the printer. Click "Next". Setup Your Label and Print...
- Page 23 6. Set your background photo, if desired. For this printer you will probably not want a background photo. In this case, select nothing and click "Next" or "Finish". If you click "Finish", the remaining default wizard options will be set. 7.
-
Page 24: Add Text, Barcodes And Graphics To Abartender Label
B. ADD TEXT, BARCODES AND GRAPHICS TO A BARTENDER LABEL Once you have created your label size you will need to add text, a barcode and/or graphics. This can be done using one of buttons on the button bar at the top of the screen. Add Text. -
Page 25: Printing From Bartender
C. PRINTING FROM BARTENDER 1. To print, click the Print button or go to the File Menu and select "Print". The Print Dialog window will appear. 2. Select the Durable Label 500. 3. Set the number of copies. 4. Click "Print". Setup Your Label and Print... -
Page 26: Printing From Other Programs
3. Choose the right printing program. There are many different applications that are capable of printing to the LP130e. However, there are only a few that are ideal printing applications. For example, Adobe Illustrator is an excellent design program but is not always the best printing program. -
Page 27: Printer Settings
To access advanced printer settings go to the Start Menu. Choose "All Programs". Then choose "LP130e Settings". Current status of the printer will be displayed on the bottom of the application along with the remaining number of labels on the installed roll and the total number of labels printed over the life of your printer. - Page 28 There are four tabs across the top. The following is a description of the contents of each. Status Tab The Status tab contains the current status of the printer, the media percentage remaining and details about any error that appears. You can also switch to Advanced mode which displays additional status which may be useful to tech support for solving any problems.
- Page 29 Tear Off Position – When using the Present mode, adjust this setting to change the output position of the label. This will move the labels out further from the printer or move them back toward the printer. The goal is to center the gap between labels over the Label Tear Bar so that you can easily tear off a run of labels after they have been printed.
- Page 30 Media Settings Tab You can adjust Output Mode settings and media overrides. All media comes with an internal memory chip which stores the correct settings for that media. The printer uses those settings to print to the media. However, using the media overrides, you can change the settings. Output Mode –...
- Page 31 • Clear Overrides will revert all settings to defaults stored on the Media chip. Preferences Tab On the Preferences tab you can set the display language. Information Icon Click the information icon in the upper right corner of the software to display software version information.
-
Page 32: Section 5: Setup The Df-30E Filtration System
1. Disconnect power and USB if it is connected to the LP130e. 2. Lift the LP130e onto the top of the DF-30e. Make sure that the feet on the LP130e are resting in the indents on the top of the DF-30e. - Page 33 4. Connect power to the DF-30e and switch it on. 5. Connect power and USB to the LP130e. Note: The LP130e will automatically turn on the fan and regulate the air flow on the DF-30e. Note: The DF-30e will require periodic filter replacement. Replace filters according to Section B when the Service Filters LED is illuminated.
-
Page 34: Replace Filters
B. REPLACE FILTERS DF-30 Replace the filters when the “Service FILTRATION SYSTEM System ON RESET Filters” LED is lit. Some filters are POWER Service Motor replaced every time and others are Service Filters CALIBRATION POWER CORD replaced every other time. The first time the “Service Filters”... - Page 35 Part/Description Frequency 74473 - MERV 15 Deep Replace every Pleated Filter Element time the Service (box of 2) Filters LED is lit. • Initial Kit 74481 (Contains 1x) • Complete Kit 74482 (Contains 2x) 74474 - Small Particle HEPA Replace every Filter Element (box of 1) other time the Service Filters • Complete Kit 74482...
- Page 36 3. Install filters as shown. Filter 1, 2, and 3 – Replace Every Time Filter 4 and 5 – Replace Every Other Time Baffle Filter Deep-Pleated Filter (3x) Alternate felt and opening as shown. Felt side up Opening Gasket Stack filters on top of each other with the handles facing up or the gaskets facing down.
- Page 37 Filter Replacement Schedule: Write the date and check the box when you replace the filter. Date 1. Felt (3x) 2. Bag 3. Pleated 4. HEPA 5. Charcoal £ £ £ £ £ £ £ £ £ £ £ £ £ £...
-
Page 38: Section 6: Maintenance And Troubleshooting
Section 6: Maintenance and Troubleshooting The follow maintenance should be done according to the schedule below: Maintenance Action Frequency Section Clean Guide Shafts Before every label roll* Clean Encoder Strip Every five label rolls* Replace Exhaust System Before every label roll Clean Print Support Plate Before every smoke 6A (Step 4) label roll Clean Exhaust Duct... - Page 39 Smoke labels require the use of the DF-30e Filtration System. Note: A replacement Exhaust Duct and Exhaust Chimney come with every new roll of smoke label stock. You can also purchase additional replacements from Primera. Exhaust Duct (Part # 084001)
- Page 40 3. Move the Carrier to the far left if it is not already there. Pull the right side of the Exhaust Duct up and through the slot as shown in the illustration. Then slide the duct to the right to completely remove it.
- Page 41 4. Once the Exhaust Duct has been removed you will have access to the label feed path. Inspect the area for smoke residue. Remove it using rubbing alcohol and a paper towel or cloth. Smoke residue will be present on the Print Support Plate where it was not covered by label stock.
- Page 42 7. Locate a new Exhaust Chimney. Insert the new Exhaust Chimney with the gasket end down. Push it down until the top is even with the adjacent Print Support Plate. Gasket 8. Locate a new Exhaust Duct. After making sure the carrier is pushed to the far left, insert the left side into the slot as shown in the illustration.
- Page 43 9. Guide the right end of the duct down through the slot as shown in the illustration. Push toward the rear of the printer until the duct snaps into place. Verify that the opening in the bottom of the Exhaust Duct aligns with the top of the Exhaust Chimney. Print Head Exhaust Duct Maintenance and Troubleshooting...
-
Page 44: Cleaning The Laser Windows
B. CLEANING THE LASER WINDOWS Cleaning the Laser Windows is necessary if debris, dust, finger prints or smoke residue are visible on the windows. Typically, poor print quality would be the first sign of Laser Window contamination. Carrier Laser Windows To clean the windows, first disconnect power. -
Page 45: Cleaning The Feed Path
C. CLEANING THE FEED PATH If smokeless label stock is used the exhaust system will not need to be replaced every roll of label stock. However, this means that adhesive may build up on the bottom edge of the Exhaust Duct causing feeding problems. -
Page 46: Cleaning The Guide Shafts And Encoder Strip
D. CLEANING THE GUIDE SHAFTS AND ENCODER STRIP The Guide Shafts and the Encoder Strip should be inspected regularly for debris and then cleaned, if necessary. The Guide Shafts are the metal bars upon which the Carrier travels. The Encoder Strip is a transparent strip of plastic with small vertical lines. -
Page 47: Troubleshooting
E. TROUBLESHOOTING Print quality is poor; missing 1. Replace the exhaust system or blurry text, graphics or according to Section 6A. barcodes. 2. Clean the Laser Windows according to Section 6B. 3. Clean the Guide Shafts or Encoder Strip according to Section 6D. -
Page 48: Technical Support
System Errors System errors are reported in the LP130e Settings application. Click the Advanced Status button. Clamp system Error. Carrier Error. TOF Edge not found. Vacuum System Error. Paper out sensor triggered. Laser Temp high (>35 degC). Media Smart chip error. -
Page 49: Section 7: Specifications
Media Sensing: See-through and black mark reflective sensors Supply Roll: 6” (152 mm) OD on 3” (76.2 mm) ID core Label Design Software: BarTender Primera Edition included (Most other Windows-based label design software may also be used) Operating System: Windows XP/Vista/7/8 Data Interface: USB 2.0...
Need help?
Do you have a question about the LP130e and is the answer not in the manual?
Questions and answers