
Related Manuals for Omega HH376


Summary of Contents for Omega HH376
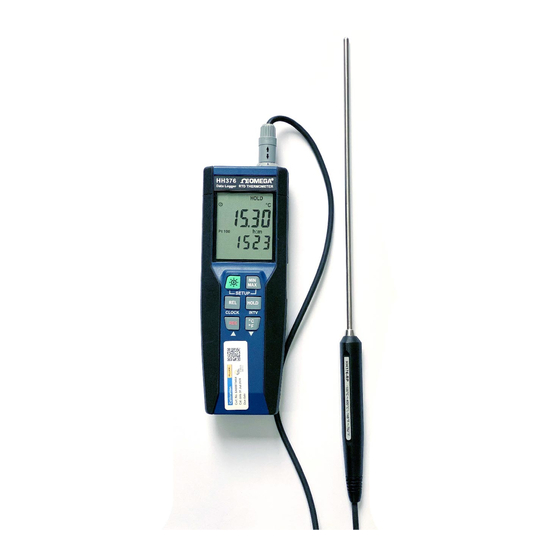
- Page 1 User’ s Guide Shop online at omega.com e-mail: info@omega.com For latest product manuals: omegamanual.info MADE IN TAIWAN HH376 Data Logger, RTD Thermometer...
- Page 2 Approach Directives. OMEGA will add the CE mark to every appropriate device upon certification. The information contained in this document is believed to be correct, but OMEGA accepts no liability for any errors it contains, and reserves the right to alter specifications without notice.
-
Page 3: Table Of Contents
6. Setting the Time…………………………………………………………......5 7. Changing the Logging Interval………………………………………………………… 5 8. Clearing Memory…………………………………………………………………………. 5 9. Temperature Meter Calibration Setup ……….……………………………………….. 6 10. Communicating with a PC…………………………………………………………….. 7 Testlink HH376 Software………………………………………………………………… 7 11. Power Preparation……………………………………………………………………...11 12. Maintenance .…….…………………………………………………………………….. 11 13. Temperature Probe.……………………………………………………………... 11... -
Page 4: Introduction
RTD THERMOMETER 1. INSTRUCTION This instrument is a digital thermometer for use with platinum-type temperature sensor. Temperature indication follows IEC751 temperature table for PT-type sensor. 2. SPECIFICATIONS Numerical Display: 5 digital liquid crystal displays Measurement Range: -100°C ~ 400°C; -148°F ~ 752°F Resolution: 0.01°C;... -
Page 5: Symbol Definition And Button Location
RTD THERMOMETER 3. SYMBOL DEFINITION & BUTTON LOCATION : The Battery is not sufficient for proper operation. : The Minimum value is now being displayed MAX : The Maximum value is now being displayed HOLD : This indicates that the display data is being hold. : This indicates Auto Power Off is enabled. -
Page 6: Operation Instructions
RTD THERMOMETER 4. OPERATION INSTRUCTIONS 4.1 Power-Up Press the “ ” key to turn ON the thermometer and Press and hold “ ” buttons for 3 seconds to OFF. 4.2 Connection the Temperature Pprobe For measurement, plug the temperature probe into the input connectors. 4.3 Selecting the Temperature Scale When the meter is first powered on, the default scale setting is set at Celsius (°C) scale. -
Page 7: Auto Power Off
RTD THERMOMETER Press button again, then the MIN symbol is on the display and also the minimum reading. Press button again, MAX and MIN will blink together. This means that all these data is updated in the memory and the reading is the present temperature. One may press to circulate the display mode among these options. -
Page 8: Setting The Time
RTD THERMOMETER 6. SETTING THE TIME Press and hold button and then power on the meter to enter setup mode. Press button to enter Time setting mode. The right two digits blink. Press button until the display shows the correct year, and then press button to select. -
Page 9: Temperature Meter Calibration Setup
RTD THERMOMETER 9. TEMPERATURE METER CALIBRATION SETUP Below table diagram shows each button function when user enters into the calibration mode. Note: Turn the Power “OFF” before attempting SETUP. Setup mode is cancelled during below procedure if “POWER” button is pressed. 9.1 Temperature Calibration Place the temperature probe in a known, stable temperature environment. -
Page 10: Communicating With A Pc
USB or RS-232 serial connection. TESTLINK SE-376 SOFTWARE (1) The SE-376 package contains: 80mm CD Custom designed USB cable for HH376 (2) System Required: Windows NT 4.0/ NT2000/ XP/ VISTA/ Windows 7 (3) Minimum Hardware Required: PC or NoteBook with Pentium 800MHz or higher, 128 MB RAM... - Page 11 RTD THERMOMETER Output To Graph - Send tabular data to another graph New - Reset all the data Option - Setup dialog to set attributions of graph. (You can also double click on the graph.) Sampling Rate - Time interval between each data to be recorded. If you want to change it, move mouse cursor to the digit you want to change and click, then input the new sampling rate.
- Page 12 RTD THERMOMETER (7) Tabular: The Tabular window can be used to record real time data in a table format. The maximum number of records that the Tabular window can keep will be dependent on availability of memory and hard disk space of the connected computer. (8) Data Logger When you have the thermometer connected to a computer, select "Load Data"...
- Page 13 RTD THERMOMETER SE376 will transfer the first data set to graph and tabular on the right side window once you finish loading recorded data from the thermometer. You can click on at any data set to show it’s graph and tabular on the right side window. You can choose a rectangle area on the graph to zoom in for detail.
-
Page 14: Power Preparation
Do not use tools with sharp edges, screwdrivers, metal brushes or anything similar to clean the device. 13. Temperature Probe Model HH376-RP 13.1 Piercing type temperature probe Model # HH376-RP. 13.2 Piercing type temperature probe Specification: hermometer sensor Pt 100 (4 wires) : t ( Measurement Range -100 to 400°C... - Page 15 In no event shall OMEGA be liable for consequential, incidental or special damages. CONDITIONS: Equipment sold by OMEGA is not intended to be used, nor shall it be used: (1) as a “Basic Component” under 10 CFR 21 (NRC), used in or with any nuclear installation or activity;...
- Page 16 Where Do I Find Everything I Need for Process Measurement and Control? OMEGA…Of Course! Shop online at omega.com TEMPERATURE Thermocouple, RTD & Thermistor Probes, Connectors, Panels & Assemblies Wire: Thermocouple, RTD & Thermistor Calibrators & Ice Point References Recorders, Controllers & Process Monitors...
Need help?
Do you have a question about the HH376 and is the answer not in the manual?
Questions and answers