
Related Manuals for HoMedics BPW-201


Summary of Contents for HoMedics BPW-201
- Page 1 Automatic Wrist Blood Pressure Monitor BPW-201 El manual Ver. A en español empieza en la página 44...
-
Page 2: Table Of Contents
TABLE OF CONTENTS Risk Category Index ........27 Irregular Heartbeat Detector (IHB) ....28 INTRODUCTORY INFORMATION: Recalling Values from Memory ..... 30 Important Product Notices and Clearing Values from Memory ...... 32 Safety Instructions .......... 5 Important Notes Regarding Your About Blood Pressure ........ -
Page 3: Important Product Notices And Safety Instructions
IMPORTANT PRODUCT NOTICES AND women and for users with irregular heartbeat, SAFETY INSTRUCTIONS diabetes, poor circulation of blood, kidney problems or for users who have suffered from a stroke. When using your blood pressure monitor, basic • Consult your physician before measuring blood precautions should always be followed. -
Page 4: About Blood Pressure
Why Measure Your Blood Pressure? Blood pressure measurements determined with this device are equivalent to those obtained by Among today’s various health problems, those a trained observer using the cuff/stethoscope associated with high blood pressure are very common. auscultatory method, within the limits prescribed by High blood pressure dangerously correlates with the American National Standard, Manual, electronic, cardiovascular diseases. -
Page 5: Blood Pressure Standard
BLOOD PRESSURE STANDARD Although one can easily find where their own blood pressure readings fall on this table, this monitor comes The table below contains defined levels for hypertension equipped with a Risk Category Index that automatically that are publicly available from the National Heart Lung compares each reading to the defined levels and and Blood Institute at the U.S. -
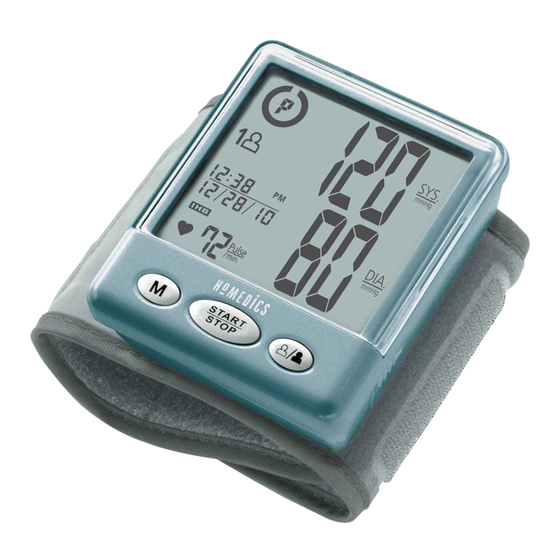
Page 6: Name/Function Of Each Part
NAME/FUNCTION OF EACH PART individual. With one touch of a button, the cuff will automatically inflate to block the blood flow through your artery. Next, the deflation process starts. When measurement is complete, the monitor will display Date/Time your systolic pressure, diastolic pressure, and pulse Set Buttons Display readings. -
Page 7: Display Explanations
Display Symbols: DISPLAY EXPLANATIONS User 1: Appears when the monitor is operated by User 1 User 2: Appears when the monitor is operated by User 2 Weak Battery Symbol: Appears when batteries should be replaced Pulse Symbol: Shows the heart rate per minute Irregular Heartbeat Detector: Refer to page 28 for Systolic more information. -
Page 8: Installing Batteries
INSTALLING BATTERIES Replace the batteries if: 1. The weak battery symbol appears on the display. 1. The battery cover is located 2. Nothing appears on the display when the power is along the side of the monitor. switched on. Remove battery cover by pressing down and pulling As the supplied batteries are for test only, they may away from the monitor. -
Page 9: Date & Time Set Procedure
DATE & TIME SET PROCEDURE APPLYING THE CUFF 1. To adjust the date/time, press the Set button 1. Remove all watches, wrist jewelry, etc. prior to located on the top of the monitor. attaching the wrist monitor. Clothing sleeves should be rolled up and the cuff should 2. -
Page 10: Correct Measurement Posture
4. In order to insure accurate CORRECT MEASUREMENT POSTURE Fig. C measurements, fasten the hook and loop strap securely 1. Place your elbow on a table around your wrist so there is so that the cuff is at the same no extra space between the Fig. -
Page 11: Measurement Procedure
MEASUREMENT PROCEDURE 3. Turn your palm upwards. Fig. C Important Notes: 4. Sit upright in a chair, and take • Position the monitor at the same level as your 5-6 deep breaths. heart during measurement to ensure accurate Note: Avoid leaning back readings. - Page 12 • During the measurement, do not talk or move your 2. With the cuff wrapped around your wrist, press the arm or hand muscles. START/STOP button. Do not inflate the cuff unless it is wrapped around your wrist. All digits will light AVG.
- Page 13 Note: The monitor will re-inflate automatically if Note: the system detects that your body requires 1. This monitor automatically turns off approximately more pressure for measurement. 1 minute after last operation. You may also press the START/STOP button to turn the unit off. 2.
-
Page 14: Risk Category Index
RISK CATEGORY INDEX IRREGULAR HEARTBEAT DETECTOR (IHB) This monitor comes equipped with a Risk Category Index that automatically compares each reading The appearance of the icon indicates that to defined levels established by the U.S. National a pulse irregularity consistent with an irregular Institutes of Health’s (NIH) National Heart Lung and heartbeat was detected during measurement. -
Page 15: Recalling Values From Memory
RECALLING VALUES FROM MEMORY IRREGULAR HEARTBEAT DETECTOR (IHB), CONTINUED T o determine the presence of an irregular heartbeat, This monitor can be used by two individuals. Each user the average of the heartbeat intervals is calculated can store up to 60 measurements. with the first 3 normal effective heartbeat values. It is important to note that the average is not a strict 1. -
Page 16: Clearing Values From Memory
CLEARING VALUES FROM MEMORY 4. The monitor will first display the calculated average applied to the last 3 memories (“AVG. 3”). 1. Press the User-Select button to select User 1 or User 2. START STOP AVG. 3 AVG. 3 START STOP 2. Press and hold the buttons at the same time while in memory recall mode and the data for 5. -
Page 17: Important Notes Regarding Your Blood Pressure Measurement
You should not use any tool to open the device nor should you attempt to adjust anything inside the • Once inflation reaches 300 mmHg, the unit will device. If you have any problems with this device, deflate automatically for safety reasons. please contact HoMedics Consumer Relations (contact information on warranty page). -
Page 18: Potential For Electromagnetic Interference
POTENTIAL FOR ELECTROMAGNETIC 6. Do not immerse the unit in water as this will result in damage to the unit. INTERFERENCE 7. Do not subject the monitor and cuff to extreme To avoid inaccurate results caused by temperatures, humidity, moisture, and direct sunlight. electromagnetic interference between Protect from dust. -
Page 19: Troubleshooting
System error. Measure again. shown on display Note: If the unit still does not work, contact HoMedics Consumer Relations. Under no circumstance should you disassemble or attempt to repair the unit by yourself. Contact information for HoMedics Consumer Relations Department can be found on the warranty page (See page 41). -
Page 20: Specifications
SPECIFICATIONS SPECIFICATIONS (continued) Two 1.5V DC (AAA) Alkaline batteries Power Source: 0.30 lbs (136.1 g) (without batteries) Weight: Measurement Wrist Oscillometric 5.3” - 7.7” (13.5cm - 19.5cm) Method: Circumference: Measurement Pressure: 40~280 millimeters Mercury (mmHg) Two AAA alkaline batteries, instruction Accessories: Pulse: 40~199 beats/minute Range: manual, hard plastic storage case... - Page 21 LIMITED FIVE YEAR WARRANTY HoMedics sells its products with the intent that they are free of defects in manufacture and workmanship for a period of five years from the date of For service or repair, original purchase, except as noted below. HoMedics warrants that its products...
- Page 22 Monitor automático de presión sanguínea para la muñeca BPW-201 Ver. A...
- Page 23 ÍNDICE INFORMACIÓN INICIAL: Índice de Categoría de Riesgo ....69 Avisos importantes del producto Detector de latidos irregulares e instrucciones de seguridad ....47 (IHB, por sus siglas en inglés) ....70 Sobre la presión sanguínea .....50 Cómo recuperar los valores de la ¿Qué...
-
Page 24: Avisos Importantes Del Productoe Instrucciones De Seguridad
AVISOS IMPORTANTES DEL PRODUCTO No cambie sus medicinas sin el consejo de su médico o profesional de la salud. E INSTRUCCIONES DE SEGURIDAD • Este producto no es adecuado para personas con Cuando utilice su monitor de presión sanguínea, arritmia. Este dispositivo puede tener dificultad debe seguir siempre las precauciones básicas. -
Page 25: Sobre La Presión Sanguínea
SOBRE LA PRESIÓN SANGUÍNEA • Utilice el monitor de presión sanguínea únicamente para el uso para el cual fue diseñado. ¿Qué es la presión sanguínea? • No coloque el brazalete en otra parte de su La presión sanguínea es la presión que se ejerce en cuerpo que no sea la muñeca. -
Page 26: Estándar De Presión Sanguínea
ESTÁNDAR DE PRESIÓN SANGUÍNEA Categoría Sistólica (mmHg) Diastólica (mmHg) Normal menor que 120 menor que 80 La tabla incluida en la siguiente página contiene niveles Prehipertensión 120-139 80-89 definidos de hipertensión, disponibles en forma pública en el National Heart Lung and Blood Institute en los Hipertensión National Institutes of Health (NIH) de los EE.UU. -
Page 27: Cómo Funciona Este Monitor De Presión Sanguínea
CÓMO FUNCIONA ESTE MONITOR NOMBRE/FUNCIÓN DE CADA PIEZA DE PRESIÓN SANGUÍNEA Este monitor utiliza la tecnología Smart Measure™ para Pantalla LCD detectar la presión sistólica, presión diastólica y de pulso. Botones de configuración La tecnología Smart Measure™ permite que el monitor de fecha y hora infle y desinfle automáticamente al nivel apropiado para cada persona. -
Page 28: Explicaciones De La Pantalla
Símbolos de la pantalla: EXPLICACIONES DE LA PANTALLA Usuario 1: aparece cuando el Usuario 1 opera el monitor Usuario 2: aparece cuando el Usuario 2 opera el monitor Símbolo de pilas bajas: aparece cuando tiene que cambiar las pilas Presión Símbolo de pulso: muestra el rítmo cardíaco por minuto sistólica Indicador de latidos irregulares: Vea la página 70 para obtener más información... -
Page 29: Instalación De Las Pilas
INSTALACIÓN DE LAS PILAS Reemplace las pilas si: 1. La tapa de la pila está ubicada 1. El símbolo de pilas bajas aparece en la pantalla. a lo largo del lado del monitor. 2. No aparece nada en la pantalla cuando enciende Retire la tapa de la batería el dispositivo. -
Page 30: Procedimiento De Configuración De Fecha Y Hora
APLICACIÓN DEL BRAZALETE PROCEDIMIENTO DE CONFIGURACIÓN DE FECHA Y HORA 1. Quítese el reloj, las alhajas que tenga en la muñeca, etc., antes de colocar el monitor para 1. Para ajustar la fecha/hora, presione el botón Set la muñeca. Deberá remangarse si tiene mangas que se encuentra en el superior del monitor. -
Page 31: Postura Correcta Para La Medición
4. A fin de asegurar mediciones POSTURA CORRECTA PARA LA Fig. C precisas, ajuste la tira con velcro MEDICIÓN en forma segura alrededor de su 1. Coloque el codo sobre una mesa de modo que el muñeca para que no haya espacio brazalete quede al mismo nivel que su corazón, entre el brazalete y la muñeca, como se muestra en la Fig. -
Page 32: Procedimiento De Medición
PROCEDIMIENTO DE MEDICIÓN 3. Coloque la palma de la mano Fig. C Notas importantes: hacia arriba. 4. Siéntese derecho en una silla y respire profundamente 5 ó 6 • Coloque el monitor al mismo nivel que su corazón veces. durante la medición para asegurar lecturas precisas. •... - Page 33 • Vea la página 75 para obtener notas adicionales Con el brazalete puesto en el brazo, presione el con respecto a la medición de su presión botón START/STOP (COMENZAR/DETENER). sanguínea. No infle el brazalete a menos que esté puesto en la muñeca. Todos los dígitos se encenderán Si usted está...
- Page 34 3. Una vez que el símbolo desaparezca, la pantalla 4. Cuando la medición esté completa, el brazalete mostrará un “00”. El monitor está “Listo para medir” se desinflará. Se mostrarán simultáneamente las e inflará el brazalete automáticamente para comenzar lecturas de presión sistólica, presión diastólica y pulso a medir.
-
Page 35: Índice De Categoría De Riesgo
ÍNDICE DE CATEGORÍA DE RIESGO DETECTOR DE LATIDOS IRREGULARES Este monitor viene equipado con un Índice de categoría (IHB, por sus siglas en inglés) de riesgo que compara automáticamente cada lectura Cuando aparece el ícono , indica que durante con los niveles definidos establecido por el National Heart lamedición se detectó... -
Page 36: Cómo Recuperar Los Valores De La Memoria
DETECTOR DE LATIDOS IRREGULARES, CÓMO RECUPERAR LOS VALORES DE CONTINUACIÓN LA MEMORIA Para determinar la presencia de un latido irregular, el Este monitor puede ser utilizado por dos individuos. promedio de intervalos de latidos se calcula con los 3 Cada usuario puede almacenar hasta 60 mediciones. primeros valores eficaces normales del ritmo cardíaco. -
Page 37: Cómo Borrar Los Valores De La Memoria
4. El monitor mostrará primero el promedio CÓMO BORRAR LOS VALORES DE calculado aplicado a las últimas 3 memorias LA MEMORIA (“AVG. 3”). 1. Presione el botón de Selección de usuario para elegir Usuario 1 o Usuario 2. START STOP AVG. 3 AVG. 3 START STOP 2. Mantenga presionado los botones de en el modo de memoria, y los datos guardados 5. -
Page 38: Notas Importantes Con Respecto A Las Mediciones De Presión Sanguínea
NOTAS IMPORTANTES CON RESPECTO A LAS • Una vez que esté inflada a 300 mmHg, la unidad se desinflará automáticamente por motivos de seguridad. MEDICIONES DE PRESIÓN SANGUÍNEA • E ste producto no es adecuado para personas con • Tome su lectura en un entorno cómodo ya que las arritmia. medidas pueden verse afectadas por las temperaturas calurosas o frías. Tome su presión sanguínea a una • E ste dispositivo puede tener dificultad para determinar temperatura corporal normal. - Page 39 14. Este monitor puede no cumplir con sus este dispositivo, póngase en contacto con Relaciones especificaciones de rendimiento si se guarda o se con el Consumidor de HoMedics (encontrará la utiliza fuera de estos rangos de temperatura y información de contacto en la página de la garantía).
-
Page 40: Potencial De Interferencia Con
NOTA: este equipo ha sido probado y se ha observado POTENCIAL DE INTERFERENCIA CON RADIO/ que cumple con los límites para un dispositivo de Clase TELEVISIÓN B, conforme a la parte 15 de las reglas de la FCC. Estos límites están diseñados para proporcionar una Para evitar resultados incorrectos protección razonable contra la interferencia nociva en provocados por la interferencia... -
Page 41: Diagnóstico Y Resolución De Problemas
Podrá encontrar la información de contacto del poco tiempo de carga. Departamento de Relaciones con el Consumidor de HoMedics en la página de Nota: Estas especificaciones están sujetas a cambios sin previo aviso. garantía. (Vea la página 83). - Page 42 HoMedics de forma alguna más allá de las 8:30 am a 7pm Hora Distributed by otras cosas la venta de dichos productos en sitios de remate por Internet y/o condiciones aquí...
Need help?
Do you have a question about the BPW-201 and is the answer not in the manual?
Questions and answers