Table of Contents
Advertisement
Available languages
Available languages
Advertisement
Chapters
Table of Contents

Related Manuals for HoMedics BPW-040 Ver. C


Summary of Contents for HoMedics BPW-040 Ver. C
- Page 1 Automatic Wrist Blood Pressure Monitor Register Your Product At: www.homedics.com/register Your valuable input regarding this product will help us create the products you will want in the future. BPW-040 Ver. C El manual en español empieza en la página 28...
-
Page 2: Table Of Contents
TABLE OF CONTENTS INTRODUCTORY INFORMATION: Important Product Notices and Safety Instructions ........3 About Blood Pressure ........5 Blood Pressure Standard ......5 How This Blood Pressure Monitor Works..........7 USAGE INFORMATION: Name/Function of Each Part ......8 Display Explanations ........9 Installing Batteries ........11 Date &... - Page 3 Care, Maintenance & Cleaning ....21 Potential for Electromagnetic Interference ..........23 Troubleshooting ..........24 Specifications ..........25 5 Year Limited Warranty ......26...
-
Page 4: Important Product Notices And Safety Instructions
IMPORTANT PRODUCT NOTICES AND SAFETY INSTRUCTIONS When using your blood pressure monitor, basic precautions should always be followed. Please read and follow all instructions and warnings before using this product. Save these instructions for future reference. • P lease note that this is a home healthcare product only and it is not intended to serve as a substitute for the advice of a physician or medical professional. - Page 5 • C onsult your physician before measuring blood pressure at the wrist if you have any of the following conditions: Severe hypertension, severe diabetes, severe arteriosclerosis, severe kidney disease or vascular disease that may compromise circulation. • T he pulse display is not suitable for checking the frequency of heart pacemakers. • E lectromagnetic interference: The device contains sensitive electronic components.
-
Page 6: About Blood Pressure
ABOUT BLOOD PRESSURE What is Blood Pressure? Blood pressure is the pressure exerted on the artery walls while blood flows through the arteries. The pressure measured when the heart contracts and sends blood out of the heart is systolic (highest) blood pressure. The pressure measured when the heart dilates with blood flowing back into the heart is called diastolic (lowest) blood pressure. - Page 7 Blood pressure tends to go up and down, even in people who normally don’t have high readings. If your numbers stay above the “normal” range most of the time, you may be at increased risk and should consult your physician. Category Systolic (mmHg) Diastolic (mmHg)
-
Page 8: How This Blood Pressure Monitor Works
HOW THIS BLOOD PRESSURE MONITOR WORKS This monitor uses innovative technology to detect your systolic pressure, diastolic pressure and pulse. This technology enables the monitor to automatically inflate and deflate at the appropriate level for each individual. With one touch of a button, the cuff will automatically inflate to block the blood flow through your artery. -
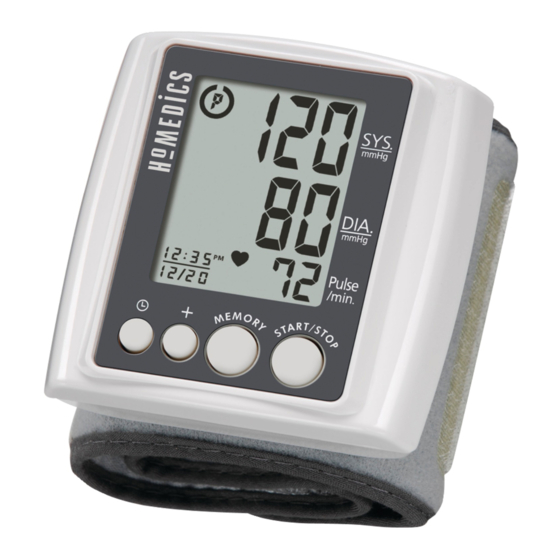
Page 9: Name/Function Of Each Part
NAME/FUNCTION OF EACH PART LCD Display Battery Cover Wrist cuff Date/Time Set Buttons MEMORY START/STOP RECALL Button Button Other Accessories (not included): 2 “AAA” size, 1.5V alkaline batteries (batteries not included) -
Page 10: Display Explanations
AVG. 3 DISPLAY EXPLANATIONS Systolic Pressure ERROR Diastolic Pressure AVG. 3 Heart Rate Date/Time Indicator... -
Page 11: Display Symbols
Display Symbols: Weak Battery Symbol: Appears when AVG. 3 AVG. 3 batteries should be replaced. Pulse Symbol: Shows the heart rate per stolic minute. essure Memory Average: Displays average of last AVG. 3 3 readings Risk Category Index: For more information, refer to the RISK CATEGORY INDEX section of this manual. -
Page 12: Installing Batteries
INSTALLING BATTERIES 1. The battery cover is located along the left side of the monitor. Remove battery cover by pressing down and pulling away from the monitor. 2. Install batteries according to the polarity indications inside the compartment (as shown in fig. -
Page 13: Date & Time Set Procedure
Note: Batteries are hazardous waste. Do not dispose of them together with the household garbage. DATE & TIME SET PROCEDURE 1. To adjust the date/time, press the SET button The display will show a blinking number showing the MONTH. 2. Change the MONTH by pressing the button. -
Page 14: Applying The Cuff
APPLYING THE CUFF 1. Remove all watches, wrist jewelry, etc. prior to attaching the wrist monitor. Clothing sleeves should be rolled up and the cuff should be wrapped around bare skin for correct measurements. 2. Apply cuff to left wrist with palm facing up as shown in Fig. -
Page 15: Correct Measurement Posture
it can also be used on your right wrist. However, all measurements should be made using the same wrist. CORRECT MEASUREMENT POSTURE 1. Place your elbow on a table Fig. A so that the cuff is at the same level as your heart as shown in Fig. -
Page 16: Measurement Procedure
MEASUREMENT PROCEDURE Important Notes: • P osition the monitor at the same level as your heart during measurement to ensure accurate readings. • B lood pressure changes with every heartbeat and is in constant fluctuation throughout the day. • B lood pressure measurement can be affected by the position of the user, his or her physiologic condition and other factors. For greatest accuracy, wait 1 hour after exercising, bathing, eating, drinking beverages with alcohol or caffeine, or smoking to measure... - Page 17 1. With the cuff wrapped around your wrist, press the START/STOP button. Do not inflate the cuff unless it is wrapped around your wrist. All digits will light up, checking the display functions. The checking procedure will be completed after about 2 seconds. 2.
-
Page 18: Risk Category Index
3. When the measurement is completed, the cuff will deflate entirely and systolic pressure, diastolic pressure and pulse will be shown simultaneously on the LCD screen. The measurement is then automatically stored into memory. AVG. 3 Note: • T his monitor automatically turns off ERROR approximately 1 minute after last operation. -
Page 19: Recalling Values From Memory
one of the stages that could potentially indicate increased risk. No cue is given if the reading falls in the normal range as defined by NIH. Please note that cues provided by this monitor are only intended to assist you in using this table. The table and cues are only provided for convenience to help you understand your non-invasive blood pressure reading as it relates to the NIH... -
Page 20: Clearing Values From Memory
AVG. 3 2. The monitor will first display the calculated average applied to the last 3 memories (“AVG. 3”). ERROR AVG. 3 3. Every new press of the MEMORY button will recall a previous reading. The latest reading will be recalled first. AVG. -
Page 21: Important Notes Regarding Your Blood Pressure Measurement
IMPORTANT NOTES REGARDING YOUR BLOOD PRESSURE MEASUREMENT • T ake your reading in a comfortable environment as measurements can be affected by hot or cold temperatures. Take your blood pressure at normal body temperature. • D o not move or talk during measurement as this can elevate readings. • D o not move or cross legs during measurement. -
Page 22: Care, Maintenance & Cleaning
If you have any problems with this device, please contact HoMedics Consumer Relations (contact information on WARRANTY page). • D o not immerse the unit in water as this will result in damage to the unit. - Page 23 • D o not subject the monitor to extreme shocks (do not drop on floor). • Do not inflate the cuff unless wrapped around wrist. • Do not wrap the cuff around body parts other than your wrist. • D o not drop or insert any object into any opening.
-
Page 24: Potential For Electromagnetic Interference
POTENTIAL FOR ELECTROMAGNETIC INTERFERENCE To avoid inaccurate results caused by electromagnetic interference between electrical and electronic equipment, do not use the device near a cell phone or microwave oven. This device complies with Part 15 of the FCC Rules. Operation is subject to the following two conditions: (1) this device may not cause harmful interference, and (2) this device must accept any interference received, including interference that may cause undesired... -
Page 25: Troubleshooting
System error. Measure again. shown on display Note: If the unit still does not work, contact HoMedics Consumer Relations. Under no circumstance should you disassemble or attempt to repair the unit by yourself. Contact information for HoMedics Consumer Relations Department... -
Page 26: Specifications
SPECIFICATIONS Two 1.5V DC (AAA) Alkaline batteries Power Source: (not included) Measurement Method: Oscillometric Pressure: 40~280 millimeters Mercury Measurement Range: (mmHg) Pulse: 40~199 beats/minute Pressure: ±3 mmHg Accuracy: Pulse: ±5% of reading Pressure Sensor: Semi-conductor Inflation: Pump driven Deflation: Automatic Pressure release valve Memory Capacity: 99 memories 1 minute after last button operation Auto-shut-off: Temperature: 41°F~104°F Operation Environment:... -
Page 27: Year Limited Warranty
LiMiTEd FiVE YEaR WaRRanTY batteries HoMedics sells its products with the intent that they For service or repair, do not are free of defects in manufacture and workmanship return this unit to the retailer. for a period of five years from the date of original Contact HoMedics Consumer purchase, except as noted below. - Page 28 HoMedics. This warranty provides you with specific legal rights. You may have additional rights which may vary from state to state.
- Page 29 NS IN LIEU OF of opened, ducts, cts on Internet surplus or ntees shall ducts or parts r modified, f HoMedics. ights. You m state to state. f the above ne in the USA, Registre su producto en: www.homedics.com/register Su valioso aporte sobre este producto nos ayudará...
- Page 30 ÍNDICE INFORMACIÓN INICIAL: Avisos importantes del producto e instrucciones de seguridad ....31 Sobre la presión sanguínea .....33 Estándar de presión sanguínea ....33 Cómo funciona este monitor de presión sanguínea ..........35 INFORMACIÓN DE USO: Nombre/Función de cada pieza ....36 Explicaciones de la pantalla ....37 Instalación de las pilas ......39 Procedimiento de configuración de fecha y hora ........40...
- Page 31 Notas importantes con respecto a las mediciones de presión sanguínea ..49 Cuidado, mantenimiento y limpieza ..51 Potencial de interferencia con electromagnética ........53 Diagnóstico y resolución de problemas .........54 Especificaciones ........55 5 Años Garantía limitada ......56...
-
Page 32: Avisos Importantes Del Producto E Instrucciones De Seguridad
AVISOS IMPORTANTES DEL PRODUCTO E INSTRUCCIONES DE SEGURIDAD Cuando utilice su monitor de presión sanguínea, debe seguir siempre las precauciones básicas. Sírvase leer y seguir todas las instrucciones y advertencias antes de utilizar este producto. Guarde estas instrucciones para referencia futura. • O bserve que éste es un producto doméstico de cuidado de la salud únicamente y no está... - Page 33 la presión sanguínea en la muñeca si tiene alguna de las siguientes afecciones: hipertensión grave, diabetes grave, arteriosclerosis grave, enfermedad renal grave o enfermedad vascular que pueda afectar la circulación. • L a pantalla de pulso no es adecuada para verificar la frecuencia de los marcapasos. • I nterferencia electromagnética: el dispositivo contiene componentes electrónicos sensibles. Evite los campos eléctricos o...
-
Page 34: Sobre La Presión Sanguínea
SOBRE LA PRESIÓN SANGUÍNEA ¿Qué es la presión sanguínea? La presión sanguínea es la presión que se ejerce en las paredes de la arteria cuando la sangre fluye por las arterias. La presión medida cuando el corazón se contrae y sale la sangre es la presión sanguínea sistólica (la mayor). - Page 35 La presión sanguínea tiende a subir y bajar, incluso en personas que normalmente no tienen lecturas altas. Si sus resultados permanecen por encima del rango “normal” la mayoría del tiempo, es posible que corra un riesgo mayor y debería consultar a su médico. Categoría Sistólica (mmHg) Diastólica (mmHg)
-
Page 36: Cómo Funciona Este Monitor De Presión Sanguínea
CÓMO FUNCIONA ESTE MONITOR DE PRESIÓN SANGUÍNEA Este monitor utiliza tecnología innovadora para detectar su presión sistólica, presión diastólica y de pulso. Esta tecnología permite que el monitor infle y desinfle automáticamente al nivel apropiado para cada persona. Al presionar un botón, el brazalete se inflará... -
Page 37: Nombre/Función De Cada Pieza
NOMBRE/FUNCIÓN DE CADA PIEZA Pantalla LCD Tapa de las pilas Brazalete para la muñeca Botones de definición de fecha/hora Botón de Botón de START/STOP recuperar (COMENZAR/DETENER) memoria Otros Accesorios (no includios): 2 pilas alcalinas “AAA” de 1,5 V... -
Page 38: Explicaciones De La Pantalla
AVG. 3 EXPLICACIONES DE LA PANTALLA Presión sistólica ERROR Presión diastólica AVG. 3 Rítmo cardíaco Indicador de fecha/hora... - Page 39 Símbolos de la pantalla: AVG. 3 Símbolo de pilas bajas: aparece cuando tiene que cambiar las pilas. AVG. 3 Símbolo de pulso: muestra el rítmo cardíaco por minuto. sión Promedio de memoria: muestra un promedio ólica AVG. 3 de al menos 3 lecturas. Índice de Categoría de Riesgo: Vea la sección ÍNDICE DE CATEGORÍA DE RIESGO de este manual para obtener más...
-
Page 40: Instalación De Las Pilas
INSTALACIÓN DE LAS PILAS 1. La tapa de la pila está ubicada a lo largo del lado del monitor. Retire la tapa de la batería presionando hacia abajo y en dirección opuesta al monitor. 2. Instale la baterías siguiendo las indicaciones de olaridad que se ncuentran dentro del compartimiento (como se indica en la figura 2). -
Page 41: Procedimiento De Configuración De Fecha Y Hora
fecha y hora. Limpie los contactos de la pila y del compartimiento para pilas con un paño suave cada vez que instale pilas. Nota: Las pilas son desechos peligrosos. No las deseche junto con la basura doméstica. PROCEDIMIENTO DE CONFIGURACIÓN DE FECHA Y HORA 1. Para ajustar la fecha / hora, pulse el botón SET (ajuste). -
Page 42: Aplicación Del Brazalete
APLICACIÓN DEL BRAZALETE 1. Quítese el reloj, las alhajas que tenga en la muñeca, etc., antes de colocar el monitor para la muñeca. Deberá remangarse si tiene mangas largas y deberá colocar el brazalete alrededor de la piel para obtener una medición correcta. 2. -
Page 43: Postura Correcta Para La Medición
Nota: Si no es posible colocar el brazalete en la muñeca izquierda, también lo puede colocar en la muñeca derecha. Sin embargo, todas las mediciones deben realizarse usando la misma muñeca. POSTURA CORRECTA PARA LA MEDICIÓN 1. Coloque el codo sobre una mesa de modo que el brazalete quede al mismo nivel que su corazón, como se muestra en la Fig. -
Page 44: Procedimiento De Medición
3. Coloque la palma de la Fig. C mano hacia arriba. 4. S iéntese derecho en una silla y respire profundamente 5 ó 6 veces. Nota: Evite recostarse hacia atrás durante la medición como se muestra en la Fig. C. PROCEDIMIENTO DE MEDICIÓN Notas importantes: • C oloque el monitor al mismo nivel que su corazón durante la medición para asegurar lecturas precisas. - Page 45 • D urante la medición, no hable ni mueva los músculos del brazo ni la mano. • P ara las notas adicionales con respecto a la medición de su presión sanguínea vea la sección NOTAS IMPORTANTES CON RESPECTO A LAS MEDICIONES DE PRESIÓN SANGUÍNEA de este manual para obtener más información. Si usted está...
- Page 46 2. Una vez que el símbolo desaparezca, la pantalla mostrará un “00” en forma intermitente. El monitor está “Listo para medir” e inflará el brazalete automáticamente para comenzar a medir. El brazalete comenzará a desinflarse a medida que continúa la medición. Nota: El monitor se volverá...
- Page 47 3. Cuando haya finalizado la medición, el brazalete se desinflará completamente y se mostrarán las lecturas de presión sistólica, presión diastólica y pulso simultáneamente en la pantalla LCD. La medida se almacenará automáticamente en la memoria. AVG. 3 Nota: 1. Este monitor se apaga en forma automática ERROR aproximadamente 1 minuto después de la última operación. También puede presionar...
-
Page 48: Índice De Categoria De Riesgo
ÍNDICE DE CATEGORÍA DE RIESGO Este monitor viene equipado con un Índice de categoría de riesgo que compara automáticamente cada lectura con los niveles definidos establecido por el National Heart Lung and Blood Institute de los National Institutes of Health (NIH) de EE.UU. como se describió... -
Page 49: Cómo Recuperar Los Valores De La Memoria
CÓMO RECUPERAR LOS VALORES DE LA MEMORIA 1. Presione el botón MEMORY para acceder a la memoria. 2. El monitor mostrará primero el promedio AVG. 3 calculado aplicado a las últimas 3 memorias (“AVG. 3”). ERROR AVG. 3 3. Cada vez que presiona el botón MEMORY se recuperará... -
Page 50: Cómo Borrar Los Valores De La Memoria
CÓMO BORRAR LOS VALORES DE LA MEMORIA Presione y mantenga presionados al mismo tiempo los botones mientras se encuentra en el modo de recuperar memoria y los datos se borrarán automáticamente. NOTAS IMPORTANTES CON RESPECTO A LAS MEDICIONES DE PRESIÓN SANGUÍNEA • T ome su lectura en un entorno cómodo ya que las medidas pueden verse afectadas por las temperaturas calurosas o frías. - Page 51 • L e sugerimos que tome las mediciones todos los días a la misma hora y en la mismo muñeca, para establecer una coherencia. • L os usuarios deberán esperar un mínimo de 5 minutos antes de tomar más mediciones. Dependiendo de su complexión fisiológica, es posible que necesite más tiempo. • Los resultados de las mediciones que los usuarios reciben son únicamente para referencia.
-
Page 52: Cuidado, Mantenimiento Ylimpieza
Si tiene problemas con este dispositivo, póngase en contacto con Relaciones con el Consumidor de HoMedics (encontrará la información de contacto en la página de la GARANTÍA). • N o sumerja la unidad en el agua ya que puede dañarla. - Page 53 solar directa. Proteja del polvo. • N o doble el brazalete ni el tubo demasiado apretados. • No desarme el monitor ni el brazalete. Si alguno de los componentes necesita reparación, consulte la sección de la garantía de este manual. • N o exponga el monitor a golpes extremos (no lo deje caer al suelo).
-
Page 54: Potencial De Interferencia Con
POTENCIAL DE INTERFERENCIA CON RADIO/TELEVISIÓN Para evitar resultados incorrectos provocados por la interferencia electromagnética entre los equipos eléctricos y electrónicos, no use el dispositivo cerca de un celular o un horno microondas. Este dispositivo cumple con la sección 15 de las reglas de la FCC (Comisión Federal de Comunicaciones). El funcionamiento está sujeto a las siguientes dos condiciones: (1) Este dispositivo no puede causar interferencias nocivas y (2) este dispositivo debe aceptar cualquier interferencia que reciba, inclusive la interferencia que pueda causar un funcionamiento no... -
Page 55: Diagnóstico Y Resolución De Problemas
EP en la pantalla. Nota: Si la unidad aún sigue sin funcionar, póngase en contacto con Relaciones con el Consumidor de HoMedics. Bajo ningún concepto deberá desarmar ni intentar reparar la unidad por su cuenta. Podrá encontrar la información de contacto del Departamento de Relaciones con el Consumidor de HoMedics en la página de garantía. -
Page 56: Especificaciones
ESPECIFICACIONES Dos pilas alcalinas (AAA) de 1.5 V CC Fuente de energía: (no incluidas) Oscilométrico Método de medición: Presión: 40~280 milímetros de Rango de medición: mercurio (mmHg) Pulso: 40~199 latidos/minuto Presión: ±3 mmHg Precisión: Pulso: ±5% de la lectura Sensor de presión: Semiconductor Inflado: Por bombeo Válvula de liberación de Desinflado: presión automática 99 memorias Capacidad de memoria: 1 minuto después de haber Apagado automático:... - Page 57 HoMedics no autoriza a nadie, incluyendo, pero sin limitarse homedics.com a, distribuidores, posteriores consumidores compradores del producto a un distribuidor, o compradores remotos, a obligar a HoMedics de forma alguna más allá de las Teléfono: condiciones aquí establecidas. La garantía de este producto 1-800-466-3342 última vez...
- Page 58 Por más información con respecto a nuestra línea de productos en los EE.UU., visítenos en: www.homedics.com HoMedics ® es una marca registrada de HoMedics, LLC. © 2009-2013 HoMedics, LLC. Todos los derechos reservados. IB-BPW040C...
- Page 60 IB-BPW040C P/N: 323102177 VER:001...
Need help?
Do you have a question about the BPW-040 Ver. C and is the answer not in the manual?
Questions and answers