Manley Neo-Classic 300B Owner's Manual
Preamplifier rc
Hide thumbs
Also See for Neo-Classic 300B:
- Owner's manual (12 pages) ,
- Owner's manual (12 pages) ,
- Owner's manual (12 pages)
Advertisement
Quick Links
Advertisement

Related Manuals for Manley Neo-Classic 300B


Summary of Contents for Manley Neo-Classic 300B
- Page 1 THE NEO-CLASSIC 300B PREAMPLIFIER RC OWNER’S MANUAL RULE TUBES rev4.20.11cd...
-
Page 2: Table Of Contents
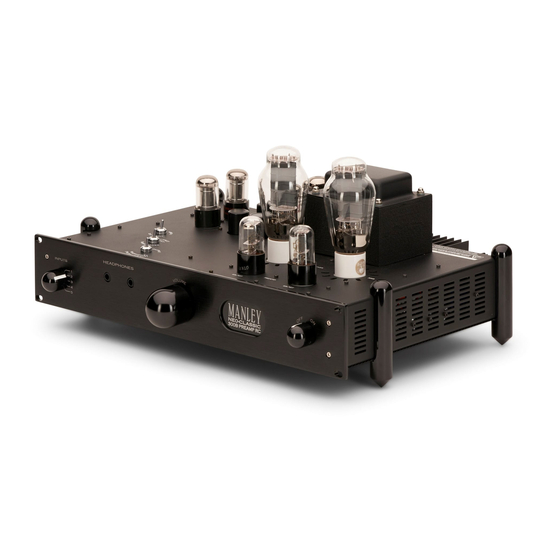
CONTENTS SECTION PAGE INTRODUCTION & GENERAL NOTES MAINS CONNECTIONS CONNECTING YOUR PREAMPLIFIER FIGURE 1 FRONT PANEL FIGURE 2 TOP VIEW FIGURE 3 BACK PANEL OPERATIONAL NOTES REMORA REMOTE CONTROL OPERATING INSTRUCTIONS SPECIFICATIONS... - Page 3 This is where the impedances are not too low and the power requirements are not too high but where smaller triodes tubes might run out of steam. In our Neo-Classic 300B Preamplifier, we combine the classic 300B with another classic - the octal-based 6SL7GT dual triode to perform the amplification duties. To complement this tube choice we also employ tube-based rectification and regulation as well as our usual extreme filtering with gobs of large filter caps.
-
Page 4: Mains Connections
Note: This unit has been factory wired for your country. If you plan to take the unit to countries with a differ- ent mains voltage you will need to send the unit to a qualified service technician, or contact the Manley Labs Service Center (email: service@manleylabs.com) for the correct transformer primaries wiring conversion. -
Page 5: Connecting Your Preamplifier
CONNECTING YOUR PREAMPLIFIER Setting up your preamplifier is rather easy. 1. Please refer to page 8 for an illustration of the back of the preamplifier. 2. Connect the RCA outputs to the input of your power amplifiers when they are off. 3. -
Page 6: Front Panel
FRONT PANEL VOLUME HEADPHONES OFF ON TAPE TUNER VIDEO A) INPUT SELECT - 5 Position switch for input selection. Each input is electrically identical. The RECORD OUT directly follows this switch. There is no buffer amp to isolate the effects of loading and cable capacitance so we recommend disconnecting any interconnect cables from the RECORD OUT if you are not recording. -
Page 7: Top View
TOP VIEW 5U4G 5U4G 300B 300B 6SL7GT 6SL7GT A) HEADPHONE IMPEDANCE SWITCH - You should set this switch to best match your headphones. You may have to look at the specification sheet to get the value in ohms. If using two sets of phones divide that number in 2. If you don’t have this info then pick the setting that sounds best - no harm will be done. -
Page 8: Rear Panel
REAR PANEL A) MAINS FUSE - Depending on your local power outlet’s voltage, replace with 3A SLO- BLO fuse (120 V) or 1.5A SLO-BLO fuse (230V). B) IEC MAINS SOCKET - Standard IEC mains socket (120/240 VAC as indicated) C) MAIN OUTPUT - Main left and right outputs driven by 300B’s. Connect these to your power amplifier inputs when the amps are off. -
Page 9: Operational Notes
OPERATIONAL NOTES SWITCHING ON The power knob is located on the right hand side of the front panel. Turn the knob to the right to turn on the preamp, or to the left to turn it off. Don’t ever rock it back and forth rapidly. Note: on this knob and on the input selector there is a long garolite 1/4”... -
Page 10: Remora Remote Control Operating Instructions
Yes, we installed a new 9V battery in the Remora Remote when it left the factory. Turn on the Neo-Classic 300B Preamplifier and after a few seconds, push and hold either the up or down com- mand buttons. The command is sent via radio signal to the preamplifier and the motorized volume control will react by moving as directed by the remote switch activation, with motor action occurring as long as a button is engaged. - Page 11 Remora Remote Features! 1. Remote transmitter and receiver operate under crystal-clocked microprocessor control for maximum signal discrimination, flexibility, and system range. 2. The user may easily reprogram the user-number portion of the remote system’s serial I.D. data stream. This will eliminate the possibility of undesired operation due to remote command collisions. 3.
- Page 12 Manley Labs. Keep the remote and all other parts of the system away from rain or moisture of any sort. The Remora Re- mote’s circuitry is extremely intolerant of moisture intrusion.
- Page 13 Remora system user-number. 1. Make sure the Neo-Classic 300B preamplifier is plugged into the mains power line, but turned off, and make sure that the battery in the Remora Remote transmitter is healthy.
-
Page 14: Specifications
SPECIFICATIONS * Inputs: 5 stereo pair unbalanced RCA jacks * Outputs: 2 stereo pairs MAIN out same as SUB out unbalanced RCA jacks * RECORD output: 1 stereo pair pre-volume control unbalanced RCA jacks * HEADPHONE Outs: 2 front panel 1/4” headphone jacks * Optimized headphone impedance switching: 30-400 ohms to 300-4000 ohms * MUTE: Selecting HEADPHONE operation mutes LlNE outputs * Output Vacuum Tubes: 2 x 300B Electro-Harmonix...
Need help?
Do you have a question about the Neo-Classic 300B and is the answer not in the manual?
Questions and answers