Table of Contents
Advertisement
Quick Links
See also:
User Manual
633
Portable Production Mixer and Recorder
User Guide and Technical Information
Firmware Version 1.02
interstage
Phistersvej 31, 2900 Hellerup, Danmark
Telefon 3946 0000, fax 3946 0040
www.interstage.dk
- pro audio with a smile
Sound Devices, LLC
E7556 State Highway 23 and 33 • Reedsburg, WI • USA • 53959
+1 (608) 524-0625 • fax: +1 (608) 524-0655
Toll-Free: (800) 505-0625
www.sounddevices.com
UDMA
support@sounddevices.com
Advertisement
Table of Contents

Related Manuals for Sound Devices 633


Summary of Contents for Sound Devices 633
- Page 1 Telefon 3946 0000, fax 3946 0040 www.interstage.dk - pro audio with a smile Sound Devices, LLC E7556 State Highway 23 and 33 • Reedsburg, WI • USA • 53959 +1 (608) 524-0625 • fax: +1 (608) 524-0655 Toll-Free: (800) 505-0625 www.sounddevices.com...
-
Page 3: Table Of Contents
633 User Guide and Technical Information Table of Contents Panel Descriptions Front Panel ....... . 1 Right (Output) Panel . - Page 4 633 User Guide and Technical Information Master Outputs (XLR-3M)....26 AES3 Digital Outputs (XLR-3M) ....27 AUX 1/2 Outputs (TA3) .
- Page 5 633 User Guide and Technical Information Using a USB Keyboard Storing and Recalling Settings Setup Menu Power ........58 Timecode .
-
Page 6: Limitation Of Liability
LLC. SOUND DEVICES is not responsible for any use of this information. SOUND DEVICES, LLC shall not be liable to the purchaser of this product or third parties for damages, losses, costs, or expenses incurred by purchaser or third parties as a result of: accident, misuse, or abuse of this product or unauthorized modifications, repairs, or alterations to this product, or failure to strictly comply with SOUND DEVICES, LLC’s operating and installation instructions. -
Page 7: Panel Descriptions
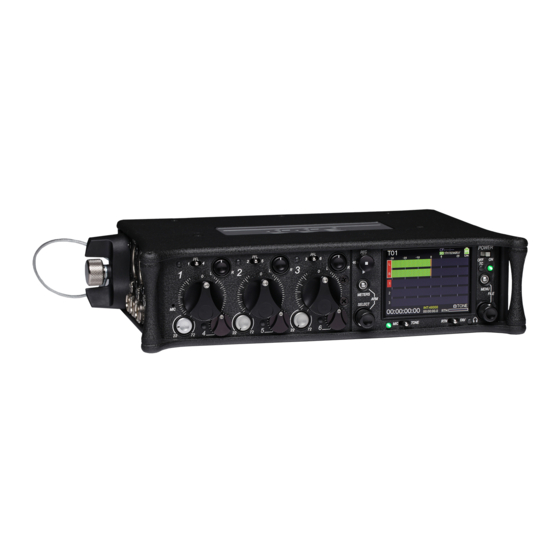
633 User Guide and Technical Information Panel Descriptions Front Panel Input Fader Input Activity LED Primary control for adjusting the level of Indicates input signal activity. Illuminates Inputs during operation. Ranges from off in various colors and intensities to show to +16 dB. - Page 8 Power Switch slide again to deactivate. Two-position slide switch, slides left Slate Mic / Tone LED to power the 633 off and slides right to power the 633 on. Illuminates green when Slate Mic or tone is active. Power LED...
-
Page 9: Left (Input) Panel
633 User Guide and Technical Information Left (Input) Panel XLR-3F Inputs 1-3 Battery Compartment Active-balanced analog microphone- or Holds 6 AA batteries; Three batteries in line-level input for inputs 1-3 on XLR-3F two rows held by screw cap. Top row connector. -
Page 10: Rear Panel
Balanced analog outputs on standard cards with the notched corner oriented 3-pin XLR-3M connectors. Mic, Line, -10, toward the top of the 633. Insert until it or AES (1,2 and 3,4 on L and R respective- clicks securely in the slot. The card should ly) selectable from Setup Menu section glide smoothly into the slot. -
Page 11: Quick Start Guide
(+) side facing in and the bottom three batteries with the nega- tive (-) side facing in. 2) Power On the 633 Slide the Power Switch right. The LCD will briefly display a boot screen with the Sound Devices logo and then the Main Screen will be displayed:... - Page 12 633 User Guide and Technical Information 3) Connect Audio Source Using a standard XLR cable, connect a microphone or line level analog source to Input 1 on the left panel. 4) Power On Input If the Input 1 trim knob is recessed, pop it up by pushing it in. If the trim knob is rotated fully counter- clockwise, the input is powered off.
- Page 13 633 User Guide and Technical Information 5) Select Input Type Slide Input 1’s the Input Select Switch left to display the Input Settings Screen for Input 1. Press the Headphone Encoder to display a list of available input types. Rotate the Headphone Encoder to select an input type and press the Headphone Encoder to select that type.
- Page 14 SD card with the bottom of the card (the side with metal contacts visible) facing toward the rear of the 633. Insert the CF card with the top of the card (the side with the manufacturer’s branding label) facing the rear of the 633.
- Page 15 633 User Guide and Technical Information 4. Rotate the Headphone Encoder to highlight Erase/Format CF or Erase/Format SD. 5. Press the Headphone Encoder to begin the formatting process. 6. Press the Headphone Encoder to accept the warning messages. The formatting process will begin.
-
Page 16: Screen Overview
633 User Guide and Technical Information Screen Overview Primary Screen Elements The Main Screen displays important information at-a-glance. The Main Screen can be accessed quickly from any other screen by pressing the Meters Button. Press and hold the Meters Button, then slide the RTN / FAV Switch to the left to toggle between display of timecode frame rate and sample rate. -
Page 17: Input Settings Screen
633 User Guide and Technical Information L, R, 1-6 L, R, X1-X4, RTN Note that the time and date is displayed in place of the small RTN meter on the L, R, X1-X4, RTN Meter View Input Settings Screen The Input Settings Screen displays all relevant information for the selected input as well as allow- ing these parameters to be changed. - Page 18 633 User Guide and Technical Information 1) Track Name 2) Input Number 3) Input Meter 12) Trim Gain 4) Current Fader Gain 5) HPF Frequency 8) Input Selection 9) Headphone Source / Level 10) LR Bus Assignment 6) Aux Bus Assignment...
-
Page 19: Routing Screens
633 User Guide and Technical Information Routing Screens Various Routing Screens are present in the 633 interface. A Routing Screen displays available source signals for routing destination tracks or outputs. An assigned route is indicated with a blue box and an unassigned route is indicated with a black box. -
Page 20: Inputs
Input 1 XLR-3F connector is used for digital input. Input Routing Each input of the 633 has a corresponding “ISO” Track that it is permanently routed to. Addition- ally, each Input can be independently routed to the Left (L), Right (R), Aux 1 (X1), and/or Aux 2 (X2) buses from the Input Settings Screen (See “Input Settings Screen”, page... -
Page 21: Pan Control
With the Input Fader set to unity gain (0 dB or 12 o’clock), make the appropriate adjustments to trim levels. Once the coarse gain is set to the desired level, press the Trim control to hide it from the 633’s mixing surface. -
Page 22: Input Fader
The 633 accepts AES3 (AES/EBU) balanced, AES42 (Mode 1) balanced, and AES3 unbalanced digital signals on the Input 1 XLR-3F connector. The 633 auto-detects between AES3 balanced and AES3 unbalanced digital signals and adjusts accordingly. Digital input gain is controlled by rotating the Select Encoder from the input’s Input Settings Screen. -
Page 23: High-Pass Filter
100 Hz is rarely used, especially for speech reproduction. The 633’s High-pass Filter circuit features an adjustable corner (-3 dB) frequency over a range from 80 to 240 Hz. Below 80 Hz, the filter’s slope is 12 dB/octave. At higher corner frequency settings, the slope is 6 dB/octave. -
Page 24: Input Linking
633 User Guide and Technical Information Polarity reversal is used to compensate for incorrectly wired balanced cables, to prevent signal can- cellation when a source is dual-miked from opposite directions, or to reverse left/right with micro- phones in a mid-side (M/S) configuration. -
Page 25: Limiters
Limiters prevent clipping by attenuating signals that surpass a set threshold. The amount of attenua- tion is defined by the “ratio” of the limiter and expressed as two numbers. All 633 limiters use a 20:1 compression ratio. This means that signal that exceeds the threshold by 20 dB will exit the limiting stage at only 1 dB above the threshold. -
Page 26: Metering
Audio meter “ballistics” is the manner in which a visual meter responds to audio signal levels. The ballistics of all 633 meters is set globally from Setup Menu option SYSTEM > Meter Ballistics. The default ballistics setting is Peak + VU. -
Page 27: Peak Hold
633 User Guide and Technical Information Peak Hold When Peak Metering is enabled (Peak Only or Peak + VU), peak hold displays the last high- est peak value on the meter as a separate, individual meter segment. By default this meter segment will remain visible for 1 second. -
Page 28: Headphone Monitoring
Headphone gain during adjustment Headphone Encoder The 633 can drive headphones to dangerously high volumes. Turn down the headphone gain before selecting a Headphone Source to prevent accidental signal extremes. Headphone Source Selection... -
Page 29: Headphone Encoder Mode
633 User Guide and Technical Information Headphone Source Description LR ST Master Bus in stereo. LR Mono Master Bus summed mono to both ears. L Mono Left channel of Master Bus sent to both ears. R Mono Right channel of Master Bus sent to both ears. -
Page 30: Favorite Headphone Source
633 User Guide and Technical Information 4. To toggle the assignment of a source, turn the Headphone Encoder to highlight the source and press the Headphone Encoder to toggle the assignment. Editing occurs in real time and source adjustments will be heard in the monitors. -
Page 31: Headphone Bells
633 User Guide and Technical Information Headphone Bells The start of a recording can be indicated audibly by a single 440 Hz tone sent to headphones. When recording is stopped two 220 Hz tones can be sent to the headphones. The Record/Stop Bell can be enabled from the Setup Menu item SYSTEM >... -
Page 32: Master Outputs (Xlr-3M)
633 User Guide and Technical Information Output Setup and Control Master Outputs (XLR-3M) Master Left (L) and Right (R) analog signal output is provided on a pair of balanced XLR-3M connections. Each output can be independently set to Line (+4 dBu nominal), -10, or Mic level (40 dB of attenuation versus Line) from the Setup Menu options OUTPUTS >... -
Page 33: Aes3 Digital Outputs (Xlr-3M)
633 User Guide and Technical Information L, R, and ISO track routings to X3 and X4 can be set to pre- or post-fader. This setting is independent of the values set in Setup Menu option INPUTS > Input to ISO Routing. The All ISO Tracks option on this routing screen globally applies pre- or post-fade status to all ISO track routings to X3 and X4. - Page 34 5. Press the Select Encoder again, or wait 2 seconds. The background color of the meter label will become grey to indicate exit from level adjustment mode. Output level adjustments do not affect tone signal from the 633’s tone generator. v. 1.02...
-
Page 35: Slate Mic And Tone Oscillator
The 3-position Mic / Tone Switch controls both the slate microphone and the tone oscillator. Slate Microphone The 633’s built-in slate microphone is used to notate scenes from the mixer location. Its audio per- formance is not suitable for critical recording applications; it should be used for documenting scenes and for communication purposes only. - Page 36 633 User Guide and Technical Information When the slate mic or tone oscillator is activated, program audio is muted on the destinations they are routed to and replaced with slate or tone signal. Slate signal is always sent to both headphone channels. Tone signal is always sent to both head- phone channels, unless the current Headphone Source is RTN.
-
Page 37: Recorder Setup And Control
Recording Tracks Each input of the 633 has a corresponding “ISO” Track that it is permanently routed to. The routing of ISO Tracks 1-6 can be adjusted to pre- or post-fader (See “Input Routing”, page 14). -
Page 38: Track-To-Media Routing
If an input is off (Trim 1-3 Control fully counter-clockwise, Fader 4-6 fully counter-clockwise, or Input Selection set to Off), the track label will be black. Track-to-Media Routing The 633 supports simultaneous recording to CF and SD media (See “Recording Media”, page 35). By default, all armed tracks are recorded to both cards as a polyphonic WAV file. - Page 39 633 User Guide and Technical Information To rename tracks from the Input Settings Screen: 1. Enter the Input Settings Screen of the Track to be renamed. The method for doing this de- pends on the setting of Setup Menu option INPUTS > PFL Toggle Mode.
-
Page 40: Digital Audio Format & File Format
MPEG Layer III is a lossy compression algorithm, often used for transcription recording purposes. The 633 records two-channel MP3 audio files with data rates of 320 kb/s, 192 kb/s, or 128 kb/s. MP3 files do not utilize the any standard container format. No industry-standard tagging format has defined for the MP3 file format. -
Page 41: Sample Rate
Bit Depth When recording WAV files, the 633 records either 16 or 24 bit files. The bit depth for recorded WAV files is set from the Setup Menu option RECORDER > Bit Depth. -
Page 42: Pre-Roll
/ FAV Switch left or right, then selecting Erase/Format from the available options. The 633 uses the FAT32 file system for all cards 32 GB or less in capacity. Cards with a capacity greater than 32GB are formatted with the exFAT file system. FAT32 and exFAT are compatible with all current major operating systems. -
Page 43: Playback
Playback The 633 can play back any file it has recorded. To play back the last file recorded or loaded, press the Play Button. In the Take List or File List, pressing the Play button will initiate playback of the high- lighted take. -
Page 44: File Management
FAT32 file system. Cards with a capacity greater than 32 GB are formatted with the exFAT file sys- tem. To manage files on 633 media using a computer, simply remove the media from the 633 and insert into a compliant CF or SD card reader connected to a computer. -
Page 45: File Format
The 633 records audio to the industry-standard Broadcast Wave file format. Additionally, the 633 can record to MP3 format. Recording WAV or MP3 is selectable per media, from the Setup Menu items RECORDER > Record to CF, and RECORDER > Record to SD. The 633 can write files to both cards simultaneously. -
Page 46: Folder Options
Folder Options All files generated by the 633 can be saved to the Root directory, a Project Folder, a Daily (Roll) Fold- er, or a Scene Folder (Files are saved to the Root directory by default). File organization is managed in the Setup Menu option FILE STORAGE >... -
Page 47: Automatic File Splitting
<None>. When set to <Scene>, a new folder will be created each time the scene name is changed. Automatic File splitting During recording, the 633 will split a take that exceeds 4 GB into multiple files. The split is sample- accurate, so files joined together in post-production will be seamless. The maximum file size that the 633 creates can be adjusted from the Setup Menu option FILE STORAGE >... -
Page 48: Metadata In Mp3 Files
Metadata is included in MP3 files inside the ID3 tags. Metadata in MP3 files can not be edited with the 633. The following table shows the ID3 fields that metadata is stored in and the format in which it is stored (Square brackets denote variables and are not included in actual metadata). -
Page 49: Sound Report Setup
Selection> (At time of report generation) or <None> Information in the Overview section is managed in the Setup Menu option FILE STORAGE > Sound Report Info. The 633 derives information for the overview section from these settings at the time the sound report is generated. -
Page 50: Generating Sound Reports
• Notes • Length Generating Sound Reports A sound report can be generated for all the files in any folder on the 633. Sound reports are created from the File List. To generate a sound report: 1. Press and hold the Menu Button and then press the Headphone Encoder to access the Take List. -
Page 51: Take Number
633 User Guide and Technical Information Take Number A take is a single recording that is represented by a single poly or mp3 file or a group of monophonic files on each media. Takes are labeled numerically and begin at the number 1. Each new recording creates a new take. -
Page 52: Scene Increment
Often, a particular phrase will be used in the notes field of many different takes. To save data entry time, the 633 provides the ability to save phrases that can be entered into the notes field quickly. To edit, create, and use phrases: 1. -
Page 53: Timecode
All files generated by the 633 have timecode numbers that begin on the 0 frame (or 02 in DF modes) and end on the 0 frame such that a file’s duration is always an integer number of seconds long. If necessary, pre-roll and post-roll is dynamically applied to accomplish this. -
Page 54: Record Run
Free Run Auto Mute Functions the same as Free Run mode except timecode signal is muted from the LEMO output when the 633 is in stopped mode. This allows rec-run functionality when Rec Run mode is not suitable (e.g. Multi-camera shoots). -
Page 55: Timecode Frame Rate
(or cross-jam compatible) the external frame rate. When the incoming timecode frame rate differs from the 633’s frame rate, the frame rate indicator on the L, R, X,1, X2, X3, X4, RTN Meter View will flash the incoming frame rate in red and 633’s frame rate in white. -
Page 56: Timecode Hold Off
633. To eliminate these problems, the 633 features a Timecode Hold Off function. When using external timecode auto-record modes, the 633 will wait (“hold off”) for the amount of time specified in Setup Menu option TIMECODE >... -
Page 57: Time Zone And Daylight Savings
633 User Guide and Technical Information Time and Date Settings Properly setting the time and date is important for file metadata, file system functioning, and some timecode functions. To set the time and date, access Setup Menu option SYSTEM > Set Time/Date. -
Page 58: External Dc Powering
External DC Powering The 633 can be powered from any DC voltage from 10 to 18 VDC. Pin-4 of the locking, Hirose con- nector is positive (+) and pin-1 is negative (–). -
Page 59: Power Screen
When the DC Voltage Indicator is flashing red, automatic shutdown will occur soon. During automatic shutdown, the 633 will display a warning, stop any active recordings, finish writing files, and shut the 633 down. The PowerSafe Battery will power the 633 during this time. -
Page 60: Powersafe
QuickBoot circuitry is enabled for 2 hours after the 633 is powered down. During this time, the 633 can turn on and start recording in less than 2 seconds. Each time the 633 is turned on and off, this 2 hour timer is reset. -
Page 61: Power Consumption
633 User Guide and Technical Information If QuickBoot is not engaged when the 633 is powered down, or if QuickBoot deactivates less than 2 hours after powering down, the PowerSafe Battery might be depleted. To charge the PowerSafe Battery, power the 633 on for at least one hour. -
Page 62: Using A Usb Keyboard
Using a USB Keyboard To aid in navigation and data entry, a standard USB keyboard can be connected to the 633. To use a USB keyboard, connect the male USB A plug of the keyboard into the supplied USB A female adapt- er, then connect the keyboard to the left panel USB B jack on the 633 with the supplied USB cable. -
Page 63: Storing And Recalling Settings
Storing and Recalling Settings The 633 can store and recall user settings to User Setup Files on the SD card, CF card, or internal memory. User Setup Files contain all settings made in the Setup Menu and all Input Settings (includ- ing routing). -
Page 64: Setup Menu
633 User Guide and Technical Information Setup Menu Power The Power Setup Menu option displays the Power Screen as well as the following options. Parameter Name Description Options Ext DC Ref » 12V Ext DC Adjust the voltage range and Warning Voltage for the external DC Voltage Indicator. -
Page 65: Limiters
633 User Guide and Technical Information Parameter Name Description Options TA3-X1 Out Select the analog output level of the Aux 1 TA3 output. • Mic » Line • -10 TA3-X2 Out Select the analog output level of the Aux 2 TA3 output. • Mic »... -
Page 66: Timecode
Hold Off Sets the duration that a valid timecode signal has to • 0.0-8.0 s (0.1 second increment) be recognized by the 633 before generating a new » 0.0 seconds take while in Ext TC-Auto Record and Ext TC/cont- Auto Record modes. -
Page 67: File Storage
• Tone Level (<Current Selection>) File Max Size Selects the file size when the 633 will close, then » 4GB start a new file. The 633 will not record a file • 2GB larger than the selected size. • 1GB •... -
Page 68: System
The level of the 633’s internal tone generator. • 0-20 dBu (1 dBu increment) » 0 dBu Tone Frequency The audio frequency of the 633’s internal tone gen- • 100-10000 Hz (10 Hz increment) erator. » 1000 Hz Tone Mode Continuous tone generates tone a the set tone level »... -
Page 69: Quick Setup
• dd/mm/yy • yy/mm/dd Set Time/Date Displays a dialog where the 633 time and date can be set. When highlighter is orange, turn Headphone Encoder to highlight a field and press Headphone Encoder to edit. When highlighter is blue, turn Headphone Encoder to change the value, and press Headphone Encoder to accept the value. - Page 70 633 User Guide and Technical Information Quick Setup Parameter Name Description Options Load Settings Lists all available setup files found on attached media » Factory Default and on internal setup storage. • Other available setups..Save Settings to INT1 Saves settings to internal setup storage location 1.
-
Page 71: Front Panel Button Shortcuts
633 User Guide and Technical Information Front Panel Button Shortcuts Function Key Sequence Action Press and hold the Headphone Encoder then slide the Transport Control left (Rewind). False Take Moves take to FALSETAKES folder and decrements take number. Press and hold the Headphone Encoder then slide the Transport Control right (Fast Forward). -
Page 72: Connector Pin Assignments
4 – tuning out 5 – SMPTE TC out (1) Hirose 4-pin 1 – ground 10-18 Volt DC input. Mates with Sound Devices XL-NPH DC Input 2 – not connected and XL-WPH3 powering accessories. See Accessories for 3 – not connected details. -
Page 73: Specifications
633 User Guide and Technical Information Specifications Analog Inputs Frequency Response · 10 Hz to 40 kHz ± 0.5 dB, -3dB @ 65 kHz (192 kHz sample rate, re 1 kHz) THD + Noise · 0.09% max (1 kHz, 22 Hz–22 kHz BW, fader at 0, 0 dBu output) Equivalent Input Noise ·... -
Page 74: Analog Outputs
633 User Guide and Technical Information Analog Outputs Output Type · XLR-3M Line: Active Balanced for use with ≥600 ohm inputs · XLR-3M -10: Active Balanced for use with ≥10k ohm inputs · XLR-3M Mic: Active Balanced for use with ≥600 ohm inputs ·... -
Page 75: Timecode And Sync
633 User Guide and Technical Information Sampling Clock Accuracy · ± 0.2ppm Timecode and Sync Modes Supported · Off · Free Run · External · Rec Run · 24h Run Frame Rates · 23.976 · 29.97DF · 30DF · 24 ·... - Page 76 633 User Guide and Technical Information Accessories Several high-value accessories are available for the 633, including production cases, cables, and power accessories. For a full list of Sound Devices products and accessories, visit our web site www.sounddevices.com/products. Optional 633 Related Accessories CS-633 Production case for use with the 633 Field Production Mixer.
- Page 77 633 User Guide and Technical Information Wave Agent Wave Agent Beta is a WAV file librarian for Mac OS and Windows computers. Designed for Produc- tion Sound Mixers and Post Production Editors, Wave Agent provides a comprehensive and indis- pensable range of tools for preparing audio files for problem-free passage through complex produc- tion workflows.
- Page 78 633 User Guide and Technical Information Index AES 2, 4, 16, 17, 26, 27, 30, 34, 58, 59, 66, AES42 3, 12, 14, 16, 17, AES3 3, 12, 14, 16, 17, 27, 58, 66, AUX 3/4 Output ballistics 12, 20,...
- Page 79 633 User Guide and Technical Information Power Switch 2, RTN / FAV Switch 2, 10, 12, 13, 24, 26, 33, 36, 38, 39, 40, RTN Input 4, 44, 45, 46, 47, 57, sample rate 10, 17, 34, 35, 36, 37, 41, 42, 43, 47, 60, 61,...
- Page 80 633 User Guide and Technical Information Declaration of Conformity According to EN ISO/IEC 17050-1:2004 Manufacturer’s Name: Sound Devices, LLC Manufacturer’s Address: E7556 State Rd. 23 and 33 Reedsburg, WI 53959 Declares under sole responsibility that the product as delivered Product Name:...
- Page 81 Sound Devices hosts a user support forum. The URL is: http://forum.sounddevices.com Sound Devices cannot guarantee that a given computer, software, or operating system configuration can be used satisfactorily with the 633 based exclusively on the fact that it meets our minimum system requirements.
- Page 84 Phistersvej 31, 2900 Hellerup, Danmark Telefon 3946 0000, fax 3946 0040 www.interstage.dk - pro audio with a smile 633 Rev. 1 - Printed in the U.S.A.
Need help?
Do you have a question about the 633 and is the answer not in the manual?
Questions and answers