HIKVISION DS-1005KI User Manual
Hide thumbs
Also See for DS-1005KI:
- User manual (17 pages) ,
- How to use manual (6 pages) ,
- Quick start manual (75 pages)
Table of Contents
Advertisement
Advertisement
Table of Contents

Related Manuals for HIKVISION DS-1005KI


Summary of Contents for HIKVISION DS-1005KI
- Page 1 DS-1005KI USB Keyboard User Manual UD05349B...
- Page 2 INDIRECT DAMAGES, INCLUDING, AMONG OTHERS, DAMAGES FOR LOSS OF BUSINESS PROFITS, BUSINESS INTERRUPTION, OR LOSS OF DATA OR DOCUMENTATION, IN CONNECTION WITH THE USE OF THIS PRODUCT, EVEN IF HIKVISION HAS BEEN ADVISED OF THE POSSIBILITY OF SUCH DAMAGES. REGARDING TO THE PRODUCT WITH INTERNET ACCESS, THE USE OF PRODUCT SHALL BE WHOLLY AT YOUR OWN RISKS.
- Page 3 User Manual of DS-1005KI Keyboard Regulatory information FCC Information Please take attention that changes or modification not expressly approved by the party responsible for compliance could void the user’s authority to operate the equipment. FCC compliance: This equipment has been tested and found to comply with the limits for a Class B digital device, pursuant to part 15 of the FCC Rules.
- Page 4 User Manual of DS-1005KI Keyboard Preventive and Cautionary Tips Before connecting and operating your keyboard, please be advised of the following tips: Ensure unit is placed in a well-ventilated, dust-free environment. Keep all liquids away from the keyboard.
-
Page 5: Table Of Contents
User Manual of DS-1005KI Keyboard Table of Contents Chapter 1 Product Overview ....................5 Introduction ........................5 Key Features ........................5 Typical Applications ......................6 Chapter 2 Functional Buttons and Joystick ................. 7 Functional Buttons and Indicators .................. 7 Joystick Description ......................8 Chapter 3 Keyboard Operation .................. -
Page 6: Chapter 1 Product Overview
DVR/NVR, and can realize functions such as windows switching, PTZ control, picture capture, recording, etc. DS-1005KI is compatible with the USB joystick via USB HID protocol, and can access to the third-party platform software. It provides programmable buttons for setting custom function and has the advantage of simple interface and easy operation. -
Page 7: Typical Applications
User Manual of DS-1005KI Keyboard Typical Applications Decoding Device Network IP Dome DVR/NVR Client Software or DS-1005KI Platform Software Figure 1-1 Typical Applications Make sure the DVR/NVR connected supports the DS-1005KI keyboard access. -
Page 8: Functional Buttons And Joystick
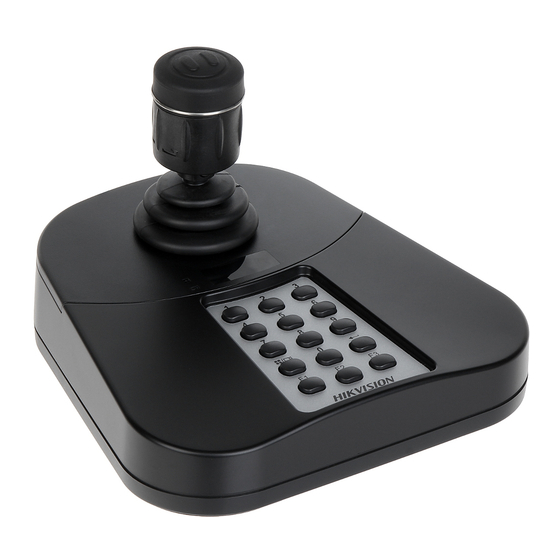
User Manual of DS-1005KI Keyboard Chapter 2 Functional Buttons and Joystick Functional Buttons and Indicators Refer to the following figure and table for the description of the functional buttons and indictors. Figure 2-1 Keyboard Buttons and Indicators Table 2-1 Description of Keyboard NO. -
Page 9: Joystick Description
User Manual of DS-1005KI Keyboard 0 to 9 Number USB Keyboard Mode: select window or channel; Buttons USB Joystick Mode: customizable; Window/Channel Press and hold it for more than 5s to switch between keyboard mode and joystick mode; Switch USB Keyboard Mode: select window switching mode or channel switching mode;... -
Page 10: Chapter 3 Keyboard Operation
User Manual of DS-1005KI Keyboard Chapter 3 Keyboard Operation The keyboard is compatible with the client software and platform software. You can use the keyboard to operate the PTZ control and video wall. This chapter introduces the application of iVMS-5200 professional system as the example, and you can also use the iVMS-4200 client software to realize the keyboard control. -
Page 11: Usb Joystick Mode
User Manual of DS-1005KI Keyboard Figure 3-1 Keyboard and Joystick Shortcut Functions Step 6 Click Save to save the settings. Refer to the Chapter 2.1 Functional Buttons and Indicators for the definition of numeric buttons, capture, record, F1, F2 and F3 shortcuts... -
Page 12: Operating Ptz Control
User Manual of DS-1005KI Keyboard 3.2.2 Operating PTZ Control You can use the keyboard to control PTZ, call preset, patrol and pattern in the live view under USB joystick mode. Step 1 Open the iVMS-5200 Control Client. Step 2 Go to Control Panel>Main View. -
Page 13: Operating Dvr/Nvr Control
Select channels in all-day playback. control panel) Press and hold for 5 seconds to switch between joystick mode and keyboard mode of DS-1005KI keyboard; and the DVR/NVR control Switch must be in the joystick mode. Enter main menu interface in joystick mode. -
Page 14: Usb Keyboard Mode
The 4 directions (up, down, left, right) of the rocker control respectively the operation of the 4 directions of PTZ control. The functions of buttons may be different when DS-1005KI keyboard controls different types of DVR/NVR devices. Detailed information is in accordance with real devices. USB Keyboard Mode... - Page 15 User Manual of DS-1005KI Keyboard The following steps introduce the window switch in video wall. The Main View interface of iVMS-5200 Control Client, use the same instructions to switch the window. Step 1 Open the iVMS-5200 Professional Video Wall Client Software.
-
Page 16: Setting Files Saving Directory
User Manual of DS-1005KI Keyboard The input numeric can be a 4-digit number at most; The input numeric in range of 1-99 indicates the number of the selected window. When you want to switch the sub-window, you can input a 3-digit or 4-digit numeric, in which the last two numbers indicates the sub-window number. - Page 17 User Manual of DS-1005KI Keyboard Step 6 Click Save to save the settings. Figure 3-5 Keyboard and Joystick Shortcut Functions...
-
Page 18: Appendix1: Specifications
User Manual of DS-1005KI Keyboard Chapter 4 Appendix1: Specifications Model DS-1005KI Compatible System Window XP/7/8/8.1/10 Interface Type USB 2.0, DirectX Control Joystick (3-axis control, rotating zoom) Power Supply 5 VDC via USB interface Operating Temperature -10 to +55º C (+14 to +131º F) -
Page 19: Chapter 5 Appendix2: System Upgrade
User Manual of DS-1005KI Keyboard Chapter 5 Appendix2: System Upgrade Step 1 When the drive is installed, access the keyboard USB with the PC, and it will prompt that device is discovered and auto load the corresponding drive. Make sure the keyboard is in USB keyboard mode before upgrading the device. If the single indicator on the panel does not light, press and hold the Window/Channel button for more than 5 seconds to switch to the USB keyboard mode. - Page 20 User Manual of DS-1005KI Keyboard Before sending the command, make sure your PC has installed the serial port tool with Send Ymode functions, e.g., SecureCRT 6.5. Figure 5-2 Prompt Step 5 Send upgrade file to upgrade the device. The following steps introduce the serial port tool SecureCRT as the example to upgrade the device.
- Page 21 User Manual of DS-1005KI Keyboard Figure 5-4 Send Command 5) Select the upgrade file from the directory and double-click it to add it to the field as shown in the picture below. 6) Click OK to start upgrading it: Figure 5-5 Send Upgrade File 7) Corresponding prompt is shown when the device is upgraded successfully.
- Page 22 User Manual of DS-1005KI Keyboard Figure 5-6 Upgrade Completed When the upgrade is accomplished, please close the current serial port and reboot the keyboard. If the upgrade is failed, the digital tube of the keyboard will light always. Reboot the keyboard, open the serial port tool and start to upgrade (step 5).
- Page 23 User Manual of DS-1005KI Keyboard...
Need help?
Do you have a question about the DS-1005KI and is the answer not in the manual?
Questions and answers