Table of Contents
Advertisement
Quick Links
Download this manual
See also:
User Manual
Advertisement
Table of Contents

Subscribe to Our Youtube Channel
Related Manuals for Sangean HDR-1


Summary of Contents for Sangean HDR-1
- Page 1 HD Radio/FM-RDS/AM Digital Stereo Receiver User Manual 381QB0SA-A 20061122_HDR-1_381QB0SA-A_GB_«Ê-±.p65 2006/11/22, ¤W¤È 09:10...
- Page 2 HD Radio™ Technology Manufactured Under License From iBiquity Digital Corporation. iBiquity Digital and the HD Radio and HD logos are registered trademarks of iBiquity Digital Corporation. HD Radio is a trademark of iBiquity Digital Corporation. U.S. and Foreign Patents. 2006/11/22, ¤W¤È 09:13 20061122_HDR-1_381QB0SA-A_GB.p65...
-
Page 3: Important Safety Instructions
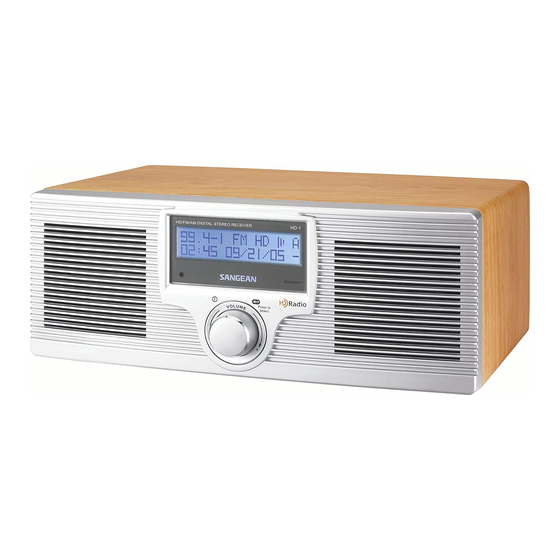
Important Safety Instructions 1. Read these instructions. 10. Only use attachments/accessories specified by the manufacturer. 2. Keep these instructions. 11. Use only with the cart, stand, tripod, bracket or table specified 3. Heed all warnings. by the manufacturer or sold with the apparatus. When a cart is used, use caution when moving the cart/apparatus combination 4. - Page 4 Main Unit Controls (Front) LCD display Remote Control Sensor Standby LED indicator Power and Control knob 2006/11/22, ¤W¤È 09:14 20061122_HDR-1_381QB0SA-A_GB.p65...
-
Page 5: Main Unit Controls
Main Unit Controls (Rear) FM Telescopic Antenna Headphone socket AC power cord socket Aux In socket Music and News selection switch External AM Loop antenna socket 2006/11/22, ¤W¤È 09:14 20061122_HDR-1_381QB0SA-A_GB.p65... -
Page 6: Remote Control
Remote Control Audio Equalizer selection Power Information button Last station recall ATS and Setup button HD Radio Seek button Band selection Tuning Control Volume Control Mute button Number buttons Execution button 2006/11/22, ¤W¤È 09:14 20061122_HDR-1_381QB0SA-A_GB.p65... - Page 7 Accessories Detachable power cord x 1 AM loop antenna x 1 Remote control unit x 1 Instruction manual x 1 Warranty card x 1 2006/11/22, ¤W¤È 09:14 20061122_HDR-1_381QB0SA-A_GB.p65...
-
Page 8: Getting Started
Getting started First find a location for your new HD Radio, 3. Connect the AM loop antenna into external AM loop antenna 1. Plug the AC power cord into the socket located on the rear, terminal on the rear. ensuring that the plug is pushed fully into the socket. Plug the other hand of the AC power cord into a wall socket Important : and switch on the wall socket if needed. -
Page 9: Radio Controls
Radio Controls Selecting the radio band 1. To turn the radio on, press and release the Power button on the Press the BAND button to select the appropriate band. remote control or Power / Control knob on the unit. When you switch from one band to another, the radio will return to 2. - Page 10 Volume Control Music/News selection switch 1. Rotary the Power / Control button to do the volume control. Music/News selection switch is located at the rear of the receiver. You can do the same by pressing the Volume UP/Down button Switch Music/News selection to Music position when you listen to on the remote control.
-
Page 11: Listening To Hd Radio Broadcasts
Listening to HD Radio Broadcasts When HD Radio station is found, display will show, 1. Station call sign. 2. The number of the multicasting program ( 1= main program ). 3. The total number of HD Radio program services and HD Radio mark . - Page 12 Information To get information from the radio program you are listening to, press INFO button. Repeatedly pressing INFO button will cycle through information of Radio Text Program Type ( PTY ) Frequency and Preset no Signal quality Audio Mode Graphic EQ level EQ mode Time/Date Alarm 1 status...
-
Page 13: Advanced Information
Advanced Information Long press INFO button for 2 seconds to enter Advanced Information. Press and release INFO button will cycle through bit error rate Service mode Station ID Software version HD Radio Module Hardware and Software version. Those advanced information are required mainly for factory and after sales service reference only. -
Page 14: Ats - Auto Tuning System
Hybrid Seek – traditional AM/FM stations + HD Radio stations seek When radio is on, press Tuning Up/Down button on the remote control for more than 0.5 seconds will seek next available station with good signal. “HD” will appear on the display, when the stations found are HD Radio stations. - Page 15 Using AM/FM presets Preset stations There are 10 preset stations each for AM and FM. Select radio station by any of above tuning methods, press and hold for 2 seconds for the number 0-9 of where you would like to store this station until display indicating the station is stored.
-
Page 16: Other Functions
Other functions Sleep timer The radio can be set to turn off after a preset time has elapsed. You can set Sleep timer only when radio is on. 1. Long press ATS/SET UP button until display shows SET UP and flashing ATS. - Page 17 Setting the alarm timer – Beep There are two alarm timers in this radio. You can set the alarm timer either radio is on or off ( standby ). 1. Press ATS/SET UP button for more than 2 seconds until display appears SET UP and flashing ATS ( radio is on ) or Clock Set ( radio is off ).
- Page 18 Set the alarm timer – AM, FM and Aux In Following the same procedures described above 1-4 to select Alarm Source AM, FM or Aux IN ( make sure audio source for Aux In is connected, if Aux In socket is not connected, Alarm source will be switched to Alarm Beep ).
-
Page 19: Snooze Function
Snooze function Canceling alarms The alarm will activate for 60 minutes ( 30 minutes for Beep alarm ) The alarm will sound at the selected alarm time. Press any button until you press Power button to cancel it. except Power ( Standby ) button can be silence for 5 minutes interval until alarm is on again ( Snooze ). -
Page 20: System Reset
Change Hour format You can change 12 hours time format into 24 hours format and vice versa. 1. Long press ATS/SET UP button until display appears SET UP and flashing ATS. 2. Repeatedly press and release ATS/SET UP button to get Hour Mode. -
Page 21: Reset The Radio
RESET the radio Specifications If the radio fails to operate correctly i.e. display can’t change Power Requirement: according to the operation. Unplug the AC power cord and wait for Mains AC 120 volts 60 Hz only 5 seconds then re-plug. This is to reset the radio for troubleshooting Battery ( remote control ) 3.0V CR 2025 button type the possible CPU power down .After RESET the radio, radio will be back to Standby mode ( Power off ). - Page 22 Brief User Interface: Button action status HDR1 function Note any key click Alarm ON Snooze ON except Power/ Standby click Standby / Power ON / Standby toggle recall the last station Standby Power ON on last band Power OFF click Alarm ON / Snooze OFF, Alarm OFF &...
- Page 23 Preset 0~9 click Power ON Go to Preset 0~9 long 2s Power ON Store Preset 0~9 Volume click Power ON VOLUME long hold Power ON VOLUME fast Mute click Power ON Toggle Mute ON / OFF click Power ON Tune next frequency step.
Need help?
Do you have a question about the HDR-1 and is the answer not in the manual?
Questions and answers