Table of Contents
Advertisement
Advertisement
Table of Contents

Related Manuals for Sangean HDR-18


Summary of Contents for Sangean HDR-18
- Page 1 HDR-18 Revision 1...
- Page 2 RF VERY IMPORTANT PLEASE READ exposure requirements and void user’s authority to operate the device, Sangean suggest that you keep your AC Adapter at least 12 inches and all warranties. away from the radio while listening to the AM Band.
- Page 3 Cautions Do not allow this radio to be exposed to water, steam or sand. Do not leave your radio where excessive heat could cause damage such as in a parked car where the heat from the sun can build up even though the outside temperature may not seem too high. ●...
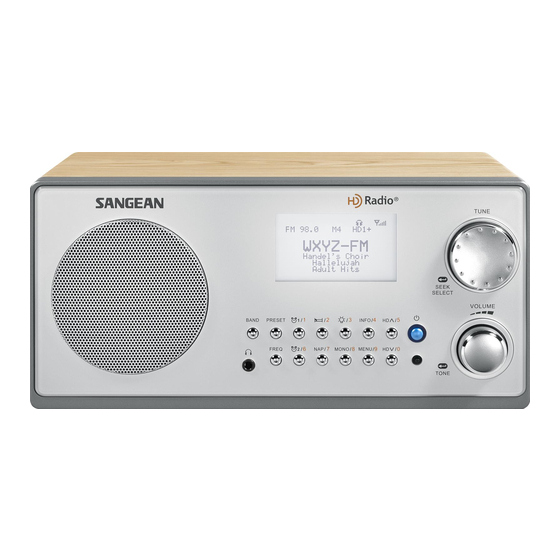
- Page 4 Control 1. Speaker 8. HD seek up button/Preset 5 15. Menu button/Preset 9 2. Band button 9. LCD display 16. Mono button/Preset 8 3. Preset button 10. Standby button/Power button 17. Nap timer button/Preset 7 4. Alarm 1 button/Preset 1 11.
- Page 5 Control 21. External F-type FM antenna terminal 22. External AM antenna terminal 23. DC IN socket 24. REC out socket 25. AUX IN socket 26. External/Internal antenna switch...
- Page 6 Control 27. Reset...
-
Page 7: Remote Control
Remote control A. Standby button/Power button B. Mute button C. Key pad button1-10/0 D. Tuning up button E. HD seek down button F. Info button G. Alarm 1 button H. Nap timer button I. Sleep timer button J. Alarm 2 button K. -
Page 8: Power Your Radio
Power your radio Antenna setup for AM reception The AC power adaptor required for this unit should be 12 volts DC at This radio comes with a built-in AM Ferrite antenna which should be 1.5A center pin positive. enough for normal listening. To improve the AM reception, you may Insert the adaptor plug into the DC socket on the rear of the radio. -
Page 9: Setting The Time Format
Auto clock set mode Scan tuning FM / AM 1. Repeatedly press the Menu button until ‘Clock Update’ is shown on 1. Make sure the FM antenna is set up in advance and internal or external switch is selected. the display. 2. -
Page 10: Presetting Stations
Presetting stations There are 10 presets each for FM and AM radio. They are used the same way for each operating mode. 1. Press the Standby button to switch on your radio. 2. Tune to the required radio station as previously described. 3. -
Page 11: Stereo / Mono Switching
Stereo / Mono switching Receiving HD Radio stations If the FM radio station being listened to has a weak signal, some hiss When the radio is tuned to an HD Radio station, the HD Radio logo will may be audible. It is possible to reduce this hiss by forcing the radio to flash in the display, indicating that the signal is blending from analog to play the station in mono rather than stereo. - Page 12 Emergency alert (EA) Emergency Alerts (EA) is a warning system used by broadcasters to notify listeners about potential hazardous situations related to extreme weather, floods, infrastructure failures, amber alerts (child abductions), and more. Your Radio must be in a location that allows for adequate reception of audio and data services and tuned to a station that provides the Emergency Alerts.
- Page 13 5. There are three options for Alert Location: State/ County, Zip and Off.Rotate the Tuning control knob to select your desired Alert Location option and then press the Tuning control knob to enter the setting. If State/County was selected: 1) Rotate the Tuning control knob to change the State and press the Tuning control knob to confirm the setting.
- Page 14 Snoozing and ignoring an EA Indicators for Emergency alerts Once the alert is triggered, the EA will remain on the display until the Your radio may display various EA indicators on the top right user snoozes or ignores the alert by pressing any button. The EA will corner of the display.
-
Page 15: Display Options
Display options Press the Info button to cycle through the various modes. a. Radio display RDS status RDS indicator Signal strength indicator Station Frequency Station name Radio Text Call sign Stereo indicator Program type HD Radio status Multicast set index Program type HD Radio indicator Stereo indicator... -
Page 16: Setting The Alarm Clock
b. Guide mode (If the radio is tuned to an HD Radio station with Multicasts) d. Clock e. Emergency Alerts History (if alerts have occurred) Setting the alarm clock Your radio has 2 separate alarms which can be set to wake you to FM, AM or buzzer. Each alarm can be set to sound once, daily, on weekdays or weekends. -
Page 17: When The Alarm Sounds
Disabling/canceling alarm setting To cancel the alarm setting before the alarm sounds, firstly, press the 5. Rotate the Tuning control knob to choose the desired source for the corresponding alarm button (i.e. alarm 1 or alarm 2 button) to enter the alarm (FM, AM or BUZZER). -
Page 18: Nap Timer
Nap timer Loudness 1. Press and hold the Nap timer button to enter the adjustment mode. You can get compensation on lower and higher frequency for your radio 2. Rotate the Tuning control knob to select your desired Nap time (1-120 by adjusting the Loudness function. -
Page 19: Brightness Control
Brightness control AUX IN input level attenuation The brightness of the display can be adjusted when the radio is in The input level attenuation is to allow input level reduction if the signal Standby mode or when it is in use. from external device is too strong. -
Page 20: Software Version
Rec-out socket Reset the radio On the rear of your radio a Rec-out socket is provided for use with a If your radio fails to operate correctly or some digits on the display are tape recording/mini disc or to allow connection to line input of a Hi-Fi missing or incomplete, please carry out the following procedure. -
Page 21: Antenna System
1mW+1mW (load 32 ohm) Weight: 5.7 lbs Sangean reserves the right to amend the specification without notice. If at any time in the future you should need to dispose of this product please note that: Waste electrical products should not be disposed of with household waste.
Need help?
Do you have a question about the HDR-18 and is the answer not in the manual?
Questions and answers
How to power on and off howto power on and off the system