
Related Manuals for Fluke ULT800


Summary of Contents for Fluke ULT800
- Page 1 ULT800 TEE Transducer Leakage Current Tester Users Guide PN 2461434 August 2005 © 2005 Fluke Corporation, All rights reserved. Printed in USA All product names are trademarks of their respective companies.
-
Page 2: Warranty And Product Support
Fluke Biomedical. This warranty does not apply if the product has been damaged by accident or misuse or as the result of service or modification by other than Fluke Biomedical. -
Page 3: Key Features
Use the hand-held, battery-operated instrument during the routine transducer cleaning procedure conducted between patients. Connect the transducer to be tested to the ULT800 via a unique adapter. The ULT800 performs the measurement with the transducer immersed in either the cleaning solution or saline. To insure that the leakage current test is accurate, first test the conductivity of the fluid. - Page 4 Outside the USA: 425.446.5560 E-Mail: service@fluke.com For additional sales or service information, contact your local Fluke Biomedical Distributor or Fluke Electronics office. Claims Our routine method of shipment is via common carrier, FOB origin. Upon delivery, if physical damage is found, retain all packing materials in their original condition and contact the carrier immediately to file a claim.
-
Page 5: Obtaining Assistance
2. Pack the instrument carefully, using the original packing materials if available. Failure to pack the instrument properly could void your warranty and result in you paying for the instrument’s repair. Insure the unit for full retail value and ship to the address specified by Fluke. -
Page 6: Controls And Indicators
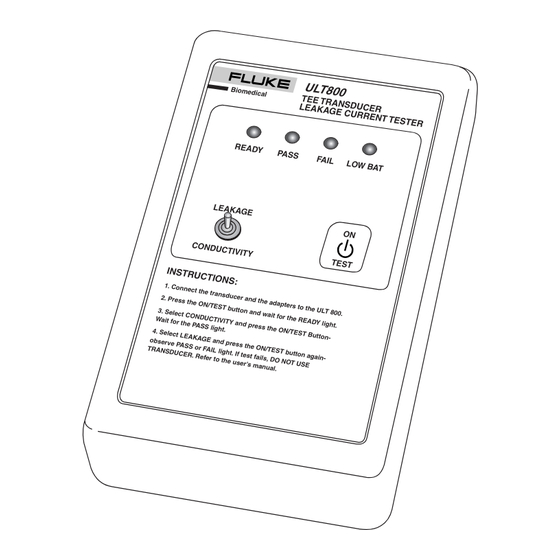
ULT800 Users Guide Controls and Indicators Input connectors are interchangeable and provide for inputting an ultrasound transducer adapter and the dual conductivity electrode. Refer to Figure 1 and Table 1 for complete control and indicator descriptions. ecy10f.eps Figure 1. Controls and Indicators... - Page 7 Controls and Indicators Table 1. Controls and Indicators Item Description READY Glows amber when the self-test procedure completes (approx. 8 sec.). The ULT800 is then ready for testing. PASS Glows green when either the Conductivity Test or Leakage Test passes. FAIL Glows red when either the Conductivity Test or the Leakage Test fails.
-
Page 8: Specifications
ULT800 Users Guide Specifications Power: 9 V Alkaline Battery No. of Measurements: Approximately 1000 measurements on a single battery Conductivity: Limit to pass: greater than 250 A ±5 % Leakage: Limits to pass: less than 100 A ±5 % and greater than 20 A ±5 A Dimensions: 6.5 x 3.7 x 1.5 in. - Page 9 The ULT800 TEE Transducer Leakage Current Tester is a portable, self- contained, battery-operated device. It measures the leakage current of the devices attached to its connectors. The ULT800 applies 120 VAC, 60 Hz to devices placed in a conductive bath (basin or storage tube). The ULT800 measures the current and compares the results to an internal threshold.
- Page 10 ULT800 Users Guide 4. Plug the probe adapter and the electrode wire connectors into the ULT800. The connections are fully interchangeable. 600/212 HP/Agilent Fluke ULT800 ULT800 Biomedical TEE TRANSDUCER LEAKAGE CURRENT TESTER READY PASS FAIL LOW BAT 600/210 LEAKAGE TEST...
- Page 11 Using the ULT800 600/210 HP/Agilent Transducer Adapter Fluke ULT800 ULT800 Biomedical TEE TRANSDUCER LEAKAGE CURRENT TESTER READY PASS FAIL LOW BAT 600/212 Dual LEAKAGE Conductivity TEST CONDUCTIVITY Electrode INSTRUCTIONS: 1. Connect the transducer and the adapters to the ULT 800.
-
Page 12: Checking The Battery
Conductivity Test. Check that you have immersed the electrodes to a depth of at least 25 mm (1 inch) and that they are firmly connected to the ULT800, then retest. If the failure repeats, replace the solution and then retest. -
Page 13: Maintenance
Maintenance Your ULT800 needs little maintenance or special care. However, treat it as a calibrated measuring instrument. Avoid dropping or other mechanical abuse that could cause a shift in the calibrated settings. - Page 14 Dispose of the battery in accordance with any applicable state or local regulations. The ULT800 uses a standard 9-volt alkaline battery. The battery has a life expectancy of approximately 1000 measurements. Replace the battery yearly, regardless of its condition.
- Page 15 Accessories Accessories Refer to Table 2 for a list of transducer adapters and other accessories for the ULT800. Table 2. Accessories Part Model Number Number Description 2392430 600/156FG Ultrasound Transducer Adapter – Siemens/Acuson 156 series probes 2392453 600/202FG Ultrasound Transducer Adapter – GE...
- Page 16 ULT800 Users Guide Table 2. Accessories (cont.) Part Model Number Number Description 2392540 600/216FG Ultrasound Transducer Adapter – Hitachi 2392557 600/218FG Ultrasound Transducer Adapter – Philips/ATL 2392578 600/260FG Ultrasound Transducer Adapter – Siemens/Acuson 260 series probes 2231811 600/360 Ultrasound Transducer Adapter –...
- Page 17 Symbols Symbols Symbol Description See Users Guide Caution: risk of electric shock Standby – On Manufacturer’s declaration of product compliance with applicable EU directives > UL Listing mark LISTED 58GB E233218 Do not mix with solid waste stream. Dispose using a qualified recycler or hazardous material handler.
- Page 18 ULT800 Users Guide...
Need help?
Do you have a question about the ULT800 and is the answer not in the manual?
Questions and answers