Table of Contents
Advertisement
Quick Links
Download this manual
See also:
User Manual
Advertisement
Table of Contents

Related Manuals for Grundig 420


Summary of Contents for Grundig 420
- Page 1 Digta 420 >> Quick Reference Guide English x-Version...
- Page 2 This operating manual contains important instructions for safe and efficient handling of the Grundig Business Systems Digta 420 (hereinafter referred to as “device”). This operating man- ual is part of the device and must be kept accessible in the imme- diate vicinity of the device for persons working on and with the device.
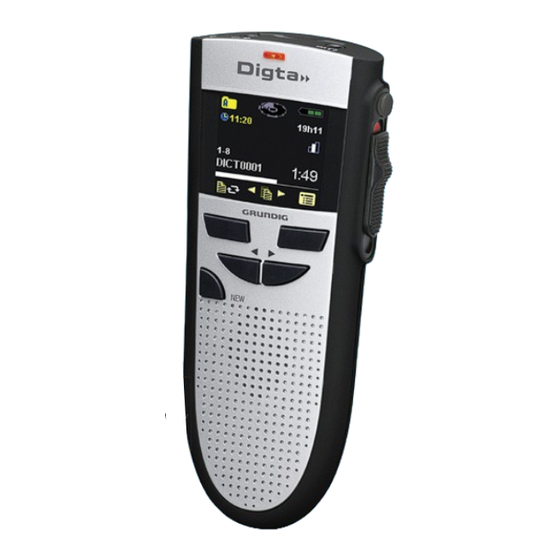
- Page 3 Illustration 1: Device front Illustration 2: Display 18 19 Illustration 3: Device rear, battery compartment...
- Page 4 Explanation of User Controls and Connections No Description Functional significance ►► Fast forward button FFWD Fast forward Slide switch Recording STOP Stop ► PLAY Play-back ◄◄ REW Rewind Loudspeaker Play-back of sound signals „NEW“ button Create new dictation Navigation button Dictation-/function selection Selection button Menu activation, cancel or execute a...
-
Page 5: Table Of Contents
Accessories ...11 Initial.operation..12 Insert batteries or rechargeable batteries . 12 Charging of rechargeable batteries ... 12 Switching on the Digta 420 ... 13 Utilization of internal or external memories 13 Key lock ... 13 Software ... 14 System requirements ... -
Page 6: General
General General Explanation of signalwords and symbols Warnings Warnings are indicated by symbols. In addition they are intro- duced with signal words that express the scope of the hazard. All instructions must be strictly complied with! ■ When working always act cautiously to prevent accidents, per- ■... -
Page 7: Safety.information
Safety information Intended use The Digta 420 has been designed exclusively for the recording, he Digta 420 has been designed exclusively for the recording, storage and play-back of dictations only. The device may only be used for its intended purpose. Any other kind of utilization is for- bidden. -
Page 8: Rechargeable Batteries
Safety information Do.not.operate.or.store.the.power.supply*.near.heaters.or. ■ direct.sunlight..Ensure.adequate.ventilation..The.permit- ted.temperature.range.is:. -4°F.(-20°C).to.158°F.(70°C).for.storage. 32°F.(0°C).to.95°F.(35°C).for.operation Grundig.Business.Systems.power.supplies.are.only.to.be. ■ used.with.Grundig.Business.Systems.office.equipment. Pull.the.power.supply.out.of.the.socket.to.separate.the. ■ device.from.the.power.grid. Unplug.the.power.supply.before.cleaning.it. ■ Clean.the.power.supply.only.with.a.soft,.dry.cloth..Do.not. ■ use.chemical.cleaning.agents.such.as.alcohol,.thinner,. gasoline.or.the.like. Disregarding.these.precautions.means.risking.fire,.explosion. or.overheating. * Extra equipment Rechargeable batteries WARNING Danger.of.explosion.and.burns! Do.not.throw.batteries*.or.rechargeable.batteries*.into.a. ■ fire..Do.not.short-circuit.the.contacts. Do.not.keep.batteries.or.rechargeable.batteries.loose.in. ■ pockets,.take.them.apart.or.modify.them. Recharge.the.rechargeable.batteries.only.in.the.dictation. ■ machine. Do.not.use.damaged.batteries.or.rechargeable.batteries. -
Page 9: Particular Groups Of Persons
Particular groups of persons CAUTION Risk.of.injury! Do.not.leave.the.device.unattended.and.use.it.with. ■ extreme.caution.if.children.or.persons.who.cannot.assess. the.dangers.are.nearby. Keep.the.device.away.from.persons.(including.children). ■ who.are.unable.to.use.it.safely.due.to.their.physical,.sen- sory.or.mental.limitations,.lack.of.experience.or.lack.of. knowledge. Disregarding.these.precautions.means.risking.injury. Obstacle CAUTION Stumbling.hazard! Ensure.that.the.power.supply*.is.always.in.a.safe.posi- ■ tion.and.that.neither.the.power.supply.nor.any.cables.con- nected.to.the.device.or.to.the.docking.station*.constitute. obstacles. Safety information Disregarding.these.precautions.may.lead.to.a.stumbling.haz- ard. Electronic components NOTICE Risk.of.damage.and.void.warranty! Protect.the.device.from.moisture.(such.as.rain.or.water. ■ spray). Do.not.place.the.device.near.a.heater.nor.in.direct.sun- ■ light..The.permitted.temperature.range.is:. -4°F.(-20°C).to.158°F.(70°C).for.storage. -
Page 10: Cleaning
Safety information NOTICE Loss.of.data! Please.check.your.recording.to.ensure.that.it.is.complete. ■ and.repeat.it.if.necessary. If.you.are.electrostatically.charged.and.touch.a.device.which. is.switched.on,.the.device.may.switch.off.automatically.to. protect.against.damage. NOTICE Signal.interference! Do.not.make.recordings.near.mobile.telephones..In.case. ■ of.interference.(such.as.hissing),.increase.the.distance. Disregarding.this.point.may.lead.to.disruption.of.the.record- ing.by.interference. Cleaning NOTICE Risk.of.damage! Clean.the.device.only.on.the.outside.with.a.dry,.soft.cloth.. ■ Do.not.use.chemical.cleaning.agents. Disregarding.these.instructions.can.cause.the.device.to.be. damaged. Disposal Batteries and rechargeable batteries are not to be disposed of in ordinary household trash. Please dispose of them in an environ- mentally sound manner by bringing them to an appropriate public collection area or returning them to your dealer. -
Page 11: Ce Note
Please make sure to choose only genuine accessories from Grundig Business Systems. Product liability and warranty service are provided only in this case. The use of non-Grundig-Business- Systems accessories or those which are not recommended and approved by Grundig Business Systems automatically void any... -
Page 12: Initial.operation
Disregarding.these.precautions.means.risking.explosions. and.burns. After switching off the Digta 420, connect the power supply ► 475* to the PC/USB-jack of the Digta 420. – Shortly afterwards, the load indicator will appear on the dis- play, and the LED-indicator will start flashing green. -
Page 13: Switching On The Digta 420
Switching.on.the.Digta.420 Move the On/Off switch down to the »ON« position. ► When the unit is started for the first time, opt the required lan- ► guage provided in the menu prompt by using the navigation buttons »◄►« and confirm it with the » «button. Then set the date and time. -
Page 14: Software
Software Insert into your pc drive the CD containing the software for admin- istration, sending of dictations and configuration information of the Digta 420. Follow the instructions displayed on your pc. Further information about the configuration/sys- tem requirements/firmware-update/usage of acces- sories is described in the comprehensive user‘s... -
Page 15: Operating
The switchover from the E to M through switching on the Digta 420. A description about the full functionality of the Digta 420 is includ- ed in the comprehensive user‘s manual. You will find this manual in the „Docu” directory on the delivered CD. -
Page 16: Create A New Dictation
Press the „NEW“ button to start a new ► dictation. The Digta 420 will switch over to the recording pause , and the LED- indicator of the Digta 420 will flash red. Move the slide switch to the ► »... -
Page 17: Modifying The Dictation
Move the slide switch to the ► » REC« position and dictate the text to be inserted. Move the slide switch to the ► » STOP« position at the end of the insertion process. Press the left selection button » « in order to accomplish the process. -
Page 18: Select And Listen To A Dictation
Operating Select.and.listen.to.a.dictation Move the slide switch to the position » ► Select the desired dictation by using the ► navigation buttons » «. The selected dictation name will appear on the display, for example: »DICT0001«. Move the slide switch to the position ►... -
Page 19: Setting The Volume
Setting.the.volume Press the left navigation button during the play-back process to turn down the volume or press the right one to turn up the volume. The loudspeaker symbol » « in the display will turn into – the volume setting symbol » «. -
Page 20: Delete An Entire Dictation
Connect the Digta 420 to the USB-cable and plug the USB-cable to the pc in order to transfer the dictations to your pc first, and in a next step, you can send the data to your typist. The Grundig Busi- ness System pc-software can be configurated so that the entire process runs automatically. -
Page 21: Menu.function.overview
The menu functions are switched off in the E . Press the „NEW“ button when switching on the Digta 420 till the initial display view appears on the display (hour glass and progress bar). Menu Function Overview Press the right selection button »... -
Page 22: Troubleshooting
„ambience loud“ (See the section „Micro- phone sensitivity“ in the comprehensive user‘s manual on the delivered CD) activated. Press the „NEW“ button when switching on the Digta 420 till the initial display view appears on the display (hour glass). -
Page 23: Technical.data
Technical.data Memory capacity for 10 min recording Frequency range Microphone socket Earphone socket PC interface Batteries Rechargeable battery Operating time Size (H x W x D, without pro- truding controls) Weight DSS standard play: approx. 1 MB DSSPro quality play: approx. 2 MB DSS standard play: 200 Hz –... - Page 24 Mit allen Funktionen, durch die professionelle Vieldiktierer effektiv Zeit sparen. Mit einer überzeugenden Grundig Business Systems GmbH Bedienerfreundlichkeit. Weiherstraße 10 Und mit einer technischen Ausstattung, die D-95448 Bayreuth keine Wünsche offen lässt. Germany info@grundig-gbs.com www.grundig-gbs.com...
Need help?
Do you have a question about the 420 and is the answer not in the manual?
Questions and answers