Table of Contents
Advertisement
Available languages
Available languages
Quick Links
Portico Collection
™
Electric Grill
Colección Pórtico
™
Parrilla Eléctrica
OWNER'S MANUAL / MANUAL DEL PROPIETARIO
ASSEMBLY AND OPERATING IN STRUC TIONS
INSTRUCCIONES DE ARMADO Y OPERACIÓN
SAVE THIS MANUAL FOR FUTURE REFERENCE
GUARDE ESTE MANUAL PARA REFERENCIA FUTURA
WARNING/ADVERTENCIA
NOTICE TO INSTALLER:
HAZARDOUS EXPLOSION MAY RESULT IF THESE WARNINGS AND INSTRUCTIONS
LEAVE THESE INSTRUCTIONS
ARE IGNORED. READ AND FOLLOW ALL WARNINGS AND INSTRUCTIONS IN THIS
WITH THE GRILL OWNER FOR
MANUAL TO AVOID PERSONAL INJURY, INCLUDING DEATH OR PROPERTY DAMAGE.
FUTURE REFERENCE .
SE PUEDE PRODUCIR UNA EXPLOSIÓN PELIGROSA SI SE HACE CASO OMISO A
AVISO PARA EL
ESTAS ADVERTENCIAS E INSTRUCCIONES. LEA Y SIGA TODAS LAS ADVERTENCIAS E
INSTRUCCIONES EN ESTE MANUAL PARA EVITAR LESIONES PERSONALES, INCLUSO
INSTALADOR:
LA MUERTE, O LOS DAÑOS MATERIALES.
ENTREGUE ESTAS
INSTRUCCIONES AL
PROPIETARIO DE LA PARRILLA
PARA REFERENCIA FUTURA.
Advertisement
Table of Contents

Related Manuals for Brinkmann Portico Collection


Summary of Contents for Brinkmann Portico Collection
-
Page 1: Electric Grill
Portico Collection ™ Electric Grill Colección Pórtico ™ Parrilla Eléctrica OWNER’S MANUAL / MANUAL DEL PROPIETARIO ASSEMBLY AND OPERATING IN STRUC TIONS INSTRUCCIONES DE ARMADO Y OPERACIÓN SAVE THIS MANUAL FOR FUTURE REFERENCE GUARDE ESTE MANUAL PARA REFERENCIA FUTURA WARNING/ADVERTENCIA... - Page 2 IMPORTANT SAFETY WARNINGS WE WANT YOU TO ASSEMBLE AND USE YOUR GRILL AS SAFELY AS POSSIBLE. THE PURPOSE OF THIS SAFETY ALERT SYMBOL IS TO ATTRACT YOUR ATTENTION TO POSSIBLE HAZARDS AS YOU ASSEMBLE AND USE YOUR GRILL. WHEN YOU SEE THE SAFETY ALERT SYMBOL PAY CLOSE ATTENTION TO THE INFORMATION WHICH FOLLOWS! READ ALL SAFETY WARNINGS AND INSTRUCTIONS CAREFULLY BEFORE ASSEMBLING AND OPERATING YOUR GRILL.
-
Page 3: Table Of Contents
TABLE OF CONTENTS General Warnings ..........3-4 Operating Grill and Helpful Hints . -
Page 4: General Warnings
GENERAL WARNINGS WARNING When using electric appliances, basic safety precautions should always be followed including the following: • Do not attempt to touch cooking surfaces or other hot surfaces. Use handles or knobs • To protect against electric shock, do not immerse cord, plugs, or heating element in water or any other liquids. - Page 5 GENERAL WARNINGS WARNING • Never alter or remove the grounding plugs on the power cord or household outlet. • Keep electric plugs off of the ground and dry at all times. • In case of fire, turn the control “OFF”. Unplug the grill from the power source and allow the fire to burn out on its own.
-
Page 6: Operating Grill And Helpful Hints
WARNING OPERATING THE GRILL: Read and follow all warnings and instructions contained in the preceding sections of this manual. BREAKING IN YOUR GRILL: • In manufacturing and preserving the components of your grill, oil residue may be present on the element and cooking surfaces of your grill. - Page 7 WARNING OPERATING THE TEMPERATURE CONTROLLER: Using an extension cord is NOT recommended. IF AN EXTENSION CORD IS ABSOLUTELY NECESSARY: • Use a CSA or UL- approved 3-prong grounded extension cord that is rated for at least 15 A and is marked as suitable for outdoor use. •...
-
Page 8: Proper Care And Maintenance
GRILL COOKING TIPS CLEANLINESS • Always wash hands thoroughly with soap and hot water prior to handling food and after handling raw meat, uncooked poultry or seafood. • When using a platter to carry raw meat, uncooked poultry or seafood to the grill, make sure to wash the platter thoroughly with soap and hot water before placing cooked foods back on the platter or use different platters for raw and cooked foods. -
Page 9: Cleaning And Maintenance
CLEANING AND MAINTENANCE: • Keep the appliance free and clear of combustible materials, gasoline and other flammable vapors and liquids. • For safe grilling and peak performance of your grill, perform these checks at least twice per year or after extended periods of storage. •... -
Page 10: Trouble Shooting
TROUBLE SHOOTING PROBLEM CAUSE CORRECTION 1. Check that the 3-wire plug is fully seated 1. Reseat plug in a 3-wire grounded GFCI Electric into a 3-wire grounded GFCI outlet wired for outlet wired for 120 volts and protected at element 120 volts and protected at 15 or 20 amps. -
Page 11: Parts List And Assembly Instructions
PARTS BAG CONTENTS Make sure you have all items listed under PARTS LIST and PARTS CARD CONTENTS before you begin the installation process. PARTS CARD CONTAINS: Qty. M6 X 12 mm Bolts M5 X 10 mm Bolts M6 Nuts M5 Nuts Hinge Pins Cotter Pins M6 X 12 mm Phillips... - Page 12 READ ALL SAFETY WARNINGS & ASSEMBLY INSTRUCTIONS CAREFULLY BEFORE ASSEMBLING OR OPERATING YOUR GRILL. WE RECOMMEND TWO PEOPLE WORK TOGETHER WHEN AS SEM BLING THIS UNIT. ® The following tools are required to assemble this Brinkmann Portico Collection Electric Grill: • Screwdriver PARTS LIST: Hood Firebox...
- Page 13 FOR COVERS, ACCESSORIES AND OTHER PRODUCTS, PLEASE VISIT US ONLINE AT: Inspect contents of the box to ensure all parts are included and undamaged.
- Page 14 Choose a good, cleared assembly Base area and get a friend to help you put your grill together. Lay card board down to protect grill finish and assembly area. CAUTION: Some parts may contain sharp edges. Wear protective gloves if necessary. Wheel Brackets Cotter Pin Step 1...
- Page 15 Step 3 Use six M5 x 12 mm bolts and six M5 nuts to attach the front Front Column column panel as illustrated. Panel Step 4 Install column brace using four M6 x 12 mm bolts. Column Brace Column Brace...
- Page 16 Step 5 With the help of a friend, set the firebox/column assembly onto base aligning the mounting Firebox/Column holes. Insert six M6 x 12 mm Assembly bolts, and tighten securely. Base Step 6 Attach temperature controller as illustrated. Insert the controller's probe into the bottom of conductor.
- Page 17 Back Handle Step 7 Use two M6 x 12 mm bolts to attach the back handle to the back of the firebox as illustrated. Step 8 Use four M6 x 12 mm bolts to attach the firebox hinges to the back of the firebox as illustrated.
- Page 18 Cotter Pin Step 10 Hinge Pin Put the hood onto the firebox and align the holes of the hood and firebox hinges, use two hinge pins and two cotter pins to lock on place. Step 11 Attach side shelf brackets to firebox using eight M6 x 12 mm Side Shelf bolts (four on left side, and four...
- Page 19 Right Side Shelf with Hooks M6 x 12 mm Phillips Head Shoulder Bolts Cooking Grates Step 12 Put the cooking grates in the firebox.
- Page 20 Step 13 Attach the grease cup to the bottom of the firebox. Grease Cup...
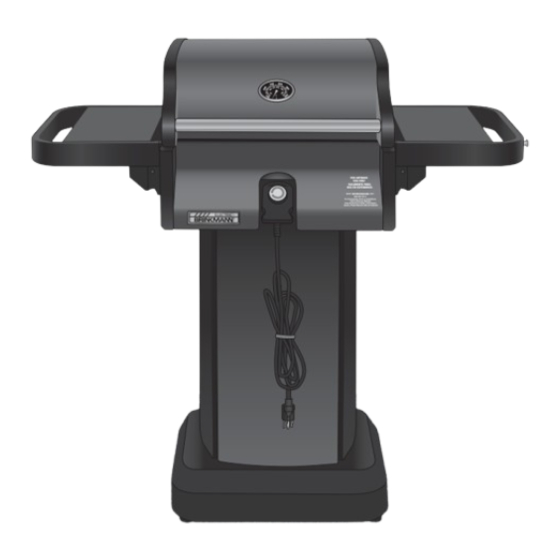
- Page 21 Brinkmann ® 9050 (Assembled)
- Page 22 IMPORTANTES ADVERTENCIAS DE SEGURIDAD ES NUESTRO DESEO QUE ARME Y UTILICE SU PARRILLA EN LA FORMA MÁS SEGURA POSIBLE. EL PROPÓSITO DE ESTE SÍMBOLO DE ALERTA DE SEGURIDAD ES QUE USTED PRESTE ATENCIÓN A LOS POSIBLES PELIGROS CUANDO ARME Y UTILICE SU PARRILLA. ¡CUÁNDO VEA ESTE SÍMBOLO DE ALERTA DE SEGURIDAD PRESTE ESPECIAL ATENCIÓN A LA INFORMACIÓN A CONTINUACIÓN!
- Page 23 ÍNDICE Advertencias generales ........23-24 Funcionamiento de la parrilla y recomendaciones útiles.
- Page 24 ADVERTENCIAS GENERALES ADVERTENCIA Cuando utilice electrodomésticos, cumpla con estas medidas de seguridad básicas: • No intente tocar las superficies de la cocina o cualquier otra superficie caliente. Utilice mangos o perillas. • Para protegerse de descargas eléctricas, no sumerja el cable, las conexiones ni el elemento calentador en agua ni en ningún otro líquido.
- Page 25 ADVERTENCIAS GENERALES ADVERTENCIA • Nunca cambie o retire los enchufes de conexión a tierra del cable de alimentación o del tomacorriente para el hogar. • Siempre asegúrese de que los enchufes eléctricos estén secos y no estén en contacto con la tierra. •...
- Page 26 ADVERTENCIA OPERACIÓN DE LA PARRILLA: Lisez et suivez tous les avertissements et instructions se trouvant aux chapitres précédents de ce manuel. PREPARACIÓN DE LA PARRILLA PARA USARLA POR PRIMERA VEZ: • Debido al proceso de fabricación y preservación de los componentes de la parrilla, puede haber residuo de aceite presente en la hornillas y en las superficies de cocción de la parilla.
- Page 27 ADVERTENCIA CÓMO OPERAR EL CONTROLADOR DE TEMPERATURA: NO se recomienda utilizar el cable de extensión. SI UN CABLE DE EXTENSIÓN ES ABSOLUTAMENTE NECESARIO: • Utilice un cable de extensión conectado a tierra de 3 puntas aprobado por CSA o UL que esté calificado para al menos 15 A y marcado como apto para uso en exteriores.
- Page 28 RECOMENDACIONES PARA COCINAR EN LA PARRILLA LIMPIEZA • Siempre lávese bien las manos con agua caliente y jabón antes de manipular alimentos y después de tocar carne, pollo o mariscos crudos. • Cuando utilice una fuente para llevar carne, pollo o mariscos crudos a la parrilla, asegúrese de lavar bien la fuente con agua caliente y jabón antes de colocar alimentos cocidos en ella, o utilice fuentes distintas para los alimentos crudos y cocidos.
-
Page 29: Limpieza Y Mantenimiento
LIMPIEZA Y MANTENIMIENTO: • Mantenga el artefacto alejado de materiales combustibles, gasolina u otros vapores o líquidos inflamables. • Verifique lo siguiente por lo menos dos veces al año o después de largos períodos de almacenaje para cocinar sin peligro y obtener el mejor rendimiento de su parrilla. •... - Page 30 IDENTIFICACIÓN Y CORRECCIÓN DE PROBLEMAS PROBLEMA CAUSA CORRECCION Elemento 1. Asegúrese que el cable de 3 alambres este 1. Enchufe de nuevo al cable de 3 alambres enchufado bien en una tomacorriente de 120 voltios que es protegido por GFCI eléctrico aterrizador de 3 alambres de 120 voltios de 15 o 20 amperios.
- Page 31 CONTENIDO DE LA BOLSA DE PARTES Verifique que tiene todos los artículos indicados en la LISTA DE PARTES y en el CONTENIDO DE LA BOLSA DE PARTES antes de comenzar con el proceso de instalación. LA BOLSA DE PARTES INCLUIRÁ LO SIGUIENTE: Cant.
- Page 32 INSTRUCCIONES DE ARMADO LEA DETENIDAMENTE TODAS LAS ADVERTENCIAS DE SEGURIDAD E INSTRUCCIONES ANTES DE ARMAR Y USAR LA PARRILLA RECOMENDAMOS QUE ESTA UNIDAD SEA ARMADA POR DOS PERSONAS Se necesitan las siguientes herramientas para armar esta Colección Pórtico Parrilla Eléctrica ®...
- Page 33 PARA CUBIERTAS, ACCESORIOS Y OTROS PRODUCTOS, FAVOR DE VISITARNOS POR LA RED MUNDIAL EN: Inspeccione el contenido de la caja para verificar que todas las partes estén incluidas e intactas.
- Page 34 Elija un lugar adecuado y Base despejado para armar la parrilla y pídale a un amigo que le ayude. Tienda cartón sobre el suelo para proteger el acabado de la parrilla y el área de armado. PRECAUCIÓN: Algunas partes pueden tener bordes afilados.
- Page 35 Paso 3 Use seis tornillos M5 x 12 mm y Panel Delantero seis tuercas M5 para unir el panel de la Columna frontal de la columna como se muestra en la figura. Paso 4 Instale el soporte de columna usando cuatro tornillos M6 x 12 mm.
- Page 36 Paso 5 Con ayuda de un amigo, coloque el conjunto caldera/columna sobre la base alineando los Conjunto orificios de montaje. Inserte seis Caldera/columna tornillos M6 x 12 mm y ajústelos firmemente. Base Paso 6 Coloque el controlador de temperatura como se muestra en la figura.
- Page 37 Manija Trasera Paso 7 Use dos tornillos M6 x 12 mm para unir la manija trasera a la parte trasera de la caldera como se muestra en la figura. Paso 8 Use cuatro tornillos M6 x 12 mm para unir las bisagras de la caldera a la parte trasera de la caldera como se muestra en la figura.
- Page 38 Bisagra de Chaveta Paso 10 Perno Coloque la capilla sobre la caldera y alinee los orificios de las bisagras de la capilla y de la caldera. Luego use dos pasadores de bisagra y dos pasadores de chaveta para asegurar las bisagras. Paso 11 Soporte Una los suportes para los...
- Page 39 Estante Lateral Derecho con Ganchos M6 x 12 mm Cabeza Phillips Pernos de Hombro Rejilla para Cocinar Paso 12 Coloque las rejillas de cocción en la caldera.
- Page 40 Paso 13 Una el recipiente para grasa a la parte inferior de la caldera. Recipiente para la Grasa...
- Page 41 ® Brinkmann 9050 (Armado)
-
Page 44: One Year Limited Warranty
To obtain replacement parts for your Brinkmann Portico Collection Electric Grill Grill under the terms of this warranty, please call Customer Service Department at 800-527-0717. A receipt will be required. The Brinkmann Corporation will not be responsible for any grills forwarded to us without prior authorization.
Need help?
Do you have a question about the Portico Collection and is the answer not in the manual?
Questions and answers