D-Link ShareCenter DNS-320 User Manual
Hide thumbs
Also See for ShareCenter DNS-320:
- User manual (223 pages) ,
- Quick installation manual (77 pages) ,
- Technical specifications (2 pages)
Table of Contents
Advertisement
Quick Links
Advertisement
Table of Contents

Related Manuals for D-Link ShareCenter DNS-320


Summary of Contents for D-Link ShareCenter DNS-320
- Page 1 USER MANUAL ShareCenter™ Pulse DNS-320 VERSION 2.10...
-
Page 2: Table Of Contents
Admin.password..............11 Adding.New.Network.Shares.Wizard......48 Network.Setup..............12 Adding.New.ISO.Mount.Shares.Wizard.......54 Dynamic.DNS................13 Admin.Password..............59 DDNS.Account.and.System.Time........14 Network.Management..............60 E-mail.Settings.and.Volume.Information....15 LAN.Setup................60 RAID.Configuration.and.Drive.Mapping.....16 Dynamic.DNS................62 Configuration.Summary.and.Drive.Formatting..17 Application.Management............63 Format.Complete..............18 FTP.Server................63 D-Link.Storage.Utility..............20 UPnP.AV.Server..............64 D-Link DNS-320 User Manual... - Page 3 Notifications................75 Logs..................79 Firmware.Upgrade...............80 Status....................81 System.Info................81 Hard.Drive.Info..............82 Applications...................83 FTP/HTTP.Downloads............83 Remote.Backups..............85 Local.Backups................90 Local.Backups.-.Time.Machine........91 P2P.Downloads.-.Settings..........92 P2P.Downloads.-.Downloads..........93 Web.File.Server..............94 AjaXplorer................95 Amazon.S3................96 My.Favorites................101 Re-arranging.the.My.Favorites.View......101 Add.an.Icon.to.My.Favorites......... 102 D-Link DNS-320 User Manual...
-
Page 4: Product Overview
Section 1 - Product Overview Product Overview Introduction The.D-Link.ShareCenter™.Pulse.DNS-320.2-Bay.Network.Storage,.when.used.with.internal.SATA.drives ,.enables.you.to.share. documents,.files,.and.digital.media.such.as.music,.photos,.and.video.with.everyone.on.the.home.or.office.network..Remotely. accessing.files.through.the.Internet.is.also.possible.with.the.built-in.FTP.server,.Web.File.server.and.WebDAV.protocol..Whether. you.are.allowing.access.locally.or.over.the.Internet,.keep.data.safe.by.only.giving.rights.to.specific.users.or.groups..When. configuring.the.ShareCenter ,.you.can.create.users.and.groups.and.assign.them.to.folders.with.either.read.or.read/write. permissions..This. is.ideal.for.an.office. environment. with.employee-specific. sensitive. data.or. for. the.home.where. you.can. ensure.your.children.will.only.have.access.to.age.appropriate.material..The.ShareCenter .will.be.available.to.any.computer. (PC,.MAC,.or.Linux-based).on.your.network,.without.the.need.to.install.any.software.on.the.computer. Back.up.your.music,.photo,.and.video.collections.to.the.ShareCenter .for.safekeeping..Then,.enjoy.the.benefits.of.the.built-in. DLNA.Certified™.media.server.as.you.stream.digital.content.to.compatible.media.players .(such.as.the.D-Link’s.Boxee.Box).. This.feature.is.highly.convenient.as.it.allows.you.to.turn.off.a.computer.that.would.normally.be.needed.for.the.same.function. The.availability.of.four.different.hard.drive.modes.(Standard,.JBOD,.RAID.0,.RAID.1).allows.you.to.choose.the.configuration. best.suited.to.your.needs..Standard.mode.creates.two.separately.accessible.hard.drives..JBOD.combines.both.drives.in.linear. fashion.for.maximum.space.efficiency..RAID.0.combines.both.drives.in.a.‘striped’.configuration,.which.provides.the.highest. performance.when.using.a.Gigabit.Ethernet.connection..RAID.1.causes.the.drives.to.mirror.each.other,.providing.maximum. protection..If.one.drive.fails.while.configured.as.RAID.1,.the.unaffected.drive.continues.to.function.as.a.single.drive.until.the. failed.drive.is.replaced..The.new.drive.will.then.be.re-mirrored,.allowing.the.ShareCenter.Pulse.to.return.to.its.full.protection. 1..Hard.Drive(s).not.included. 2..D-Link.cannot.guarantee.full.compatibility.or.proper.playback.with.all.codecs..Playback.capability.depends.on.the.codec.support.of.the.UPnP™.AV.media.player. D-Link DNS-320 User Manual... -
Page 5: Package.contents
•. CD-ROM.with.Manual.and.Software. •. Quick.Installation.Guide •. Power.Adapter •. Power.Cord •. CAT5.Ethernet.Cable Note:.Using.a.power.supply.with.a.different.voltage.than.the.one.included.with.the.D-Link.ShareCenter™.DNS-320.2-Bay.Network.Storage.will.cause. damage.and.void.the.warranty.for.this.product. If any of the above items are missing, please contact your reseller. System Requirements For.best.results,.the.following.minimum.requirements.are.recommended.on.any.system.used.to.configure.and.use.the.D-Link. ShareCenter .DNS-320.2-Bay.Network.Storage: •. Computer.with:.1GHz.processor./.512.MB.RAM./.200.MB.available.space./.CD-ROM.drive. •. Internet.Explorer.version.7,.Mozilla.Firefox.3.or.Apple.Safari.4.and.above •. Windows®.XP.(with.Service.Pack.2.or.higher),.Vista®.or.Windows®.7 •. 3.5”.SATA.Hard.Drive(s). D-Link DNS-320 User Manual... -
Page 6: Features
Supports.Auto.Power.Recovery. •. Disk.Management. Supports.Scheduled.power.off Four.Hard.Drive.Configurations:.Standard,.JBOD.(Linear),.. •. Media.Streaming. RAID.0,.and.RAID.1 UPnP.AV.Server.for.streaming.music,.Photos,.and.videos.. Supports.Advanced.Format.HDD to.compatible.media. Supports.RAID.Migration:.Standard.to.RAID1 iTunes.software.will.be.able.to.automatically.find.and.. Supports.HDD.S.M.A.R.T.test play..music.directly.from.the.ShareCenter Supports.FAT16/32,.NTFS.for.USB.external.Storage •. System.Management •. Account.Management. Web.Browser.configuration. .Users.and.Groups.can.be.assigned.to.Folders.with.Read-.. Supports.HTTPS.Management.Function -or..Read/Write.Permissions. Network.Recycle.Bin Quotas.for.Users.and.Groups. Supports.Yahoo!.Widget Supports.ISO.mount.Shares. Supports.System.Logging/FTP.Logging Built-in.FTP.server.for.File.Access.over.the.Internet. Automatic.E-Mail.and.SMS.Notifications Supports.FTP.over.SSL/TLS.abd.FXP •. Download.Management Scheduled.downloads.from.Web.or.FTP.sites. Supports.P2P.and.aMule.downloads D-Link DNS-320 User Manual... -
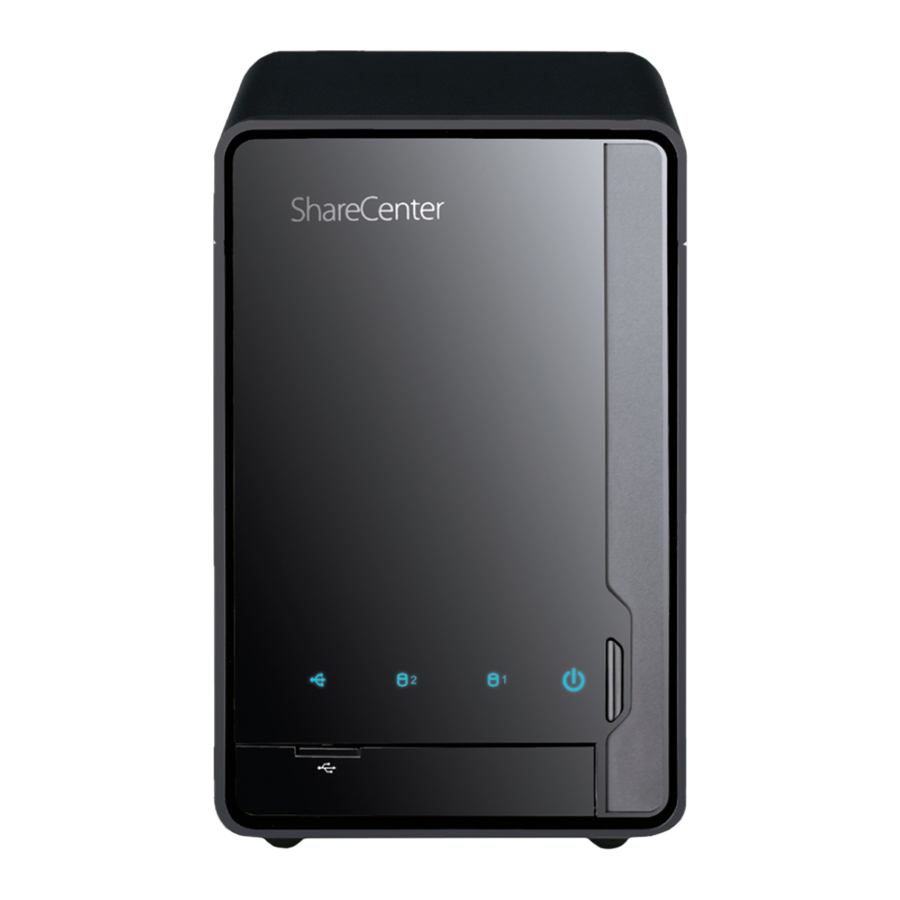
Page 7: Hardware.overview
Front Panel HDD(R).LED HDD(L).LED Power.LED USB.LED Power.Button USB.Copy/.Unmount.Button USB.Port Front..Latch COMPONENT DESCRIPTION These.lights.will.be.solid.BLUE.when.drives.are.connected.but.inactive.The.lights.will.blink.when.the.drives.are.being HDD(L)/HDD(R) accessed,.formatted.or.synchronized..They.will.illuminate.AMBER.if.a.drive.has.failed. USB LED This.light.will.illuminate.when.a.USB.device.is.inserted.into.the.USB.Port..When.there’s.traffic.this.light.will.blink. USB Port This.is.the.USB.Port..Devices.like.a.USB.Print.Server,.UPS.or.USB.drive.can.be.inserted.here. Front Latch This.latch.can.open.and.close.by.simply.pressing.it. Power LED This.light.will.illuminate.when.this.ShareCenter.Pulse.is.powered.on. Power Button Press.once.to.power.on.the.device..To.power.down,.press.and.hold.the.button.until.it.begins.to.blink. USB Copy / Press.1~3.seconds.to.copy.data.from.a.USB.drive.to.your.ShareCenter.Pulse..Press.and.hold.5.seconds.to Unmount Button unmount.a.USB.drive. D-Link DNS-320 User Manual... -
Page 8: Rear.panel.(Connections)
Section 1 - Product Overview Rear Panel (Connections) Cover.Lock Cooling.Fan Gigabit.Ethernet.Port Reset.Button Cable.Hook Security.Lock Power.Receptacle COMPONENT DESCRIPTION Cover.Lock This.lock.is.used.to.remove.the.cover.when.unlocked..Locking.it.will.restrict.the.removal.of.the.top.cover. The.cooling.fan.is.used.to.cool.the.hard.drives.and.features.speed.control..When.the.unit.is.first.powered.on.the. Cooling.Fan fans.rotate.at.a.low.speed.and.rotate.at.a.high.speed.when.the.temperature.rises.above.49.°C. Reset.Button. Press.this.button.for.more.than.5.seconds.to.reset.the.unit.to.factory.defaults. Power.Receptacle. Connect.the.supplied.power.cord.to.the.receptacle. Use.the.Gigabit.Ethernet.Port.to.connect.the.device.to.the.local.network..The.port.is.equipped.with.both.a.LAN. Gigabit.Ethernet.Port LINK.(R).and.Traffic.LED.(L).to.indicate.connectivity.and.traffic.respectively.to.the.local.LAN Security.Lock This.lock.can.be.used.to.tie.the.ShareCenter.Pulse..to.the.desk.to.prevent.theft..Cables.are.sold.separately. D-Link DNS-320 User Manual... -
Page 9: Getting Started
Section 2 - Getting Started Getting Started ShareCenter Pulse Software CD To.get.started.with.the.ShareCenter.Pulse.Setup.Wizard,.insert.the.supplied.CD.into.your.CD-ROM.drive: Click.the.START.button.to.start.the.ShareCenter. Pulse.Setup.Wizard. D-Link DNS-320 User Manual... -
Page 10: Installation
Note: The computer used to access the ShareCenter Pulse web-based configuration manager must be on the same subnet as the ShareCenter Pulse. If your network is using a DHCP server, the ShareCenter Pulse will automatically be in the same subnet. D-Link DNS-320 User Manual... -
Page 11: Install.the.hard.drives
Section 3 - Installation Install the Hard Drives This.step.shows.you.how.to.open.your.ShareCenter.Pulse.so.that.you.can.install.one.or. two.hard.drives..Click.Next.to.continue. Slide.either.one.or.two.hard.drives.into.the.open.hard.drive.bays.of.your.device..Click. Next.to.continue. D-Link DNS-320 User Manual... - Page 12 Section 3 - Installation Once.the.hard.drives.are.installed,.you.can.attach.the.top.cover..Click.Next.to.continue. A. standard. CAT5E. Ethernet. cable. with. a. RJ-45. connector. is. needed. to. connect. your. ShareCenter.Pulse.to.your.network..Click.Next.to.continue. D-Link DNS-320 User Manual...
-
Page 13: Power.and.device.selection
With. the. power. on. check. that. the. Power. LED. is. solid.. If. it. is. solid,. answer. Yes. to. the. confirmation. window. otherwise. select. No. and. wait. for. the. power. connection. to. the. ShareCenter.Pulse..If.the.connection.is.good.then.check.that.the.hard.drives.are.installed. correctly.and.have.no.other.issues..Click.Next.to.continue. Note:.When.you.select.your.device.from.the.list,.it.will.cause.the.LEDs.to.blink.to.confirm. the.device.selection. D-Link DNS-320 User Manual... -
Page 14: Admin.password
Section 3 - Installation Admin password This.window.requests.the.Admin.(administrator).password..If.this.is.the.first.installation. of.this.device.then.the.password.will.be.blank..Click.Next.to.continue. In.this.step.you.can.create.a.new.password.for.the.Admin.username..It.is.recommended. you.set.a.password.however.you.may.also.leave.the.fields.blank..Click.Next.to.continue. D-Link DNS-320 User Manual... -
Page 15: Network.setup
Section 3 - Installation Network Setup You. may. use. either. Static. IP. or. DHCP. to. configure. the. IP. network. settings. of. the. ShareCenter.Pulse..If.you.select.Static.IP.then.input.the.IP.network.settings..Click.Next. to.continue. If.you.want.your.ShareCenter.Pulse.to.be.part.of.a.Windows.Workgroup.network,.enter. the.parameters.requested.or.leave.the.default.settings.that.appear.initially.in.the.window.. The.name.will.be.used.whenever.you.map.one.of.the.ShareCenter.Pulse.volumes.as.a. Network.Drive..Click.Next.to.continue. D-Link DNS-320 User Manual... -
Page 16: Dynamic.dns
Section 3 - Installation Dynamic DNS Click.on.the.Yes.radio.button.if.you.already.have.a.DDNS.account.to.use.for.the.ShareCenter. Pulse.DDNS.settings..If.you.do.not.have.a.DDNS.account.or.do.not.want.to.use.one,.click. on.the.No.Radio.button..Click.Next.to.continue. If.you.clicked.Yes,.enter.the.DDNS.parameters.requested.in.this.window.so.that.your. ShareCenter.Pulse.can.be.accessed.by.a.URL.over.the.Internet..Click.Next.to.continue. D-Link DNS-320 User Manual... -
Page 17: Ddns.account.and.system.time
DDNS Account and System Time If.you.want.a.DDNS.account.to.use.with.your.ShareCenter.Pulse,.D-Link.provides.a.free. DDNS.account.by.clicking.on.the.web.link.shown..You.will.need.to.do.the.following: •. Create.an.account.with.a.username.and.password. •. Create.a.hostname.that.the.DDNS.service.will.use.to.track.your.device.no. matter.what.the.Local.Network.WAN.settings.are.(i.e..public.IP.address). •. Configure.your.device.with.the.hostname.and.DDNS.service.provider. details. •. Configure.your.router.to.forward.port.80. Follow.the.steps.listed.here.in.order.to.create.a.DDNS.account.and.configure.your.LAN. equipment.and.ShareCenter.Pulse.to.work.with.the.new.settings. Configure. the. time,. date. and. time. zone. settings. here.. Select. the. time. zone. from. the. drop-down.menu..You.can.set.the.time.and.date.manually,.from.a.NTP.server.or.from. the.computer’s.settings.. D-Link DNS-320 User Manual... -
Page 18: E-Mail.settings.and.volume.information
Section 3 - Installation E-mail Settings and Volume Information You.can.configure.messages.to.be.sent.alerting.you.to.certain.operational.conditions. and.drive.status.conditions.to.your.e-mail.account..These.alerts.can.prove.helpful.with. the.management.and.safeguarding.of.important.data. Enter.your.e-mail.information.and.settings.and.then.click.Next.to.continue..If.you.do.not. want.to.configure.your.e-mail.settings,.click.Skip.to.continue. This.step.is.informational.and.shows.any.currently.configured.Volumes.previously.setup. on.the.ShareCenter.Pulse..Click.Next.to.continue. D-Link DNS-320 User Manual... -
Page 19: Raid.configuration.and.drive.mapping
Section 3 - Installation RAID Configuration and Drive Mapping Select.one.of.the.Volume.File.Systems.type..Clicking.on.each.file.system.type.radio.button. will.give.a.description.below.. For.more.information.concerning.the.different.RAID.Disk.Formats.please.refer.to.“What. is.RAID?”.on.page.104 Click.Next.to.continue. This.step.allows.you.to.map.the.volume(s).created.as.network.drive(s).on.your.computer.. Click.Next.to.continue. D-Link DNS-320 User Manual... -
Page 20: Configuration.summary.and.drive.formatting
Section 3 - Installation Configuration Summary and Drive Formatting Review.your.volume.configuration.summary.details.here.before.clicking.next.and.starting. the.drive.format..If.necessary.use.the.PREV.button.to.go.back.and.reconfigure.the.RAID. configuration.of.the.volume(s)..When.you.click.NEXT.a.warning.message.will.appear.to. confirm.you.want.to.format.the.drives.as.all.the.data.on.the.drives.will.be.deleted..Click. on.the.No.button.if.you.are.unsure. During.the.hard.drive.formatting.the.wizard.displays.percentage.complete.bars. D-Link DNS-320 User Manual... -
Page 21: Format.complete
Section 3 - Installation Format Complete The.wizard.will.show.this.window.if.the.hard.drive.format(s).are.successful..Click.Next. to.continue. D-Link DNS-320 User Manual... - Page 22 Section 3 - Installation The.final.window.of.the.installation.wizard.shows.successful.completion.. Your. device. is. now. installed. and. ready. for. use..Your. drives. are. network. mapped.from.using.the.wizard.so.you.will.be.able.to.access.them.under. you.My Computer.icon.. D-Link DNS-320 User Manual...
-
Page 23: D-Link.storage.utility
Section 3 - Installation D-Link Storage Utility When.first.powered.on,.during.the.initial.boot.sequence,.the.device.will.wait.to.be.assigned.an.IP.address.via.DHCP..If.it.does. not.receive.a.DHCP.assigned.IP.address.the.Auto-IP.process.will.assign.a.169.254.xxx.xxx.address.to.the.device.If.you.want.to. change.the.IP.address.before.logging.in.or.are.unable.to.connect.to.the.ShareCenter.Pulse.IP.address,.you.can.use.the.Storage. Utility.provided.on.the.product.CD.to.locate.the.device.on.your.network.and.make.any.needed.changes. Network Storage The. D-Link. Storage. Utility. displays. any. ShareCenter. Pulse. devices. it. Device: detects.on.the.network. Refresh: Click.to.refresh.the.device.list. Configuration: Click. Configuration. to. access. the.Web-based. configuration. of. the. ShareCenter.Pulse. LAN: Configure.the.LAN.Settings.for.the.ShareCenter.Pulse.here. Apply: Click.Apply.to.save.and.activate.the.changes.to.the.LAN.Settings. - Page 24 IP. address. listed.for.the.device..Make.sure.the.browser.is.not.configured.to.use.a.proxy. server. Note:. The. computer. used. to. access. the. ShareCenter. Pulse. web-based. configuration. manager. must. be. on. the. same. subnet. as. the. ShareCenter. Pulse..If.your.network.is.using.a.DHCP.server.and.the.computer.receives.IP. settings.from.the.DHCP.server,.the.ShareCenter.Pulse.will.automatically.be.in. the.same.subnet. D-Link DNS-320 User Manual...
-
Page 25: Configuration
Note: The computer, used to access the web-based configuration, manager must be on the same subnet as the ShareCenter.Pulse . If your network is using a DHCP server and the computer receives IP settings from DHCP, the ShareCenter.Pulse will automatically be in the same subnet. D-Link DNS-320 User Manual... -
Page 26: Web.ui.general.layout
-.Contains.the: •. Setup Wizard -. Step-through. settings. for. accounts,. time. and. date,.and.connectivity. •. Disk Management -.Configures.the.Volume.Setup.and.perform. Disk.Diagnostics. •. Account Management -.Configures.the.Admin.Password,.Users,.Groups,.Quotas.and.Network.Share.Folders. •. Network Management - Configures.the.LAN.settings.and.Dynamic.DNS. •. Application Management.-.Configures.File.Sharing.protocols.and.Add-On.management. •. System Management - Configures.the.Time.and.Date,.Device,.System.Settings,.Power.Management,.Email.Alerts,.Logs,.and.Firmware.settings. These.icons.and.their.configuration.sub-menus.will.be.discussed.in.detail.in.the.following.pages.of.this.manual. Note:.After.logging.in.to.the.ShareCenter.Pulse.for.the.first.time.it.is.recommended.to.add.a.password.to.the.admin.account. D-Link DNS-320 User Manual... -
Page 27: Management
Section 4 - Configuration Management This.tab.contains.the.Setup.Wizard,.Disk.Management,.Account.Management,.Network.Management,.Application.Management,. System.Management.and.Status.Icons..Click.each.of.the.icons.to.see.the.submenus... D-Link DNS-320 User Manual... -
Page 28: Setup.wizard.(Web.ui)
Section 4 - Configuration Setup Wizard (Web UI) The.ShareCenter.Pulse.has.a.System.Wizard.that.allows.you.to.quickly.configure.some.of.the.basic.device.settings..Click.the. System Wizard.icon.to.start.the.Setup.Wizard. Click.the.Run Wizard.button.to.start.the.setup.wizard. Click.Next.to.continue. D-Link DNS-320 User Manual... - Page 29 Section 4 - Configuration It.is.recommended.you.set.an.admin.password.here..Enter. the.new.password.and.re-enter.it.for.confirmation..Click.Next. to.continue. Set.the.appropriate.Time.Zone.for.your.location..Click.Next. to.continue. D-Link DNS-320 User Manual...
- Page 30 Section 4 - Configuration Edit.or.change.the.LAN.settings..Selecting.DHCP Client.will. cause.the.device.to.obtain.an.IP.address.from.the.local.DHCP. server.such.as.a.router..Selecting.Static IP.requires.you.to. assign.the.IP.information.manually..Click.Next.to.continue. Enter.your.workgroup,.name.and.description,.or.leave.the. default.values.and.click.Next.to.continue. D-Link DNS-320 User Manual...
- Page 31 Section 4 - Configuration Select. Account. and. enter. your. e-mail. parameters. in. the. boxes. to. send. event. alerts. from. the. device.. Click. Next. to. continue. Click.Finish.to.save.your.settings.and.complete.the.wizard.. You.may.click.the.Previous.button.to.go.back.and.edit.your. settings.or.click.Exit.to.end.the.wizard.without.saving.the. settings... D-Link DNS-320 User Manual...
-
Page 32: Disk.management
Configuration: then.set.the.Auto-Rebuild.function.here.using.the. radio.buttons.. Enable Auto-Rebuild: Enabling. Auto-Rebuild. will. rebuild. a. failed. RAID. 1. drive.when.a.new.drive.has.replaced.the.degraded. one. Disable Auto-Rebuild: If. you. do. not. want. to. automatically. rebuild. drives. after.a.failure.when.using.the.RAID.1.functionality. then.you.can.check.this.option.. Note:.You.can.still.rebuild.a.drive.using.the.RAID.1. functionality.however.you.must.initiate.the.rebuild. manually. Manual Rebuild Now: If.you.have.disabled.Auto-Rebuild.then.you.can.use. the.Manual.Rebuild.option.by.clicking.this.button. D-Link DNS-320 User Manual... -
Page 33: Hard.drive.configuration.wizard
Section 4 - Configuration Hard Drive Configuration Wizard When.you.click.the.Set RAID type and Re-Format.button.in.the.Disk.Management-Hard.Drive.Configuration.menu,.a.wizard.will.launch..allowing. you.to.format.your.drives.and.create.the.RAID.format..The.following.is.an.example.of.a.RAID1.configuration: Initially.the.steps.of.the.configuration.process.are.shown..You.must.decide. on.the.RAID.type.you.would.like.to.format.your.HDDs.with..Click.the.Next. button.to.continue.or.click.Exit.to.cancel. This. screen. displays. the. currently. installed. HDD. information.. Any. data. on.the.installed.hard.drives.will.be.lost.by.the.formatting..Click.Next.to. continue. D-Link DNS-320 User Manual... - Page 34 Section 4 - Configuration Select.the.format.desired.by.clicking.on.the.RAID.type.box.to.highlight. it.in.blue..In.this.example.the.maximum.data.protection.option.of.RAID. 1.is.selected..Click.Next.to.continue. If.you.have.selected.RAID.1.then.the.wizard.will.display.this.step.to. enable.or.disable.Auto-Rebuild..Auto-Rebuild.will.automatically.rebuild. a.failed.disk.drive.if.it.has.been.replaced.with.a.new.one..Set.to.disabled. if.you.prefer.to.start.this.process.manually..Click.Next.to.continue. D-Link DNS-320 User Manual...
- Page 35 Section 4 - Configuration If.you.select.a.RAID.0.or.1.option.then.you.need.to.determine.the.size.of. the.RAID.volume..Any.extra.space.will.be.formatted.as.a..JBOD.volume.. . Click.Next.to.continue. Note:.If.you.select.Leaving the remaining disk space for future,.you. can.format.the.JBOD.partition.at.a.later.time. A.Volume.Configuration.Summary.is.displayed..Check.the.table.and. click.Next.to.format.the.drives..Otherwise.click.the.Previous.button. to.make.changes.to.your.configuration.or.click.Exit.to.end.the.wizard. D-Link DNS-320 User Manual...
- Page 36 Section 4 - Configuration During.the.formatting.process.a.progress.bar.is.displayed. When. the. formatting. is. completed. the. wizard. displays. the. finished. . Volume.Configuration.table..Click.Finish.to.end.the.wizard. D-Link DNS-320 User Manual...
-
Page 37: S.m.a.r.t.test..you.will.be.able.to.schedule.a.test.on.a
10. minutes..This. test. will. check. the. electrical,. mechanical,.and.read.performance.of.the.hard.drive.. The.results.are.displayed.as.Passed/Failed.on.the.web. UI.and.can.also.be.sent.as.an.e-mail.alert... Extended Test: Runs.an.extended.S.M.A.R.T.test..This.test.requires.a.lot. more.time.to.complete..However,.it.is.a.more.thorough. and.complete.test.when.compared.to.the.Quick.Test. Send result by Enable.this.function.in.order.to.have.the.results.of.the. E-mail: S.M.A.R.T.test.sent.to.you.by.e-mail. Create Schedule: Click. on. this. button. in. order. to. create. a. scheduled. S.M.A.R.T.test..You.will.be.able.to.schedule.a.test.on.a. daily,.weekly,.and.monthly.basis. D-Link DNS-320 User Manual... - Page 38 Click. on. the. Create. button. to. add. a. schedule. Schedule List: In. the. window. all. the. created. schedule. lists. will. be. displayed. Note: When. performing. a. S.M.A.R.T.. test,. your. hard. drives. will. not. be. available.over.the.network.until.it.has.completed.testing. D-Link DNS-320 User Manual...
-
Page 39: Scan.disk
Section 4 - Configuration Scan Disk Scan.disk.provides.a.method.to.test.the.disk’s.file.system.in.your.ShareCenter.Pulse. Scan Disk: Scan.Disk.will.scan.your.disks.file.system.for.errors. and/or.corruption..After.completion,.the.test.results. will.show.Success.or.Failure..Click.on.the.Scan Disk button.to.start.the.test..If.the.test.fails.you.can.try. reformatting. the. drive. and. test. again.. Otherwise. you.will.need.3rd.party.disk.troubleshooting.tools. Volume: Use.the.drop-down.menu.to.select.the.disk.volume. that.you.want.to.run.the.Scan Disk.test.on... Scan Disk Progress If.you.have.started.a.Scan.Disk.test.then.a.window. Window: with.a.progress.bar.will.appear.to.monitor.the.test.. Click.the.Exit.button.to.abort.the.test.if.required.or. once.the.test.has.run.100.percent. D-Link DNS-320 User Manual... -
Page 40: Account.management
User Settings: Your.hard.drives.can.be.configured.and.formatted.in.various. RAID.configurations.here. New: Click. this. button. to. launch. a. wizard. that. will. walk. you. through.adding.a.new.user.configuration. Modify: Click.on.an.existing.user.in.the.table.so.that.it.is.highlighted. in. red. and. then. click. the. Modify. button. to. change. the. configuration.of.an.existing.user. Delete: Click.on.an.existing.user.in.the.table.so.that.it.is.highlighted. in.red.and.then.click.the.Delete.button.to.remove.a.user. from.the.configuration. D-Link DNS-320 User Manual... -
Page 41: Adding.new.users.wizard
Adding New Users Wizard The.following.section.will.describe.how.to.add.a.new.user.on.this.device..To.add.a.user.click.on.the.New.button..A.easy.to.configure.wizard.will.be. launched.and.look.like.the.following: This. window. welcomes. the. user. to. the. setup. wizard. for. adding. or. modifying.a.user..This.wizard.will.guide.the.user.through.the.steps.of.setup. In.this.wizard.the.user.will.be.able.to: 1).Create.a.new.user.account. 2).Join.a.group. 3).Configure.the.appropriate.network.shares.settings. 4).Configure.the.user.quota. 5).View.a.summary.of.the.configuration.before.completing.the.addition. Click.on.the.Next.button.to.continue. Click.on.the.Exit.button.to.discard.the.changes.made.and.return.to.the. User/Group.window. Step 1: Here.you.can.enter.the.User.Name.and.Password.for.the.new.user. account..The.password.needs.to.be.confirmed.by.re-entering.the. password.in.the.Confirm.Password.field. Click.on.the.Previous.button.to.return.to.the.previous.window. Click.on.the.Next.button.to.accept.the.change.and.continue.to. the.next.window. Click.on.the.Exit.button.to.discard.the.changes.made.and.return. to.the.User/Group.window. D-Link DNS-320 User Manual... - Page 42 Click.on.the.Previous.button.to.return.to.the.previous.window. Click.on.the.Next.button.to.accept.the.change.and.continue. to.the.next.window. Click. on. the. Exit. button. to. discard. the. changes. made. and. return.to.the.User/Group.window. Step Here.the.user.can.configure.the.appropriate.Network.Access. settings.for.the.user.by.simply.selecting.one.of.the.following. options:.Read Only,.Read/Write.or.Deny Access. Click.on.the.Previous.button.to.return.to.the.previous.window. Click.on.the.Next.button.to.accept.the.change.and.continue. to.the.next.window. Click. on. the. Exit. button. to. discard. the. changes. made. and. return.to.the.User/Group.window. D-Link DNS-320 User Manual...
- Page 43 Section 4 - Configuration Step 3-1: Here.the.user.can.configure.the.application.privileges.assigned. to.this.user..Select.either.FTP.or.WebDAV..CIFs.and.AFP.is.set.as. default. • CIFS.is.short.for.Common.Internet.File.System. • AFP.is.short.for.Apple.Filing.Protocol. • FTP.is.short.for.File.Transfer.Protocol. • WebDAV.is.short.for.Web-based.Distribution,.Authoring,.and. Versioning. Click.on.the.Previous.button.to.return.to.the.previous.window. Click.on.the.Next.button.to.accept.the.change.and.continue.to. the.next.window. Click.on.the.Exit.button.to.discard.the.changes.made.and.return. to.the.User/Group.window. Step 3-1-1: Here.the.user.can.configure.the.WebDAV.settings.for.the.user. account..Select.the.volumes.the.user.can.have.WebDAV.access.to. and.then.select.whether.to.give.Read Only.or.Read/Write access. Click.on.the.Previous.button.to.return.to.the.previous.window. Click.on.the.Next.button.to.accept.the.change.and.continue.to. the.next.window. Click.on.the.Exit.button.to.discard.the.changes.made.and.return. to.the.User/Group.window. D-Link DNS-320 User Manual...
- Page 44 Section 4 - Configuration Step 4: Here.you.can.configure.the.Quotas.settings.for.the.user.account..Enter. the.quota.amount.in.the.block(s).indicated.in.Megabytes..By.entering. 0Mb.the.quota.will.be.set.to.unlimited. Click.on.the.Previous.button.to.return.to.the.previous.window. Click.on.the.Next.button.to.accept.the.change.and.continue.to.the.next. window. Click.on.the.Exit.button.to.discard.the.changes.made.and.return.to.the. User/Group.window. Step 5: Here.you.can.confirm.to.create.the.new.account. Click.on.the.Previous.button.to.return.to.the.previous.window. Click.on.the.Finish.button.to.accept.the.change.and.complete.the.wizard. Click.on.the.Exit.button.to.discard.the.changes.made.and.return.to.the. User/Group.window. After.the.new.account.has.been.created,.a.window.will.appear.that.states. the.account.was.created.successfully..Click.on.the.OK.button.to.continue. Step 6: A.final.message.appears.indicating.the.user.is.successfully.added.to.the. ShareCenter.Pulse.configuration.. D-Link DNS-320 User Manual...
-
Page 45: Adding.new.groups.wizard
Adding New Groups Wizard The.following.section.will.describe.how.to.add.a.new.group.on.this.device..To.add.a.group.click.on.the.New.button..A.wizard.will.be.launched: This. window. welcomes. the. user. to. the. setup. wizard. for. adding. or. modifying.a.group..This.wizard.will.guide.the.user.through.the.steps.of. setup. In.this.wizard.the.user.will.be.able.to: 1).Create.a.new.group. 2).Add.a.user.to.a.group. 3).Configure.the.appropriate.network.shares.settings. 4).Configure.the.quota.settings. 5)..View.a.summary.of.the.configuration.before.completing.the.addition. Click.on.the.Next.button.to.continue. Click.on.the.Exit.button.to.discard.the.changes.made.and.return.to.the. User/Group.window. Step 1: Enter.the.name.for.your.new.group. Click.on.the.Previous.button.to.return.to.the.previous.window. Click.on.the.Next.button.to.accept.the.change.and.continue.to. the.next.window. Click.on.the.Exit.button.to.discard.the.changes.made.and.return. to.the.User/Group.window. D-Link DNS-320 User Manual... - Page 46 Click. on. the. Exit. button. to. discard. the. changes. made. and. return.to.the.User/Group.window. Step 3: Assign.the.appropriate.Network.Access.settings.for.this.group. by.simply.clicking.one.of.the.following.options:.Read Only,. Read Write.or.Deny Access. Click.on.the.Previous.button.to.return.to.the.previous.window. Click.on.the.Next.button.to.accept.the.change.and.continue. to.the.next.window. Click. on. the. Exit. button. to. discard. the. changes. made. and. return.to.the.User/Group.window. D-Link DNS-320 User Manual...
- Page 47 Click.on.the.Previous.button.to.return.to.the.previous.window. Click.on.the.Next.button.to.accept.the.change.and.continue. to.the.next.window. Click. on. the. Exit. button. to. discard. the. changes. made. and. return.to.the.User/Group.window. Step 4: Configure.the.Quotas.settings.for.this.group..Enter.the.quota. amount.in.the.block.indicated.in.Megabytes..By.entering.0Mb. the.quota.will.be.set.to.unlimited. Click.on.the.Previous.button.to.return.to.the.previous.window. Click.on.the.Next.button.to.accept.the.change.and.continue. to.the.next.window. Click. on. the. Exit. button. to. discard. the. changes. made. and. return.to.the.User/Group.window. D-Link DNS-320 User Manual...
- Page 48 Section 4 - Configuration Step 5: Verify.the.settings.and.click.Finish. Click.on.the.Previous.button.to.return.to.the.previous.window. Click.on.the.Finish.button.to.accept.the.change.and.completed. the.wizard. Click. on. the. Exit. button. to. discard. the. changes. made. and. return.to.the.User/Group.window. After.the.new.group.has.been.created,.a.window.will.appear. that.states.the.group.was.created.successfully..Click.on.the. OK.button.to.continue. Success: A. final. message. appears. indicating. the. group. was. created. successfully.and.added.to.the.ShareCenter.Pulse.configuration. D-Link DNS-320 User Manual...
-
Page 49: Quotas
Section 4 - Configuration Quotas The.ShareCenter.Pulse.supports.storage.quotas.for.both.groups.and.individual.users..Assigning.a.quota.to.a.group.or.user.will.limit.the.amount.of. storage.they.are.allocated..By.default,.users.and.groups.do.not.have.a.quota. Click.the.Enabled.button.to.enforce.the.quotas.that. are. set. in. the. Users. /. Groups. management. or. the. tables.below. In.the.User.Quota.Settings.table.you.can.view.the. current.user.usage.and.limit.setting..Click.on.the.blue. font.to.set.usage.limits. In.the.Group.Quota.Settings.table.you.can.view.the. current.group.usage.and.limit.setting..Click.on.the. blue.font.to.set.the.limit. D-Link DNS-320 User Manual... -
Page 50: Network.shares
To. add. a. rule. click. on. the. New. button..To. modify. an. existing.rule.click.on.the.Modify.button..To.remove.a. rule.click.on.the.Delete.button. To.select.a.rule,.simply.click.on.the.rule.and.the.entry. should.change.to.red. At.the.bottom.of.the.table.the.user.can.navigate.through. pages. and. also. refresh. the. window. by. click. on. the. Refresh.button. If.at.any.point.the.user.wants.to.reset.the.network.access. list. to. the. default. configuration,. click. on. the. Reset Network Shares.button. D-Link DNS-320 User Manual... -
Page 51: Adding.new.network.shares.wizard
Adding New Network Shares Wizard The.following.section.will.describe.how.to.add.a.new.Network.Share.on.the.ShareCenter.Pulse..To.add.a.Network.Share..click.on.the.Add.button.. A.easy.to.configure.wizard.will.be.launched.and.look.like.the.following: Start: This.window.welcomes.the.user.to.the.setup.wizard.for.adding.or. modifying.a.network.share.. In.this.wizard.the.user.will.be.able.to: 1).Select.share.folders. 2).Configure.shared.folder.access.rights. 3).Configure.network.access.settings. 4).View.a.summary.of.the.configuration.before.completing. Click.on.the.Next.button.to.continue. Click.on.the.Exit.button.to.discard.the.changes.made.and.return. to.the.Network.Shares.Page. Step 1: Select. the. folder. you. want. to. include. in. this. network. share. by. checking.the.box. Click.on.the.Previous.button.to.return.to.the.previous.window. Click.on.the.Next.button.to.accept.the.change.and.continue.to. the.next.window. Click.on.the.Exit.button.to.discard.the.changes.made.and.return. to.the.Network.Shares.Page. D-Link DNS-320 User Manual... - Page 52 Select. All Account. to. allow. all. accounts. access. to. this. folder..Select.Specific User/Group.to.only.allow.certain.users.or. groups.access.to.this.folder. Click.on.the.Previous.button.to.return.to.the.previous.window. Click.on.the.Next.button.to.accept.the.change.and.continue.to.the. next.window. Click.on.the.Exit.button.to.discard.the.changes.made.and.return.to. the.Network.Shares.Page. Select. the. appropriate. access. rights. for. the. share.. Options. to. Step 2-1: choose.from.are.Read Only,.Read Write.and.Deny Access..This. procedure.can.also.be.used.to.block.certain.users.from.accessing. certain.folders. Click.on.the.Previous.button.to.return.to.the.previous.window. Click.on.the.Next.button.to.accept.the.change.and.continue.to. the.next.window. Click.on.the.Exit.button.to.discard.the.changes.made.and.return. to.the.Network.Shares.Page. D-Link DNS-320 User Manual...
- Page 53 Section 4 - Configuration Step 2-2: If.you.select.Specific User/Group.in.Step.2,.then.this.step.allows. you.to.set.the.access.rights.for.each.User.configured.on.the.device. Click.on.the.Previous.button.to.return.to.the.previous.window.. Click.on.the.Next.button.to.accept.the.change.and.continue.to. the.next.window. Click.on.the.Exit.button.to.discard.the.changes.made.and.return. to.the.Network.Shares.Page. Step 2-2-1: If.you.select.Specific User/Group.in.Step.2.then.this.step.allows. you. to. set. the. access. rights. for. each. Group. configured. on. the. device. Click.on.the.Previous.button.to.return.to.the.previous.window.. Click.on.the.Next.button.to.accept.the.change.and.continue.to. the.next.window. Click.on.the.Exit.button.to.discard.the.changes.made.and.return. to.the.Network.Shares.Page. D-Link DNS-320 User Manual...
- Page 54 However.it.is.recommended.to.set.the.share.oplocks.to.No.(off ). when.using.file-based.database.applications..When.enabled,.the. file.attribute. “ Map.Archive”.will.be.copied.as.the.file.is.being.stored. on.the.device. Click.on.the.Previous.button.to.return.to.the.previous.window. Click.on.the.Next.button.to.accept.the.change.and.continue.to. the.next.window. .Click.on.the.Exit.button.to.discard.the.changes.made.and.return. to.the.Network.Shares.Page. Step 3-1: Assign.protocol.privileges.that.a.user.can.use.to.access.this.share.. Options.to.choose.from.are.FTP,.NFS.and.WebDAV..CIFS.and.AFP. are.set.as.default. • CIFS.is.short.for.Common.Internet.File.System.. • AFP.is.short.for.Apple.Filing.Protocol.. • FTP*.is.short.for.File.Transfer.Protocol. • NFS.is.short.for.Network.File.System.. • WebDAV*.is.short.for.Web-based.Distributed.Authoring.and. Versioning. Click.on.the.Previous.button.to.return.to.the.previous.window. Click.on.the.Next.button.to.accept.the.change.and.continue.to. the.next.window. Click.on.the.Exit.button.to.discard.the.changes.made.and.return. to.the.Network.Shares.Page. D-Link DNS-320 User Manual...
- Page 55 Select.the.FTP.settings.for.this.share..FTP.access.can.be: 1).FTP.Anonymous.None.(No.Access). 2).FTP.Anonymous.Read.Only.(Limited.Access). 3).FTP.Anonymous.Read/Write.(Full.Access). Click.on.the.Previous.button.to.return.to.the.previous.window. Click.on.the.Next.button.to.accept.the.change.and.continue.to. the.next.window. Click.on.the.Exit.button.to.discard.the.changes.made.and.return. to.the.Network.Shares.Page. Step 3-1-2: If.you.selected.NFS.as.an.access.method.to.your.network.share. then.set.the.parameters.below: • Host. -. Allowable. host. address. that. can. access. using. NFS (*.indicates.all.hosts). • Root Squash.-.Disables.writing.to.the.Root.owned.directories. and.files.on.the.system.when.the.user.has.root.access.privileges. • Write.-.provide.write.permission.to.the.file.system. Click.on.the.Previous.button.to.return.to.the.previous.window. Click.on.the.Next.button.to.accept.the.change.and.continue.to. the.next.window. Click.on.the.Exit.button.to.discard.the.changes.made.and.return. to.the.Network.Shares.Page. D-Link DNS-320 User Manual...
- Page 56 Section 4 - Configuration Step 3-1-3: If.you.selected.WebDAV.as.an.access.method.in.Step.3.then.this. step.allows.you.to.set.the.access.parameters. Click.on.the.Previous.button.to.return.to.the.previous.window. Click.on.the.Next.button.to.accept.the.change.and.continue.to. the.next.window. Click.on.the.Exit.button.to.discard.the.changes.made.and.return. to.the.Network.Shares.Page. Step 4: Click.Finish.to.save.your.settings. Click.on.the.Previous.button.to.return.to.the.previous.window. Click.on.the.Finish.button.to.accept.the.change.and.complete. the.wizard. Click.on.the.Exit.button.to.discard.the.changes.made.and.return. to.the.Network.Shares.Page. *Note:.If.you.are.going.to.use.FTP.or.WebDav.from.this. NAS.through.the.internet,.make.sure.the.ShareCenter is.connected.to.a.router,.you.will.also.need.to.configure. the.router.to.forward.port.20~21.for.FTP,.and.port.80.for. WebDAV.IP.address.of.this.ShareCenter D-Link DNS-320 User Manual...
-
Page 57: Adding.new.iso.mount.shares.wizard
Section 4 - Configuration Adding New ISO Mount Shares Wizard The.following.section.will.describe.how.to.add.a.new.ISO.mount.on.the.ShareCenter.Pulse..To.add.a.ISO.Mount.click.on.the.New.button..A.easy.to. configure.wizard.will.be.launched.and.look.like.the.following: In.Account.Management,.under.Network.Shares,. the.section.ISO.Mount.Shares.Settings.allows.the. user.to.add.new.ISO.mounts. D-Link DNS-320 User Manual... - Page 58 Section 4 - Configuration Setup: This.window.welcomes.the.user.to.the.setup.wizard.for.creating.a new.ISO.mounted.share..This.wizard.will.guide.the.user.through the.steps.of.setup. In.this.wizard.the.user.will.be.able.to: 1).Select.an.ISO.file. 2).Share.folder.access.rights. 3).Configure.network.access.settings. 4).View.a.summary.of.the.configuration.before.completing. Click.on.the.‘Next’.button.to.continue. Click.on.the.‘Exit’.button.to.discard.the.changes.made.and.return to.the.Network.Shares.Page. Step 1: Click.on.the.Previous.button.to.return.to.the.previous.window.. Click.on.the.Next.button.to.accept.the.change.and.continue.to. the.next.window. Click.on.the.Exit.button.to.discard.the.changes.made.and.return. to.the.Network.Shares.Page. D-Link DNS-320 User Manual...
- Page 59 Section 4 - Configuration Step 2: Assign.access.privileges.to.this.ISO.Mount.share.. •. Select.All.Accounts.to.assign.the.ISO.Mount.share.read/deny. privileges.to.all.users.. •. Select. Specific. User/Group. in. order. to. assign. read/deny. privileges.to.individual.users.and.groups. Click.on.the.Previous.button.to.return.to.the.previous.window.. Click.on.the.Next.button.to.accept.the.change.and.continue.to. the.next.window. Click.on.the.Exit.button.to.discard.the.changes.made.and.return. to.the.Network.Shares.Page. Step 2-1: You.can.assign.Read Only.or.Deny Access.privileges.to.the.ISO. Mount.share.here..Click.on.the.appropriate.radio.button.for.the. privileges.you.would.like.to.assign. Click.on.the.Previous.button.to.return.to.the.previous.window. Click.on.the.Next.button.to.accept.the.change.and.continue.to. the.next.window. Click.on.the.Exit.button.to.discard.the.changes.made.and.return. to.the.Network.Shares.Page. D-Link DNS-320 User Manual...
- Page 60 Section 4 - Configuration Step 3: You.may.add.a.comment.that.describes.the.ISO.Mount.Share. Click.on.the.Previous.button.to.return.to.the.previous.window. Click.on.the.Next.button.to.accept.the.change.and.continue.to. the.next.window. Click.on.the.Exit.button.to.discard.the.changes.made.and.return. to.the.Network.Shares.Page. Step 3-1: Assign.protocol.privileges.that.a.user.can.use.to.access.this.share..Options.to.choose.from.are.FTP,.NFS.and.WebDAV..CIFS.and.AFP. are.set.as.default. • CIFS.is.short.for.Common.Internet.File.System.. • AFP.is.short.for.Apple.Filing.Protocol.. • FTP.is.short.for.File.Transfer.Protocol. • NFS.is.short.for.Network.File.System.. • WebDAV.is.short.for.Web-based.Distributed.Authoring.and. Versioning. Click.on.the.Previous.button.to.return.to.the.previous.window. Click.on.the.Next.button.to.accept.the.change.and.continue.to. the.next.window. Click.on.the.Exit.button.to.discard.the.changes.made.and.return. to.the.Network.Shares.Page. D-Link DNS-320 User Manual...
- Page 61 Section 4 - Configuration Step 4: Click.Finish.to.save.your.settings. Click.on.the.Previous.button.to.return.to.the.previous.window. Click.on.the.Finish.button.to.accept.the.change.and.complete. the.wizard. Click.on.the.Exit.button.to.discard.the.changes.made.and.return. to.the.Network.Shares.Page. Step 5: Using.the.D-Link.Storage.Utility.the.ISO.Mount.Share.can.now.be. mapped.to.your.computer.so.that.you.can.access.it. D-Link DNS-320 User Manual...
-
Page 62: Admin.password
Section 4 - Configuration Admin Password Username: The. administrator.user. name. is. admin,. and. this. cannot.be.changed. Password: Enter.the.current.password..(Leave.this.blank.if.you. have.not.set.a.password.yet.) New Password: Enter.a.new.password. Confirm Password: Enter.the.new.password.again.for.confirmation. D-Link DNS-320 User Manual... -
Page 63: Network.management
Section 4 - Configuration Network Management LAN Setup The.LAN.Settings.allows.you.to.enable.LLTD.and.to.configure.the.Link.Speed.and.the.IP.address.as.a.DHCP.client.or.Static.IP. IP Settings DHCP Client: Selecting.DHCP.Client.will.cause.the.DNS-320.to.obtain.an.IP.address. from.the.local.DHCP.server. Static IP: Selecting.Static.IP.requires.you.to.assign.the.IP.information.for.the. DNS-320.manually.. IP Address: Enter.an.IP.address.for.your.device..The.IP.address.of.each.device. on.the.local.area.network.must.be.within.the.same.IP.address.range. and.subnet.mask.. Subnet Mask: Enter.the.Subnet.Mask..The.default.subnet.mask.is.255.255.255.0. Gateway IP Enter.the.Gateway.IP.Address.for.the.device..The.Gateway.IP.Address. Address: is.almost.always.the.LAN.address.of.your.router..Most.D-Link.routers. have.a.default.LAN.IP.address.of.192.168.0.1. DNS1/ DNS2: Specify.the.first.and.second.DNS.Addresses.for.the.device..The.first. DNS.address.is.usually.the.LAN.address.of.your.router..A.DNS.Address. will.allow.the.device.to.resolve.names.into.IP.addresses..Click.Save Settings.when.finished D-Link DNS-320 User Manual... -
Page 64: Link Speed And Lltd Settings
Section 4 - Configuration Link Speed and LLTD Settings Speed: Displays.the.current.Ethernet.bit.rate.in.Megabits.per. second.. Link Speed: Select. either. Auto. (Auto-Negotiate),. 100. Mbps,. or. 1000.Mbps.by.clicking.the.appropriate.radio.button.. Then.click.the.Save Settings.button.to.save.the.new. settings. LLTD: The. device. supports. LLTD. (Link. Layer. Topology. Discovery).and.is.used.by.the.Network.Map.application. that.is.included.in.Windows.Vista®.and.Windows®.7. Select.to.enable.or.disable.LLTD. D-Link DNS-320 User Manual... -
Page 65: Dynamic.dns
Select. a. DDNS. Server. from. the. combo. box. on.the.right.hand-side,.or.type.in.the.server. address.manually. Host Name: Enter.your.DDNS.host.name. Username or Key: Enter.your.DDNS.username.or.key. Password or Key: Enter.your.DDNS.password.or.key. Verify Password or Re-enter.your.password.or.key. Key: Status: Displays.your.DDNS.status. When.the.user.clicks.on.the.“Sign.up.for.D-Link’s.Free.DDNS.service.at. www.DLinkDDNS.com”.link,.the.user.will.be.re-directed.to.the.D-Link. DDNS.page.. Here.the.user.can.create.or.modify.a.D-Link.DDNS.account.to.use.in. this.configuration. Note:.If.you.are.going.to.use.DDNS.from.this.NAS.make.the. ShareCenter .is.connected.to.a.router,.you.will.also.need.to.configure. the.router.to.forward.port.80.to.the.IP.address.of.this.ShareCenter D-Link DNS-320 User Manual... -
Page 66: Application.management
Western. European. code. page. when. transferring. files.. Language: Support.has.been.added.for.non.standard.FTP.clients.that. are.capable.of.supporting.these.character.sets. Flow Control: Allow.you.to.limit.the.amount.of.bandwidth.available.for. each.user. SSL/TLS: Here.the.user.can.enable.the.SSL/TLS.connection.only. FXP: Enable.or.Disable.File.eXhange.Protocol.to.transfer.files. from.one.FTP.server.to.another. Note:. In. order. to. use. FXP. (File. Exchange. Protocol). for. server-to-server. data. transfer,. make. sure. to. change. the. port.from.21.to.some.other.port.as.listed.in.the.Port.section. of.the.Web.UI..Also,.make.sure.to.open.the.corresponding. port.on.your.router.and.forward.that.port.from.your.router. to.the.device. D-Link DNS-320 User Manual... -
Page 67: Upnp.av.server
Click.the.Refresh All.button.to.update.all.the.shared.files.and.folder.lists. UPnP AV Server: Select.Enable.or.Disable. After. enabling. the. UPnP. AV. Server. option,. the. following.window.will.appear. In.the.window.you.will.be.able.to.add,.delete.and.view. existing.UPnP.AV.Server.shared.folders. Add, Delete: To.add. a.new. folder. to. the. shared. list,. click. on.the. Add.button..To.delete.an.existing.folder,.click.on.the. Delete.button..To.refresh.the.list,.click.on.the.Refresh. button. Refresh All: Click.the.Refresh All button.after.adding.new.files.to. be.used.by.UPnP.AV.compatible.devices. D-Link DNS-320 User Manual... -
Page 68: Itunes.server
If.the.server.is.enabled,.the.device.will.be.automatically.detected.by.the.iTunes.program.and.the.music.and.videos.contained.in.the.specified. directory.will.be.available.to.stream.over.the.network..Click.the Refresh All button.to.update.all.the.shared.files.and.folder.lists. iTunes Server: Select.to.enable.or.disable.the.iTunes.Server. Folder: Specifies.the.folder.or.directory.that.will.be.shared. by.the.iTunes.server..Select.root.to.share.all.files. on.all.volumes,.or.click.Browse.to.select.a.specific. folders. Password: Sets.password.for.the.iTunes.server..(Optional) MP3 Tag Here. the. user. can. select. the. MP3.Tag. Codepage. Codepage: used.by.this.device..Currently.the.Codepage.is.set. to.Western.European. Auto Refresh: Here.the.user.can.select.the.Automatically.Refresh. time. After.enabling.the.iTunes.server.on.the.device,.launch.iTunes..In.your.iTunes.utility,.select.the.device..and.enter.the.iTunes.server.password.if.required. Media.stored.on.the.device..will.then.be.available.for.use.in.iTunes. Select.the.device.When.prompted,.enter.in.the.iTunes.server. password..Click.OK. D-Link DNS-320 User Manual... -
Page 69: Afp.service
Section 4 - Configuration AFP Service The.ShareCenter.Pulse.supports.Apple.Filing.Service.for.connectivity.with.MAC.OS.based.computers..If.you.need.to.use.AFP.service.enable.it.here. otherwise.leave.it.disabled.to.reduce.CPU.resource.overhead. AFP Service: Select. enable. to. allow. MAC. OS. based. systems. connect.to.your.device.using.AFP.protocol..Select. disable. to. prevent. unnecessary. CPU. resource. depletion.when.AFP.is.not.being.used. Save Settings: Click.to.save.your.AFP.settings. Note:.Enabling.AFP.service.will.disable.oplocks. D-Link DNS-320 User Manual... -
Page 70: Nfs.service
Section 4 - Configuration NFS Service The.device.supports.Network.File.System.(NFS).service..To.enable.this.multi-platform.file.system.on.your.device.enable.it.here..Otherwise.disable. the.option.to.prevent.unnecessary.CPU.overhead. NFS Service: Select.Enable.to.allow.systems.that.support.NFS.to. connect. to. your. device. using. NFS. protocol.. Select. Disable. to. prevent. unnecessary. CPU. resource. depletion.when.NFS.is.not.being.used. Save Settings: Click.to.save.your.NFS.settings. Note:.Applying.NFS.service.to.any.Share.will.disable.oplocks. D-Link DNS-320 User Manual... -
Page 71: System.management
Section 4 - Configuration System Management Language This.menu.item.allows.you.to.install.language.packages.onto.your.system..In.addition,.you.can.also.install.language.packages.to.suit.your.local. language.needs. Languages: Click.on.Browse.to.search.for.the.specific.language. pack.you.want.to.install..After.selecting.the.language. pack,.then.click.Apply.to.install.the.language.pack. Language In.the.languages.window.you.will.see.a.table.where. Pack List: the. loaded. language. packs. will. be. displayed. and. can. be. enabled. at. will. by. simply. clicking. the. (>). “play”.button..More.than.one.language.pack.can.be. installed,.but.only.one.language.pack.can.be.used. at.a.time. D-Link DNS-320 User Manual... -
Page 72: Time.and.date
Click. Save Settings. to. apply. these. settings..To. synchronize. the. device. clock. with. your. computer,. click.the.Set time from my computer.button. Time Zone: Select. your. time. zone. from. the. drop-down. menu.. Click.Save Settings.after.selecting.your.time.zone NTP Server: Network.Time.Protocol.(NTP).synchronizes.the.device. with.an.Internet.time.server.. D-Link.provides.two.time.servers.for.your.convenience.. Select.the.one.closest.to.your.location. Click.Save Settings.to.accept.these.changes. D-Link DNS-320 User Manual... -
Page 73: Device
Section 4 - Configuration Device The.device.settings.page.allows.you.to.assign.a.workgroup,.name.and.description.to.the.device..You.can.access.this.device.by.typing.the.host.name. in.the.URL.section.of.your.web.browser..For.example:.http://dlink-d10001. Workgroup: Enter. your.Workgroup. name. here..The. workgroup. name.should.be.the.same.as.the.computers.on.the. network..Devices.using.the.same.workgroup.will.have. additional.file.sharing.methods.available. Name: Enter.your.device.name.here..This.name.is.what.the. device.will.appear.as.on.the.network..By.default,.the. device.name.is.dlink-xxxxxx,.where.xxxxxx.is.the.last. six.digits.of.the.MAC.address. Description: Assign.a.device.description.to.the.device. Click.Save Settings.to.accept.these.changes. D-Link DNS-320 User Manual... -
Page 74: System.settings
Section 4 - Configuration System Settings Restart: Clicking.to.reboot.the.device. Default: Click. to. restore. the. device. back. to. the. factory. default.settings..All.previous.settings.that.have.been. configured.will.be.erased. Shutdown: Click.to.turn.off.the.device. D-Link DNS-320 User Manual... - Page 75 Idle Time: Enter. the. time. (in. minutes). that. the. administrator. and. users. will. be. allowed. to. remain.idle.while.accessing.the.web.UI. System Temperature Here. the. user. can. configure. the. system. Threshold: temperature.threshold.value..This.value.can. be.set.in.Fahrenheit.or.Celsius..The.device.will. automatically.shutdown.when.it.reaches.the. temperature.set.here. D-Link DNS-320 User Manual...
-
Page 76: Power.management
Section 4 - Configuration Power Management The.device.Power.Management.feature.allows.you.to.configure.the.drives.to.shut.down.while.power.remains.constant.to.the.device..The.drives. will.power.up.again.when.data.is.accessed. HDD Hibernation: Click.Enable.or.Disable. Turn Off Hard Drive: Set.the.amount.of.idle.time.before.the.drives. go.into.hibernation. Power Recover: Click.Enable.or.Disable..The.Power.Recovery. feature.will.automatically.restart.your.device. from.a.previously.unexpected.shutdown.due. to.a.power.failure. D-Link DNS-320 User Manual... - Page 77 Fan Control: The. speed. of. the. fan. can. be. controlled. from. this. section. If.you.select.Auto.mode,.the.speed.of.the.fan.will. change. (Off/Low/High). depending. on. the. internal. temperature.of.the.enclosure.. Power Off Click.Enable.to.turn.on.this.function.. Scheduling: Enable.or.disable.the.power.off.days.using.the.check. box. and. configure. the. time. for. each. day. that. the. power.off.will.occur. D-Link DNS-320 User Manual...
-
Page 78: Notifications
Enter. the. IP. address. or. domain. name. of. your. outgoing.mail.server..If.you.are.unsure.of.this. value,.contact.your.e-mail.provider. Sender E-mail: Enter. the.“from”. e-mail. address. (e.g.. alerts@ share.com)..This. field. does. not. require. a. valid. e-mail.address..However,.if.your.e-mail.client.is. filtering.spam,.make.sure.you.allow.this.address. to.be.received. Receiver E-mail: Enter.the.e-mail.address.you.want.to.send.the. alerts.to..This.address.must.correspond.with.the. SMTP.server.configured.above. SMTP Click.this.option.to.use.SMTP.authentication. Authentication: Click.the.Test E-Mail.button.to.send.a.test.alert. Test E-Mail: and.confirm.your.settings.are.correct. D-Link DNS-320 User Manual... -
Page 79: Sms Settings
Automatically. populated. from. the. Add. button. function. Phone Number 2: Enter. a. second. mobile. telephone. number.. Verify.that.the.number.input.is.according.to.the. configuration. instructions. from. your. Mobile. Service.Provider. Test SMS button: Click.this.button.to.send.a.test.message.to.your. mobile. phone. to. verify. the. settings. are. correct. and.the.API.URL.is.functioning.with.your.provider. D-Link DNS-320 User Manual... -
Page 80: Adding An Sms Service Provider
Section 4 - Configuration Adding an SMS Service Provider Once.you.have.a.SMS.Service.provide.you.with.a.HTTP.API.URL,.enter.it.into.the.Add.SMS.Service.Provider.wizard..Enter.the.URL.in.the.first.window. with.an.appropriate.Provider.Name..In.the.next.window.select.the.appropriate.HTTP.API.URL.parameter.types.definitions.from.the.drop-down. menus.next.to.the.parsed.fields.of.the.URL. Enter.your.SMS.Provider. name.here. Enter. the. HTTP. API. URL. provided.to.you. Choose. the. appropriate. type. parameter.in.the.drop-down.menu. for.the.parsed.parameters.of.the.URL. on.the.left. D-Link DNS-320 User Manual... -
Page 81: Event Settings
Section 4 - Configuration Event Settings You.can.limit.which.events.are.sent.as.alerts.to.the.Email.or.SMS.settings.by.checking.the.events.here. Event Settings: Select. the. information. you. want. e-mailed. to. the. above. address. or. sent. over. SMS. messages. to. the. above. mobile. number..The. items. checked. will. be. sent.when.necessary. D-Link DNS-320 User Manual... -
Page 82: Logs
Section 4 - Configuration Logs Within.the.Logs.menu.item.you.can.setup.your.device.to.receive.Log.Events.from.other.ShareCenter.Pulses.or.send.the.log.events.to.another. ShareCenter.Pulse.or.SysLog.server..You.can.also.view.the.NAS.system.logs.and.the.FTP.logs.here. Enable Syslog: Click.to.activate.the.Syslog.server.functionality.of. your.device.to.be.able.to.receive.logs.from.other. ShareCenter.Pulses. Syslog Server IP: Enter.the.IP.address.of.an.external.Syslog.server.that. you.wish.to.send.the.logs.of.this.device.to. Click.Clear Log.to.delete.all.the.existing.logs. Clear Log: Backup Log: Click.Backup Log.to.save.the.existing.logs.to.a.text. file.on.your.computer. D-Link DNS-320 User Manual... -
Page 83: Firmware.upgrade
Displays. the. date. of. when. the. firmware. was. Firmware Date: created. When. upgrading. the. firmware,. click. Browse. Firmware Upload: to. select. the. new. firmware. file. on. your. local. computer. and. then. click. Apply. to. begin. the. firmware.upgrade.process. D-Link DNS-320 User Manual... -
Page 84: Status
Section 4 - Configuration Status System Info Here.you.can.view.various.system.information.some.of.which.is.static.and.others.dynamic. Displays.the.local.network.settings.of.your.device. Information: Device Displays.the.workgroup,.name,.description,.current. Information: temperature,.packet.counts,.and.system.uptime. Volume Displays. the. hard. drive. information,. including. the. Information: disk.mode,.total.size,.used.and.remaining.drive.space. D-Link DNS-320 User Manual... -
Page 85: Hard.drive.info
Section 4 - Configuration Hard Drive Info This.section.will.display.a.summary.of.the.hard.drive(s).currently.installed..The.summary.will.include.information.such.as.the.hard.drive.manufacturer,. model,.serial.number,.temperature,.total.capacity.size,.and.status..The. “ Status”.of.the.hard.drive.will.display.the.health.of.the.hard.drive..If.your.hard. drive.is.healthy,.the.status.will.display.“Normal”..If.your.hard.drive.is.not.healthy,.the.status.will.display.“Abnormal”..At.any.time,.if.you.wish.to.view. the.S.M.A.R.T.table.of.the.hard.drive,.you.can.press.the.“Normal/Abnormal”.button..After.pressing.the.button.a.table.appears.with.the.S.M.A.R.T.. data.below.the.table.of.the.Hard.Drives.installed. D-Link DNS-320 User Manual... -
Page 86: Applications
Use.the.radio.buttons.to.select.the.type.of.server.that. the.source.files/folders.for.the.Schedule.Downloads. are.located.on..Click.the.HTTP.radio.button.to.specify. that.the.source.files.are.located.on.a.web.server..Click. the.FTP.radio.button.to.specify.that.the.source.files/ folders.are.located.on.an.FTP.server. Login Method: Enter.the.login.information.for.the.site.that.contains. the.files.that.you.want.to.schedule.for.downloading.. If.no.password.is.required,.select.Anonymous..If.a. password. is. required,. select. Account. and. provide. the.user.name.and.password. Username: Enter.the.user.name.here. Password: Enter.the.password.here. Type: Select.either.File.or.Folder.from.the.drop-down.list. depending.on.whether.you.wish.to.download.a.file.or. a.folder..Select.File.if.you.wish.to.download.a.specific. file..Select.Folder.if.you.wish.to.download.all.the.files. in.a.specific.folder. URL: Enter.the.FTP/.HTTP.site.address.for.the.scheduled. download..Click.on.Test.to.verify.access.to.the.site. address.and.file/folder..If.you.have.chosen.File.from. the.above.drop-down.list,.you.must.specify.the.exact. file.in.the.URL.path,.including.the.file.extension..(e.g.. http://example.com/test/testfile.txt). D-Link DNS-320 User Manual... - Page 87 In. addition,. there. is. an. option. to. delete. a. download. event. at. anytime.. Current. download. statistics,. such. as. %. completed. and. download. speed,. are. displayed. for. each. event.. A. refresh.button.is.also.provided.to.produce.updated. listings.at.any.time. Note:.If.you.are.going.to.use.FTP/HTTP.services,.i.e..scheduling.file.and.folder.backups.from.an.FTP.server,.web.server,.or.local. network.share,.from.this.NAS.through.the.internet,.you.may.need.to.configure.the.router.that.the.NAS.is.connected.to;.to.forward. port.20~21.for.FTP,.and.port.80.for.HTTP.to.the.IP.address.of.this.ShareCenterTM. D-Link DNS-320 User Manual...
-
Page 88: Remote.backups
Password: Enter.a.password.that.the.remote.client.will. use. Remote Backups list: This.is.the.list.of.remote.backup.jobs.built.by. pressing.the.Create.button.above.the.list.to. configure.each.job. Create: Click. the. Create. button. to. build. a. new. remote.backup.job. Modify: Click. to. make. changes. to. your. existing. Remote.Backup.jobs.in.the.Remote.Backup. list..You.must.select.the.remote.backup.job. first.and.then.click.the.Modify.button. Delete: To.remove.a.Remote.Backup.job.select.the.job. in.the.list.and.then.click.the.Delete.button. D-Link DNS-320 User Manual... - Page 89 Wecome: Displays.the.steps.of.the.wizard. Service Type: NAS to NAS:.Backup.from.the.local.NAS.to.a.remote. NAS.or.vice.versa. NAS to Linux:.Backup.from.the.local.NAS.to.a.Linux. file.system.or.vice.versa. Local to Remote:.Sets.the.backup.source.as.the.local. NAS.and.the.target.destination.for.the.backup.files. as.the.remote.NAS.or.Linux.file.system. Remote To Local: Sets. the. backup. source. as. the. remote. NAS. or. Linux. file. system. and. the. target. destination.for.the.backup.files.as.the.local.NAS. D-Link DNS-320 User Manual...
- Page 90 Each. incremental. backup. builds. a. complete. snapshot. of. the. backup. source. however. only. the. initial. backup. contains. all. the. original. files. and. folders..The.subsequent.backups.in.the.incremental. series.contain.new.files.and.folders.plus.the.links.to. the.first.incremental.backup. D-Link DNS-320 User Manual...
- Page 91 Section 4 - Configuration Remote Remote Path:.Using.the.drop-down.menu,.select.the. Settings: file.system.(folder).path.to.the.remote.target.or.source. system.for.backup. Schedule Manual:.Check.either.Yes.or.No.selection.below.to. Settings: start.the.backup.(yes).immediately.on.completion.of. the.wizard.or.(no).manually.start.the.backup.from.the. Remote.Backup.list. Once.-.Select.this.option.to.run.the.Remote.Backup. once.at.a.specific.date.and.time.set. Scheduled:. Select. this. option. to. set. the. backup. to. occur.daily,.weekly,.or.monthly.per.a.specific.schedule. D-Link DNS-320 User Manual...
- Page 92 Task:.The.name.of.the.Remote.Backup.job. Backups list: Schedule:.When.the.Remote.Backup.job.will.execute. Status:.Current.status.which.can.be •. Ready.the.remote.backup.job.is.ready.to.be.executed. •. Finished. the. remote. backup. job. has. executed. completely. and. successfully. •. Failed.the.Remote.backup.job.was.unsuccessful.during.execution. Enable/Disable:.If.the.button.shows.a.red.circle.the.remote.backup.job. is.enabled..Click.the.red.button.to.disable.the.remote.backup.job.and. the.button.will.change.to.a.green.triangle..Clicking.the.green.triangle. will.enable.the.job.again. Backup now:.Click.to.execute.the.backup.job.immediately.as.long.as. the.job.is.enabled. Recovery:.Click.to.write.the.backup.files.and.folders.back.into.the.source. file.system.from.the.backup.target.system.(reverse.the.file.direction). Navigation buttons: Use.these.buttons.to.move.up.and.down.in.the.list. when.there.are.multiple.jobs.configured. Refresh Button:.Click.this.button.during.a.backup.or.recovery.process. to.monitor.the.progress.by.updating.the.progress.completed.bar. D-Link DNS-320 User Manual...
-
Page 93: Local.backups
Overwrite. mode,. meaning. that. identical. files. URL: Enter.the.URL.of.the.site.or.server.you.are.initiating. in. the. destination. folder. will. be. overwritten. by. the. a. transfer. from.. E.g.. ftp://123.456.789/Test. or. source.files..Checking.Incremental.Backup.will.have. ftp://123.456.789/test.txt the.device.compare.identical.file.names.at.the.source. and.destination..Files.will.only.be.overwritten.if.the. Save To: Enter.a.valid.destination.drive.on.the.device,.or.click. source.file.is.more.recent. Browse.to.select.the.destination. Rename: Enter.the.renamed.file.name.here. D-Link DNS-320 User Manual... -
Page 94: Local.backups.-.Time.machine
Time. Machine. Settings. list. will. appear. when. this.checkbox.is.ticked. Time Machine Settings A. list. of. destination. folders. on. the. Network. list: Shares. associated. with. the. Time. Machine. backup. New: Click.to.add.a.NAS.folder.as.a.Time.Machine. destination. Delete: Click.to.delete.a.NAS.folder.setup. Remove all Network Deletes.all.of.the.NAS.folders.in.the.list. Shares: D-Link DNS-320 User Manual... -
Page 95: P2P.downloads.-.Settings
Port Settings: Click.Enable.to.allow.the.device.to.automatically. choose.incoming.connection.port.or.click.Custom. and. configure. the. incoming. connection. port. manually. Seeding: Select.one.of.the.three.seeding.options. Torrent Save Path: Displays. the. volume. where. the.Torrent. will. be. saved. Encryption: Select.Enable.or.Disable. Bandwidth Configure. the. maximum. download. rate. and. Control: maximum.upload.rate..Enter.-1.to.set.the.respective. field.to.unlimited. D-Link DNS-320 User Manual... -
Page 96: P2P.downloads.-.Downloads
The.user.can.also.navigate.to.next.pages.when. Delete: Click.Delete.to.remove.a.selected.download..This. more.than.one.page.exist.. will.remove..not.only.the.torrent.file,.but.also.the. Refresh: Click.Refresh.to.refresh.the.P2P.task.list.to.display. partially.downloaded.files.too. the.most.updated.statistics. Start / Stop: The.start.and.stop.button.allows.the.user.to.start. and.stop.selected.P2P.downloads.in.the.task.list. *Note:.If.you.are.going.to.use.P2P.from.this.NAS. through.the.internet.make.sure.the.ShareCenter™. Torrent Scheduling: Click.the.Torrent Scheduling.button.to.configure. is. connected. to. a. router,. you. will. also. need. to. a.scheduling.rule.for.the.select.P2P.downloading. configure.the.router.to.forward.port.6881~6890. task. to.the.IP.address.of.this.ShareCenter™ D-Link DNS-320 User Manual... -
Page 97: Web.file.server
Refresh: Click.the.Refresh.button.to.update.the.folder.and.file. view.of.the.Web.File.Server. Download: Downloads.the.selected.file.to.your.computer. Copy: Click.to.copy.the.file.to.the.clipboard...A.wizard.will.launch. and.allow.you.to.select.the.folder.to.paste.the.copy.of. the.file.to..Once.you.have.selected.the.folder,.click.OK. to.paste.the.file.in.that.folder. Move: Moves.the.file.to.a.new.folder. Delete: Removes.the.selected.file. *Note:.If.you.are.going.to.use.Web.File.Server.from.this.NAS.through. the.internet.make.sure.the.ShareCenter™.is.connected.to.a.router,. Rename: Allows.you.to.configure.a.new.file.name.for.the.selected. you.will.also.need.to.configure.the.router.to.forward.port.80.to.the. file. IP.address.of.this.ShareCenter™ Properties: Displays. the. file. properties. such. as. ownership,. access. rights.and.modify.time. D-Link DNS-320 User Manual... -
Page 98: Ajaxplorer
AjaXplorer. interface..That. users. read/write. access. privileges. to. the. shares. of. the.ShareCenter.Pulse.will.be.applicable.within.the. AjaXplorer.interface.as.well. *Note:. If. you. are. going. to. use. AjaXplorer. from. this. NAS. through. the. internet. make. sure. the. ShareCenter™.is.connected.to.a.router,.you.will.also. need.to.configure.the.router.to.forward.port.80.to. the.IP.address.of.this.ShareCenter™. D-Link DNS-320 User Manual... -
Page 99: Amazon.s3
Section 4 - Configuration AMAZON S3 Amazon.S3.(Simple.Storage.Service).is.an.online.storage.web.service.offered.by.AWS.(Amazon.Web.Services),.it.provides.a.simple.web.services. interface.that.can.be.used.to.store.and.retrieve.any.amount.of.data,.at.any.time,.from.anywhere.on.the.web..With.Amazon.S3.support,.it.is. possible.to.upload.the.data.from.your.the.DNS-320.to.Amazon.S3.or.download.the.data.from.Amazon.S3.to.your.DNS-320.. D-Link DNS-320 User Manual... -
Page 100: Creating An Aws Account
Section 4 - Configuration Creating an AWS Account In.a.suitable.web.browser.open.the.following.link.to.Amazon.Web.Services:.http://www.aws.amazon.com/s3.Then.click.on.the.link.at.the.top. named.“Create.an.Amazon.Web.Services.Account”.Follow.the.instructions.to.create.your.AWS.account.. Click.the.“Sign.Up.for.Amazon.S3”.button.and.follow.the.instructions.to.select.the.amount.of.desired.storage.and.create.your.Amazon.S3. account. You.will.be.issued.the.following.keys.as.credentials.to.give.you.access.to.the.account: 1..Access.Key.ID 2..Secret.Access.Key. Save.these.keys.in.a.secure.location.as.your.ShareCenter.will.need.them.to.create.the.backup.and.recovery.jobs.to.and.from.the.Amazon.S3. Cloud.Storage. D-Link DNS-320 User Manual... - Page 101 1. A Job Name - A 16 character name identifying the backup/restore job. 2. Remote Settings - the access key id and secret access key, the remote bucket name (remote path) and the Amazon Cloud Server region to use. D-Link DNS-320 User Manual...
- Page 102 5. Schedule Settings - -Select when the backup or restore job will execute from either: manually (now or later from the job list), once (at a predetermined time and day), or scheduled (a predetermined time on a daily basis). D-Link DNS-320 User Manual...
- Page 103 Section 4 - Configuration MODIFY BUTTON Once.a.job.is.created,.the.Modify.button.is.used.to.change.any.of.the.settings.described.in.the.Create.Button.help.text.above..Click.on.a.created. job.in.the.Amazon.S3.table.so.that.its.text.turns.red..Then.click.the.Modify.button.to.edit.the.job.settings.in.a.wizard.that.appears.. Note:.The.Job.Name.cannot.be.modified.. DELETE BUTTON The.Delete.button.is.used.to.delete.any.backup.or.restore.job.listed.in.the.Amazon.S3.table..Click.on.a.created.job.in.the.Amazon.S3.table.so. that.its.text.turns.red..Then.click.the.Delete.button.to.remove.the.job.from.your.ShareCenter.configuration.. ENABLE/DISABLE COLUMN This.field.of.the.jobs.created.administratively.controls.whether.the.job.will.execute.or.not..If.the.button.shows.a.green.triangle,.clicking.it. enables.the.job.to.function..If.the.button.shows.the.red.square,.clicking.it.disables.the.job.from executing.. D-Link DNS-320 User Manual...
-
Page 104: My.favorites
Section 4 - Configuration My Favorites The. My. Favorites. tab. allows. you. to. add. any. icon. you. routinely. access. from. the. Applications. or. Management.Tab. in. one. convenient.location.for.easy.and.quick.access..You.can.add.icons.to.the.My.Favorites.tab.using.two.different.methods: Re-arranging the My Favorites View Within.the.My.Favorites.tab.you.can.arrange.the.layout.of.the.icon.order.according.to.your.needs..To.move.the.position.of.an. icon,.click.and.drag.the.icon.to.a.new.position.anywhere.in.the.current.icon.locations..Once.you.have.dragged.the.icon.to.the. new.location,.release.the.mouse.button.and.the.other.icons.will.automatically.reorder.themselves. D-Link DNS-320 User Manual... -
Page 105: Add.an.icon.to.my.favorites
Section 4 - Configuration Add an Icon to My Favorites There.are.two.methods.to.add.an.icon.alias.to.My.Favorites..You.can.either.right-click.the.icon.and.select.Add to My Favorites.or.use.the.Drag.and. Drop.method.as.per.item.2.below. 1..Right-click.on.an.icon.in.the.applications. or.management.tab.and.click.on.the.Add to My Favorite.menu.item.from.the.command. list.that.appears.. 2..While.holding.the.left.button.down.over. the.icon.drag.it.over.the.My.Favorites.tab. (drag. and. drop. method)..You. will. see. an. white. arrow. pointing. to. the. My. Favorites. tab.which.is.highlighted.when.you.start.to. drag.the.icon D-Link DNS-320 User Manual... -
Page 106: Remove.an.icon.from.my.favorites
Section 4 - Configuration Remove an Icon from My Favorites To.remove.an.icon.alias.from.the.My.Favorites.tab.simply.right-click.on.it.and.select.Remove From My Favorite.in.the.context.selection.that.appears. Right-click.an.Icon.alias.in.the.My.Favorites. tab.and.select.Remove From My Favorite option...The.Icon.alias.should.disappear.from. the.My.Favorites.tab.view. D-Link DNS-320 User Manual... -
Page 107: Knowledge Base
Knowledge Base What is RAID? RAID,.short.for.Redundant.Array.of.Independent.Disks,.is.a.combination.of.two.or.more.disks.with.the.aim.of.providing.fault.tolerance.and.improving. performance..There.are.several.different.levels.of.RAID,.with.each.one.providing.a.different.method.of.sharing.or.distributing.data.among.the.drives.. The.device.supports.JBOD,.RAID.0,.RAID.1,.and.Standalone. RAID 0 RAID.0.provides.data.striping,.which.spreads.out. RAID 1 RAID.1.provides.mirroring.over.multiple.disks,.with.the. blocks.of.data.over.all.drives,.but.does.not.provide. same.read/write.speed.of.a.single.disk..A.RAID.1.array.can. data.redundancy. only.be.as.large.as.it’s.smallest.member.disk. Although. performance. is. improved,. the. lack. of. Because.the.data.is.stored.on.multiple.disks, fault.tolerance.means.that.if.one.drive.fails,.all.data. RAID. 1. provides. fault. tolerance. and. protection,. in. in.the.array.will.be.lost. addition.to.performance.advantages. D-Link DNS-320 User Manual... -
Page 108: Mapping.a.drive
Section 5 - Knowledge Base Mapping a Drive You.can.use.the.D-Link.Storage.Utility.to.map.drives.to.your.computer..Insert.the.ShareCenter.Pulse.CD.into.your.CD-ROM.drive. Click.on.the.D-Link Storage Utility The.Easy.Search.Utility.will.load.and.detect.any.ShareCenter.Pulse.devices.that.are.on.the.local.network. D-Link DNS-320 User Manual... - Page 109 Section 5 - Knowledge Base If.the.device.you.are.working.with.does.not.show.up.in.the.device.list,.click.Refresh.. Highlight.an.available.device. Available. volumes. will. be. displayed. under. Drive. Mapping.. Highlight. the. volume.you.want.to.map. Select.an.available.drive.letter.from.the. drop-down.menu.and.click.Connect. Once.connected,.your.mapped.drive(s).will.appear.in.My.Computer. D-Link DNS-320 User Manual...
- Page 110 Section 5 - Knowledge Base Double-click. the. My Computer icon.on.your.desktop. Double-click. the. mapped. drive. to.access.the.files.and.folders. D-Link DNS-320 User Manual...
-
Page 111: Mapping.the.recycle.bin
Section 5 - Knowledge Base Mapping the Recycle Bin If.you.have.turned.on.the.Recycle.Bin.option.with.any.of.your.Network.Shares.created,.then.you.can.map.the.recycle.bin.as.a.Network.Drive.to.have. access.to.it. The. Recycle. Bin. will. appear. in. the. drive. mapping. area. of. the. Storage.Utility. Once.connected.the.Recycle.Bin. of. the. device. will. appear. as. a. Network.Drive. D-Link DNS-320 User Manual... -
Page 112: Usb.print.server
Section 5 - Knowledge Base USB Print Server The.device.features.a.built-in.USB.print.server,.giving.users.the.ability.to.share.a.printer.on.their.local.network..Connect.a.USB.printer.to.the.USB. port.on.the.back.of.the.device..It.is.important.to.ensure.that.any.of.the.printer.manufacturer’s.drivers.are.already.installed.or.available.on.any. computer.you.want.to.print.from. Note:.Only.the.print.function.is.supported..The.device.does.not.support.the.copy.and.scan.functions.of.Multi-Function.Printers. To.add.a.printer,.connect.your.printer.via.USB.cable.to.the.USB.port.of.your.device: The.printer.should.appear.in.your.in.the.System.Info.menu.of.the.Status.icon. D-Link DNS-320 User Manual... - Page 113 Section 5 - Knowledge Base Connect. to. your. device. with. Samba. and.then.double-click.the.lp.icon. The.Windows .Add.Printer.Wizard.will.launch: ® Select. the. printer. driver. from. the. installed. Manufacturer.list.or.use.the.Have Disk.button.to. browse.for.the.printer.driver.file. Click.OK.to.continue. D-Link DNS-320 User Manual...
- Page 114 Section 5 - Knowledge Base Once. you. have. selected. the. proper. driver. as. shown.in.the.browse.list.then.click.OK to.install. the.printer. The. printer. is. now. installed. and. the.printer.queue.will.appear. D-Link DNS-320 User Manual...
-
Page 115: Yahoo!.Widget.installation
Section 5 - Knowledge Base Yahoo! Widget Installation D-Link.provides.an.added.feature.called.a.Yahoo!.Widget. What is a Yahoo Widget? Yahoo!.Widgets.are.free.application.platforms.that.can.be.used.in.Microsoft.Windows.and.Mac.OS.X..The.engine.uses.a.JavaScript.runtime.environment. combined.with.an.XML.interpreter.to.run.small.applications.referred.to.as.widgets,.and.hence.is.part.of.a.class.of.software.applications.called.widget. engines. Step 1: Install. the.Yahoo!.Widget.. Once. the.Yahoo!.Widget. is. installed.a.D-Link.icon.will.appear.in.your.Widget.Dock.. Once.you.hover.with.your.mouse.over.the.D-Link.Widget. you’ll.be.able.to.click.the.configuration.button. Step 2: Click.the.configuration.button.to.configure.the.Widget. Enter.the.IP.Address.of.your.device.and.click.the.Save. button..Now.you.are.ready.to.use.your.new.D-Link. Y ahoo!. Widget! D-Link DNS-320 User Manual... -
Page 116: Yahoo!.Widget.display
Section 5 - Knowledge Base Yahoo! Widget Display The.D-Link.Widget.is.mainly.used.for.monitoring.the.activities.taking.place. System: In.the.System.window.information.about.your.Computer,. DNS-320,. IP. Address,. Firmware. Version. and. Current. Operational.Temperature.are.displayed. Hard Drive: In.the.Hard.Drive.window.information.about.the.storage. space.of.your.device.is.displayed. Server: In. the. Server. window. information. about. the. USB. Device,.UPnP.Server,.ITunes.and.FTP.Server.configured. is.displayed. Download: When.the.P2P.Application.is.loaded,.you.can.monitor.your. P2P.download.status.here. D-Link DNS-320 User Manual... -
Page 117: Usb.copy.function
USB. storage. un-mounted. successfully.and.is.ready.to.be.removed. To.check.whether.the.USB.storage.device.is.connected. successfully,.the.user.can.navigate.to.the.System Info menu.of.the.System Status icon in.the.Management. Tab. of. the.Web. GUI. of. the. device. and. view. the. USB Information section. Note: It. is. a.very.good. practice. to. un-mount.an.USB. storage.device.before.removing.it.from.a.USB.port. D-Link DNS-320 User Manual...
Need help?
Do you have a question about the ShareCenter DNS-320 and is the answer not in the manual?
Questions and answers