
Related Manuals for MobiBlu DAH-220


Summary of Contents for MobiBlu DAH-220
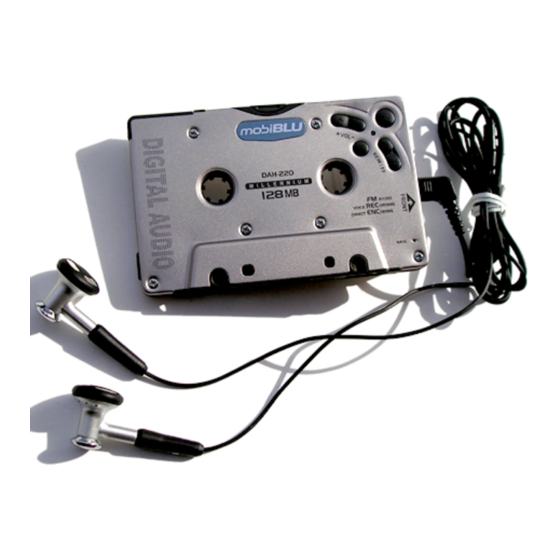
- Page 1 P/N : SAFF022M0GQ User Manual DAH-220 Cassette Tape Type MP3/WMA Player Digital Voice Recorder / Direct Music Encoder FM Radio & FM Recorder / Mass Storage Drive...
- Page 2 Please be aware of these safety instructions and use the product properly in order to prevent risks of injury or damages to the property. Avoid places with high moisture or Avoid exposure to direct sunlight or dust level. (It can cause damage to heater.
- Page 3 When carrying the product in a pocket with the batteries in place, Don’t wash the product with chemicals avoid contact with other metal items Don’t wear the headset when Sharing music without permition is or a detergent in order to protect the such as coins or keys.
-
Page 4: Table Of Contents
Product How to Use? Welcome to the World of Digital Audio Volume Control What is a Digital Audio Player? Selecting Next & Previous Music Special Features of the Product Voice Recording & Music Recording Product Specification FM Radio Hardware Descriptions Recording FM Radio PC System Requirements and Accessories A-B Book marking feature... -
Page 5: Welcome To The World Of Digital Audio
Welcome to the World of Digital Audio What is a Digital Audio Player? Thank you for purchasing the MP3 Player, a cassette tape-shaped What is the MP3/WMA file? portable digital audio player. MP3 stands for MPEG1-Layer3 and it uses a compression technology that converts This product has been designed for you to enjoy high quality digital sound conventional CD music data into an MP3 file format that is used on a PC, at 1/12 compression ratio. -
Page 6: Special Features Of The Product
Special Features of the Product MP3 Direct Encoding (Music Recording) Without connecting to a PC the product enables to record FM radio, CD or cassette tape Cassette Tape-like Design sounds in digital format while enjoying them. It is also very helpful for those who are learning languages etc. -
Page 7: Product Specification
Product Specification Hardware Descriptions External Memory(MMC) Slot Category Item Specification Volume Controller FM Frequency Range 87.5MHz~108.0MHz Play/Stop/Pause/Power Headphone output Max. 7mW (16 ) at max. volume FM TUNER S / N 50dB FF/REW Headphone/earphone cord antenna Antenna REC/ RPT A-B Frequency Characteristics 20Hz ~ 20KHz High Sensitivity Microphone... -
Page 8: Simple Use Of The Player
Simple Use of the Player PC System Requirements You may use the player in the following methods; PC system requirements for the player are as follows: 1. Microsoft OS (Windows 98SE, ME, 2000, XP) Install the software CD included in the package to your PC. 2. -
Page 9: Software Installation
Software Installation After disconnecting the USB cable from the player, press PLAY button ( II) to turn Please Note! the power on. Press the Play button again to listen to your music. (Blue LED keeps blinking) With the Mass Storage Function of the player files can be downloaded / uploaded without using any software Enjoy digital sound with an earphone or by inserting the player into an audio deck. - Page 10 Click on NEXT. By clicking the OK button, the window system will restart at the completion of installation. Click! Click! Click! Click! Click! Click! Click! Click! Click! Click! Click! Click! Click! Click! Click! Click! Click! Click! Click! Click! Click! Click! Click! Click! Click!
-
Page 11: Usb Cable Separation
After installing the software, click on Convert or Format shortcut by selecting PC, and connect the other end to the player. indows Start Program DAH-220 Utility’ in sequent to run the program. Player USB Port USB Cable PC USB Port Caution What’s USB? - Page 12 Separating the USB cable from the Player When the message “Hardware Safe Removal” appears, click on OK and disconnect the USB cable. Before separating the USB cable from the PC, double click on the green arrow on the toolbar located at the bottom right of the Windows screen.
-
Page 13: File Download/Upload
File Download/Upload Click on PASTE using the right button of the mouse in Please Note! the Removable disk as shown on the figure. This player also enables data (.jpg .xls .doc and etc) upload/download as a portable storage disk. In the root folder of the removable disk up to 256 files with less than 8 characters in their file names can be saved. - Page 14 Completion of Installation (For Windows XP) File saving has been completed in the player as shown below. Connect the player to the PC in its Recovery Mode. To enable Recovery Mode; Turn the power on Press VOL+ and FF buttons simultaneously for more than 2 seconds. if the orange colored LED blinks, the player is in Recovery Mode.
- Page 15 For Windows XP, the following message will appear. The wizard program has been completed. Click on Press CONTINUE button to keep on the process. FINISH button. Click! Click! Click! Click! Click! Click! Click! Click! Click! Click! Click! Click! Click! Click! Click! Click! Click!
-
Page 16: Formatting
Formatting the Internal Memory (recommended) Click on ‘Start’ by selecting the function. After connecting the player to the PC using a USB cable, Verify the OS version that you’re currently using. select and execute “DAH220 Utility Format” from START PROGRAMS. (Recovery Mode –... -
Page 17: File Converting
File Converting Format is in process. Click on and execute CONVERT file by selecting START PROGRAM DAH220 Utility CONVERT. Please Note! Click! Click! Click! Click! Click! Click! Click! Click! Click! Click! Click! Click! Click! Click! Click! Click! Click! Click! Click! Click! Click! Click! - Page 18 Select the folder where the files are to be saved. Select the file to be converted after choosing the desired format (ADP WAV, WAV ADP) to convert to. Select the type to be converted. Starting file converting. Click on START button. File conversion has been completed.
-
Page 19: Os Update
Before starting the update check the following: - Quit all the programs currently in operation. - Disconnect any USB device from the PC. Execute DAH220_xxxxxx.exe file which can be downloaded from the website www.mobiBLU.com and click on NEXT button. Click the NEXT button once activated. Click! -
Page 20: Charging Rechargeable Battery (Ac/Dc)
Charging Rechargeable Battery (AC/DC) Click the NEXT button once activated. Charging battery with an AC adapter - The Charger LED will go out when the battery is fully charged for 2-3 hours. - When using the battery for the first time, fully charge the battery for more than 2 hours. - Page 21 Power On Inserting the Battery Press and hold the PLAY ( II) to turn the power on. The In normal conditions, on AVARAGE, expect 7 hours play from each battery charge. This varies according to use. When used in a cassette blue LED blinks for 2-3seconds and then goes out.
-
Page 22: Volume Control
Power Off/ Stop Volume Control Stop Adjust the volume using By pressing the PLAY ( II) button while playing music, the player pauses. By the VOL +/- button on the pressing and holding the PLAY ( II) button once for longer seconds the player player. -
Page 23: Selecting Next/Previous Music
Selecting Next/Previous Music Voice Recording Searching a certain part Starting voice recording of a file By turning the power on, press - Press and hold the FF/REW and hold REC/A-B button until button for a longer period to an orange LED turns on, and search a certain part of the press the button once more to music while it is playing. - Page 24 Music Recording Recording with an encoder cable Press and hold REC/A-B button to start music recording and the Turn the power on by orange LED will blink. moving the slide switch to MUSIC and press REC/A-B button for longer seconds to make the player ready to record with an orange LED on.
- Page 25 About Recorded File Recording in an Audio Deck Please Note! Turn the power on after Recorded voice will be saved as an ADPCM file with switching the slide switch the file extension of *.ADP. to MUSIC. Recorded music will be saved with the file extension of *.MP3.
-
Page 26: Fm Radio
FM Radio Searching Frequencies Manually - You can search frequencies you Move the slide switch on the desire by pushing the REW/FF upper side of the player to button shortly. FM and press PLAY ( II) button once shortly to turn Searching Frequencies on the FM radio. -
Page 27: Recording Fm Radio
Recording FM Radio A – B BOOKMARKING FEATURE When you press the Press the REC ( ) button while listening to the radio. REC/A-B ( ) button once (Orange LED turns on) shortly while a file is playing in MUSIC mode, - Press the button again to start the the range ‘A’... - Page 28 Playing the Player in an Audio Deck Press REW/FF button on the deck for more than 4 seconds for fast forward/rewind. Selecting a file from the deck Insert the player in the direction of the arrow ( ) marked on the front side of the player. Press REW/FF button on the audio deck for less than 4 Please Note! seconds and press PLAY to move to next/previous song.
-
Page 29: Using Removable Memory Card (Mmc)
Controlling Volume from the Deck Using Removable Memory Card (MMC) The volume can be controlled by the volume controller mounted on the deck. The volumes may vary as the files You can extend the memory have been converted with different volumes. easily by using removable Multi Media Cards (MMC). -
Page 30: Troubleshooting
TROUBLESHOOTING Can not turn the power on or play a file Check if the battery is flat. The player is not working. - Reinsert the battery. - Check the polarity of the battery - Execute OS update or format after connecting to the PC. - Check if the slide switch is in MUSIC position - Check the polarity of the battery - Check if the battery is flat. -
Page 31: Warranty Services
Warranty Services The player is not recognized as a “Removable Disk” in the Windows Explorer. Customers are entitled to warranty service for a period of one year from the - Check the USB connection date of purchase. Warranty service does not apply to defects resulting from - Reinstall the software CD customer fault or acts of God. - Page 32 Note This equipment has been tested and found to comply with the limits for a Class B digital device, pursuant to Part 15 of the FCC Rules. These limits are designed to provide reasonable protection against harmful interference in a residential installation.
- Page 33 WARRANTY FORM Warranty Term: 1 year from the date of purchase Product Model : Date of Purchase : (month) (day) (year) Name of purchaser : Phone Number : Address : Place Purchased : Phone Number : Address : Hyunwon Incorporated You need to show this Warranty Certificate with the date of purchase when requesting service, in order to receive satisfactory services.
Need help?
Do you have a question about the DAH-220 and is the answer not in the manual?
Questions and answers