
Subscribe to Our Youtube Channel
Related Manuals for Comfort Zone CZ2011P


Summary of Contents for Comfort Zone CZ2011P
- Page 1 PORTABLE INFRARED HEATER with Remote Control OWNER’S MANUAL Model No. CZ2011P PLEASE SAVE THESE INSTRUCTIONS WARNING: READ THIS OWNER’S MANUAL CAREFULLY BEFORE USE.
-
Page 2: Important Instructions
Thank you for choosing a Comfort Zone® Infrared Heater. This owner’s manual will provide you with valuable information necessary for the proper care and maintenance of your new product. Please take a few moments to thoroughly read the instructions and familiarize yourself with all the operational aspects of your new heater. -
Page 3: Specifications
18. Always use on a dry, level surface. Use on floor only. 19. DO NOT use outdoors. 20. WARNING: To reduce the risk of fire or electric shock, DO NOT use this unit with any solid-state speed control device. 21. DO NOT attempt to repair or adjust any electrical or mechanical functions on this unit. Doing so will void your warranty. -
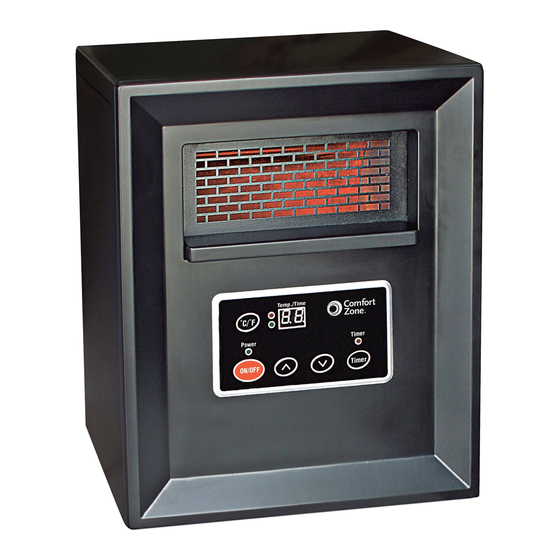
Page 4: Product Diagram
IN THE BOX ·INFRARED HEATER ·REMOTE CONTROL ·REMOTE CONTROL BATTERY ·INSTRUCTION BOOKLET PRODUCT DIAGRAM Remote Control Air Intake Air Outlet Cord Clamp Front Panel Control Panel Master Foot pad Power Switch Control Panel 1 Signal-receiving window: for receiving remote control signal. 2 Digital display: indicate set room temperature and set timer value. -
Page 5: Remote Control
5 Temp down button: for setting temperature lower. 6 Temp up button: for setting temperature higher. 7 ON/OFF switch button: for power ON or OFF. 8 Power indication Light: indicate when the unit connects to power supply. 9 Fahrenheit indicator light. Button: Button to alternate between Fahrenheit and Celsius readout. -
Page 6: Operating Instructions
OPERATING INSTRUCTIONS Start Turn on or off the heater by pressing the ON/OFF button on the control panel or by pressing the Power button on the supplied remote control. Once power is off, heating elements will stop working first. Fan will continue working for up to 3 minutes to dispense residual heat inside the heater. -
Page 7: Maintenance
Setting timer-power-off Note: timer-power-off function can only be set while heater is in power-on mode. When starting the unit, press the timer button on the control panel or remote control. Digital display turns set temperature readout to time value for the timer. - Page 8 7. Air filter should be cleaned after use for 3 months or if it appears to be blocking airflow. With heater unplugged, remove 2 assembly screws as illustrated below. With filter assembly removed, remove 4 filter screws. Clean all parts of filter assembly. Allow parts to completely dry. 8.
-
Page 9: Troubleshooting
TROUBLESHOOTING If the heater will not operate, please check the following before seeking repair of service: 1. Check if the power cord is plugged into an electrical outlet, if not, plug in. 2. Check if electricity to the main fuse is working. 3.
Need help?
Do you have a question about the CZ2011P and is the answer not in the manual?
Questions and answers