
Related Manuals for GE Motion Sensor


Summary of Contents for GE Motion Sensor
- Page 1 Personal Security Motion Sensor with Remote User Manual Do not use in wet locations...
-
Page 3: Low Battery Indicator
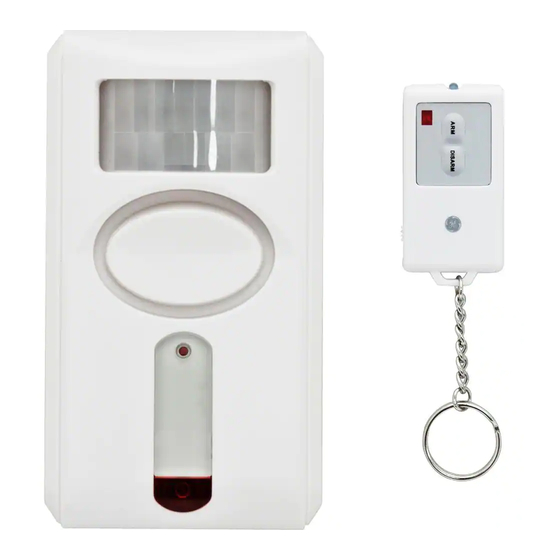
Motion Sensing Alarm With Remote Control Wall Mount Indicator Light Keychain Remote Motion Sensing Alarm Alarm/Chime Switch Low Battery Indicator The Motion Sensing Alarm has a low battery indicator light. If the batteries need to be replaced, the indicator light will flash slowly. - Page 4 INSTALLING BATTERIES The Remote Controlled Motion Sensing Alarm requires 3 AA Alkaline batteries (not included). Installing Batteries in the Alarm The battery compartment is located on the back of the unit. 1. Remove the battery compartment screw and slide off cover in the direction of the open arrow.
- Page 5 located on the back of the remote control. 2. Insert a 2032 battery noting polarity inside the battery compartment. 3. Replace cover. Battery Compartments Learn Button Remote...
- Page 6 LINKING THE REMOTE TO THE ALARM Make sure you have installed the batteries before proceeding. 1. Remove the battery compartment screw and slide off cover in the direction of the open arrow. Locate LEARN button. Battery Compartment Learn Learn Button 2.
- Page 7 INSTALLATION The unit is designed to be wall mounted with the ball and socket mount (included). The ball and socket mount will provide the flexibility to aim the motion sensor in a particular direction.
- Page 8 1. Choose your desired location, such as the corner of the room. This will provide maximum coverage. NOTE: The sensor has a 15-20 ft. detection zone, with approximate angles of 110˚ horizontal x 70˚ vertical. Recommended installation height is 6 to 8 feet.
- Page 9 wall using either the provided wall anchors or by screwing directly into a wall stud. Once installed securely on the wall, slide insert bracket of mount into the back of the unit and lock in place. The mount will click when secured to the alarm.
- Page 10 Arming the Alarm 1. Point the remote control at the front of the alarm and press the ARM button. The alarm will sound a tone and the red indicator light will flash. There will be a 45 second exit delay before the unit is armed.
- Page 11 Disarming the Alarm When returning to the protected area, the unit will beep once if motion is sensed. 1. Point the remote control at the front of the alarm unit and press the DISARM button within 30 seconds to disarm the alarm.
- Page 12 OPERATING IN THE CHIME MODE The chime is used to notify you when motion is sensed in the area. 1. Locate ALARM/CHIME switch on the side of the remote. Chime Alar m 2. Slide switch to CHIME mode. ACTIVATING THE CHIME Activate the chime by pointing the remote control at the alarm and pressing the ‘ARM’...
- Page 13 To turn off the panic alarm, aim the remote at the front of the alarm and press the DISARM button. TESTING MOTION SENSOR OPERATION 1. Set remote to CHIME mode and press ARM button; the chime will sound once.
- Page 14 cloth slightly dampened with water and wipe dry. Do not use chemical agents as this may damage and discolor the unit. WARNING Limitations of Alarm Products This product should be tested periodically to make sure it is working properly. The product, if used properly, may reduce the risk of burglary, robbery, or other adverse events.
- Page 15 WARNING Risk of personal injury • Prolonged exposure to alarm siren may cause permanent hearing loss Battery Warning • Remove batteries before storing the Alarm for extended periods • Batteries may leak harmful liquids or ignitable materials or explode causing injury and product damage •...
- Page 16 This device complies with part 15 of the FCC rules. Operation is subject to the following two conditions: (1) This device may not cause harmful interference. (2) This device must accept any interference received, including interference that may cause undesired operation.
- Page 17 Seguridad Personal Alarma Con Sensor De Movimiento Y Control Remoto Manual Del Usuario No utilizar en lugares húmedos...
- Page 19 Alarma Con Sensor De Movimiento Con Control Remoto Soporte de pared Luz indicadora Control remoto Interruptor de Motion Alarma con sensor Alarma/Campana de movimiento Indicador de batería baja La alarma con sensor de movimiento tiene una luz indicadora de batería baja.
- Page 20 CÓMO INSTALAR LAS BATERÍAS La alarma con sensor de movimiento y control remoto funciona con tres (3) baterías alcalinas AA (no vienen incluidas). Para instalar las baterías en la alarma El compartimento para baterías se encuentra en la parte de atrás de la unidad.
- Page 21 promedio de las baterías es de hasta un año para una utilización normal. 1. Retire la tapa del compartimento para baterías que se encuentra en la parte de atrás del control remoto. 2. Inserte una batería 2032 teniendo en cuenta la polaridad dentro del compartimento para baterías.
- Page 22 CÓMO CONECTAR EL CONTROL REMOTO A LA ALARMA Cerciórese de que ha instalado las baterías antes de proceder. 1. Retire el tornillo del compartimento para baterías y deslice la tapa en dirección de la flecha para abrir. Ubique el botón CREAR. Compartimentos Para Baterías Botón Crear...
- Page 23 3. Inmediatamente apunte el control remoto hacia la parte frontal de la unidad de la alarma y presione el botón ACTIVAR. La alarma producirá un tono corto y la luz dejará de alumbrar para confirmar que el control remoto ha sido conectado a la alarma.
- Page 24 dirigir el sensor de movimiento hacia una dirección en particular. 1. Elija la ubicación deseada, como la esquina de una habitación. Esto brindará mayor cobertura. NOTA: El sensor tiene una zona de detección de 4,6 a 6 metros, con ángulos aproximados de 110°...
- Page 25 2. Asegure el soporte de ajuste a la pared con las bases de pared que se suministran o atornillando directamente en un travesaño. Una vez el soporte esté bien instalado en la pared, deslice el brazo del soporte en la parte de atrás de la unidad y ajuste bien.
- Page 26 CÓMO ACTIVAR LA ALARMA 1. Apunte el control remoto hacia la parte del frente de la alarma y presione el botón ACTIVAR. La alarma emitirá un sonido y la luz indicadora roja se encenderá y apagará intermitentemente. Habrá un lapso de 45 segundos para darle tiempo para salir antes de que se accione la alarma.
- Page 27 si hay movimiento. Si se detecta movimiento, la sirena sonará de nuevo. El ciclo se repetirá hasta que la unidad sea desactivada con el control remoto. CÓMO DESACTIVAR LA ALARMA Al regresar al área protegida, la unidad emitirá un pito una vez si siente movimiento.
- Page 28 apagará de manera intermitente. Utilice el control remoto en cualquier momento para desactivar la alarma. NOTA: Al hacer una prueba, utilice un pedazo de paño para cubrir la alarma y reducir el riesgo de daño auditivo. CÓMO OPERAR LA MODALIDAD DE CAMPANA La campana se utiliza para notificarle cuando se sienta movimiento en el área.
- Page 29 CÓMO DESACTIVAR LA CAMPANA Desactive la campana apuntando el control remoto hacia la alarma y presionando el botón “DESACTIVAR”. CARACTERÍSTICA DE EMERGENCIA Si desea accionar la alarma inmediatamente sin el lapso de tiempo, apunte el control remoto hacia la parte frontal de la alarma y mantenga presionados los botones ACTIVAR y DESACTIVAR del control remoto durante 2 segundos.
- Page 30 2. Después de la campana inicial, espere 15 segundos y mueva la mano frente al sensor. Si la campana suena inmediatamente es porque el sensor funciona bien. 3. Para suspender la prueba, apunte el control remoto hacia el frente de la alarma y presione DESACTIVAR.
- Page 31 ADVERTENCIA Limitaciones de las alarmas Este producto debe ser revisado periódicamente para garantizar que esté funcionando bien. Si el producto es utilizado adecuadamente, puede reducir el riesgo de robo y otros eventos adversos. Sin embargo, JASCO no es una aseguradora, este producto no es un seguro ni una garantía de que se podrá...
- Page 32 ADVERTENCIA Riesgo de lesiones personales • La exposición prolongada a la sirena de la alarma puede ocasionar una pérdida permanente de la audición. Advertencia sobre las baterías • Retire las baterías antes de guardar la alarma por períodos largos de tiempo. •...
- Page 33 Este dispositivo cumple con la Parte 15 de los Reglamentos de la FCC. Su Operación está sujeta a las siguientes condiciones: (1) Este dispositivo no debe causar ninguna interferencia. (2) Este dispositivo debe aceptar cualquier interferencia recibida, incluyendo interferencia que pudiera causar una operación indeseable.
Need help?
Do you have a question about the Motion Sensor and is the answer not in the manual?
Questions and answers