
Related Manuals for ARRI Arricam System


Summary of Contents for ARRI Arricam System
-
Page 1: User Guide
THE ARRICAM SYSTEM USER GUIDE Compiled by Frédéric-Gérard Kaczek AAC and Andreas Pauleschitz... - Page 2 ALL ARTWORK, PICTURES AND TEXTS ARE COVERED BY OUR COPY-RIGHT. THEY MUST NOT BE COPIED FOR REPRODUCTION (E.G. ON CD-ROM DISKS OR INTERNET-SITES) OR USED IN THEIR ENTIRE FORM OR IN EXCERPTS WITHOUT OUR PREVIOUS WRITTEN AGREEMENT. IF YOU ARE DOWNLOADING PDF-FILES FROM OUR INTERNET HOME-PAGE FOR YOUR PERSONAL USE, MAKE SURE TO CHECK FOR UPDATED VERSIONS.
- Page 3 In no event shall ARRI or its subsidiaries be liable for...
- Page 4 or you have a remedy for recovery of any special, direct, indirect, incidental, or consequential damages, including but not limited to lost profits, lost savings, lost revenues or economic loss of any kind or for any claim by third party, downtime, good-will, damage to or replacement of equipment or property, any costs or recovering of any material or goods associated with the assembly or use of our products, or any other damages...
-
Page 6: Preface
Please take time to read the following pages carefully. mounted on dollies and cranes, on tripods and special You will see that the ARRICAM System offers you a rigs, on Steadicam and sophisticated three axis remote Caution! great variety of possibilities. -
Page 7: Table Of Contents
Lens Data Screens The Viewfinders’ housing The LDD-FP Menu structure Acknowledgment Viewing-filter lever Marking the Focus Scale TABLE OF CONTENT TABLE OF CONTENT TABLE OF CONTENT ARRICAM System Users’ Guide 01/2003 ARRICAM System Users’ Guide 01/2003 ARRICAM System Users’ Guide 01/2003... -
Page 8: Product Specifications
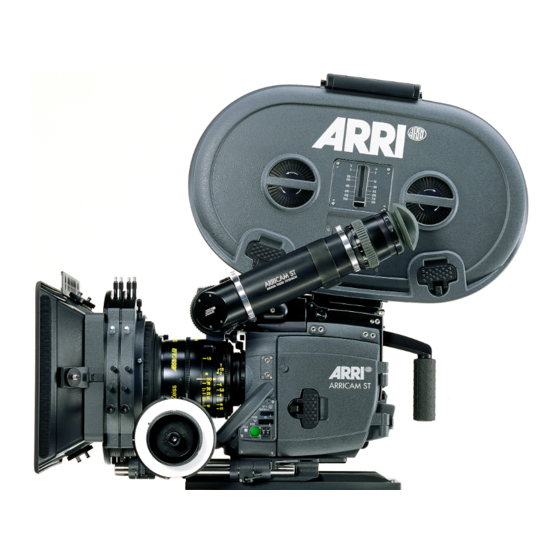
This Users’ Guide applies to the ARRICAM Studio boxes)! MCB Adapter Cable, Remote Control Station and the ARRICAM Lite as well as the whole ARRI- CAM Accessory range. Sections that only apply to • Never RUN the camera without a lens or a protective... - Page 9 1 CAMERA MAIN SWITCH (ON/OFF) 2 POWER RECEPTACLE (24 V) 3 CAMERA ACCESSORY CONNECTOR (CAC) 4 CAMERA COVERS FOR ACCESSORY BOXES 5 ST VIDEO ASSIST 6 FOOTAGE COUNTER 7 ST 300/1000 MAGAZINE 8 ST VIEWFINDER 9 LDS LENS 10 MATTE BOX (MB 14) 11 CAMERA ACCESSORY ROSETTE 12 FOLLOW FOCUS 13 ST MEDIUM EXTENSION TUBE...
-
Page 11: The Arricam Camera Bodies
The Camera Bodies The cameras’ front On the front of both cameras, an LDS 54 mm ARRI PL (positive lock) lens port accepts lenses (spherical or anamorphic) fitted with either LDS PL or with the well established regular PL mounts. Depending on the way... - Page 12 24 V dc outlet RS connector Lite front fig.1/2 dust check button 24 V outlets heatable eyecup/ work light 35/S35 index 35/S35 markings lens port lens port levers 24 V dc outlet RS connector 1 – THE CAMERA BODIES ARRICAM System Users’ Guide 01/2003...
- Page 13 To check the gate, either by looking through the lens or by removing it, turn the mirror out of the way by pushing briefly the 1 – THE CAMERA BODIES 01/2003 ARRICAM System Users’ Guide...
- Page 14 1.6 A multifuse and may be used to remote con- trol the camera status RUN or STOP as well as for supply power to any kind of 24 V accessory, e.g. a zoom drive. 1 – THE CAMERA BODIES ARRICAM System Users’ Guide 01/2003...
- Page 15 24 V HEATED EYECUP/WORK LIGHT OUTLETS On both sides of the lens port, small connectors supply the 24 V dc power for the following two accessories: the Work Light and the Heated Eyecup. 1 – THE CAMERA BODIES 01/2003 ARRICAM System Users’ Guide...
- Page 16 Lens Data Box lens port levers RS connector for right hand- grip button power attachment for right handgrip connector receptacle Lens Data Box rosette attachment 1 – THE CAMERA BODIES ARRICAM System Users’ Guide 01/2003...
-
Page 17: The Cameras' Right Sides
On the STUDIO and LITE PROTECTING COVERS Covers fig.1/7 Protecting covers are components of the ARRICAM System and should be handled with care. When remo- ving them from the camera bodies, immediately store 1 – THE CAMERA BODIES 01/2003 ARRICAM System Users’ Guide... - Page 18 On the LITE only RELEASE SCREW OF THE COVER To mount the LT-LDB on the LITE, you must first remove the little cover by unscrewing one 3 mm hex screw. 1 – THE CAMERA BODIES ARRICAM System Users’ Guide 01/2003...
-
Page 19: The Cameras' Rear
24 V battery or a 24 V dc Power Supply Unit. Further information about the power supply and power distribution of the ARRICAM System is described in chapter 10 – Power Management. MAIN SWITCH... - Page 20 These two connectors allow the mounting of the Speed Control Box (SCB) and the Manual Control Box (MCB) – see chapter 7. Both connectors must be protected by covers if not used. 1 – THE CAMERA BODIES ARRICAM System Users’ Guide 01/2003...
- Page 21 Lite rear release button for magazines/mag.adapter electric contacts for the magazine/ mag.adapter main switch CAC connector power receptacle camera opening rails for the magazines/mag.adapter 1 – THE CAMERA BODIES 01/2003 ARRICAM System Users’ Guide...
- Page 22 When the movement is in its loading position, the door cannot be closed. Door Lock fig.1/10 door lock safety door lock latch 1 – THE CAMERA BODIES ARRICAM System Users’ Guide 01/2003...
- Page 23 When mounting the door on the camera, take care that the hinge-pins enter the hinges properly. Studio Door fig.1/11 1 – THE CAMERA BODIES 01/2003 ARRICAM System Users’ Guide...
- Page 24 1 – THE CAMERA BODIES ARRICAM System Users’ Guide 01/2003...
-
Page 25: The Camera Control Panels
Shutter opening will be set by means of little buttons instead of pointed items. Furthermore, the ST Extended Camera Control Panel has a third display to show the film length. 1 – THE CAMERA BODIES 01/2003 ARRICAM System Users’ Guide... - Page 26 DISPLAY OPTIONS’ MENU In addition to the regular operational mode, two further display modes are available in the ARRICAM System: • The Service mode will be used by the Maintenance Personnel only. • The Options mode is dedicated to the users.
- Page 27 “B” will U s e r change the display as follows: display: shutter Footage text: L B a t V 2 1 . 7 U s e r 1 – THE CAMERA BODIES 01/2003 ARRICAM System Users’ Guide...
- Page 28 “C” or “D”, the display will change to a next compo- nent or to FW if SW is already shown. display: shutter Footage text: S C B 1 0 4 c 1 – THE CAMERA BODIES ARRICAM System Users’ Guide 01/2003...
- Page 29 L O C K appear in the related display when a setting button is pushed. By pushing the unlock button, arrows show the possibili- ty to set the fps. 1 – THE CAMERA BODIES 01/2003 ARRICAM System Users’ Guide...
- Page 30 1 to 40 (LITE) or 1 to 60 (STUDIO) can be preset. If a higher rate is erroneously preset and the RUN button is pressed, the camera will not start to RUN and the display will show FPS! 1 – THE CAMERA BODIES ARRICAM System Users’ Guide 01/2003...
- Page 31 If a component like the SCB, the MCB or the WRC has control over the shutter opening, no setting of the shutter angle will be possible by means of the Camera Control Panel buttons and the controlling device will be display- 1 – THE CAMERA BODIES 01/2003 ARRICAM System Users’ Guide...
- Page 32 FPS selector FPS display run/stop LED FPS selector reset button film length display raw stock button 1 – THE CAMERA BODIES ARRICAM System Users’ Guide 01/2003...
- Page 33 FPS selector button FPS display run/stop button run/stop LED FPS selector 1 – THE CAMERA BODIES 01/2003 ARRICAM System Users’ Guide...
- Page 34 – pushing a RUN button will have no effect. If the camera is powered, the cause why the camera is not in STAND BY status will be displayed on the FPS displays – see page 44. 1 – THE CAMERA BODIES ARRICAM System Users’ Guide 01/2003...
- Page 35 0.2 fps as long as the button is held down. This also works when e.g. the SCB or another remote device c o n t rols the fps rate. 1 – THE CAMERA BODIES 01/2003 ARRICAM System Users’ Guide...
- Page 36 FPS DISPLAY Regarding the brightness control of displays Many components of the ARRICAM System are fitted with similar displays. The brightness of all these displays can be adapted to the needs of the users by means of the dimmers located e.g.
- Page 37 STAND BY. The warnings will appear auto- matically when the camera is powered ON in order to remind you to ask as soon as possible a ARRI- CAM Maintenance Centre to up-date the system. 1 – THE CAMERA BODIES 01/2003 ARRICAM System Users’...
- Page 38 C o n t rol Panel) or displayed (Extended C a m e r a Control Panel). Camera is RUNNING. 2 4 . 0 Camera is RUNNING with the preset fps RUNNING (e.g. 24 fps). 1 – THE CAMERA BODIES ARRICAM System Users’ Guide 01/2003...
- Page 39 Camera Control Box. C C B The ARRIMOTION CCB controls the STANDBY camera. Camera Control Box. – C C B The ARRIMOTION CCB controls the camera STANDBY for shooting REVERSE. 1 – THE CAMERA BODIES 01/2003 ARRICAM System Users’ Guide...
-
Page 40: Warning Messages
Fi x d The PHASE button has been pushed while RUNNING the SPEED CONTROL switch on the SCB is set on SYNC mode and the PHASE switch has been set to FIXED. 1 – THE CAMERA BODIES ARRICAM System Users’ Guide 01/2003... - Page 41 While the camera is RUNNING, the Camera eater turns itself OFF. ) Guides, jam. J a m At least one sprocket guide is open or a film NOT READY jam has occurred. 1 – THE CAMERA BODIES 01/2003 ARRICAM System Users’ Guide...
- Page 42 R A M P Alternates with FPS or messages like SCB, NOT READY WRC, etc. Check ramp values, at least, one of the settings is out of the possible range. 1 – THE CAMERA BODIES ARRICAM System Users’ Guide 01/2003...
- Page 43 SYNC but no valid sync signal is present. Camera changes to NOT READY. R U N N I N G ATTENTION: Alternates with actual fps even though the synchronization fails! 1 – THE CAMERA BODIES 01/2003 ARRICAM System Users’ Guide...
- Page 44 (e.g. 24.6 V dc) is displayed. In-camera Slate Box power management. V 3.3 The ISB battery voltage (e.g. 3.3 V) will appear while the TEST button on the In-Camera Slate Box is pushed. 1 – THE CAMERA BODIES ARRICAM System Users’ Guide 01/2003...
- Page 45 Do not turn the camera ON when a loaded magazine is mounted but the film is not threaded. For testing purposes without film, either remove the loaded magazine or mount an empty magazine on the camera. 1 – THE CAMERA BODIES 01/2003 ARRICAM System Users’ Guide...
- Page 46 Camera Control Panel because MCB con- trols the camera. ‹ ‹ › › MCB controls the camera. – MCB No REVERSE fps adjustment is possible STANDBY because MCB controls the camera. 1 – THE CAMERA BODIES ARRICAM System Users’ Guide 01/2003...
- Page 47 SYNC. ‹ ‹ › › IVS controls the camera. Vi S y No adjustment of the fps is possible becau- STANDBY se Video Assist IVS controls the camera. 1 – THE CAMERA BODIES 01/2003 ARRICAM System Users’ Guide...
- Page 48 ) CCB controls the camera. C C B No shutter adjustment is possible on the S TA N D B Y Camera Control Panel because ARRI- MOTION CCB controls the camera. 1 – THE CAMERA BODIES ARRICAM System Users’ Guide...
- Page 49 Alternates with shutter angle. RUNNING ) WRC controls the camera. W R C No shutter adjustment is possible on the STANDBY Camera Control Panel because WRC con- trols the camera. 1 – THE CAMERA BODIES 01/2003 ARRICAM System Users’ Guide...
- Page 50 P h s e Appears simultaneously with the NOT READY warning in the FPS display. REMARK: By pushing one of the PHASE buttons the camera goes in STAND BY status. 1 – THE CAMERA BODIES ARRICAM System Users’ Guide 01/2003...
-
Page 51: The Cameras' Top
(gauged holes) On STUDIO & LITE ADJUSTING SCREWS Caution! Do not touch the adjusting screws – they must be used by technicians of the ARRICAM Maintenan- ce Centres only! 1 – THE CAMERA BODIES 01/2003 ARRICAM System Users’ Guide... - Page 52 Lite top fig.1/21 lens cap viewfinder viewfinder mounting plate connector door hinge tape measure attachment for hook accessories viewfinder window release knob for magazines/adapter 1 – THE CAMERA BODIES ARRICAM System Users’ Guide 01/2003...
- Page 53 LT Magazine Adapter, push the RELEASE knob and, while holding it pressed down, carefully pull the maga- zine out of the LITE body. Caution! Do not touch the adjusting screws! 1 – THE CAMERA BODIES 01/2003 ARRICAM System Users’ Guide...
-
Page 54: The Camera Bodies' Bases
All not described screws are strictly reserved for Maintenance Technicians only! Do not touch these adjusting screws! Lite base Studio base fig.1/22 threaded gauged holes sockets attachment for sliding cover of the shoulder pad power connectors 1 – THE CAMERA BODIES ARRICAM System Users’ Guide 01/2003... - Page 55 Movement fig.1/23 front film guide spacer plate handle spacer plate safety spring movement spacer plate locking lever inching knob movement pitch adjustment screw adjustment screw 1 – THE CAMERA BODIES 01/2003 ARRICAM System Users’ Guide...
- Page 56 Lite Interior fig.1/24 Studio Interior 1 – THE CAMERA BODIES ARRICAM System Users’ Guide 01/2003...
- Page 57 If this should be avoided, e.g. when threading the camera, first move the buckle switch out of its rest position. 1 – THE CAMERA BODIES 01/2003 ARRICAM System Users’ Guide...
- Page 58 Universal Format Mask in order to avoid the risk of image overlap- ping and flare. fig.1/25 Aperture Plate gate in-camera slate window 1 – THE CAMERA BODIES ARRICAM System Users’ Guide 01/2003...
- Page 59 • The surfaces where the Aperture Plate meets the camera body must be meticulously clean – any dirt might alter the flange focal distance. • In case the Aperture Plate is slanting, start inser- ting again. 1 – THE CAMERA BODIES 01/2003 ARRICAM System Users’ Guide...
- Page 60 For mounting, the Aperture Plate has a V-shaped notch at its bottom edge. This notch must be absolu- tely clean to make sure the Aperture Plate can be seated properly. 1 – THE CAMERA BODIES ARRICAM System Users’ Guide 01/2003...
- Page 61 • A Format Mask and a Filter Holder must always be inserted in the Aperture Plate. • The Aperture Plate can only be locked if the Filter Holder and the Format Mask are correctly inserted. 1 – THE CAMERA BODIES 01/2003 ARRICAM System Users’ Guide...
- Page 62 6. push the Filter Holder behind the Format Mask into the Aperture Plate 7. insert the Aperture Plate into the camera body. fig.1/28 Aperture Plate filter holder format mask 1 – THE CAMERA BODIES ARRICAM System Users’ Guide 01/2003...
- Page 63 Spacer Plate. This Plate – held by a spring loa- ded fixture – has raised surfaces that hold the film in the gate plane. Smudged surfaces inevitably cause film scratches! 1 – THE CAMERA BODIES 01/2003 ARRICAM System Users’ Guide...
- Page 64 1. take hold of the Spacer Plate by its handle and insert it at an angle from above into the movement block. 2. push the Spacer Plate downwards until it locks audibly in place. Spacer Plate fig.1/29 1 – THE CAMERA BODIES ARRICAM System Users’ Guide 01/2003...
-
Page 67: The Magazines & Magazine Adapters
ARRICAM Mainte- nance Centres only. The roller assembly is best cleaned with a vacuum cleaner. The ARRICAM System includes four magazines, each one deserves the best specific application. 1. ST 300/1000 Magazine for STUDIO and LITE 2. - Page 68 ST Mag 300/1000 fig.2/1 ST Mag 120/400 fig.2/2 LT Mag 120/400 Shoulder fig.2/3 LT Mag 120/400 Steadicam fig.2/4 2 – THE MAGAZINES AND MAGAZINE ADAPTERS ARRICAM System Users’ Guide 01/2003...
- Page 69 Because of the size of the ST 300/1000 Magazine, secure it when the equipment is operated under extreme g-force conditions by mounting the Magazine Stabili- zing Bracket. ST 300/1000 Mag Stabilizing Bracket fig.2/5 magazine stabilizing bracket 2 – THE MAGAZINES AND MAGAZINE ADAPTERS 01/2003 ARRICAM System Users’ Guide...
-
Page 70: Care & Cleaning
Check the connector and remove possible dust out of the recesses by blowing carefully, e.g. with an aerosol spray (avoid blowing on the roller assembly), or better, with a vacuum cleaner. 2 – THE MAGAZINES AND MAGAZINE ADAPTERS ARRICAM System Users’ Guide 01/2003... - Page 71 Be aware that the safety catch enga- ges properly in the latch, both parts must fit flush together when the magazine is closed. 2 – THE MAGAZINES AND MAGAZINE ADAPTERS 01/2003 ARRICAM System Users’ Guide...
-
Page 72: The Coreholder
In case of a malfunction of a coreholder, do not disassemble it – the magazine should be serviced at an ARRICAM Maintenance Centre only. Coreholder fig.2/7 core release knob 2 – THE MAGAZINES AND MAGAZINE ADAPTERS ARRICAM System Users’ Guide 01/2003... - Page 73 The magazine battery usually recharges automatically during the shooting period. ST Mag Footage Counter fig.2/8 LT Mag Footage Counter fig.2/9 2 – THE MAGAZINES AND MAGAZINE ADAPTERS 01/2003 ARRICAM System Users’ Guide...
- Page 74 SHOW/SET ASA next to the footage counter display with a toothpick, the cursor will move on the display, from m or ft to ASA, and the set sensitivity will appear for about 3 sec. 2 – THE MAGAZINES AND MAGAZINE ADAPTERS ARRICAM System Users’ Guide 01/2003...
- Page 75 The spring which brings the tigh- tening wheel back to its resting position can be checked by depressing it slightly. 2 – THE MAGAZINES AND MAGAZINE ADAPTERS 01/2003 ARRICAM System Users’ Guide...
-
Page 76: The Digital Footage Counter
The film length remaining in the magazine’s left half – usually the unexposed film – is shown on a scale located between both tightening wheels. 2 – THE MAGAZINES AND MAGAZINE ADAPTERS ARRICAM System Users’ Guide 01/2003... - Page 77 Caution! Due to the length of the footage indicator lever, care should be taken when checking it! ST Mag manual footage indicator fig.2/11 ST Mag footage lever fig.2/12 2 – THE MAGAZINES AND MAGAZINE ADAPTERS 01/2003 ARRICAM System Users’ Guide...
- Page 78 Centres, can be slid into a holder at the outside of the magazines. Use these labels to identify film during shooting and stick them later onto the film cans. fig.2/14 Label 2 – THE MAGAZINES AND MAGAZINE ADAPTERS ARRICAM System Users’ Guide 01/2003...
-
Page 79: The Four Arricam Magazines Adapters
2. inclined at the rear with the Combi-Adapter e.g. for shoulder operation or with a geared/fluid head 3. vertically at the rear with the Back Load Adapter e.g. for handheld or Steadicam operation 2 – THE MAGAZINES AND MAGAZINE ADAPTERS 01/2003 ARRICAM System Users’ Guide... - Page 80 Studio – ST Mag Adapter fig.2/15 Studio – ST Mag Adapter fig.2/16 2 – THE MAGAZINES AND MAGAZINE ADAPTERS ARRICAM System Users’ Guide 01/2003...
- Page 81 Studio – ST Mag Combi-Adapter fig.2/17 Studio – ST Mag Combi-Adapter fig.2/18 2 – THE MAGAZINES AND MAGAZINE ADAPTERS 01/2003 ARRICAM System Users’ Guide...
-
Page 82: Mounting/Removing The Magazine Adapters
3 mm hex screws on the top-rear edge (middle) of the adapter. Then tighten the four remaining screws. When removing the adapter, also unscrew the middle screws first – see fig. 1/8 on page 27. 2 – THE MAGAZINES AND MAGAZINE ADAPTERS ARRICAM System Users’ Guide 01/2003... - Page 83 Studio – ST Mag Adapter mounting fig.2/19 Studio – ST Mag Combi-Adapter mounting fig.2/20 mounting screws 2 – THE MAGAZINES AND MAGAZINE ADAPTERS 01/2003 ARRICAM System Users’ Guide...
-
Page 84: Mounting Studio Magazines On Adapters
OFF or open one of the film guides first – see chapter 3, fig. 3/7. 2 – THE MAGAZINES AND MAGAZINE ADAPTERS ARRICAM System Users’ Guide 01/2003... - Page 85 Studio – ST Mag Top Load Adapter, release button fig.2/21 Studio – ST Mag Back Load Adapter, release button fig.2/22 2 – THE MAGAZINES AND MAGAZINE ADAPTERS 01/2003 ARRICAM System Users’ Guide...
- Page 86 Camera Cover Cap to the adapter. The engraving ARRICAM must cover the electric connec- tors. Studio – ST Mag Back Load Adapter, Cover Cap fig.2/23 2 – THE MAGAZINES AND MAGAZINE ADAPTERS ARRICAM System Users’ Guide 01/2003...
- Page 87 • The Combi-Adapter Cover Cap with detachable handgrip is not compatible with the one of the other magazine adapters. Studio – ST Mag Combi-Adapter, Cap and Handgrip fig.2/24 2 – THE MAGAZINES AND MAGAZINE ADAPTERS 01/2003 ARRICAM System Users’ Guide...
-
Page 88: Adapters' Carrying Handles
On the ST Mag Combi-Adapter, the handgrip is part of the removable Cover Cap. Therefore you must be sure that the cover is mounted firmly to the adapter before carrying the camera. 2 – THE MAGAZINES AND MAGAZINE ADAPTERS ARRICAM System Users’ Guide 01/2003... - Page 89 Studio – ST Mag Back Load Adapter, Handgrip mounting fig.2/25 mounting screws Studio – ST Mag Back Load Adapter, Handgrip mounting fig.2/26 2 – THE MAGAZINES AND MAGAZINE ADAPTERS 01/2003 ARRICAM System Users’ Guide...
- Page 90 When closing the camera door, the magazine will auto- matically be held in the correct position. Lite – Magazine attachment fig.2/27 threaded holes for LT mag adapter LT magazine/LT mag adapter release button camera cover cap 2 – THE MAGAZINES AND MAGAZINE ADAPTERS ARRICAM System Users’ Guide 01/2003...
-
Page 91: The Lite Magazine Adapter
THE ARRICAM LITE MAGAZINE ADAPTER In order to mount the ST Magazines on the LITE, ARRI- CAM offers an adapter that replicates the receptacle of the ARRICAM ST Magazine Adapters. The adapter door located at the left side of the LT Mag Adapter can be swung towards you to facilitate the threading of the film. - Page 92 ST Top or Back Load Adapter, please see previous instructions. Caution! Before closing the camera door, be sure that the adapter door is closed first. 2 – THE MAGAZINES AND MAGAZINE ADAPTERS ARRICAM System Users’ Guide 01/2003...
-
Page 95: Loading The Magazines
4. Lay the magazine down carefully in the darkroom or changing bag onto footage counter side; roller assembly is facing you. 5. Insert core on the take up side. fig.3/1 LT Magazine feed take up side side 3 – LOADING THE MAGAZINES 01/2003 ARRICAM System Users’ Guide... - Page 96 – turn the roll gently clockwise until you hear a sec- ond ”click”. Only now the roll is properly seated. If you don’t hear a second ”click”, lift the roll from the coreholder and repeat the operation. 3 – LOADING THE MAGAZINES ARRICAM System Users’ Guide 01/2003...
- Page 97 Wound up film has to be flush with the core and lie flat on take up plate or coreholder disk. 3 – LOADING THE MAGAZINES 01/2003 ARRICAM System Users’ Guide...
- Page 98 Especially with the ST 300/1000 Magazine, for- cible closing might lead to light leakage! Further- more, the rubber sealing might be damaged! 3 – LOADING THE MAGAZINES ARRICAM System Users’ Guide 01/2003...
- Page 99 12. Attach a loop protector. 13. Input length and ASA rate of unexposed film into footage counter – see page 79, fig 2/8 and 2/9 and insert a label into the dedicated holder. 3 – LOADING THE MAGAZINES 01/2003 ARRICAM System Users’ Guide...
- Page 100 On the ARRICAM Studio Remove the cover from the Magazine Adapter. While pushing the silver magazine release safety but- ton, push down the release lever to remove either the cover or a magazine. 3 – THREADING THE CAMERAS ARRICAM System Users’ Guide 01/2003...
- Page 101 On the ARRICAM Lite (without Magazine Adapter) Open the camera door. Push the silver release button down to slide out the Camera Cover Cap. LT Mag fig.3/6 release button 3 – THREADING THE CAMERAS 01/2003 ARRICAM System Users’ Guide...
- Page 102 For the following steps, make sure • that the film will not get caught between the magazine and the adapter! • that the magazine is firmly attached to the magazine adapter 3 – THREADING THE CAMERAS ARRICAM System Users’ Guide 01/2003...
- Page 103 Swing magazine towards camera body until it engages in the latch. Double check that the magazine is secured firmly. fig.3/9 Studio – threading fig.3/10 Studio – threading 3 – THREADING THE CAMERAS 01/2003 ARRICAM System Users’ Guide...
- Page 104 Place the magazine carefully onto the LT Mag Adapter. Pull some more film out of the magazine feed side and lay the film into the proper path. Lite – threading ST Mag fig.3/11 3 – THREADING THE CAMERAS ARRICAM System Users’ Guide 01/2003...
- Page 105 7. Rotate the INCHING knob so the index point is at 12 o’clock. Thread film between Aperture Plates and movement block in a not too narrow loop. 3 – THREADING THE CAMERAS 01/2003 ARRICAM System Users’ Guide...
- Page 106 Studio – Loop adjustment Lite fig.3/14 10. Form upper film loop by depressing and turning the sprocket roller. It should follow the ”LOOP” mark engraved on the rear of the camera interior. 3 – THREADING THE CAMERAS ARRICAM System Users’ Guide 01/2003...
- Page 107 To avoid this when mounting a magazine or loading film, just open a film guide by pushing a sprocket guide release button or set the camera MAIN switch to OFF. 3 – THREADING THE CAMERAS 01/2003 ARRICAM System Users’ Guide...
- Page 108 When closing the camera door, care should be taken that the camera interior is clean and the door lock is flush with the door. Studio – ST Mag Top Load Adapter fig.3/16 3 – THREADING THE CAMERAS ARRICAM System Users’ Guide 01/2003...
- Page 109 Studio – ST Mag Back Load Adapter fig.3/17 Studio – ST Mag Combi-Adapter (rear) fig.3/18 Studio – ST Mag Combi-Adapter (top) fig.3/19 3 – THREADING THE CAMERAS 01/2003 ARRICAM System Users’ Guide...
- Page 110 Lite – Shoulder Mag fig.3/20 Lite – Steadicam Mag fig.3/21 Lite – ST Mag with LT Mag Adapter fig.3/22 3 – THREADING THE CAMERAS ARRICAM System Users’ Guide 01/2003...
- Page 112 ST viewfinder arm hinge type ST viewfinder module 4 – THE OPTICAL VIEWFINDER COMPONENTS 4 – THE OPTICAL VIEWFINDER COMPONENTS 4 – THE OPTICAL VIEWFINDER COMPONENTS 01/2003 ARRICAM System Users’ Guide 01/2003 ARRICAM System Users’ Guide 01/2003 ARRICAM System Users’ Guide...
-
Page 113: The Optical Viewfinder System Components Introduction/Overview
The Optical Viewfinder System Components INTRODUCTION ARRI offers a versatile modular ARRICAM Viewfinder System. All Viewfinders are usable without the need of adapters on both cameras, the ARRICAM Studio and the ARRICAM Lite. THE ARRICAM VIEWFINDERS The user may choose between four Optical Viewfinders: The ST Viewfinder for spherical and anamorphic cinematography. - Page 114 LT-VF LT video assist video assist mounting screws swivel friction adjustment swivelling viewfinder filter lever LT MASK eyepiece frameglow rotation module friction adjustment eyecup image LT eyepiece levelling adjustment 4 – THE OPTICAL VIEWFINDER COMPONENTS ARRICAM System Users’ Guide 01/2003...
- Page 115 ST LCD frameglow module filter lever hinge release knob eyepiece medium eyecup rotation extension tube extension friction clamping adjustment ring eyepiece image levelling adjustment 4 – THE OPTICAL VIEWFINDER COMPONENTS 01/2003 ARRICAM System Users’ Guide...
-
Page 116: Bottom View
PL filter lever bayonet viewfinder mounting screw port fixing pins viewfinder mounting viewfinder window screws viewfinder block 4 – THE OPTICAL VIEWFINDER COMPONENTS ARRICAM System Users’ Guide 01/2003... -
Page 117: Top View
Hinge type ST-VF fig.4/9 hinge extension release clamping knob ring readout mounting screw image levelling hinge adjustment eyepiece rotation viewfinder friction adjustment mounting screws filter lever 4 – THE OPTICAL VIEWFINDER COMPONENTS 01/2003 ARRICAM System Users’ Guide... -
Page 118: The Arricam 100% Video Tops
Unscrew the hex screws with an 3 mm Allen key to remove the cover and mount the Viewfinder or the 100% Video Top to the camera. 4 – THE OPTICAL VIEWFINDER COMPONENTS ARRICAM System Users’ Guide 01/2003... - Page 119 THE ARRICAM VIDEO ASSISTS ARRI offers two technically similar Video Assists – see for description chapter 5 – to be installed on the appropria- te Optical Viewfinder or 100% Video Top. 4 – THE OPTICAL VIEWFINDER COMPONENTS 01/2003 ARRICAM System Users’...
- Page 120 STANDARD 35 or in SUPER 35, the Viewfinder must be mounted to fit these formats. Viewfinder mounting plate fig.4/13 viewfinder attachment (threaded sockets) format label viewfinder attachment (gauged holes) 4 – THE OPTICAL VIEWFINDER COMPONENTS ARRICAM System Users’ Guide 01/2003...
- Page 121 Hinge type ST-VF fig.4/14 threaded sockets LT-VF fig.4/15 threaded sockets ST 100% Video Top fig.4/16 opposite view mounting screws 4 – THE OPTICAL VIEWFINDER COMPONENTS 01/2003 ARRICAM System Users’ Guide...
-
Page 122: The Viewfinders' Housing
Viewfinder Mounting Plate will be installed. In ARRICAM Maintenance Centre, skilled technicians are not only trained to adapt the ARRI- CAM to the production needs, but also have all the control instruments to check e.g. the flange focal distance. -
Page 123: Viewing-Filter Lever
Viewfinder Arm attachment. When depressing the filter lever, an ND 0.6 filter will be swung into the Viewfinder optical beam path. LT-VF Filter lever fig.4/19 4 – THE OPTICAL VIEWFINDER COMPONENTS 01/2003 ARRICAM System Users’ Guide... - Page 124 Hinge type ST-VF fig.4/22 image levelling arm extension clamping ring adjustment knob front image levelling eyepiece rotation hinge fixing knob friction adjustment 4 – THE OPTICAL VIEWFINDER COMPONENTS ARRICAM System Users’ Guide 01/2003...
-
Page 125: The Viewfinders' Arms
Viewfinder Arms on the camera right side. The ULT-VF Bracket is dedicated to the Universal LT View- finder. The ST-/UST-VF Bracket is dedicated to the ST and Universal ST Viewfinder. 4 – THE OPTICAL VIEWFINDER COMPONENTS 01/2003 ARRICAM System Users’ Guide... -
Page 126: Adjustment Of The Swivel Friction
The tension of the swivel friction can be adjusted by means of a 2 mm Allen key and an ARRI specific tool (A 16SR 3) with the part number K5.26129.0 – it is a twin-pronged driver. To increase or decrease the ten- sion, first loosen the locking sleeve by turning it counter- clockwise one turn. - Page 127 System! 2. With well maintained cameras, pivoting is easily possible without having to apply force. Hinge type ST-VF fig.4/25 release knob Bayonet type ST-VF fig.4/26 Bayonet type ST-VF fig.4/27 4 – THE OPTICAL VIEWFINDER COMPONENTS 01/2003 ARRICAM System Users’ Guide...
-
Page 128: Ergonomy
PL bayonet mount to attach the Eyepiece. In order to adjust the Eyepiece position for a comfortable viewing, loose the rotation friction adjustment knob located on the bottom side of the Viewfinder Arm. 4 – THE OPTICAL VIEWFINDER COMPONENTS ARRICAM System Users’ Guide 01/2003... - Page 129 Long Eyepiece, we recommend to use the Levelling Rod – see fig.4/39. Caution! The tension has to be loosen when using the Levelling Rod! LT-VF eyepiece rotation friction adjustment fig.4/29 loose 4 – THE OPTICAL VIEWFINDER COMPONENTS 01/2003 ARRICAM System Users’ Guide...
-
Page 130: Levelling Of The Viewfinder Image
To fix the new position, tighten the knob at the bottom again while holding the one on top. Image levelling adjustment fig.4/30 image levelling adjustment knob fixing knob loose 4 – THE OPTICAL VIEWFINDER COMPONENTS ARRICAM System Users’ Guide 01/2003... -
Page 131: The Swing-Away De-Squeezer
“in-between” position. Therefore, if the Eyepiece must be placed e.g. on the top rear of the camera, the use of the ST Long Zoom Anamorphic Extension Tube is recommended. 4 – THE OPTICAL VIEWFINDER COMPONENTS 01/2003 ARRICAM System Users’ Guide... -
Page 132: The Eyepiece
Eyepieces fig.4/32 universal LT eyepiece flange dioptre adjustment barrel and scale eyecup mount Caution! Because of the different mounts, the LT Eyepiece is not interchangeable with the other Eyepieces. 4 – THE OPTICAL VIEWFINDER COMPONENTS ARRICAM System Users’ Guide 01/2003... -
Page 133: Mounting The Eyepiece
Eyepiece bayonets. So, after rotating the bayo- net lever, push the little button to release the Eyepiece or Extension Tube. fig.4/33 Eyepiece mini PL bayonet mount unlock safety button locking lever locking lever 4 – THE OPTICAL VIEWFINDER COMPONENTS 01/2003 ARRICAM System Users’ Guide... -
Page 134: The Eyecup
Eyepiece mounting fig.4/34 THE EYECUPS ARRI provides two rubber cushionable Eyecups to be mounted on all ARRICAM Eyepieces. The rubber Eyecup is mounted on a holder which inte- grates a shutter mechanism. By moving the lever the Viewfinder can be opened or closed. - Page 135 Set the heating level with the toggle switch to LO for lower heat output or to HI for higher heat output. Heated Eyecup Cable – KC 63-SP-S fig.4/37 4 – THE OPTICAL VIEWFINDER COMPONENTS 01/2003 ARRICAM System Users’ Guide...
-
Page 136: The Eyepiece Extension Tubes
3. The ST Long Zoom Anamorphic Extention Tube with variable image magnifier and swing-away de-squee- zer lens brings the entry pupil of the Eyepiece about 30 cm/11.8” behind the film plane. 4 – THE OPTICAL VIEWFINDER COMPONENTS ARRICAM System Users’ Guide 01/2003... - Page 137 ST medium extension tube levelling rod attachment ST long zoom extension tube ST long zoom anamorphic extension tube zoom ring anamorphic/ LT extension tube spherical lever magnifier button 4 – THE OPTICAL VIEWFINDER COMPONENTS 01/2003 ARRICAM System Users’ Guide...
-
Page 138: Viewfinder Levelling Rod
To remove it press the spring. The support is clamped to the head and its lenghts is adjustable. Levelling rod fig.4/39 Levelling rod attachment fig.4/40 4 – THE OPTICAL VIEWFINDER COMPONENTS ARRICAM System Users’ Guide 01/2003... - Page 139 The Eyepiece rotation friction adjustment has to be loosen when using the Levelling Rod! FURTHER VIEWFINDER COMPONENTS ARRI also offers several Groundglasses as well as three Frameglow Modules and a Readout Unit. THE ARRICAM FIELDLENS AND GROUNDGLASS The Fieldlens is located on top of the interchangeable Groundglass.
- Page 140 6. When screwing the Combi Tool in or out, hold the Groundglass holder only. 7. Push the Groundglass frame gently all the way in until it rests against the stop and then unscrew the Combi Tool. 4 – THE OPTICAL VIEWFINDER COMPONENTS ARRICAM System Users’ Guide 01/2003...
-
Page 141: The Frameglow Modules
Do not use force! THE FRAMEGLOW MODULES In order to make the frame marks of the Groundglass visible while shooting dark scenes, ARRI provides small attachments for all Viewfinders called Frameglow. Three different Frameglow Modules, one for all LT Viewfinders and two for the ST Viewfinders, are available. - Page 142 After removing both protector covers, attach the adequa- te Frameglow Module to the Viewfinder with one 3 mm hex screw. LT MASK Frameglow Module fig.4/43 LT viewfinder connector mounting screw 4 – THE OPTICAL VIEWFINDER COMPONENTS ARRICAM System Users’ Guide 01/2003...
- Page 143 Caution! Never use force. Notice On the LT MASK Frameglow Module first the little cover must be slid away by moving the button in order to access to the adjusting screws. 4 – THE OPTICAL VIEWFINDER COMPONENTS 01/2003 ARRICAM System Users’ Guide...
- Page 144 ST LCD Frameglow Module fades in one or – simultane- ously – two luminous frames. Four frame outlines with the following aspect ratios are provided in the ST LCD Frameglow Module: 4 – THE OPTICAL VIEWFINDER COMPONENTS ARRICAM System Users’ Guide 01/2003...
- Page 145 Module inserts the luminous frame outlines of a single or combined aspect ratio(s) into the viewfinder image. A set of Masks with different aspect ratios and/or aspect ratio combinations is provided by ARRICAM. 4 – THE OPTICAL VIEWFINDER COMPONENTS 01/2003 ARRICAM System Users’ Guide...
- Page 146 Masks can be used with the ST or LT MASK Frameglow Modules. ST/LT Mask Frameglow Modules fig.4/47 frameglow mask LT cover ST MASK frame- plate glow module ST cover plate LT MASK frameglow module 4 – THE OPTICAL VIEWFINDER COMPONENTS ARRICAM System Users’ Guide 01/2003...
-
Page 149: The Arricam Video Assist System
• Remove all cables before transport or servicing! • Repairs should be carried out only by authorized ARRICAM Maintenance Centres! • Use only original ARRI replacement parts and accessories! • Check all operations on the corresponding monitor! • In wet weather the normal safety precautions for han- dling electrical equipment should be taken! •... - Page 150 On Board Monitors Video Assist Viewfinders Cameras 5 – THE VIDEO ASSIST SYSTEM COMPONENTS ARRICAM System Users’ Guide 01/2003...
-
Page 151: The Arricam Video Assists' Components
THE ARRICAM VIDEO ASSISTS’ COMPONENTS All Viewfinders allow the mounting of a Video Assist (VA ) . In addition to the two Video Assists, ARRI also provides two small video colour On Board Monitors (2” and 6.6”) which can be mounted on both ARRICAM Cameras, the STUDIO and LITE, by means of articulated arms. - Page 152 MGC dial button connector white balance mode leds video signal mode button on/off led manual on/off/ gain check/ signal leds control hide menu manual gain control led button switch 5 – THE VIDEO ASSIST SYSTEM COMPONENTS ARRICAM System Users’ Guide 01/2003...
-
Page 153: The 100% Video Tops
Video Assists can be mounted on the ARRICAM Cameras by means of 100% Video Top. ARRI provides one 100% top for each Video Assist. These 100% Video Tops are mounted on the camera bodies in the same way as the Viewfinders. Both 100% Video Tops may be used on the STUDIO as well as on the LITE. - Page 154 LT Viewfinders and the LT 100% Video Top will be mounted on the top. ST-VA mounting on ST-VF fig.5/5 threaded holes mounting screws LT-VA mounting on LT-VF fig.5/6 mounting screws threaded holes 5 – THE VIDEO ASSIST SYSTEM COMPONENTS ARRICAM System Users’ Guide 01/2003...
- Page 155 Be sure that the camera is not powered during mounting or removing a Video Assist. Do not slant the Video Assist while mounting it on a Viewfinder or on a 100% Video Top Adaptor! 5 – THE VIDEO ASSIST SYSTEM COMPONENTS 01/2003 ARRICAM System Users’ Guide...
-
Page 156: The Connectors And The Led Indicator
We recommend to use the Y/C cables, which are delivered with the units, for even better image quality. 5 – THE VIDEO ASSIST SYSTEM COMPONENTS ARRICAM System Users’ Guide 01/2003... - Page 157 Y/C. C portion of the video signal, with on-screen data Y portion of the video, without on-screen data Y/C. C portion of the video signal, without on-screen data 5 – THE VIDEO ASSIST SYSTEM COMPONENTS 01/2003 ARRICAM System Users’ Guide...
- Page 158 A further possibility is to use two BNC cables and one S-Video adapter cable: Red = C, White = Y Video Cable Connections fig.5/16 BNC cable white video monitor video assist BNC cable video recorder S-Video adapter cable 5 – THE VIDEO ASSIST SYSTEM COMPONENTS ARRICAM System Users’ Guide 01/2003...
- Page 159 A standard S-Video connector has no fixture similar to a BNC one. Therefore, the S-Video connected cable must be secured in order not to slip accidentally out of the connector. 5 – THE VIDEO ASSIST SYSTEM COMPONENTS 01/2003 ARRICAM System Users’ Guide...
- Page 160 THE EXT. SYNC SIGNAL When video images are provided from several ARRI- CAM Video Assists, e.g. when cameras are used in a multiple camera application and the video images must be mixed together, they must be synchronized. To do so, a BNC cable must connect the Video Assist e.g.
-
Page 161: The Mechanical Adjustments Of The Ccd
CCD adjustments cover retaining screws Three screws allow the fine positioning of the CCD and one screw (S4) will shift it to obtain the best possible focus. 5 – THE VIDEO ASSIST SYSTEM COMPONENTS 01/2003 ARRICAM System Users’ Guide... - Page 162 Four 1.5 mm screws to be turned with an Allen key allow the CCD adjustment on the LT Video Assist. LT-VA CCD adjustment fig.5/21 accessory shoe CCD adjustment screws video assist IRIS iris control dial 5 – THE VIDEO ASSIST SYSTEM COMPONENTS ARRICAM System Users’ Guide 01/2003...
- Page 163 Frameglow will affect the result. So, the more ”red light” will surround the frame, the more cyan the video picture will appear. 5 – THE VIDEO ASSIST SYSTEM COMPONENTS 01/2003 ARRICAM System Users’ Guide...
-
Page 164: The Video Assists' Iris Control Dial
Automatic Gain Co n t rol (MGC LED O F F). When MGC is O N, rotate (do not push it) the dial clockwise to i n c rease or counter-clockwise to decrease the video gain. 5 – THE VIDEO ASSIST SYSTEM COMPONENTS ARRICAM System Users’ Guide 01/2003... - Page 165 CHECK/HIDE MENU. The OSD will automatically fade out after a few sec. To hide the OSD menu, push the ON/OFF/CHECK/HIDE MENU s w i t c h 5 – THE VIDEO ASSIST SYSTEM COMPONENTS 01/2003 ARRICAM System Users’ Guide...
-
Page 166: The Menu/Store Dial
Caution! By pushing the dial while the OSD is not visible, the actual image will be stored in the Video Assist memory, deleting the previous stored image. 5 – THE VIDEO ASSIST SYSTEM COMPONENTS ARRICAM System Users’ Guide 01/2003... -
Page 167: The Video Assist On Screen Display (Osd)
THE VIDEO ASSIST ON SCREEN DISPLAY (OSD) Beside the ”normal video tapping” function of the ARRI- CAM Video Assist System, many features are offered to the users in order to facilitate not only the work on the set, but also the one made in post production houses. -
Page 168: The Video Menu Structure
(xx = 0 to 99) THE CURSOR While turning the dial, the cursor will move from – > line to line. As soon as the desired option is reached, 5 – THE VIDEO ASSIST SYSTEM COMPONENTS ARRICAM System Users’ Guide 01/2003... - Page 169 2. To close all menus and to leave the On Screen Dis- play, push the dial for about 3 sec. Notice The menu can be left at any time. 5 – THE VIDEO ASSIST SYSTEM COMPONENTS 01/2003 ARRICAM System Users’ Guide...
- Page 170 (here MAIN MENU) is indicated. In the first line the cursor shows CONFIG = 1 (USR1 ) Beside the possibility to use the default configuration 5 – THE VIDEO ASSIST SYSTEM COMPONENTS ARRICAM System Users’ Guide 01/2003...
- Page 171 If the individual factory setting of the colour saturation is e.g. 52, you will be able to change it from 52 to 0 (–52 steps) or 52 to 99 (+47 steps). 5 – THE VIDEO ASSIST SYSTEM COMPONENTS 01/2003 ARRICAM System Users’ Guide...
-
Page 172: Main Menu
Y/C (SVHS) DATA = ON MINI MON. DATA = OFF VID SYNC = EXT (NOT TC) CAMERA SYNCED = OFF PHASE 0 – 356 = 0.0 E X I T 5 – THE VIDEO ASSIST SYSTEM COMPONENTS ARRICAM System Users’ Guide 01/2003... - Page 173 EXPOS. TIME – > EXPOS. TIME = FIXED = FILM When the mode FIXED is selected, the exposure time of the CCD will automatically be calculated accordingly to 5 – THE VIDEO ASSIST SYSTEM COMPONENTS 01/2003 ARRICAM System Users’ Guide...
- Page 174 • In the VIDEO CONFIG Sub-menu, set FLICKERFREE to ON. • In the VIDEO CONFIG Sub-menu, set EXPOS. TIME to FILM. • Exit the On Screen menu. • RUN the camera. 5 – THE VIDEO ASSIST SYSTEM COMPONENTS ARRICAM System Users’ Guide 01/2003...
- Page 175 = OFF By selecting ON, the video image supplied by the On B o a rd Monitor connector will include the data inform a t i o n . 5 – THE VIDEO ASSIST SYSTEM COMPONENTS 01/2003 ARRICAM System Users’ Guide...
- Page 176 ON (TC mode). If no ISB is moun- ted or if the switch is not set to TC mode, this option will not appear on the OSD. 5 – THE VIDEO ASSIST SYSTEM COMPONENTS ARRICAM System Users’ Guide 01/2003...
- Page 177 The LED next to the connector will show by ligh- ting green if the signal is appropriate. The use of the ARRI Pick-up Unit in connection with the Video Assist connector is not possible. MAIN MENU...
- Page 178 Groundglass Format Markings. Notice If the electronic Format Markings are not parallel to the Groundglass Format Markings, readjust the CCD chip with the Adjusting screws as explained on 5 – THE VIDEO ASSIST SYSTEM COMPONENTS ARRICAM System Users’ Guide 01/2003...
- Page 179 OFF will appear at the end of the list; it can be activa- ted if no frame saved under the selected FORMAT should be inserted. 5 – THE VIDEO ASSIST SYSTEM COMPONENTS 01/2003 ARRICAM System Users’ Guide...
- Page 180 This function is only available if FORMAT 1 or 2 is activated. No darkening function is available if there is no FORMAT Marking or if two FORMAT Markings are switched ON. 5 – THE VIDEO ASSIST SYSTEM COMPONENTS ARRICAM System Users’ Guide 01/2003...
- Page 181 Beside the possibility to change the size and position of a frame, each line (LEFT, RIGHT, TOP, BOTTOM) can be positioned individually. How to write a CONFIG NAME is described on page 207. 5 – THE VIDEO ASSIST SYSTEM COMPONENTS 01/2003 ARRICAM System Users’ Guide...
- Page 182 Assist is powered and obviously as long as it is not replaced by a new image. MENU COMPARE STORE – > VIEW MODE L I V E STORE IMAGE CLEAR IMAGE E X I T 5 – THE VIDEO ASSIST SYSTEM COMPONENTS ARRICAM System Users’ Guide 01/2003...
- Page 183 DONE will appear. MAIN MENU COMPARE/STORE – > CLEAR IMAGE While the menu-cursor points towards CLEAR, pushing the dial shortly will delete the stored image. 5 – THE VIDEO ASSIST SYSTEM COMPONENTS 01/2003 ARRICAM System Users’ Guide...
- Page 184 V I D E O FILM COUNTER = R E M A I N F O O TA G E TA K E O F F E X I T 5 – THE VIDEO ASSIST SYSTEM COMPONENTS ARRICAM System Users’ Guide 01/2003...
- Page 185 The three lines labelled SYSTEM, LDS and STATUS are parts of one block. While one of the lines is activated, the entire block will be moved by turning the dial at once. 5 – THE VIDEO ASSIST SYSTEM COMPONENTS 01/2003 ARRICAM System Users’ Guide...
- Page 186 Scene 11/III Filter in the gate UP65 65mm 7.17m( 4.20m– 22.10m) 24.6 V STBY 0.0/24.0 fps 180.0 267 m crosshair image area system line LDS line status line 5 – THE VIDEO ASSIST SYSTEM COMPONENTS ARRICAM System Users’ Guide 01/2003...
- Page 187 ISB switch is not set to TC, this option will not be shown on the OSD. Caution! It is recommended to check the requirements of all facilities involved in post-production prior to shooting. 5 – THE VIDEO ASSIST SYSTEM COMPONENTS 01/2003 ARRICAM System Users’ Guide...
- Page 188 In areas with NTSC video standard for example, the film camera would RUN at 24 fps whereas the video system works with 30 full 5 – THE VIDEO ASSIST SYSTEM COMPONENTS ARRICAM System Users’ Guide 01/2003...
- Page 189 1 1 : 2 4 : 3 0 : 0 3 While the camera is not RUNNING or when the time-code Generator built in the connected ISB is not 5 – THE VIDEO ASSIST SYSTEM COMPONENTS 01/2003 ARRICAM System Users’ Guide...
- Page 190 All Video Assists are based either on PAL or NTSC video standard, with a fixed video frequency of either 25 full video frames per second with PAL or 5 – THE VIDEO ASSIST SYSTEM COMPONENTS ARRICAM System Users’ Guide 01/2003...
- Page 191 If there is no time-code exposing, for example because the film camera is not RUNNING on a time-code speed, only A1 will be displayed. 5 – THE VIDEO ASSIST SYSTEM COMPONENTS 01/2003 ARRICAM System Users’ Guide...
- Page 192 Notice While writing the user text, briefly push the dial, otherwise the OSD menu will fade out. 5 – THE VIDEO ASSIST SYSTEM COMPONENTS ARRICAM System Users’ Guide 01/2003...
- Page 193 The Video Assist can generate information on whether the current video image corresponds with a new film frame or whether it is a repeated video image. The WHITELINE flag displays this in machine readable form. 5 – THE VIDEO ASSIST SYSTEM COMPONENTS 01/2003 ARRICAM System Users’ Guide...
-
Page 194: See Page
The insertion of the single WHITELINE must be chosen between line 6 and 22. Avoid placing the WHITELINE on the same position as the VITC line(s). 5 – THE VIDEO ASSIST SYSTEM COMPONENTS ARRICAM System Users’ Guide 01/2003... - Page 195 1 . 1 1 C O N F I G 2(USR2 EDIT NAME CLEAR NAME U N D O SET LIKE TO DEFA U LT E X I T 5 – THE VIDEO ASSIST SYSTEM COMPONENTS 01/2003 ARRICAM System Users’ Guide...
- Page 196 LDS Line Line Interpolation MODE Compare LIVE or STORE Pull-down STATUS Status Line SYS. MSG System Line Time-code Userbits User Text VITC Vertical Interval Time-code White Balance Whiteline 5 – THE VIDEO ASSIST SYSTEM COMPONENTS ARRICAM System Users’ Guide 01/2003...
-
Page 197: The Video On Board Monitors
The OSD will be switched OFF automatically when the camera starts UP. THE VIDEO ON BOARD MONITORS ARRI provides three ARRI LCD Colour Monitors which can be mounted and connected to both Video Assists. The 2” On Board Monitor is available in both NTSC and PAL standard. - Page 198 On Board Monitor upside down. In this case, push the UPSIDE DOWN button to flip the image. Caution! Because of the possible extension of the articula- ted arm, secure firmly the two tightening screws. 5 – THE VIDEO ASSIST SYSTEM COMPONENTS ARRICAM System Users’ Guide 01/2003...
- Page 199 (PAL, NTSC) as the Video Assist. The 6.6” On Board Monitor automatically detects and switches bet- ween PAL and NTSC standards. ST-VA – 2“ On Board Monitor, mounting fig.5/28 5 – THE VIDEO ASSIST SYSTEM COMPONENTS 01/2003 ARRICAM System Users’ Guide...
- Page 200 A collapsible Sunshade can be attached with velcro to the 6.6“ Video Monitor. ST-VA – 6.6“ On Board Monitor, connecting fig.5/29 LT-VA – 2“ On Board Monitor, mounting fig.5/30 5 – THE VIDEO ASSIST SYSTEM COMPONENTS ARRICAM System Users’ Guide 01/2003...
- Page 201 Be sure that the camera is not powered during mounting or removing a Video Monitor. Notice While powering up a On Board Monitor, the image on an external monitor might disappear briefly. 5 – THE VIDEO ASSIST SYSTEM COMPONENTS 01/2003 ARRICAM System Users’ Guide...
-
Page 202: Control Menu Of The 6.6" On Board Monitor
Sub-menu utilities. Notice By means of the four buttons, the brightness and the contrast can also be adjusted directly – entering the OSD menu is therefore not necessary. 5 – THE VIDEO ASSIST SYSTEM COMPONENTS ARRICAM System Users’ Guide 01/2003... - Page 203 When user is selected in the color temp Sub-menu, the amount of each primary colour can be set in a range from 0 to 100%. 5 – THE VIDEO ASSIST SYSTEM COMPONENTS 01/2003 ARRICAM System Users’ Guide...
- Page 204 In the option menu Select the position of the OSD by activating one of the icons. The horizontal and vertical position of the OSD can 5 – THE VIDEO ASSIST SYSTEM COMPONENTS ARRICAM System Users’ Guide 01/2003...
- Page 205 By increasing this setting, the video image will appear brighter but the power consumption will increase. Therefore you should first adjust the brightness of the image before altering the back- light setting. 5 – THE VIDEO ASSIST SYSTEM COMPONENTS 01/2003 ARRICAM System Users’ Guide...
-
Page 207: The Readout Unit, The Lens Data System
– please consult the related list of messages in chapter 1 on page 44 dedicated to the FPS displays. 6 – THE READOUT UNIT, THE LENS DATA SYSTEM 01/2003 ARRICAM System Users’ Guide... - Page 208 BAT LED while the camera is in STAND BY status or when the camera is not powered when the battery supplies less than e.g. 20.6 V 6 – THE READOUT UNIT, THE LENS DATA SYSTEM ARRICAM System Users’ Guide 01/2003...
- Page 209 Speed Control Box and/or the Manual Control Box. If none of these components is used, the brightness of the camera displays will automatically be set on the maximal level. 6 – THE READOUT UNIT, THE LENS DATA SYSTEM 01/2003 ARRICAM System Users’ Guide...
-
Page 210: The Lens Data System (Lds)
Last but not least, a future option will allow the measurement electronically, display focus distances and also remote control the lens motors. 6 – THE READOUT UNIT, THE LENS DATA SYSTEM ARRICAM System Users’ Guide 01/2003... - Page 211 This future option will just be a new tool in the hands of professional camera assistants. LDD Screen fig.6/4 LDD-FP Lens Screen fig.6/5 LDD-FP Status Screen fig.6/6 focus/iris configuration 6 – THE READOUT UNIT, THE LENS DATA SYSTEM 01/2003 ARRICAM System Users’ Guide...
- Page 212 This enables to place the index lines of the lens in the most convenient position for the camera crew. Sui- table contacts are provided in the lens ports of all ARRI- CAM Cameras as well as in the ARRI 435 Advanced.
-
Page 213: The Lens Data Boxes (Ldb)
Boxes control lens motors, supply the Lens Data Display with information and manage the wireless connection to the ARRI LCS components, like the hand units for focus, zoom, iris and camera control. A cable connection to the hand units is possible with the ARRI WHA-2. Both ARRI CLM-1 and ARRI CLM-2 motors can be connected to the Lens Data Boxes. - Page 214 WHA-2 must be opera- ted either wireless or via a cable connected e.g. Camera Accessory Connector CAC. • The ARRI LCS component Focus Iris Unit (FIU-1) is not compatible with the ARRICAM Lens Data System.
-
Page 215: Mounting The Lens Data Boxes
Caution! Like all other electronic components, be sure that the camera MAIN switch is OFF before connec- ting the Lens Data Box. 6 – THE READOUT UNIT, THE LENS DATA SYSTEM 01/2003 ARRICAM System Users’ Guide... - Page 216 After having checked that the con- nectors on both sides are clean, place the ST-LDB on the guiding assembly and slide it back until it sits firmly. ST-LDB mounting fig.6/10 6 – THE READOUT UNIT, THE LENS DATA SYSTEM ARRICAM System Users’ Guide 01/2003...
- Page 217 Adapter Plate is flanged on the ST Lens Data Box. The ST-LDB Adapter Cable connects the two Plates. Beyond Velcro, an ARRI Dovetail Shoe can be attached to one of the three 3/8” threaded holes of the ST-LDB Adapter Plate – see chapter 9 – supports, page 351.
- Page 218 MOUNTING OF THE LT-LDB LT-LDB mounting fig.6/12 Lens Data Box cover connectors mounting screw 6 – THE READOUT UNIT, THE LENS DATA SYSTEM ARRICAM System Users’ Guide 01/2003...
-
Page 219: Connectors And Control Leds
Only ARRI CLM-2 motors can be plugged in these three connectors. Beside these three plugs, two connectors labelled LCS allow the connection of other lens motors like the ARRI CLM-1. Also one Handgrip Attachment WHA-2 will be connected there via the Cables LC-M1-SP-S or LC-Z1-S. - Page 220 = is off (grey) Ready LED Indicates that a LDS Lens has been detected and the data communication is working well. Indicates that the LDS Lens has been recognised 6 – THE READOUT UNIT, THE LENS DATA SYSTEM ARRICAM System Users’ Guide 01/2003...
- Page 221 Shows the initialization of the transceiver The transceiver shows readiness As soon as a remote control unit, e.g. ARRI WMU-1 is ON, the RF LED shows that the radio connection is working correctly. When the selector has been incorrectly turned...
- Page 222 USA, Canada, Mexico, New Zealand, Europe except France and Spain Europe except Spain USA, Canada, Mexico, New Zealand, France Japan 5, 6 Australia Spain radio power OFF 6 – THE READOUT UNIT, THE LENS DATA SYSTEM ARRICAM System Users’ Guide 01/2003...
- Page 223 MAIN switch OFF before connecting or disconnecting motors and/or remote controls to/from the Lens Data Boxes. The combined use of both types of ARRI CLM motors is possible. ARRI CLM-1 MOTORS Daisy chain CLM-1 motors together and connect the last in line to one of the LCS connectors on the Lens Data Box.
-
Page 224: Lens Data Displays (Ldd And Ldd-Fp)
Both Lens Data Displays can be mounted on any Acces- sory Shoe, e.g. on the Readout Unit or LT Frameglow Module. A mobile arm is part of the LDD. 6 – THE READOUT UNIT, THE LENS DATA SYSTEM ARRICAM System Users’ Guide 01/2003... - Page 225 Velcro. LDD-FP with Holder fig.6/15 release button back plate backplate holder mobile shoe post tension control tightening screw accessory shoe 6 – THE READOUT UNIT, THE LENS DATA SYSTEM 01/2003 ARRICAM System Users’ Guide...
- Page 226 Because of its size, the LDD-FP can easily be mounted at the most convenient place for an optimal visibility, e.g. on a Matte Box. Therefore, ARRI provides different “L-Brackets” with Accessory Shoe that enable mounting on the MB-14, 16, 18 and 19. These “L-Brackets” will be fixed on the Matte Box Side Flap Holder.
-
Page 227: Connecting The Lens Data Displays
On the LDD-FP, the smaller LDD-FP-connector located on the right side enables several connections by using other cables. The second connector on the rear side of the LDD-FP is foreseen for future applications. 6 – THE READOUT UNIT, THE LENS DATA SYSTEM 01/2003 ARRICAM System Users’ Guide... -
Page 228: Cable Adapter
STUDIO/LITE Control Station RCS LDD-FP connections fig.6/18 LDD-FP connector K LDD-FP-RDO LT-Frameglow Module Readout Unit Remote Control Station RCS LDDFP-LCS 600 LDDFP-LCS 1000 LDDFP-LCS 3000 ST-LDB/LT-LDB 6 – THE READOUT UNIT, THE LENS DATA SYSTEM ARRICAM System Users’ Guide 01/2003... - Page 229 In case a problem occurs, turn the Display OFF; set the camera MAIN switch to OFF and start again after about 5 sec. If the problem persists, ask your ARRICAM Maintenance Centre. 6 – THE READOUT UNIT, THE LENS DATA SYSTEM 01/2003 ARRICAM System Users’ Guide...
- Page 230 THE CONTROLS OF THE LENS DATA DISPLAYS fig.6/19 on/sleep/off down delete power/sleep LED fig.6/20 LDD-FP power/sleep LED LDD-FP connector on/off unit of measurement down delete menu 6 – THE READOUT UNIT, THE LENS DATA SYSTEM ARRICAM System Users’ Guide 01/2003...
- Page 231 Notice To change the unit of measurement on the LDD, the UP and DOWN buttons will be used – see page 250. 6 – THE READOUT UNIT, THE LENS DATA SYSTEM 01/2003 ARRICAM System Users’ Guide...
-
Page 232: Function Of The Lens Data Displays
No lens detected lights up but the relevant camera parameters will still be shown. If an LDS Prime Lens is detected, its focal length will immediately be dis- 6 – THE READOUT UNIT, THE LENS DATA SYSTEM ARRICAM System Users’ Guide 01/2003... - Page 233 LDS Lens, the lens rings need to be rotated so the Lens Data System can recognize the lens rings positions. When ARRI CLM motors are used, this will happen auto- matically during the calibration procedure. If no CLM motors are used, this can be done simply by hand. For...
- Page 234 LDS info area camera info area depth focal/ field focus iris index index line line zoom scale/ focus focal iris scale scale 6 – THE READOUT UNIT, THE LENS DATA SYSTEM ARRICAM System Users’ Guide 01/2003...
- Page 235 Background colour Camera Info Area Gray STAND BY Orange INCHING RUNNING UP RUNNING DOWN Green RAMPING RUN ASYNC NOT READY Background colour Message Area Wrong operation 6 – THE READOUT UNIT, THE LENS DATA SYSTEM 01/2003 ARRICAM System Users’ Guide...
- Page 236 A small grey line on the focus scale as well as a figure in the LDS Info Area indicate the hyperfocal distance. LDD Screen fig.6/22 hyperfocal distance line 6 – THE READOUT UNIT, THE LENS DATA SYSTEM ARRICAM System Users’ Guide 01/2003...
- Page 237 On the top right corner, next to the POWER/SLEEP button, two rows of Option switches are located. The upper row labelled S2 contains four switches relevant for selecting the coc. 6 – THE READOUT UNIT, THE LENS DATA SYSTEM 01/2003 ARRICAM System Users’ Guide...
- Page 238 So in STAND BY, the fps value shows 0.000 . During RUN UP, RUN, RUN RAMP or RUN DOWN, the current camera frame rate is displayed. 6 – THE READOUT UNIT, THE LENS DATA SYSTEM ARRICAM System Users’ Guide 01/2003...
- Page 239 External Sync signal (time-code) processed by the In-camera Slate Box (ISB) External Sync signal processed by the Video Assist (IVS) W Wireless Remote Control (WRC) ARRIMOTION Camera Control Box (CCB) 6 – THE READOUT UNIT, THE LENS DATA SYSTEM 01/2003 ARRICAM System Users’ Guide...
- Page 240 NOT READY status – simultaneously the background will go red. Take The length of the film exposed between the last start and stop will be displayed here. 6 – THE READOUT UNIT, THE LENS DATA SYSTEM ARRICAM System Users’ Guide 01/2003...
- Page 241 Close Focus The closest possible focus setting with this lens is shown. MESSAGE AREA LDD Screen – Message Area fig.6/27 Messages Alert (red background colour) 6 – THE READOUT UNIT, THE LENS DATA SYSTEM 01/2003 ARRICAM System Users’ Guide...
- Page 242 The shutter is out of the viewing path Adapter Cover Warning! camera is STAND BY but magazine adapter cover is missing! Low Battery Change battery as soon as possible 6 – THE READOUT UNIT, THE LENS DATA SYSTEM ARRICAM System Users’ Guide 01/2003...
- Page 243 Push UP or Moving a Focus Mark D O W N to select, then hold SET to re m e m b e r 6 – THE READOUT UNIT, THE LENS DATA SYSTEM 01/2003 ARRICAM System Users’ Guide...
- Page 244 E x t e rnal Sync signal processed by the Video Assist (IVS) W ( W R C ) Wi reless Remote Control (WRC) ( C C B ) ARRIMOTION Camera Control Box (CCB) 6 – THE READOUT UNIT, THE LENS DATA SYSTEM ARRICAM System Users’ Guide 01/2003...
- Page 245 /iris field (numerical) area index line message area depth actual focal/actual iris area field focus iris scale scale 6 – THE READOUT UNIT, THE LENS DATA SYSTEM 01/2003 ARRICAM System Users’ Guide...
-
Page 246: Menu Button
By pushing briefly the SET button, the Brightness Screen will appear. By using the UP and DOWN buttons, the brightness can be adjusted. When leaving the Sub- menu, the new adjustment will be saved. 6 – THE READOUT UNIT, THE LENS DATA SYSTEM ARRICAM System Users’ Guide 01/2003... - Page 247 Option 1st Scale 2nd Scale Yellow Bar focus depth of field focal/zoom iris focus focal/zoom depth of field focus iris depth of field focal/zoom iris 6 – THE READOUT UNIT, THE LENS DATA SYSTEM 01/2003 ARRICAM System Users’ Guide...
- Page 248 SET button. Then move the cursor to Done and press SET to return to the Main Menu. When pushing the MENU button for 3 sec. the Lens Screen will appear. 6 – THE READOUT UNIT, THE LENS DATA SYSTEM ARRICAM System Users’ Guide 01/2003...
-
Page 249: Marking The Focus Scale
- Marks that are out of the range of the new lens are not displayed, but still stored. The only way to get rid of Focus Marks is to delete them manually. 6 – THE READOUT UNIT, THE LENS DATA SYSTEM 01/2003 ARRICAM System Users’ Guide... - Page 250 For example, if the focus scale already has Marks numbered 1, 2, 3 and 4, the new mark will be number 5. If the highest number is 9, any unused numbers will be used. 6 – THE READOUT UNIT, THE LENS DATA SYSTEM ARRICAM System Users’ Guide 01/2003...
- Page 251 Each further push of the UP or the DOWN but- tons moves the solid frame to another of the Marks that are at the same scale position. Now the DELETE button 6 – THE READOUT UNIT, THE LENS DATA SYSTEM 01/2003 ARRICAM System Users’ Guide...
- Page 252 The Message Area will display the following alert: Push SET to choose, UP/DOWN to renumber This alert disappears when either the solid or the dotted frame disappears. 6 – THE READOUT UNIT, THE LENS DATA SYSTEM ARRICAM System Users’ Guide 01/2003...
- Page 253 The first time the UP or the DOWN buttons are pushed, the Mark closest to the index line is highlighted. The alert disappears when the solid frame disappears. 6 – THE READOUT UNIT, THE LENS DATA SYSTEM 01/2003 ARRICAM System Users’ Guide...
-
Page 255: The Speed Control Box
While both boxes can be attached on the STUDIO body, cable connection will be necessary to use them with the LITE. Beside the Boxes, ARRI also offers two remote adapters to help you to configure the equipment in the most adequate way. -
Page 256: Automatic Exposure Compensation
Actually, the automatic iris compensation with the MCB and SCB is only possible with LDS Lenses. If no LDS Lens is used, the ARRI WRC will allow the iris control and so the automatic exposure compensation with the ARRICAM Cameras. - Page 257 0.025 mm/ 1/1000”. An iris versus shutter compensation is only possible within a range of 4 stops, so for example < 11.25° stop 22.5° stop 45° stop 90° stop 180° 7 – THE CAMERA CONTROL BOXES 01/2003 ARRICAM System Users’ Guide...
-
Page 258: The Manual Control Box (Mcb)
After checking that both connectors are clean, attach the little Manual Control Box by engaging easily the two pins in the gauged holes and then by tightening the two screws. fig.7/1 Studio – MCB mounting 7 – THE CAMERA CONTROL BOXES ARRICAM System Users’ Guide 01/2003... -
Page 259: The Mcb Cable Adaptor
Adapter or to the Remote Control Station (RCS) and con- nect a cable between the adapter and the CAC con- nector of the camera. fig.7/3 MCB + Cable Adapter connetor manual control box cable adapter 7 – THE CAMERA CONTROL BOXES 01/2003 ARRICAM System Users’ Guide... - Page 260 NOT READY ble with the Manual Control Box because the Speed Control Box controls the camera to RUN FORWARD and the SPEED CON- TROL switch is set to SYNC. 7 – THE CAMERA CONTROL BOXES ARRICAM System Users’ Guide 01/2003...
- Page 261 Remote Control controls the camera. BRIGHT button By pushing this button, you will increase or decrease the brightness of all displays. Three steps will be cycled: dim, normal, bright. 7 – THE CAMERA CONTROL BOXES 01/2003 ARRICAM System Users’ Guide...
- Page 262 0° and 180°. This manual change can occur either when the camera is RUNNING or in the STAND BY modus. The actual shutter opening is indicated on the MCB display. 7 – THE CAMERA CONTROL BOXES ARRICAM System Users’ Guide 01/2003...
- Page 263 Notice • ARRI guarantees the accuracy of the shutter angle between 11.25° and 180°. Please note that even though if the display shows 0°, strong lights coming straight into the lens could be photogra- phed. • If a ramp is controlled by turning fast the hand-...
- Page 264 Speed Control Box (SCB) fig.7/5 7 – THE CAMERA CONTROL BOXES ARRICAM System Users’ Guide 01/2003...
-
Page 265: The Speed Control Box (Scb)
SCB in the thre e guiding rails and slide it forw a rd until it is fixed firm l y. Studio SCB mounting fig.7/6 7 – THE CAMERA CONTROL BOXES 01/2003 ARRICAM System Users’ Guide... - Page 266 The mounting of the SCB on the adapter is similar to the one on the STUDIO body. Remote Control Station (RCS) fig.7/7 MCB holder left side MCB connector front MCB holder connector accessory shoe SCB attachment RCS plate SCB connector 7 – THE CAMERA CONTROL BOXES ARRICAM System Users’ Guide 01/2003...
- Page 267 Because the SAC connector of the RCS is similar to the ones of the SCB and the MCB Cable Adapter, the same cables can be used for connecting the Remote Control Station with the camera. 7 – THE CAMERA CONTROL BOXES 01/2003 ARRICAM System Users’ Guide...
- Page 268 REMOTE USE OF THE MCB AND SCB ARRI provides two Cables, the KC 65-S (3 m/10 ft ), the KC 69-S (15 m/50 ft ) and the Cable Drum KC 73-S (50 m/165 ft) that allow to use the MCB and the SCB as a remote control unit for the STUDIO as well as the LITE.
- Page 269 KC 65-S (3 m/10 ft) or KC 69-S (15 m/50 ft) Lite SCB/MCB remote connection fig.7/11 Studio CAC Distribution Box (KC 74-S) KC 65-S (3 m/10 ft) or KC 69-S (15 m/50 ft) Lite 7 – THE CAMERA CONTROL BOXES 01/2003 ARRICAM System Users’ Guide...
-
Page 270: Scb Connectors
At the rear of the MCB Cable Adapter and of the RCS Plate, threaded sockets allow the mounting of a fixture like the ARRI quick release Dovetail Accessory Shoe. MCB Cable Adapter fig.7/12 rear SAC connector removable dovetail accessory shoe... -
Page 271: Scb Controls And Displays
The three-digit input unit allows preseting of the ramping time between 0.1 and 99.9 seconds. Shutter (Display) Either the actual shutter angle or further messages listed in chapter 1, page 54 are shown on the SHUTTER display. 7 – THE CAMERA CONTROL BOXES 01/2003 ARRICAM System Users’ Guide... - Page 272 A change of the fps has been made on the SCB input unit while the camera is RUNNING. NOT READY Input frame rate is out of the possible range. 7 – THE CAMERA CONTROL BOXES ARRICAM System Users’ Guide 01/2003...
- Page 273 Shows that the ramp function is not possible. Compensation LED STAND BY/RUNNING Shows that the ramp compensation is possible. NOT READY Shows that the ramp compensation is not possible. 7 – THE CAMERA CONTROL BOXES 01/2003 ARRICAM System Users’ Guide...
- Page 274 SCB displays but also the ones on the Camera Control Panel and on the other ARRICAM Components including the Lens Data Display. 7 – THE CAMERA CONTROL BOXES ARRICAM System Users’ Guide 01/2003...
- Page 275 Lens Data Box. To set the iris to the requested opening, use the buttons OPEN and CLOSE. 7 – THE CAMERA CONTROL BOXES 01/2003 ARRICAM System Users’ Guide...
- Page 276 By selecting ON, the SCB is activated and the camera parameters as well as the iris aperture can be controlled by the SCB – at least one FPS LED lights up. 7 – THE CAMERA CONTROL BOXES ARRICAM System Users’ Guide 01/2003...
- Page 277 The RATIO switch allows to select 5 different preset split- ting ratios between supplied sync frequency and resul- ting fps, (1/1, 2/1, 3/1, 4/1, 5/2) – for details see page 300. FUNCTIONS AND OPERATIONS OF THE SPEED 7 – THE CAMERA CONTROL BOXES 01/2003 ARRICAM System Users’ Guide...
- Page 278 The synchronization of the camera speed with an external device like a video or computer monitor, a generator or a projector, can be easily achieved with the SCB. fig.7/14 remote LED speed control switch sync LED 7 – THE CAMERA CONTROL BOXES ARRICAM System Users’ Guide 01/2003...
- Page 279 If the warning message appears while the B AT camera is STAND BY, it automatically will change to NOT READY so that you will have to change the battery. 7 – THE CAMERA CONTROL BOXES 01/2003 ARRICAM System Users’ Guide...
- Page 280 This iris compensation is only possible with a LDS Lens, when the lens motor has been connected to the Lens Data Box and it calibration is done. 7 – THE CAMERA CONTROL BOXES ARRICAM System Users’ Guide 01/2003...
- Page 281 (e.g. FPS 2) that asks for a longer ramping time. When shooting, the TIME LED will glow green during the auto- matic RAMPING. 7 – THE CAMERA CONTROL BOXES 01/2003 ARRICAM System Users’ Guide...
- Page 282 If the IRIS compensation is selected, one should be aware that a change of the depth of field will occur. The following table should help you to find out if the intended iris compensation is possible. 7 – THE CAMERA CONTROL BOXES ARRICAM System Users’ Guide 01/2003...
- Page 283 VIDEO IN connector has priority. • A video signal can be fed into the VIDEO IN BNC connector. • The ARRI Pick-up Unit can be connected to the SYNC IN connector. 7 – THE CAMERA CONTROL BOXES 01/2003...
- Page 284 With the RATIO switch, one of 5 ratios can be selected: (1/1, 2/1, 3/1, 4/1, 5/2). So the following settings can be selected: 7 – THE CAMERA CONTROL BOXES ARRICAM System Users’ Guide 01/2003...
- Page 285 KC 65-S or KC 69-S TV-set sync in KC 78-S (to CAC) BNC (to video in) pick-up unit KC 66-S (to sync in) video in master sync in Studio 7 – THE CAMERA CONTROL BOXES 01/2003 ARRICAM System Users’ Guide...
- Page 286 So for example, if a Speed Con- trol Box is mounted on a STUDIO, do not connect a second Speed Control Box with a cable to this camera. 7 – THE CAMERA CONTROL BOXES ARRICAM System Users’ Guide 01/2003...
-
Page 289: The In-Camera Slate Box
(e.g. 35mm film and sound tape) the time identification (time-code) of the event. And therefore, extremely preci- 8 – THE IN-CAMERA SLATE BOX 01/2003 ARRICAM System Users’ Guide... - Page 290 This data are entered with the time-code generated in the In-camera Slate Box (ISB). 8 – THE IN-CAMERA SLATE BOX ARRICAM System Users’ Guide 01/2003...
- Page 291 40 when it is stop- ped. In-camera Slate Box (ISB) fig.8/1 front label TC I/0 connector (for jaming) TC LED slate exposure LED test button exposure module on/off switch mounting screws 8 – THE IN-CAMERA SLATE BOX 01/2003 ARRICAM System Users’ Guide...
- Page 292 Time-code graphic fig.8/2 emulsion film running direction exposure in-camera slate In-camera Slates fig.8/3 examples of in-camera slates 8 – THE IN-CAMERA SLATE BOX ARRICAM System Users’ Guide 01/2003...
- Page 293 In-camera Slate System always guarantees clear identifi- cation. Automatic reading of In-camera Slate informa- tion in the electronic post-production process is also pos- sible with a special ARRI Optical Character Recognition Software (OCR). The resulting Take-list can be directly transferred to non-linear editing systems. The time-code information can also be used for syncing audio.
- Page 294 24, 25 or 30 fps are needed and the camera is not fitted with the Extended Camera Control Panel. This Panel as well as the SCB enable presetting frame rates like 23.976 fps or 29.970 fps. 8 – THE IN-CAMERA SLATE BOX ARRICAM System Users’ Guide 01/2003...
- Page 295 If the TC has been re-jammed more than 10 hours ago the TC LED glows red. Whenever this LED glows red, you have to re-jam the ISB. 8 – THE IN-CAMERA SLATE BOX 01/2003 ARRICAM System Users’ Guide...
- Page 296 Independently from power supply all other data of the ISB are saved in it's internal flash memory. fig.8/4 right side fig.8/5 Studio – ISB mounting mounting screws 8 – THE IN-CAMERA SLATE BOX ARRICAM System Users’ Guide 01/2003...
- Page 297 Data Box, the connection must happen smoothly. The TC I/O Connector The 5-pin Lemo connector must be used exclusively for connecting the In-camera Slate Box with a master clock (Ambient, Soundrecorder, etc.). 8 – THE IN-CAMERA SLATE BOX 01/2003 ARRICAM System Users’ Guide...
- Page 298 Exposure Module are provided. This switch is not powering the ISB. The Label A label on the In-camera Slate Box explains the various states of the two status LEDs. ISB Label fig.8/7 8 – THE IN-CAMERA SLATE BOX ARRICAM System Users’ Guide 01/2003...
- Page 299 Changing the batteries while the ISB is mounted on a powered camera will keep up the TC function. However the LED will stop blinking after one minute if the new batteries are full. 8 – THE IN-CAMERA SLATE BOX 01/2003 ARRICAM System Users’ Guide...
- Page 300 RUNNING at 24 frames and a recorder RUNNING at 25 or 30 frames to be jam-synced. 8 – THE IN-CAMERA SLATE BOX ARRICAM System Users’ Guide 01/2003...
- Page 301 ISB. So the ISB time-code is synchronized permanently with an external TC device – Continuous Jam-syncing mode is applied. The TC cable must be connected all the time. 8 – THE IN-CAMERA SLATE BOX 01/2003 ARRICAM System Users’ Guide...
- Page 302 3. Push the TEST button on the In-camera Slate Box – both LEDs should briefly fade out and then glow green or red. If the SLATE EXPOSURE LED glows red, 8 – THE IN-CAMERA SLATE BOX ARRICAM System Users’ Guide 01/2003...
- Page 303 ISB is connected to the camera. Caution! However, the adequate synchronization mode can be selected by means of the Video Assist con- figuration menu VIDEO CONFIG – see chapter 5 page 72. 8 – THE IN-CAMERA SLATE BOX 01/2003 ARRICAM System Users’ Guide...
- Page 304 (ASA) on the magazine – see chapter 2, page 80 – to have the correct expo- sure. 8 – THE IN-CAMERA SLATE BOX ARRICAM System Users’ Guide 01/2003...
- Page 305 Flash. The document is delivered with every hand- held PC and can also be downloaded from the ARRI.com web page. More information about the ISB Software, the start menu and the restore procedure can also be downloaded from this web page.
- Page 306 2. To connect the iPAQ to the ARRICAM Camera, two cables are necessary: Plug the round 16 pin male Fischer connector of the ARRI cable KC-H-1 into the Camera Accessory Connector labelled CAC. At the other end, a DSUB 9 pin male connector will be plugged into the iPAQ own cable.
- Page 307 • Be aware that after each take, take numbers will be incremented automatically by the In-camera Slate Box – if they are not changed manually with the iPAQ! 8 – THE IN-CAMERA SLATE BOX 01/2003 ARRICAM System Users’ Guide...
- Page 308 TIMECODE and NEXT SLATE Sub-menu must be activated. More The two More buttons open Dialogue Boxes for browsing the take-list entries and for inspecting errors and warnings reported from the ISB System. 8 – THE IN-CAMERA SLATE BOX ARRICAM System Users’ Guide 01/2003...
- Page 309 The value can be chan- ged by using either touching arrows, writing in the field or selecting an option in a drop menu. 8 – THE IN-CAMERA SLATE BOX 01/2003 ARRICAM System Users’ Guide...
- Page 310 Pushing the Apply field is not sufficient! Please note that jamming time-code is more accurate than editing via handheld PC. iPAQ Current Timecode Dialogue Box fig.8/9 8 – THE IN-CAMERA SLATE BOX ARRICAM System Users’ Guide 01/2003...
- Page 311 Set all ISB Touching this field resets all ISB settings. settings to The user must confirm this action. After selecting OK all settings of the Dialogue default Box are refreshed. 8 – THE IN-CAMERA SLATE BOX 01/2003 ARRICAM System Users’ Guide...
- Page 312 N O P Q R V W X ” – < > iPAQ Next Slate Dialogue Box fig.8/10 max. numbers Field of characters Production Slate Scene Next Take Id Director Roll Production unit 8 – THE IN-CAMERA SLATE BOX ARRICAM System Users’ Guide 01/2003...
- Page 313 Clear deletes all slate settings of the Clear ISB System. This action has to be confirmed by the user. After clearing the settings the Dialogue Box is com- pletely refreshed. 8 – THE IN-CAMERA SLATE BOX 01/2003 ARRICAM System Users’ Guide...
- Page 314 ISB System: The ISB System adds an entry to the Take-list each time a take is completed by the ARRICAM Camera. THE TAKELIST BROWSER INFO BOX iPAQ Takelist Browser Info Box fig.8/11 info fields navigation fields 8 – THE IN-CAMERA SLATE BOX ARRICAM System Users’ Guide 01/2003...
- Page 315 If there is a Slate exposed only at the of take end of the take, the flag Slate at end of take is on. Slate completely The In-camera Slate has been recorded correctly exposed. 8 – THE IN-CAMERA SLATE BOX 01/2003 ARRICAM System Users’ Guide...
- Page 316 In scrolling horizontally, about 4 columns of 13 will be displayed simultaneously. Move the horizontal scroll bar to leaf through the table. 8 – THE IN-CAMERA SLATE BOX ARRICAM System Users’ Guide 01/2003...
- Page 317 Frame rate has not been constant during take. S. (Slate) In-camera Slate exposing function was E. (End) Slate at end of take. C. (Complete) Slate has been correctly exposed. 8 – THE IN-CAMERA SLATE BOX 01/2003 ARRICAM System Users’ Guide...
- Page 318 • In giving a Name to a Take-list, it will be easy to identify it later. • In saving the Take-list into a dedicated Folder, will make the search of it easy. Selecting ”None” means 8 – THE IN-CAMERA SLATE BOX ARRICAM System Users’ Guide 01/2003...
- Page 319 ISB System. Touch the entries to display the indivi- dual error/warning text in an Info Box. iPAQ Errors/Warnings Info Box fig.8/14 In case of problems, the following messages can appear: 8 – THE IN-CAMERA SLATE BOX 01/2003 ARRICAM System Users’ Guide...
- Page 320 Errors/Warnings Info Box fig.8/15 errors error warnings 8 – THE IN-CAMERA SLATE BOX ARRICAM System Users’ Guide 01/2003...
- Page 321 No communication at start of program If there is no communication at starting the program, an Error/Warning Message is displayed and after this the Main Menu appears with all entries set to <void>. 8 – THE IN-CAMERA SLATE BOX 01/2003 ARRICAM System Users’ Guide...
-
Page 323: The Camera Supports
Each camera type has its own, none interchangeable ”standard” Carrying Handle. The ST Carrying Handle as well as the LT one will be fixed to the camera right side by means of 3 mm hex screws. 9 – THE CAMERA SUPPORTS 01/2003 ARRICAM System Users’ Guide... - Page 324 LT Carrying Handle will slide into a holder on the LITE top. The two knobs loosen rosettes enabling the opti- mization of the carrying balance by positioning the Handle over the centre line of the camera. 9 – THE CAMERA SUPPORTS ARRICAM System Users’ Guide 01/2003...
- Page 325 Video Assist is mounted on the LITE, only the LT Centre Handle can be used. This Centre Handle is mounted on top of the LITE body. LITE Centre Handle mounting fig.9/3 mounting screws 9 – THE CAMERA SUPPORTS 01/2003 ARRICAM System Users’ Guide...
- Page 326 To double the possibility of mounting accessories on a shoe, a Shoe Expander can be slid into the shoes provided on the Frameglow Modules, Readout Unit and other components. Studio – Accessory Shoe mounting/Shoe Expander fig.9/4 9 – THE CAMERA SUPPORTS ARRICAM System Users’ Guide 01/2003...
-
Page 327: Power Bridgeplate
ARRICAM Power Bridgeplate to receive power supply via the camera e.g. battery. Studio – Camera Base fig.9/5 Power Bridgeplate mounting fig.9/6 9 – THE CAMERA SUPPORTS 01/2003 ARRICAM System Users’ Guide... - Page 328 The current position, STANDARD or SUPER 35, is dis- played by two index arrows on the integrated Compen- sation Bar. The Power Bridgeplate can be converted to Super 35 as follows: Power Bridgeplate mounting fig.9/7 integrated compensation 9 – THE CAMERA SUPPORTS ARRICAM System Users’ Guide 01/2003...
- Page 329 • to take the camera on the shoulder and to hold it by means of a camera handgrip attached to the camera own rosette joint on the right side. • to use the Shoulder Set and to hold the camera with 9 – THE CAMERA SUPPORTS 01/2003 ARRICAM System Users’ Guide...
- Page 330 In order to avoid confusion it is recommended to assign only one person to switch the camera ON or OFF. fig.9/9 Lite – Right Handgrip Shoulder Pad 9 – THE CAMERA SUPPORTS ARRICAM System Users’ Guide 01/2003...
- Page 331 2 cm higher than when the camera is mounted on the Power Bridgeplate. This fact is negligible when thinking of all the advantages offered by a fast opera- tion. Shoulder Set fig.9/10 9 – THE CAMERA SUPPORTS 01/2003 ARRICAM System Users’ Guide...
-
Page 332: The Shoulder Set
Underneath the Riser Plate is a removable plate which fits in the quick-release attachment of the ARRI Gearheads or some fluid heads. This ARRI Quick-Release Plate can be exchanged with an appropriate one if another camera head is used. -
Page 333: The Accessory Holders
Ø19 mm and the other one to be fixed on a rosette e.g. on the ARRIHEAD – enable the adequate positio- ning of all accessories fitted with the ARRI quick release dovetail mechanism, e.g. the Wireless Handheld Adap- ter WHA-2. Furthermore, two attachments to extend the possibilities of using the well established ARRI Dovetail System are available –... -
Page 334: The Universal Low Mode Set
This Plate can also be used as an Adapter Plate when an ARRICAM Camera is mounted in high mode on a Steadicam. Lite – LT Mounting Plate fig.9/13 mounting screws 9 – THE CAMERA SUPPORTS ARRICAM System Users’ Guide 01/2003... - Page 335 Studio – Universal Low Mode Set fig.9/14 mounting screws mounting screws Studio – Universal Low Mode Set fig.9/15 mounting screws mounting screws 9 – THE CAMERA SUPPORTS 01/2003 ARRICAM System Users’ Guide...
- Page 336 Support Rod Holder has to be fixed by one 3 mm hex screw in the correct position: STUDIO or LITE. Lite – Support Rod Holder fig.9/16 support rod holder 3 mm hex screw 9 – THE CAMERA SUPPORTS ARRICAM System Users’ Guide 01/2003...
-
Page 339: The Power Management
POWER SUPPLY The ARRICAM System should be powered by a power source providing a nominal 24 V dc. An incorporated electronic device should filter the supplied energy and compensate deviations between an acceptable voltage range from 21 V dc and max. - Page 340 Lithium ions from chemicals. Because of its lightness and high energy density, Lithium-Ion batteries are ideal for portable devices, such as the ARRICAM System. In addition, Lithium-Ion batteries have no memory effect and do not use poisonous metals, such as Lead, Mercury or Cadmium.
- Page 341 1, page 32 to preset a threshold value based on his/her experience with the delivered Li-Ion battery pack. Certainly, this is a kind of compromise to solve the problem that occurs when using ”intelli- gent” batteries. 10 – THE POWER MANAGEMENT 01/2003 ARRICAM System Users’ Guide...
- Page 342 The Fischer power supply sockets of the LITE and STUDIO are identical with the one established on the ARRI 435 and 535. (Pin 1 is –, Pin 2 is +). POWER SUPPLY CABLE The power supply cable is attached to the power supply socket on the camera.
- Page 343 CAC connectors located at the rear of the cameras. Beside the power outlets on the camera bodies, power connectors are located on further ARRICAM System components. Some of these connectors are exclusively dedicated to the powering and controlling of some ARRICAM Accessories: •...
- Page 344 No other motor type than the CLM -2 must be connected there. • To power and control ARRI CLM-1 motors, you have to connect them to one of the two connectors, label- led LCS, located on the Lens Data Box. Further remote control devices of the Lens Control System must, if not used wireless, also be connected to these LCS plugs.
- Page 345 – even fully charged. The- refore, each focus puller will have to learn how to manage the power supply based on his/her expe- rience with the available equipment and atmospheric working condition. 10 – THE POWER MANAGEMENT 01/2003 ARRICAM System Users’ Guide...
- Page 346 In order to avoid changing the Battery often, just mount the components needed for the actual shooting on the camera. All ARRICAM System components have been designed to consume as little power as possible. However, screens like the Lens Data Display or the Video On Board Monitor needs some power, it would do fine to turn them OFF when not used.
-
Page 349: 11 - Miscellaneous
• Unscrew the index pin and screw it into the opposite inner thread. • Screw both locking grips firmly into the correct opera- ting position. • Replace the six cylindrical screws and screw tightly. • Check the flange focal distance. 11 – MISCELLANEOUS 01/2003 ARRICAM System Users’ Guide... -
Page 350: Perforation/4 Perforation Conversion
C O N V E RTING THE POWER BRIDGEPLATE TO SUPER 35 See chapter 9 – Camera Supports 3 Perforation/4 Perforation Conversion The changing of the movement should be performed in an ARRICAM Maintenance Centre only. 11 – MISCELLANEOUS ARRICAM System Users’ Guide 01/2003... -
Page 351: The Assistant Work Light
Be aware to have spare bulbs – 24 V/4 W – with you. Heated Eyecup and Assistant Work Light may be used together (but keep an eye on your battery!). Studio – Work Light mounting fig.11/1 ON/OFF switch mounting screw connectors 11 – MISCELLANEOUS 01/2003 ARRICAM System Users’ Guide... -
Page 352: Checking The Mirror Shutter Manually
2. Take lens or lens cavity cover off the port. 3. If an In-camera Slate Box is connected, set its switch to OFF. 4. Check the preset shutter angle value shown on the SHUTTER display(s). 11 – MISCELLANEOUS ARRICAM System Users’ Guide 01/2003... - Page 353 Never touch the mirror with any object or with fingers! If you doubt that the opening angle corresponds with the displayed figure, consult an ARRICAM Maintenance Centre. Camera Lens Port/Mirror Shutter fig.11/2 11 – MISCELLANEOUS 01/2003 ARRICAM System Users’ Guide...
-
Page 354: Tools
In addition to the various ordinary tools and cleaning material, the camera assistant only needs just a few spe- cific tools to work with the ARRICAM System. Except the ARRICAM Combi Tools and the ARRI A 16SR 3 twin- pronged driver, all tools can be purchased in regular hardware shops. - Page 355 ARRICAM Maintenance Centre. 7. The ARRI A 16SR-3 twin-pronged driver – part No. K5.26129.0 – will be used for adjusting the swing- over tension of all swivelling Viewfinder Arms except the one of the Hinge type ST Viewfinder.
- Page 356 M 3 Allen Key (hex) M 2 Allen Key (hex) M 1.5 Allen Key (hex) ARRI A 16SR 3 twin-pronged driver ARRICAM – 2.5 mm/3 mm Combi Tool ARRICAM – M 1.5 Allen key (hex)/3 mm Combi Tool 11 – MISCELLANEOUS ARRICAM System Users’...
-
Page 358: Technical Data
ARRICAM SYSTEM – TECHNICAL DATA ARRICAM System Users’ Guide 01/2003 TECHNICAL DATA ARRICAM STUDIO ARRICAM LITE Film format 35 mm DIN 15501 35 mm DIN 15501 Lens port convertible 35/S35 format 54 mm PL 54 mm PL Flange focal distance 51.98 mm - 0.01... -
Page 359: Arri Group Addresses
Voice phone: +1 914 353 1400, FAX: +1 914 425 1250 Email: arriflex@arri.com ARRI USA Inc. – West Coast (Burbank Office) 600 North Victory Blvd., Burbank, CA 91502-1639, USA Voice phone: +1 818 841 7070, FAX: +1 818 848 4028 Email: brussell@arri.com... - Page 360 STATUS MESSAGES, WARNINGS AND TROUBLE SHOOTING LIST ARRICAM System Users’ Guide 01/2003 WARNING AND STATUS EXPLANATIONS/SUGGESTED REMEDY MESSAGES Adapter Cover missing • Always use the Combi-Adapter Cover (No other ones!) while this warning is shown, the camera can run. Adapter Cover •...
- Page 361 WARNING AND STATUS EXPLANATIONS / SUGGESTED REMEDY MESSAGES Cannot set more than 9 Marks • Delete a Focus Mark to replace it by the new one. (only with LDS Lens) Push UP or DOWN to select, • Follow the instruction to handle the Focus Marks on the Lens then DELETE (only with LDS Lens) Data Display scale.
- Page 362 THE ARRICAM CHECKLIST ARRICAM System Users’ Guide 01/2003 Rental House/Contact Order No. Date Page 1 of 8 Production Company Project Director Cinematographer Production Manager Focus Puller CAMERA BODIES 4 perf/35 4 perf/S 35 3 perf/35 3 perf/S 35 ARRICAM Studio...
- Page 363 THE ARRICAM CHECKLIST ARRICAM System Users’ Guide 01/2003 Rental House/Contact Order No. Date Page 2 of 8 VIEWFINDERS, FRAMEGLOW MODULES AND ACCESSORIES Hinge type ST Viewfinder ST-VF (H) Incl. Tube, ST Eyepiece K2.54003.0 & Eyecup K2.54044.0 Bayonet type ST Viewfinder Block S T-VF (B) Block with mini PL bayonet port K4.53001.0...
- Page 364 THE ARRICAM CHECKLIST ARRICAM System Users’ Guide 01/2003 Rental House/Contact Order No. Date Page 3 of 8 ELECTRONIC BOXES, DISPLAYS AND ACCESSORIES Readout Unit To be mounted on the ST Viewfinder only K2.54008.0 Remote Switch RS-4 RUN/STOP switch with attached short cable K2.46942.0...
- Page 365 THE ARRICAM CHECKLIST ARRICAM System Users’ Guide 01/2003 Rental House/Contact Order No. Date Page 4 of 8 REMOTE CONTROL, CABLES, MOTORS AND DISTRIBUTION BOX RS-4 Extension Cable (3 m/10 ft) KC 40-S Extension Cable for Remote Switch K2.47207.0 SCB Cable (3 m/10 ft)
- Page 366 THE ARRICAM CHECKLIST ARRICAM System Users’ Guide 01/2003 Rental House/Contact Order No. Date Page 5 of 8 MATTE BOXES 3” x 3” Lightweight Matte Box (Clip On) LMB-2 LMB-2 filter stage (K2.21973.0) K0.59954.0 rectangular sunshade (K2.21975.0) 4” x 4” Lightweight Matte Box (Clip On) LMB-3 filter holder LMB-3 Ø...
- Page 367 THE ARRICAM CHECKLIST ARRICAM System Users’ Guide 01/2003 Rental House/Contact Order No. Date Page 6 of 8 LDS LENSES LDS ARRI/ZEISS ULTRA PRIME LENSES Meter Scale Feet Scale 12 mm T2 K2.52198.0 K2.52199.0 14 mm T1.9 K2.52111.0 K2.52123.0 16 mm T1.9 K2.52112.0...
- Page 368 THE ARRICAM CHECKLIST ARRICAM System Users’ Guide 01/2003 Rental House/Contact Order No. Date Page 7 of 8 ANAMORPHIC LENSES SPECIAL LENSES OPTICAL DEVICES Swing/Tilt Lenses Rain deflector small/large T-Rex Superscope Low Mode Prisma Innovision Probe Mesmerizer Diopters/Splitfield SUPPORTS AND MECHANICAL ACCESSORIES Power Bridgeplate Ø...
- Page 369 1. This Checklist has been edited in December 2002 – some of the listed items are in preparation. 2. The covers and caps of several system components have not been listed here. 3. ARRI K numbers have been added to facilitate the identification of several items.
- Page 370 CABLES AND CONNECTORS ARRICAM System Users’ Guide 01/2003 PAGE 1 Video Video Video Signal Source Speed Control Box SCB ST/LT Video Assist Video Device K LDD-FP-RDO (coiled) K 2.54172.0 LDD-FP Lens Data Display- Readout Unit Focus Puller LT Frameglow Module...
- Page 371 CABLES AND CONNECTORS ARRICAM System Users’ Guide 01/2003 PAGE 2 KC 66-S (10 m/33 ft) K 2.54129.0 Sync Out Sync In Pick-up Unit Speed Control Box SCB Sync Generator on slaved camera KC 67-S (3 m/10 ft) K 2.54132.0 KC 68-S (15 m/50 ft) K 2.54133.0...
- Page 372 CABLES AND CONNECTORS ARRICAM System Users’ Guide 01/2003 PAGE 3 KC 76-S (3 m/10 ft) K 2.54153.0 Lens Data Display LDD Speed Control Box SCB KC 77-S (0.2 m/8 in) K 2.54154.0 Adapter Cable for Lens Data Display LDD KC 67-S/KC 68-S KC 78-S (15 m 50 ft) K 2.54155.0...
- Page 374 THE LENS DATA DISPLAY The LDD Screen – feet and inches The LDD Screen – metric camera is stand by camera is inching camera is stand by – Lens Data System not initiated camera is not ready camera is running camera is stand by –...
- Page 375 THE LENS DATA DISPLAY The LDD-FP Lens/Status Screen – feet and inches The LDD-FP Lens/Status Screen – metric camera is stand by camera is inching no cam status short cam status camera is not ready camera is running long cam status option menu...
-
Page 376: Acknowledgment
Acknowledgment Like the ARRICAM System itself, this Users’ Guide consists of several interchangeable parts that will continuously be up-dated. In order to serve you best, I would greatly appreciate your requests, inquiries, comments and suggestions mailed to office@imago.org. I would like to express my gratitude to all friends and colleagues without their help this Users’... - Page 377 Copies of this ARRICAM Users’ Guide can be ordered at any ARRICAM Maintenance Centre or at the ARRI Headquarters in Munich. Part No. K 5.58508.0 Do not hesitate to make copies of the Checklist (Chapter 12) – it is dedicated for placing your order at your rental house.
Need help?
Do you have a question about the Arricam System and is the answer not in the manual?
Questions and answers