
Related Manuals for SecurityMan DigiairWatch Series


Summary of Contents for SecurityMan DigiairWatch Series
- Page 1 DigiairWatch Series User’s Manual 4-Channel Wireless Digital Video Recorder, with Wireless Camera(s), Night Vision, Audio, and SD Card Recorder...
- Page 2 SecurityMan. The content of this manual is furnished for informational use only, is subject to change without notice, and should not be construed as a commitment by SecurityMan.
- Page 3 The liability of SecurityMan Inc, arising from this warranty and sale shall be limited to a refund of the purchase price. In no event shall SecurityMan be liable for costs of procurement of substitute products or services, or for any lost profits, or for any consequential, incidental, direct or indirect damages, however caused and on any theory of liability, arising from this warranty and sale.
-
Page 4: Table Of Contents
Table of Contents Introduction Important Features Restrictions Condictions Package contents Product Basics Camera (SM-816DT) Receiver (SM-804DR) Quick Start On-Screen Display Single Channel Full Screen Display Quad Screen Display Playback Screen Display Operation Snap Shot button Record button Camera button Quad Screen button Menu button Exit button Menu Setup... -
Page 5: Introduction
DIY kit will allow you to monitor your home, business, front or back doors, garage, backyard, or any location that you would like to keep an eye on. The DigiairWatch series includes one or two weatherproof digital wireless camera(s) and a SD card recorder. - Page 6 Features • Do-it-yourself (D.I.Y) easy to use and simple installation • 3 seconds pre-alarm recording • Integrated SD digital video recorder (SD card not included) • 2.4GHz digital wireless recording system. • Weatherproof (IP54) CMOS color camera for outdoor and indoor applications •...
- Page 7 • DO NOT this product to carry out any illegal activities such as sneak preview, and etc. SecurityMan shall not be responsible for any consequences of illegal conducts made by users. • DO NOT put the plastic package bags in reach of children or babies.
- Page 8 • DO NOT plug the AC adapter into the outlet in improper situations. • Plugging in an AC adapter with wet hands might cause electric shock. • Plugging in the AC adapter unsteadily might cause fire or electric shock. • DO NOT cover the AC adapter when it is connected to an outlet, place the adapter near heaters, or put it on the floor which is equipped with a heater.
- Page 9 Conditions Please read the following messages to make sure your working environment is suitable. • The temperature should be kept between –10˚C and 50˚C (14˚F to 122˚F). The relative humidity should be kept between 20% and 80%. • Avoid putting the product in places where temperature or humidity may change rapidly.
-
Page 10: Package Contents
Package Contents Camera (SM-816DT) 1 x DVR/Receiver 1 x AV Cable 1 for DigiairWatch (SM-804DR) 2 for DigiairWatch2 Mounting Bracket Antenna AC Adapter 1 for DigiairWatch 2 for DigiairWatch 2 for DigiairWatch 2 for DigiairWatch2 3 for DigiairWatch2 3 for DigiairWatch2 **SD card not included. -
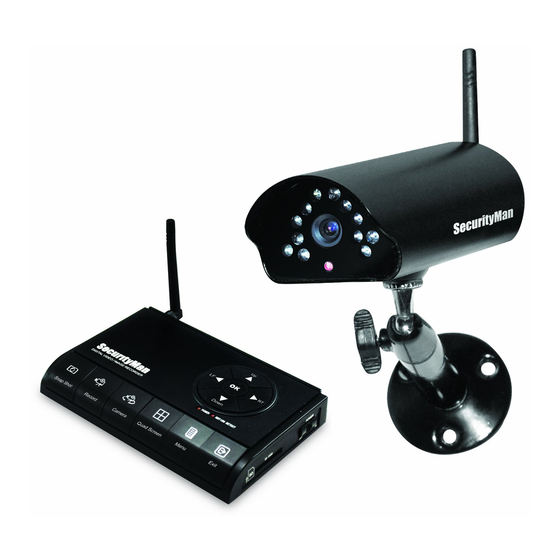
Page 11: Product Basics
Product Basics Antenna Camera (SM-816DT) Sun Visor Power Socket Pair Button Camera Lens IR LED’s Light Sensor Power LED Angle Adjust Microphone Mounting Bracket DVR/Receiver (SM-804DR) Audio Out 1 & 2 Video Out DC IN Antenna ON/OFF Switch Mounting Slots Motion Dectect SD Slot... -
Page 12: Quick Start
Quick Start 1. Mount your camera(s) in the desired position. Make sure to plug in the power (5VDC, 1.0A) and attach the supplied antenna(s). CAUTION: To prevent electric shock or damage to the camera, please make sure to properly insolate the camera’s power connections if being used as an outdoor application. - Page 13 3. Attach the antenna to the DVR/Receiver and insert a SD card (face up) into the SD Slot located on the right hand side of the DVR. NOTE: Make sure to format the SD card prior to recording. (Refer to the SD Card section of the user’s manual) *SD Card not included 4.
-
Page 14: On-Screen Display
On-Screen Display Single Channel Full Screen Display Snap Shot Video Record Signal Strength Date and Time No SD Card SD Card Initializing Camera Date and Time The Date and Time is displayed in the following format: Year/Month/Date Day HR:Min Note: Please refer to System Settings in the user’s manual for information on how to change the time and date. -
Page 15: Quad Screen Display
or recorded. You can toggle between cameras by simply pressing the Camera button on the receiver. Note: By default the user will not be able to toggle to any channel that does not have a camera allocated to it. No SD Card A “No SD card”... -
Page 16: Playback Screen Display
Playback Screen Display Loop Video Duration/Length Play Image Number File Name File Name The File Name identifies the current video/image being played or viewed. The File Name is also the starting time of the video clip and the last dash followed by a number represents the camera channel number (-1~-4) of the recorded file being played or viewed. -
Page 17: Operation
Image Number The image number is only viewable during photo playback and represents the total amount of files in the current folder and the current file being viewed. Operation Snap Shot button The Snap Shot button gives the you the ability to take an instant manual photo (jpeg) of what is being viewed on the output display monitor and are automatically stored on the SD card (not included) so they can be viewed later. -
Page 18: Camera Button
IMPORTANT NOTICE: Exiting from quad view to single channel full screen (while recording) will halt all recording for all cameras except for the live camera being displayed. • In Single Channel Full Screen Display you can use the Camera button on the receiver to toggle through all four cameras (when applicable) in full screen display and then press the Record button to start recording when the desired camera is being displayed on the screen. -
Page 19: Menu Setup
Menu Setup Press the Menu button on the DVR/Receiver at any time to enter the Main Menu Setup window as shown below. Then use the UP, DOWN, LF, and RT buttons to toggle through the menu options, press the OK button to select, save the changes, and press the EXIT button to exit from the selected menu screen. -
Page 20: Brightness
• Brightness To adjust the brightness level of the DVR/Receiver, simply highlight and press OK on the Brightness option in the system settings. Use the UP, DOWN, LF, and RT buttons to make your adjustments and press the OK button to save your changes. •... -
Page 21: Sensitivity
• • Sensitivity In the Motion Detection submenu, highlight and press OK on Sensitivity to adjust the sensitivity option for the motion detection recording feature. Options include: Never (off), Low (17’), Medium (25’), and High (30’). When sensitivity is set to Low, Medium, High or motion detection is enabled, each motion recording will have a 3 seconds pre-alarm recording before each events. -
Page 22: Date And Time
• • Motion Detection Alert In the Motion Detection submenu, highlight and press OK on Motion Detection Alert to enable or disable the audible alert notification that can be heard whenever motion is detected. Options include: ON and Off. • Date and Time It is highly recommended to set the date and time on the system prior to recording. -
Page 23: Tv Standard
• TV Standard To change the TV Standard on your DVR/Receiver simply highlight and press OK on the TV Standard option. Use the UP, DOWN, LF, and RT buttons to make your selection and press the OK button to save your changes. -
Page 24: Playback/Sd Card
• System Information The System Information option displays important information about your DVR/Receiver such as: System ID, Firmware, Total Size, and Free Space available on your SD card. To view this information simply highlight and press OK on the System Information option. Playback/SD Card The Playback/SD Card menu consists of 3 options: the Play Folder (used to view and playback recorded files), SD Unmount (used prior... -
Page 25: Play Folder (Playback From Recorder)
• Play Folder (Playback from Recorder) The Play Folder is used to view and playback recorded events stored on your SD Card and consist of 2 subfolders labeled Photos and Videos. To playback or view the recorded files stored on your SD card simply highlight and press OK on the Play Folder option to access the sub folders. - Page 26 Once inside, you can use the Up and Down buttons to highlight the dated folder that you would like to review and press the OK button to view its hourly sub folders which contain the recorded events as illustrated below. At this point you can now highlight and select the recorded video file that you would like to playback by pressing the OK button on the selected file.
-
Page 27: Photos
• • Photos All photo snap shots are stored in the Photos folder which also consists of sub folders that are automatically created according to the HOUR that the photos were taken. For example, all photos taken on March 7th 2012 will be stored in the folder labeled 03-07-2012 and categorized in subfolders by the hour they were created as shown below. -
Page 28: Pc Playback
At this point you can now highlight and select the photo that you would like to view. While viewing an image use the LF and RT buttons to skip or go back to the next/ previous file, press the Record button to enable/disable a 3 seconds slide show and auto loop through the picture files, and press the OK or Exit button to exit to Photos folder. -
Page 29: Sd Unmount
Photo: Open the Photos folder and then open one of the Date folders (mm-dd-yyyy) to view a list of all the snap-shot events taken for that date. Once inside the dated folder there is another sub- folders separated by the hour. Select the hour you want to playback to get to the time file name JPG picture files. -
Page 30: Camera
• SD Format SD Format is an important feature that should always be used whenever a NEW SD card is being used prior to recording to ensure proper compatibility format between the DVR and the card. To utilize this feature simply highlight the SD Format option and press the OK button. -
Page 31: Auto Scan
• Auto Scan Auto Scan is used to set up an automatic camera rotation period between cameras 1-4 (when applicable). To do so, simply highlight and press OK on Auto Scan. Use the Up and Down buttons to make your selection and press the OK button to save your changes. Options include: Never (default), 5 seconds, 10 seconds, 15 seconds, and 20 seconds. -
Page 32: Adding Cameras
• • Adding Cameras To add a camera to your system, simply highlight any of the available cameras/channels (unlocked) and press the OK button on the receiver. Once selected, a confirmation screen will pop up asking you to confirm (YES) or cancel (NO) your selection, use the LF and RT buttons to make your selection and press the OK button to confirm. -
Page 33: Removing Cameras
• • Removing Cameras To remove a camera from your system, simply highlight the selected camera to be removed and press the OK button on the receiver. Once selected, a confirmation screen will pop up asking you to confirm (YES) or cancel (NO) your selection, use the LF and RT buttons to make your selection and press the OK button to confirm. - Page 34 Exit The monitor icon shown below is only used to exit from the main menu. Use the Up, Down, LF, and RT buttons to scroll over to monitor icon and press the OK button to exit back to the live view screen.
-
Page 35: Specifications
Specifications Image Sensor CMOS Color Resolution 640 x 480 pixels (NTSC/PAL selectable) Viewing Angle 45 degree Audio Microphone built-in (audio monitoring up to 30ft) Minimum Illumination 2 Lux (IR off); 0 Lux (IR on) IR LED Night Vision Range Up to 30ft (B/W) SM-816DT Weatherproof Rating IP54...
Need help?
Do you have a question about the DigiairWatch Series and is the answer not in the manual?
Questions and answers