Table of Contents
Advertisement
Quick Links
Advertisement
Table of Contents

Related Manuals for Zhone 6211-I2


Summary of Contents for Zhone 6211-I2
- Page 1 6211-I2 ADSL2+ Router User’s Guide May 2006 Document Part Number: 6211-A2-ZB21-60...
- Page 2 Further, Zhone Technologies reserves the right to revise this publication and to make changes from time to time in the contents hereof without obligation of Zhone Technologies to notify any person of such revision or changes.
- Page 3 — Avoid using a telephone (other than a cordless type) during an electrical storm. There may be a remote risk of electric shock from lightning. — Do not use the telephone to report a gas leak in the vicinity of the leak. 6211-I2 ADSL2+ Router User’s Guide...
- Page 4 World Wide Web site at www.zhone.com. FCC Part 15 Declaration An FCC Declaration of Conformity may be downloaded from the Zhone World Wide Web site at www.zhone.com. This device complies with Part 15 of the FCC Rules. Operation is subject to...
- Page 5 If the site has specially wired alarm equipment connected to the telephone line, ensure the installation of the modem does not disable the alarm equipment. If you have questions about what will disable alarm equipment, consult your Telephone Company or a qualified installer. 6211-I2 ADSL2+ Router User’s Guide...
- Page 6 Council for Interference from Information Technology Equipment (VCCI). If this is used near a radio or television receiver in a domestic environment, it may cause radio interference. Install and use the equipment according to the instruction manual. 6211-I2 ADSL2+ Router User’s Guide...
-
Page 7: Table Of Contents
ONTENTS About This Guide 11 Document Purpose and Intended Audience ............11 Document Summary ....................11 Product-Related Documents ..................12 Contacting Global Service and Support ..............12 Technical Support .......................12 Service Requirements ....................12 Chapter 1 Introduction ......................13 Introduction .........................13 Features ........................13 System Requirements ....................13 Parts List ........................14 Front Panel... - Page 8 ATM Statistics ......................33 ADSL Statistics ......................34 ADSL BER Test ......................34 Route ..........................36 ..........................37 Chapter 4 Quick Setup ......................39 Quick Setup with Auto-Connect Enabled ...............39 Quick Setup with Auto-Connect Disabled ..............41 Chapter 5 Advanced Setup ....................43 ..........................43 Add Function – ATM PVC Configuration .............44 Connection Type Screen ..................45 Bridge Service and Quality of Service Screen............46 WAN Setup - Summary ..................47...
- Page 9 Chapter 7 Management ......................83 Saving and Restoring the Configuration ..............83 Backing Up Configuration Settings .................83 Restoring Configuration Settings ................85 Restoring Default Settings ..................87 System Log ........................89 View System Log....................90 Configure System Log ....................91 TR-069 Client ......................92 Internet Time .......................93 Access Control – Services ..................94 Access Control –...
- Page 10 6211-AZ-ZB21-40...
-
Page 11: About This Guide
BOUT UIDE Document Purpose and Intended Audience This guide contains detailed information about the 6211-I2 router. It is intended for all users of the router. Document Summary Section Description Chapter 1, Introduction Describes the features of the router. Chapter 2, Hardware... -
Page 12: Product-Related Documents
Contacting Global Service and Support Contact Global Service and Support (GSS) if you have any questions about this or other Zhone products. Before contacting GSS, make sure you have the following information: Zhone product you are using System configuration... -
Page 13: Introduction
— If USB drivers will be installed, 5 MB free disk space — Windows 95b, 98, 98SE, 2000, ME, NT, or XP (Note: Windows 95 requires the installation of the Winsock program, not included. Windows 95 and 98 do not support USB.) 6211-I2 ADSL2+ Router User’s Guide... -
Page 14: Parts List
In addition to this document, your 6211 ADSL router should come with the following: 6211 ADSL router Power adapter Ethernet cable (RJ45, straight-through type) Phone cable (RJ11) USB cable Figure 1: 6211 ADSL Router Package Contents 6211-I2 ADSL2+ Router User’s Guide... -
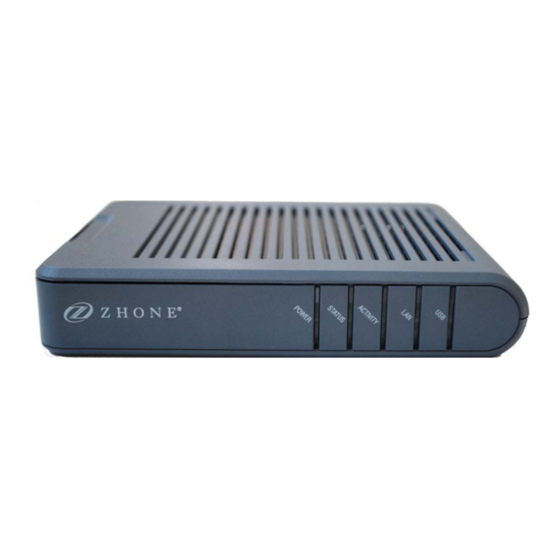
Page 15: Front Panel
Off: No ADSL link ACTIVITY Green Flashing: ADSL data transfer Green On: LAN link is established Flashing: Data transfer at LAN connection Off: No LAN link Green On: USB link is established Off: No USB link 6211-I2 ADSL2+ Router User’s Guide... -
Page 16: Rear Panel
Connects the CPE to your PC's Ethernet port, or to the uplink port on your LAN's hub or switch, using the cable provided RESET/DEFAULT To reset the router to its default settings POWER Connects to the supplied power adapter 6211-I2 ADSL2+ Router User’s Guide... -
Page 17: Hardware Installation And Pc Setup
— If your LAN has more than one computer, you can attach one end of an Ethernet cable to a hub or a switch and the other to the LAN port of the router. Either a crossover or straight-through Ethernet cable can be used. 6211-I2 ADSL2+ Router User’s Guide... -
Page 18: Chapter 2 Hardware Installation And Pc Setup
Solid green to indicate that the router can communicate with your ISP via ADSL, or flashing when the router is trying to connect to your ISP. ACTIVITY Flashing when the device is sending or receiving data over the ADSL connection. 6211-I2 ADSL2+ Router User’s Guide... -
Page 19: Installing The Usb Driver
Windows detects the new hardware and the Found New Hardware Wizard appears on your PC monitor. Follow this procedure: 1 Choose "Install from a list or specific location" from the Wizard's menu, then click on Next. Figure 4: Found New Hardware Wizard 6211-I2 ADSL2+ Router User’s Guide... - Page 20 2 Insert the supplied CD ROM and use Browse to include the CD drive in the search. Figure 5: Search and Installation Options 3 If the Wizard reports a compatibility issue, select "Continue Anyway". Installation of the USB driver proceeds. Figure 6: Compatibility Warning 6211-I2 ADSL2+ Router User’s Guide...
- Page 21 Installing the USB Driver Figure 7: Progress Screen 4. When prompted, click on Finish to close the Wizard. Figure 8: Completion Screen 6211-I2 ADSL2+ Router User’s Guide...
-
Page 22: Configuring Your Computer
The Local Area Connection dialog box displays with a list of currently installed network items. 4 Ensure that the check box to the left of the item labeled Internet Protocol (TCP/IP) is checked, and click on Properties. Figure 9: Network Connections (Windows XP) 6211-I2 ADSL2+ Router User’s Guide... - Page 23 Use the following IP address. Type an address between 192.168.1.3 and 192.168.1.254 in the IP Address field (192.168.1.20 is shown here as an example) and 255.255.255.0 in the Subnet Mask field. Figure 11: TCP/IP Properties (Windows XP) 6211-I2 ADSL2+ Router User’s Guide...
-
Page 24: Windows 2000 Pcs
1 In the Windows task bar, click on the Start button, point to Settings, and then click on Control Panel. 2 Double-click on the Network and Dial-up Connections icon. 3 In the Network and Dial-up Connections window, right-click on the Network icon, and then select Properties. 6211-I2 ADSL2+ Router User’s Guide... -
Page 25: Windows 95 And Windows 98 Pcs
5 Click on Microsoft in the Manufacturers list box, and then click on TCP/ IP in the Network Protocols list box. 6 Click on OK to return to the Network dialog box, and then click on OK again. 6211-I2 ADSL2+ Router User’s Guide... -
Page 26: Windows Nt 4.0
9 In the Protocols tab, select TCP/IP, and then click on Properties. 10 In the Microsoft TCP/IP Properties dialog box, click on the radio button labeled Use the following IP address. Type an address between 6211-I2 ADSL2+ Router User’s Guide... -
Page 27: Logging In To Your Router
Figure 12: Login Screen If you have problem connecting to the router, verify that your PC is properly configured within the subnet of the router's default IP address 192.168.1.1. Setup is described in Configuring Your Computer on page 6211-I2 ADSL2+ Router User’s Guide... - Page 28 Can display device status, but cannot change or save configuration options. admin admin Can perform all functions. You can change the passwords at any time. The home page is shown in Figure Figure 13: Web Interface Home Page 6211-I2 ADSL2+ Router User’s Guide...
-
Page 29: Device Information
EVICE NFORMATION Status Summary Display the general status report for the router by clicking on Summary under Device Info (Figure 14). Figure 14: Status Summary 6211-I2 ADSL2+ Router User’s Guide... -
Page 30: Wan
Device Information Display the WAN status report from the by clicking on WAN under Device Info (Figure 15). Figure 15: WAN Status 6211-I2 ADSL2+ Router User’s Guide... -
Page 31: Lan Statistics
LAN Statistics LAN Statistics Display LAN statistics by clicking on LAN under Statistics (Figure 16). Figure 16: LAN Statistics 6211-I2 ADSL2+ Router User’s Guide... -
Page 32: Wan Statistics
Device Information WAN Statistics Display WAN statistics by clicking on WAN under Statistics (Figure 17). Figure 17: WAN Statistics 6211-I2 ADSL2+ Router User’s Guide... -
Page 33: Atm Statistics
ATM Statistics ATM Statistics Display ATM statistics by clicking on ATM under Statistics (Figure 18). Figure 18: ATM Statistics 6211-I2 ADSL2+ Router User’s Guide... -
Page 34: Adsl Statistics
(Figure 20 Figure 21). To run a BER test: 1 Click on the ADSL BER Test button. 2 Select the test duration and click on Start 3 Check the result. 6211-I2 ADSL2+ Router User’s Guide... - Page 35 ADSL BER Test Figure 20: ADSL BER Test — Start Figure 21: ADSL BER Test — Result 6211-I2 ADSL2+ Router User’s Guide...
-
Page 36: Route
Device Information Route Obtain the Routing status report by clicking on the Route item under Device Info (Figure Figure 22: Route Information 6211-I2 ADSL2+ Router User’s Guide... -
Page 37: Arp
Display the ARP status report by clicking on ARP under Device Info (Figure Figure 23: ARP Status 6211-I2 ADSL2+ Router User’s Guide... - Page 38 Device Information 6211-I2 ADSL2+ Router User’s Guide...
-
Page 39: Quick Setup
PPPoE, PPPoA, and Bridge Protocol (with DHCP Server available). To use auto-connect: 1 Select Quick Setup. The Quick Setup initial screen appears. Figure 24: Quick Setup Initial Screen 2 Select DSL Auto-Connect, then click on Next. The progress information screen appears. 6211-I2 ADSL2+ Router User’s Guide... - Page 40 Quick Setup Figure 25: Detecting Available PVC Figure 26: Detecting available PVC – Available PVC Detected 6211-I2 ADSL2+ Router User’s Guide...
-
Page 41: Quick Setup With Auto-Connect Disabled
1 Select Quick Setup. The Quick Setup initial screen appears. Figure 27: Specifying VPI and VCI 2 Verify that DSL Auto-Connect is not selected. Specify VPI and VCI as directed by your ISP. Click on Next. 3 Use Advanced Setup to configure the PVC. 6211-I2 ADSL2+ Router User’s Guide... - Page 42 Quick Setup 6211-I2 ADSL2+ Router User’s Guide...
-
Page 43: Advanced Setup
DVANCED ETUP Set up WAN parameters as directed by your ISP. Figure 28: WAN Setup Screen 6211-A2-ZB21-60 6211-I2 ADSL2+ Router User’s Guide... -
Page 44: Add Function - Atm Pvc Configuration
VCI (Virtual Channel Identifier) – The valid range is 32 to 65535. Service Category – Five classes of traffic defined are defined: — UBR Without PCR — UBR With PCR — CBR — Non-Realtime VBR — Realtime VBR 6211-I2 ADSL2+ Router User’s Guide 6211-A2-ZB21-60... -
Page 45: Connection Type Screen
Select the type of network protocol and encapsulation mode over the ATM PVC that your ISP has instructed you to use, then click on Next button. Figure 30: Connection Type Screen Select a connection type and click on Next. 6211-A2-ZB21-60 6211-I2 ADSL2+ Router User’s Guide... -
Page 46: Bridge Service And Quality Of Service Screen
PVCs is reduced. The default setting for QoS is disabled. If you want to enable QoS service, select the "Enable Quality Of Service" check box. After finishing steps as above, click on the Next button. Figure 31: Enable Bridge Service 6211-I2 ADSL2+ Router User’s Guide 6211-A2-ZB21-60... -
Page 47: Wan Setup - Summary
Figure 32: WAN Setup Summary Note Activate this WAN interface by clicking on the Finish button and further configuring services over this interface. The router supports up to five WAN connections. 6211-A2-ZB21-60 6211-I2 ADSL2+ Router User’s Guide... -
Page 48: Remove Function
Remove check box next to the item, then click on the Remove button. Figure 33: WAN Setup List Finish Function After you change any item in WAN Setup, remember to click on the Finish button to apply the changes and reboot the system. 6211-I2 ADSL2+ Router User’s Guide 6211-A2-ZB21-60... -
Page 49: Local Area Network (Lan) Setup
LAN's IP Subnet. The Save button only saves the LAN configuration data. The Save/Reboot button saves the LAN configuration data and reboots the router to make the new configuration effective. Figure 34: LAN Setup 6211-A2-ZB21-60 6211-I2 ADSL2+ Router User’s Guide... -
Page 50: Nat
A virtual server allows you to direct incoming traffic from the WAN side to a specific IP address on the LAN side. Click on the Add button to add a virtual server. Figure 35: NAT Virtual Server Setup 6211-I2 ADSL2+ Router User’s Guide 6211-A2-ZB21-60... - Page 51 Figure 36: Virtual Server Add Screen On this screen you can view and delete servers. Click in the check box under Remove and click on the Remove button to delete selected virtual servers. Figure 37: Removing Selected Virtual Servers 6211-A2-ZB21-60 6211-I2 ADSL2+ Router User’s Guide...
-
Page 52: Port Triggering
Advanced Setup Port Triggering Click the on the Add button to add Port Triggering for your Internet application. Figure 38: Port Triggering Setup Page 6211-I2 ADSL2+ Router User’s Guide 6211-A2-ZB21-60... - Page 53 Figure 39: Port Triggering Add Page On this screen you can view and delete applications. Click in the check box under Remove and click on the Remove button to delete selected applications. Figure 40: Port Triggering List 6211-A2-ZB21-60 6211-I2 ADSL2+ Router User’s Guide...
-
Page 54: Dmz Host
Advanced Setup DMZ Host You can define the IP address of the DMZ Host on this screen. Enter the IP address and click on Save/Apply. Figure 41: DMZ Host Setup 6211-I2 ADSL2+ Router User’s Guide 6211-A2-ZB21-60... -
Page 55: Firewall
IP Filtering – Outgoing The outgoing filter will block the traffic from the LAN side to the WAN side. Click on Add to create filters. Figure 42: IP Filtering – Outgoing Filter Setup 6211-A2-ZB21-60 6211-I2 ADSL2+ Router User’s Guide... - Page 56 Destination information (from the WAN side). Then click on Save/Apply. Figure 43: IP Filtering - Outgoing Filter Add Page You can view and delete the outgoing filter settings on this screen. Figure 44: IP Filtering - Outgoing Filter Setup List 6211-I2 ADSL2+ Router User’s Guide 6211-A2-ZB21-60...
-
Page 57: Ip Filtering - Incoming
IP Filtering – Incoming Incoming filter filters the traffic from the WAN side to the LAN side. Click on Add to add incoming filter settings. Figure 45: IP Filtering – Incoming Filter Setup Page 6211-A2-ZB21-60 6211-I2 ADSL2+ Router User’s Guide... - Page 58 WAN interface. Then click on Save/Apply to add the setting. Figure 46: IP Filtering - Incoming Filter Add You can view and delete the incoming filter settings from this screen. Figure 47: IP Filtering - Incoming Filtering List 6211-I2 ADSL2+ Router User’s Guide 6211-A2-ZB21-60...
-
Page 59: Firewall - Mac Filtering
MAC filtering can forward or block traffic by MAC address. You can change the policy or add settings to the MAC filtering table using the MAC Filtering Setup screen. Figure 48: IP Filtering - MAC Filtering Setup 6211-A2-ZB21-60 6211-I2 ADSL2+ Router User’s Guide... - Page 60 Advanced Setup If you click on Change Policy, a confirmation dialog lets you verify your change. Figure 49: IP Filtering - MAC Filtering Policy Change Confirmation 6211-I2 ADSL2+ Router User’s Guide 6211-A2-ZB21-60...
- Page 61 WAN interface. Then click on Save/Apply to save it. Figure 50: IP Filtering - MAC Filtering Add Page On this screen you can view and delete MAC filtering rules. Figure 51: IP Filtering - MAC Filtering List 6211-A2-ZB21-60 6211-I2 ADSL2+ Router User’s Guide...
-
Page 62: Parental Control
Advanced Setup Parental Control Use the Parental Control feature to restrict the days and times a particular device is allowed to access the Internet. Figure 52: Parental Control Screen 6211-I2 ADSL2+ Router User’s Guide 6211-A2-ZB21-60... - Page 63 4 Select the days of the week the restriction is in force. 5 Specify the start and end times the restriction is in force. Use the form hh:mm, where 23:59, for example, is one minute before midnight. 6 Click on Save/Apply. 6211-A2-ZB21-60 6211-I2 ADSL2+ Router User’s Guide...
-
Page 64: Quality Of Service
Advanced Setup Quality of Service You can configure the Quality of Service to apply different priorities to traffic on the router. Figure 54: Quality of Service Setup 6211-I2 ADSL2+ Router User’s Guide 6211-A2-ZB21-60... - Page 65 QoS parameters, then click on Save/Apply. Note that 802.1p Priority and TOS are mutually exclusive. Figure 55: Quality of Service Add Screen On this screen you can view and delete QoS settings. Figure 56: Quality of Service List 6211-A2-ZB21-60 6211-I2 ADSL2+ Router User’s Guide...
-
Page 66: Routing - Default Gateway
Advanced Setup Routing – Default Gateway You can change the Default Gateway on the Routing - Default Gateway screen. Figure 57: Default Gateway Setup 6211-I2 ADSL2+ Router User’s Guide 6211-A2-ZB21-60... -
Page 67: Routing - Static Route
Routing – Static Route Routing – Static Route Use the Routing - Static Route screen to add a static route to the routing table. Figure 58: Static Route Setup 6211-A2-ZB21-60 6211-I2 ADSL2+ Router User’s Guide... - Page 68 Advanced Setup Enter the route information and click on Save/Apply to make it active. No reboot is required. Figure 59: Static Route Add 6211-I2 ADSL2+ Router User’s Guide 6211-A2-ZB21-60...
-
Page 69: Routing - Rip
Routing – RIP Routing – RIP If RIP is enabled, the router operation can be configured as Active or Passive. Figure 60: RIP Setup 6211-A2-ZB21-60 6211-I2 ADSL2+ Router User’s Guide... -
Page 70: Dns Server
Advanced Setup DNS Server Use the DNS Server screen to request automatic assignment of a DNS or to specify a primary and secondary DNS. Figure 61: DNS Setup 6211-I2 ADSL2+ Router User’s Guide 6211-A2-ZB21-60... -
Page 71: Dynamic Dns
Dynamic DNS Dynamic DNS Use the Dynamic DNS screen to alias a dynamic IP address to a static hostname, allowing your router to be easily accessed from anywhere on the Internet. Figure 62: Dynamic DNS 6211-A2-ZB21-60 6211-I2 ADSL2+ Router User’s Guide... - Page 72 4 Select the router Interface from the drop-down list. 5 Enter the information you used to register with the dynamic DNS service: for DynDNS, enter your Username and Password; for TOZ, enter your E-mail address and Key. 6 Click on Save/Apply. 6211-I2 ADSL2+ Router User’s Guide 6211-A2-ZB21-60...
-
Page 73: Adsl
The following modulation methods are supported by the 6211 ADSL router: G.dmt Enabled G.lite Enabled T1.413 Enabled ADSL2 Enabled Annex L Enabled ADSL2+ Enabled. Do not change this setting unless so directed by your ISP. Capability The following are included under Capability: 6211-A2-ZB21-60 6211-I2 ADSL2+ Router User’s Guide... -
Page 74: Dsl Advanced Settings
No Retrain: In this mode the router will try to establish a connection as in normal mode, but once the connection is up it will not retrain if the signal is lost. L3: Puts the router into the L3 power state. Figure 65: DSL Advanced Settings 6211-I2 ADSL2+ Router User’s Guide 6211-A2-ZB21-60... -
Page 75: Tone Selection
256 separate modems were running in parallel. The tone range is from 0 to 31 for upstream and from 32 to 255 for downstream. Do not change these settings unless so directed by your ISP. Figure 66: Tone Settings 6211-A2-ZB21-60 6211-I2 ADSL2+ Router User’s Guide... -
Page 76: Port Mapping
Advanced Setup Port Mapping Use the Port Mapping screen to map multiple ports to a PVC and create bridging groups. Each group will perform as an independent network. Figure 67: Port Mapping 6211-I2 ADSL2+ Router User’s Guide 6211-A2-ZB21-60... -
Page 77: Certificate
You can add a certificate either by creating a new one or importing an existing one from a location where one is stored. Note Certificates are used with TR-069. Firmware that does not support TR-069 will not support certificates. 6211-A2-ZB21-60 6211-I2 ADSL2+ Router User’s Guide... - Page 78 Advanced Setup Figure 69: Certificate To create a new certificate: 1 Click Create New Certificate Request. Follow the screens that appear to configure a new certificate. 2 Click on Save/Apply. 6211-I2 ADSL2+ Router User’s Guide 6211-A2-ZB21-60...
-
Page 79: Diagnostics
If a test displays a failure status, click on "Test" at the bottom of this page to make sure the failure status is consistent. If the test result continues to show a failure, click on "Help" and follow the troubleshooting procedures. Figure 71: Diagnostics 6211-I2 ADSL2+ Router User’s Guide... - Page 80 Diagnostics 6211-I2 ADSL2+ Router User’s Guide...
-
Page 81: Management
You can also restore the router to its factory default configuration. Backing Up Configuration Settings To back up your settings, select Management -> Settings -> Backup Settings. Figure 72: Back Up Settings Screen 6211-I2 ADSL2+ Router User’s Guide... - Page 82 Management Verify that you would like to save the file. Figure 73: Backup Settings Upload Confirmation Select the location where you want to save the file. Figure 74: Backup Settings File Location 6211-I2 ADSL2+ Router User’s Guide...
-
Page 83: Restoring Configuration Settings
To restore saved settings, select Management -> Settings -> Restore User Settings. Figure 75: Restore User Settings Screen Select the backup file you want to restore and click on Update Settings. Figure 76: Restore Settings File Location 6211-I2 ADSL2+ Router User’s Guide... - Page 84 Management The router will restore settings and reboot to activate the restored settings. Figure 77: Upload in Progress Screen 6211-I2 ADSL2+ Router User’s Guide...
-
Page 85: Restoring Default Settings
To restore the router to factory default settings, select Management -> Settings -> Restore Default. Figure 78: Restore Default Settings Screen Reply OK to the confirmation dialog. Figure 79: Restore Default Confirmation Dialog 6211-I2 ADSL2+ Router User’s Guide... - Page 86 Management The router will restore the default settings and reboot. Figure 80: Restore Default Settings Reboot 6211-I2 ADSL2+ Router User’s Guide...
-
Page 87: System Log
System Log System Log The System Log dialog allows you to view the System Log and configure the System Log options. Figure 81: System Log 6211-I2 ADSL2+ Router User’s Guide... -
Page 88: View System Log
Management View System Log Click on the "View System Log" button to check the log file. Figure 82: View System Log 6211-I2 ADSL2+ Router User’s Guide... -
Page 89: Configure System Log
"Local" or "Both", events will be recorded in the local memory. Figure 83: System Log Configuration Select the desired values and click on the "Save/Apply" button to configure the system log options. 6211-I2 ADSL2+ Router User’s Guide... -
Page 90: Tr-069 Client
Default values are already filled in. If you wish to enable this protocol, then select Enable and fill in the text boxes according to your configuration. You must click on the Save/Reboot button for the change to take place. Firmware versions that support TR-069 do not support SNMP. 6211-I2 ADSL2+ Router User’s Guide... -
Page 91: Internet Time
1 Select “Automatically synchronize with Internet time servers”. The SNTP fields appear. Figure 84: Internet Time Screen 2 Select SNTP servers. 3 Specify the time zone offset for your router’s location. 4 Click on Save/Apply. 6211-I2 ADSL2+ Router User’s Guide... -
Page 92: Access Control - Services
Access Control – Services You can enable or disable some services of your router by LAN or WAN. If no WAN connection is defined, only the LAN side can be configured. Figure 85: Services Setup 6211-I2 ADSL2+ Router User’s Guide... - Page 93 Access Control – Services If a WAN connection is defined, services of both the LAN side and WAN side can be configured. Figure 86: Services Setup for LAN and WAN 6211-I2 ADSL2+ Router User’s Guide...
-
Page 94: Access Control - Ip Addresses
Access Control – IP Addresses Web access to the router can be limited when Access Control Mode is enabled. The IP addresses of allowed hosts can be added using Access Control -> IP Address. Figure 87: IP Address Setup 6211-I2 ADSL2+ Router User’s Guide... - Page 95 First, add the IP address to the IP address list. Figure 88: Access Control – IP Address Add Screen Then select "Enabled" to enable Access Control Mode. Figure 89: Access Control – IP Address Enable or Disable 6211-I2 ADSL2+ Router User’s Guide...
-
Page 96: Access Control - Passwords
3. Click on the Update Software button once to upload the new image file. Figure 90: Update Software Note The update process takes about two minutes to complete, and your router will reboot automatically. 6211-I2 ADSL2+ Router User’s Guide... -
Page 97: Reboot Router
The router will save the current configuration and reboot itself using the new configuration. The rebooting process takes about two minutes to complete. Figure 91: Reboot Router Screen Figure 92: Reboot In Progress Screen 6211-I2 ADSL2+ Router User’s Guide... - Page 98 Management 6211-I2 ADSL2+ Router User’s Guide...
-
Page 99: Appendix A Specifications
ITU G.992.3 (ADSL2) ITU G.992.5 (ADSL2+) ITU G.994.1 (G.hs) ITU G.997.1 Size 1.2" High x 6" Wide x 4.4" Deep (3.0 cm High x 15.2 cm Wide x 11.8 cm Deep) Weight (Shipping) 1.5 lbs (0.7 kg) 6211-I2 ADSL2+ Router User’s Guide... - Page 100 Specifications 6211-I2 ADSL2+ Router User’s Guide...
-
Page 101: Index
Connecting Hardware 17 Connections 17 Connection Type 45 Installation 17 Default Gateway 66 Important Safety Instructions 3 Default IP Address 22 Installing Definitions 13 Hardware 17 Device Information 29 USB Driver 19 Diagnostics 81 Interfaces 101 6211-I2 ADSL2+ Router User’s Guide... - Page 102 Access Control 94 Operating Environment 101 Shipping Weight 101 Size 101 SNTP 93 Specifications 101 Parental Control 62 Static Route 67 Parts List 14 Statistics Password ADSL 34 Access Control 98 ATM 33 Default 28 6211-I2 ADSL2+ Router User’s Guide 6211-A2-ZB81-60...
-
Page 103: View System Log
Time 93 Using 29 Tone Selection 75 Weight 101 Windows 2000 24 Windows 95 25 Windows 98 25 Update Software 98 Windows ME 24 Windows NT 26 connection 17 Windows XP 22 driver 19 6211-A2-ZB81-60 6211-I2 ADSL2+ Router User’s Guide... - Page 104 6211-I2 ADSL2+ Router User’s Guide 6211-A2-ZB81-60...
Need help?
Do you have a question about the 6211-I2 and is the answer not in the manual?
Questions and answers