Table of Contents
Advertisement
Quick Links
Advertisement
Table of Contents

Subscribe to Our Youtube Channel
Related Manuals for Cortelco 122000TP227S


Summary of Contents for Cortelco 122000TP227S
- Page 1 122000TP227S USER'S MANUAL...
-
Page 2: Table Of Contents
TABLE OF CONTENTS FEATURE LIST SAFETY INSTRUCTIONS INTRODUCTION LOCATION OF CONTROLS FUNCTION BUTTONS MENU SETTINGS CALLER ID INFORMATION DISPLAY MESSAGES CALL ER ID SYSTEM OPERATION CALLER ID ON CALL WAITING TROUBLESHOOTING... -
Page 3: Feature List
FEATURE LIST 1. Large, backlit LCD with adjustable contrast 2. Two-line function 3. Memory Dialing a. 5 One-touch Memory buttons b. 5 Two-touch Memory buttons c. 70 Entry Directory (Stores name and number) 4. Stores 50 incoming calls 5. Stores 15 outgoing calls 6. -
Page 4: Caller Id Information
FEATURE LIST 17. Speakerphone 18. 2.5mm Headset jack 19. Headset Button with Indicator 20. Speaker volume selection 21. Hold function 22. Date/ Hour format setting 23. Desk/wall mounting 24. Data port... -
Page 5: Safety Instructions
LOCATION OF CONTROLS SAFETY INSTRUCTIONS To reduce the risk of fire, electrical shock, and injury, please follow these basic safety precautions before you use this equipment. 1. Carefully read the instructions in this manual. 2. Follow all warnings and instructions marked on the unit. 3. -
Page 6: Introduction
INTRODUCTION Contents The box should contain the following items. Telephone Base Telephone Stand Handset Handset Cord Line Cords(2) Power Supply (Transformer) User Manual If any of these items are missing, contact your seller. Installation - Wall 1. Remove the handset hook and reverse it so that it will hold the handset. - Page 7 Installation - Desk 1. Mount the desk stand to the telephone. 2. Plug the line cord into the LINE jack on the base of the telephone. 3. Plug the other end of the line cord into the telephone jack in the wall.
-
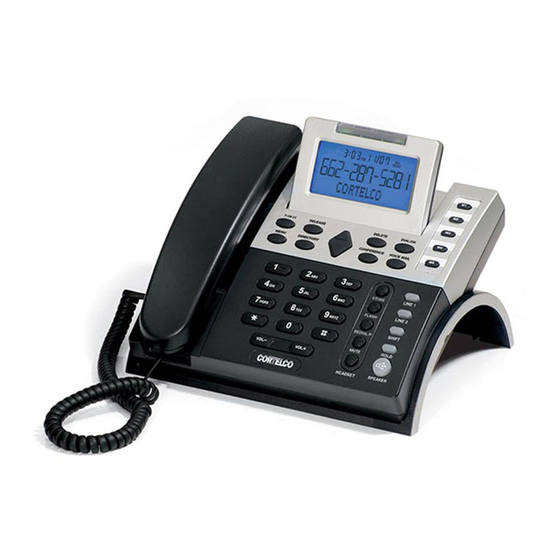
Page 8: Location Of Controls
LOCATION OF CONTROLS 7-10-11 RELEASE DELETE DIAL/OK MENU CONFERENCE VOICE MAIL LINE 1 SHIFT LINE 2 STORE HEADSET MUTE HOLD FLASH VOL. VOL. SPEAKER REDIAL/P 1. Memory buttons (M1~M5) 15. STORE button 2. DIAL/OK button 16. SHIFT button 3. DELETE button 17. -
Page 9: Headset Jack
Headset jack Power jack L1/L2 L2/DATA Telephone line jack 24V OFF 90V MESSAGE indicator switch... -
Page 10: Function Buttons
FUNCTION BUTTONS Receiver or Speaker Volume Control - To adjust the receive volume in either the handset or speaker, press VOL.- VOL.+ There are 8 steps of adjustment. 2. Making a call a. Using handset 1. Pick up the handset, then LINE1 LED will light. If you use LINE2 and press LINE2 button, then the LINE 2 LED will light. - Page 11 Pre-dialling a. In standby mode, enter the number you want to dial. You can press DELETE button to clear the incorrect digit. b. If you want to dial out the number through LINE1, press the LINE1 SPEAKER button to dial out the number. c.
- Page 12 NOTES: 1. After pressing the HOLD button, the corresponding line will be placed on hold and the LINE button will blink. The handset can now be placed on hook without disconnecting the line. 2. To continue the conversation, pick up the handset and press the LINE1 LINE2 button.
- Page 13 Method 5: a. With a call established on LINE2, LINE1 rings. b. Place LINE2 on hold. c. Answer LINE1. d. Press the CONFERENCE button Headset - A headset with a 2.5 mm plug can be connected to the 1220. The jack is on the right side of the phone. Use HEADSET to take the phone on and off hook while using the headset.
- Page 14 - This deactivates the handset, headset or speakerphone Mute microphone. It allows you to talk without being heard by the distant party. To use this feature, press MUTE The display will show " MUTE ". To deactivate the feature, press MUTE again.
- Page 15 Memory Buttons - The 1220 has five Memory Buttons ( M1 M5 Each can store 2 telephone numbers. a. Storing a number Must be done on-hook. i. Press STORE ii. Dial the number to be stored. iii. Press STORE iv. Enter the name to be stored and press STORE .
- Page 16 21. Directory - Up to names and numbers may be stored in the Directory. a. Storing a number Must be done on-hook. i. Press MENU . The display will say DIRECTORY ii. Press DIAL/OK . The display will say REVIEW .
- Page 17 e. Storing a Caller ID Record. i. While on-hook, press until the desired number is displayed. ii. Press and hold DIRECTORY until the last digit begins to flash. iii. Press DIAL/OK two times. iv. Use to select the ring cadence for this number. v.
- Page 18 - This button changes the format of the displayed 7-10-11 number. Three formats are available: 7-Digit 7 Digit Telephone Number 10-Digit 3 Digit Area Code + 7 Digit Telephone Number 11-Digit 1 Digit Long Distance Code + 3 Digit Area Code + 7 Digit Telephone Number Example: Assume the local area code is 662 and a 7 digit local number is displayed 555-1212.
-
Page 19: Menu Settings
MENU SETTINGS Many of the settings of the phone are controlled from the menu. To access the menu, press MENU while the phone is on-hook. The various menu settings are discussed in detail below. 1. Directory - This is covered in the previous section. - Page 20 k. Enter the number of 3 second pauses to be inserted between dialing the voice mail number and the PIN. For example, if you enter 2 here, the phone will pause 6 seconds. l. Press DIAL/OK m. Lift the handset to end programming. - The 1220 can respond to Stutter Dial Tone Message 6.
- Page 21 10. Date Format - This selects the format used to display the date. To select this feature, press DIAL/OK and then use to toggle between MM-DD (Month-Day) and DD-MM (Day-Month). DIAL/OK Press to confirm. 11. Hour Format - This selects the format used to display the time.
- Page 22 a. Press DIAL/OK b. E nter the time and date using the keypad. The time must be entered in 24 hour format. The setting sequence is hour, minute, month, day, and year. Use the * key to delete any incorrect values. After setting the year, the day of the week will be set automatically.
-
Page 23: Caller Id Information 2
CALLER ID INFORMATION A caller ID record consists of the following information: Time and Date Caller's Name and Number * Note that this feature requires caller ID service from your telephone company. DISPLAY MESSAGES REPEAT In addition to the Message Waiting light, an icon will appear in the display whenever there are messages. -
Page 24: End Of List
TOTAL and NEW CALLS - The total calls are 9:52 9/12 displayed at the bottom of the screen. New calls are displayed at the top right. TOTAL 04 MON 9:52 9/12 CALL # PRIVATE - If a caller has prevented his name and number from being sent, the display PRIVATE will show... -
Page 25: Call Er Id System Operation
CALLER ID SYSTEM OPERATION Note that a subscription to caller ID service is required. New call indicator - The display will show until all new calls have been reviewed. Review Call Records - Use to scroll through the caller ID records. - Page 26 On-Hook 1. Use to select the number to be called. 2. Use 7-10-11 to modify the number format if necessary. 3. Press DIAL/OK...
-
Page 27: Caller Id On Call Waiting
CALLER ID ON CALL WAITING When you subscribe to this feature from the telephone company, the LCD will display the name and number of a second caller while you are on a call. Caller two's information Caller ID info displayed is displayed Caller 1 Caller 1... -
Page 28: Troubleshooting
TROUBLESHOOTING If you have problems with your phone, please check below for helpful hints: BLANK OR Check line cord and adapter. FAINT Check Contrast setting. SCREEN Be sure your caller ID service is active. CALLER ID DOES NOT Do not answer the phone before two rings. WORK If the problem continues, contact the telephone company. - Page 29 DO NOT ATTEMPT TO REPAIR THIS PRODUCT YOURSELF. Telephones manufactured by CORTELCO must be returned to us for repair. You can return your telephone to CORTELCO for repair or replacement in accordance with our LIMITED WARRANTY. CORTELCO warrants THIS PRODUCT against defects in material and workmanship in accordance with our LIMITED WARRANTY.
-
Page 30: Limited Warranty
This warranty is in lieu of all other express warranties. During the warranty period, CORTELCO agrees to repair or, at its option, replace the defective product, or any part of it without charge for parts or labor. -
Page 31: Fcc Information
FCC INFORMATION Part 68 is a Federal regulation which requires equipment to be tested and registered with the FCC prior to its connection to the network. This equipment complies with Part 68 of FCC rules. On the bottom of the telephone is a label that contains, among other information, the FCC Registration Number and the Ringer Equivalence Number (REN) for this equipment.
Need help?
Do you have a question about the 122000TP227S and is the answer not in the manual?
Questions and answers