
Related Manuals for Cardo Systems SCALARIDER Q2 MULTISET PRO


Summary of Contents for Cardo Systems SCALARIDER Q2 MULTISET PRO
-
Page 1: User Guide
™ MultiSet ™ communication in motion ™ Gebrauchsanleitung Guide d’Utilisation Guida di Avvio Guia de Usario User Guide... - Page 2 © Cardo Systems, Inc. The Bluetooth® word mark and logos are owned by the Bluetooth SIG, Inc. and any use of such marks by Cardo Systems, Inc. is under license. Other trademarks and trade names are those of their respective owners.
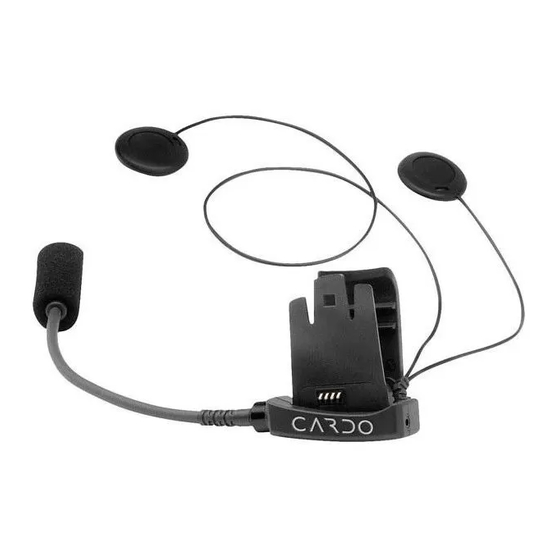
- Page 3 INTRODUCTION CONTENTS OF RETAIL BOX Congratulations and thank you for choosing the scala rider Q2 Volume Up / MultiSet Bluetooth® Headset package. Two Headsets Forward MP3 This User Guide will help you operate the headset, but you should Music first familiarize yourself with the Bluetooth® functionality of your cel- Charging lular phone and/or GPS device before using the scala rider Q2 Jack...
-
Page 4: Setup And Configuration
SET UP AND CONFIGURATION 2 Wall Chargers 2 Allen Wrenches 2 sets of Velcro Pads 2 MP3 Cables Built-in FM radio 2 MP3 Cable Holders Mobile phone & A2DP connectivity player 2 Glue Plates Driver-to- 2 Pre-moistened Towelettes Passenger Full-duplex 2 Carry-Pouches Intercom Connection... - Page 5 PRIMARY BUDDY PAIRING (two scala rider Q2 NOTE: If the Pairing process is not completed within two minutes the headset will return to Standby mode. headsets*) * Same process is applicable also for pairing with the Q2, i.e. the predecessor Your MultiSet units are already factory paired and ready for use.
- Page 6 Manual Connect Intercom can be initiated from either head- 2. With the scala rider Q2 headset turned ON, press and set by pressing the MC button for scala rider Q2 hold the CTRL Button for at least six seconds until the Red and Blue Lights begin flashing simultaneously.
-
Page 7: Getting Started
2. With the scala rider Q2 headset turned ON, press and 2. Slide the Back Plate between the internal padding and the external shell of the helmet. hold the Volume Up Button for at least six seconds until the Red and Blue Lights begin rapidly alternating. 3. -
Page 8: Positioning The Speakers
not horizontally (Be sure to clean the selected area prior to the POSITIONING THE SPEAKERS gluing process). 4. Use the pre-moistened Towelette to clean the helmet area where Attach the speakers to the Velcro inside you want to install the Glue Plate. Allow to dry thoroughly. your helmet opposite your ears (short 5. -
Page 9: Using The Headset
3. A2DP audio source REMOVING: Press here 4. FM Radio (built-in) Your headset can be removed for charging to remove Lowest 5. MP3 Connectivity (corded connection) and storage by pressing your finger gently against the tab and sliding the A high priority Audio Source will always interrupt any lower priority headset up with the other hand. -
Page 10: Troubleshooting The Intercom
NOTE: When using a scala rider Headset (not a Q2 version) as a Enable/Disable Voice Connect feature (VOX) Passenger headset, Voice Connect Intercom can be initiated only by The scala rider Q2 offers VOX technology for safe and hands-free the scala rider Q2 headset. -
Page 11: Phone Functions
MAKING AND RECEIVING MOBILE Standby – No call is in progress 1 blue flash every 3 seconds PHONE CALLS 2 blue flashes every 3 seconds Audio is on Standby – Battery is low 1 red flash every 3 seconds PHONE FUNCTIONS 2 red flashes every 3 seconds Low battery while audio is on Answer a call... - Page 12 The RDS feature is set OFF by default • Select the station you wish to replace by tapping the MC button until you find the station you want to replace. Turning the FM Radio On • Search for a new station as described above. While no call is on the headset (either mobile phone call or Intercom •...
- Page 13 Pairing the Headset to an MP3 Player or Adapter * Varies depending on your mobile phone model * * With some phones you may need to repeat this action once more NOTE: If your A2DP source is integrated inside your Mobile Phone, then CABLE OPTION –...
- Page 14 7. Tuck the MP3 cable into the hook of the MP3 cable holder. harmful interference to radio communications. However, there is no guarantee that interference will not occur in a particular installation. If this equipment does cause 8. In order to use your MP3 player, power on the headset to have it harmful interference to radio or television reception, which can be determined on Standby mode, flashing slowly in Blue.
-
Page 15: Waiver And General Release
“Vehicle”) requires your complete and undivided attention. Cardo Systems, Inc., disability; (b) these risks and dangers may be caused by the negligence of the manu-... - Page 16 THE DEVICE AND ITS ACCESSORIES ARE PROVIDED “AS IS” AND “AS AVAILABLE” WITHOUT WARRANTY OF ANY KIND BEYOND THOSE ASSUMED IN THE ENCLOSED MANUAL. Limitation of Liability IN NO EVENT SHALL CARDO BE LIABLE FOR ANY SPECIAL, INDIRECT, PUNITIVE, INCIDENTAL, EXEMPLARY OR CONSEQUENTIAL DAMAGES, OR ANY DAMAGES WHATSOEVER RESULTING FROM THE USE OF THE DEVICE, WHETHER BASED ON BREACH OF CONTRACT, TORT (INCLUDING NEGLIGENCE), PRODUCT LIABILITY OR OTHERWISE, EVEN IF ADVISED OF THE POSSIBILITY OF SUCH DAMAGES.
Need help?
Do you have a question about the SCALARIDER Q2 MULTISET PRO and is the answer not in the manual?
Questions and answers