Edge Products CS User Manual
Color touch screen/color screen
Hide thumbs
Also See for CS:
- Quick install manual (2 pages) ,
- Quick install manual (2 pages) ,
- User manual (60 pages)
Table of Contents
Advertisement
Advertisement
Table of Contents

Related Manuals for Edge Products CS


Summary of Contents for Edge Products CS
- Page 1 U S E R G U I D E User Guide Color Touch Screen Color Screen...
-
Page 2: Table Of Contents
PARTS.DESCRIPTION........12 PARTS INCLUDED ............12 PARTS DESCRIPTION .............13 INSTALLATION INSTRUCTIONS ........15 INSTALLATION..........16 Device Power Up .............21 CTS/CS Device Descriptions .......... 22 CTS LAYOUT ..............23 CS LAYOUT ..............23 OPERATING.INSTRUCTIONS......24 Navigating the Menu System ......... 24 Main Menu ................ 24 View Camera .............. - Page 3 To expedite your support call, please have your Vehicle Information, Part Number, Serial Number, and Date of Manufacture ready prior to calling Technical Support. The Edge Products information is found on the label located on the bottom of the device.
-
Page 4: Introduction
I N T R O D U C T I O N U S E R G U I D E U S E R G U I D E S A F E T Y W A R N I N G &... -
Page 5: Safety Guidelines
I N T R O D U C T I O N U S E R U S E R G U I D E G U I D E S A F E T Y G U I D E L I N E S SAFETY GUIDELINES 1. -
Page 6: Limited 1 Year Warranty
W A R R A N T Y LIMITED 1 YEAR WARRANTY Edge Products, LLC, (hereafter “SELLER”) gives Limited Warranty as to description, quality, merchantability, fitness for any product’s purpose, produc- tiveness, or any other matter of SELLER’s product sold herewith. The SELLER shall be in no way responsible for the product’s open use and service and the... -
Page 7: Warranty Information
NOTE: Even if you disconnect your unit, your dealer can detect the use of any programmer—even if the unit has been removed. Thank you for purchasing the Edge CS and CTS products. The CS and CTS products have been developed and produced from the highest quality materi- als available to ensure the best performance for years to come. -
Page 8: Product Registration
Enhanced Features - almost all Edge products are easily updated via the inter- net. We are constantly adding new features and improvementes to our product... - Page 9 Evolution is NOT RECOMMENDED as it may cause an excessively lean condition which could result in engine damage. Edge Products will not be responsible for any damages caused by using the Evo- lution on a vehicle that has been modified from a stock configuration.
- Page 10 NTRODUCING THE CS AND CTS MODELS From the pioneers in display-based technology and engine performance man- agement, comes the CS (Color Screen) and CTS (Color Touch Screen) for popular domestic late model trucks and SUVs. Edge has reinvented four of its most popular lines –...
- Page 11 G U I D E G U I D E MOUNTING OPTIONS & ACCESSORIES Both CS and CTS devices come with a standard windshield mount from Arkon Resources Inc., the leader in device-mounting solutions. The CS and CTS devices have a standard two-tab system built in so they can accept an array of different Arkon mounts.
-
Page 12: Parts.description
U S E R G U I D E P A R T S I N C L U D E D Supplied Items Suggested Tools 1. CS or CTS Device • Flat head screwdriver 2. Arkon Windshield Mount • Cutting Pliers 3. -
Page 13: Parts Description
D E S C R I P T I O N The Parts Description section of this manual describes each of the parts included in your CS/CTS kit both physically as well as functionally. CTS Device The CTS device provides you with an interface to change... - Page 14 The USB cable is used to connect your device to your PC in order to perform firmware and calibration updates using Edge Products Fusion software. It is rec- ommended you plug both USB connec- tors into the computer, and complete the Fusion software installation before connecting the device.
-
Page 15: Installation Instructions
I N S T A L L A T I O N U S E R G U I D E I N S T A L L A T I O N I N S T R U C T I O N S Step 1: Locating the OBDII Port The OBDII port is a 16-pin connector like the illustration be- low. -
Page 16: Installation
I N S T A L L A T I O N U S E R G U I D E Step 2: Connecting/Routing the OBDII Cable Remove the panel on the side of the dashboard to provide access to route the OBDII cable from the OBDII port up to the top of the dash. - Page 17 I N S T A L L A T I O N U S E R G U I D E Step 3: Position the Control Unit *Select a location that will Position the device not impair your ability to view and the mount on the the road/traffic/pedestrians while you drive.
- Page 18 (CTS) or to the side (CS) until it stops. *The mounting tabs are a tight fit by design in order to main- tain a solid connection. You may add a small amount of lithium lube to aid in insertion.
- Page 19 VERTICAL ADJ. KNOB fine tune the viewing angle and height of This knob will allow you the CTS/CS device. to adjust the viewing angle and height of the control unit up or down. VARIABLE ANGLE ADJ KNOB...
- Page 20 G U I D E Step 6: Verify Position and Viewing Placement After you’ve locked the mount and the CS/CTS device is in place on your windshield, sit back in your drivers seat and make sure the viewing angle is as desired. Check to make sure the device doesn’t create a blind spot that...
-
Page 21: Device Power Up
The CS/CTS device will not power up until the vehicle is started. If you wish to power the device prior to starting the vehicle, turn the key to the run position and press the menu button (CS) or touch the screen (CTS). -
Page 22: Cts/Cs Device Descriptions
I N S T A L L A T I O N U S E R G U I D E C T S / C S D e v i c e D e s c r i p t i o n s... -
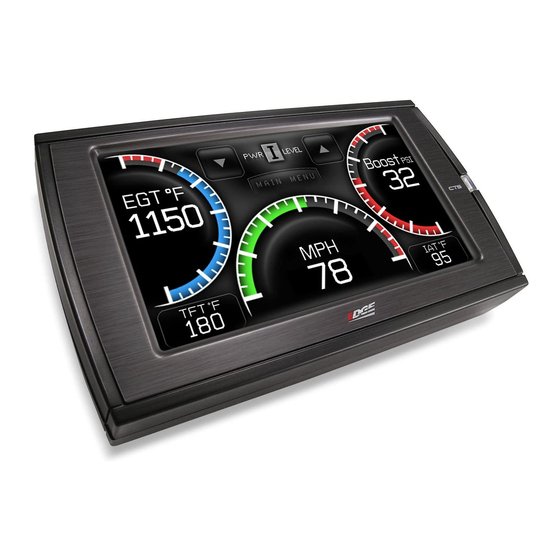
Page 23: Cts Layout
The Center gauge is one of three analog style gauges. 10. Lower Right Gauge The Lower Right Gauge is the scecond of two digital gauges. CS L AY O UT 1. Up/Down Arrow Button On the JUICE ATTITUDE these buttons are used to toggle the power level up/down. -
Page 24: Operating.instructions
Both the CS and CTS devices provide you with the following three buttons for navigating the menu system: Menu: The Menu button allows you to enter the main menu (CS only). Once you are in the main menu you’ll use the Menu button to return to the previous screen. UP/Down Arrow: The Up/Down Arrow button will allow you to toggle up or down through the menu options, you’ll notice it highlights each option as you toggle. -
Page 25: View Camera
Your CS/ CTS will display only the options/features that your vehicle’s computer system is capable of executing. -
Page 26: Cs/Cts Alerts
C S / C T S A l e r t s The CS/CTS device is equipped with an alert system that notifies the user when vehicle parameters are outside a user-defined value. There are several ways CS/CTS alerts are indicated. The first is on the main screen. -
Page 27: Show Alerts
O P E R A T I N G I N S T R U C T I O N S U S E R G U I D E S h o w A l e r t s If you have exited the Alerts screen (shown on the previous page) you can return to the screen by entering the main menu and selecting the Show Alerts menu. -
Page 28: Programming
P R O G R A M M I N G Choose your power level in the Programming menu: The CS/CTS device comes ready with power levels to be programmed into your vehicle’s Power Control Module (PCM) (see the Power Levels section of the manual for further detailed Power Level descriptions). -
Page 29: Power Levels
G U I D E P O W E R L E V E L S The CS/CTS Evolution typically has 4 levels, and each is tuned spe- cifically for different driving situations. The level names are reflec- tive of what the driving level should be used for. As a general rule of thumb the Economy level has the lowest power output, and the Extreme level has the highest power output. -
Page 30: Custom Options
O P E R A T I N G I N S T R U C T I O N S U S E R G U I D E Cus t o m O p t i o n s After choosing a power level to program into your vehicle you are prompted with the option to “Create a custom program.”... - Page 31 During programming, the CS/CTS device will go through a series of screens telling you the actions it is completing. The first screen you’ll see will show Creating files, the second screen will show Unlocking Module, the third screen Writing files, and the fourth screen Programming complete.
-
Page 32: Diagnostics
O P E R A T I N G I N S T R U C T I O N S U S E R G U I D E D i a g n o s t i c s Injector Balance Rates (Diesel When your PCM detects a prob-... -
Page 33: Trouble Codes
G U I D E Tro u bl e C o d e s The diagnostics scanner included with the CS and CTS devices is a powerful tool that allows you to view and clear Diagnostic Trouble Codes (DTCs) on your vehicle. DTCs are the messages your vehicle’s computer stores when it detects a problem with your vehicle. - Page 34 O P E R A T I N G I N S T R U C T I O N S U S E R G U I D E DPF Regeneration If you own a diesel powered vehicle built after January 1st 2007, your vehicle is equipped with a diesel particulate filter (DPF).
-
Page 35: Manual Dpf Regeneration
O P E R A T I N G I N S T R U C T I O N S U S E R G U I D E Manu a l D P F R e ge n e r a t i o n Completing a manual regeneration cycle will clear the soot mass in the filter, and lower exhaust back pressure/free up exhaust flow. -
Page 36: Performance Tests
Perform these tests only where they are legal and safe. The CTS and CS devices allow you to test the performance of your vehicle by timing 0-60 and quarter mile runs. The results recorded by the Performance Test features will likely differ from what you’ll see on a drag-strip or other racing venues. - Page 37 O P E R A T I N G I N S T R U C T I O N S U S E R G U I D E After bringing the vehicle to a stop, follow the directions noted on the screen.
-
Page 38: Injector Balance Rates
O P E R A T I N G I N S T R U C T I O N S U S E R G U I D E In je c to r B al a n c e R a t e s NOTE:.Only available on certain models. - Page 39 O P E R A T I N G I N S T R U C T I O N S U S E R G U I D E After selecting yes, you’ll see a screen with 8 parameter data display boxes.
-
Page 40: Options
O P E R A T I N G I N S T R U C T I O N S U S E R G U I D E O p t i o n s The Options menu contains menu items that will let you customize the device settings to your liking, as well as change the alert default settings to best fit your needs. - Page 41 If you turn just the sound off, you’ll still receive a visual alert when the set-point is reached. You can change the set point to better fit your driving style or indi- vidual needs, the default settings are Edge Products recommended alert settings.
-
Page 42: Sound Duration
(CTS) or pressing enter while on the main screen (CS) and choosing the PID you’d like to display from the drop down list. -
Page 43: Display Background And Mystyle
10 different screen backgrounds. Scroll through options using the up/down arrows and then press enter or touch the screen to select. Your CS/CTS screen is now ‘your’ style. Following are some example backgrounds: NEW: Create and add your own custom background using the unique Edge Products MyStyle™... -
Page 44: Backlight Auto Dim
G U I D E Ba ck l i gh t A u t o D i m The CS and CTS devices both have ambient light sensors. As it get’s darker outside the device will automatically dim the screen for easier viewing. -
Page 45: Menu Time-Out
G U I D E Me nu T i me -o u t The CS and CTS devices have a built in time-out feature. The pur- pose of this time-out is to prevent the unit from staying powered up for excess amounts of time. If you leave the device in a menu option... - Page 46 O P E R A T I N G I N S T R U C T I O N S U S E R G U I D E Choose the method for inputting tire size that best fits your needs.
-
Page 47: Factory Reset
Any changes you’ve made to the alerts, the gauge screen displays, etc will be returned to the defaults set by Edge Products. NOTE: Factory Reset will not return the vehicle to stock from a programmed Power Level. -
Page 48: Camera Delay
O P E R A T I N G I N S T R U C T I O N S U S E R G U I D E Cam er a D e la y (CTS ONLY) The Camera Delay menu item is always displayed. If you don’t have a camera or other RCA device connected, this menu op- tion will not affect device functionality in any way. -
Page 49: Help Menu
H e l p M e n u The Help menu contains useful information about your device, and the vehicle it is being used on. It also contains Edge Products Con- tact Information, and Technical Support tools. Produc t I n fo The Product Info screen contains three important items. -
Page 50: Vehicle Info
The Calibration is the data that the device programs into your ve- hicle in order to achieve better performance/mileage. From time to time Edge Products will release updates with improved functionality for both Firmware and Calibrations. Each of these updates are labeled with a number, the number shown in this menu represents the version that is currently on your device. -
Page 51: Contact Info
The Contact Information menu contains the Edge Products web site URL, the company address, the Technical Support email address, and the Technical Support phone number. This information will be useful if you need to contact Edge Products for warranty claims, sales information, upgrade information or any other technical questions/inquiries. -
Page 52: Tech Support Tools
Te ch S u p p o r t T o o l s The Technical Support Tools menu contains tools made specifically to help Edge Products Technical Support representatives help customers when they are experiencing problems with their vehicle or device. -
Page 53: Fusion Update Software
This software is included on the disc provided with your device. It can also be downloaded for free from Edge Products web site at www.edgeproducts.com , or the CD can be requested by calling 888-360-EDGE (3343). - Page 54 I N T E R N E T U P D A T E S U S E R G U I D E After you’ve selected yes on the previous screen the Fusion software will go through the steps in order to update the device. Once it’s completed you’ll see the following screen Click OK and the update will be completed.
-
Page 55: Possible.programming.errors
During programming, the device will read the stock file on your vehicle and compare it to a corresponding stock file that has been verified by Edge Products. If there is a mismatch the device will alert you, and display this message: “... -
Page 56: Accessories
G U I D E A c c e s s o r i e s The CTS and CS devices are equipped with an expandable acces- sories port which interfaces with the Edge Expandable Accessory System (EAS), as well as a video-in jack. -
Page 57: Oem Egt Locations
EGT sensor on a diesel-powered vehicle. Edge Products was the first company to integrate gauge screens with their power modules giving customers the ability to monitor EGTs and other vehicle parameters in real-time. Since the intro-... - Page 58 Edge Products recommends using a pre-turbo EGT sensor if you use the CS/CTS for any kind of competition, or heavy hauling. If your vehicle is not equipped with a pre-turbo EGT sensor, Edge recom- mends you purchase an Edge Products sensor and install it in a pre-turbo location.
- Page 59 It is however equipped with two EGT probes downstream from the turbo. Both of these probe’s readings are available for dis- play on the CS and CTS. However they are not an accurate represen- tation of combustion chamber temperatures.
- Page 60 A P P E N D I X U S E R G U I D E Modern Light-Duty diesel truck exhaust illustrations Dodge 6.7 Exhaust Manifold Cummins Post-DPF Pre-DPF/Post-Cat Pre-Cat NOX Filter Diesel Diesel Oxidation Mu er Particulate Catalyst lter GM LMM Duramax...
-
Page 61: Appendix
G U I D E Edge Ba ck u p C a m e r a Finish your CTS off with the Edge Products Backup Camera. The Edge Products Backup Camera provides a high-quality color image with “Night Vision” infrared LEDs allowing users to see objects in total darkness, up to a range of approximately 30 feet. -
Page 62: Edge Mounting Solutions
Edge M o u n t in g S ol u t i o n s Edge Products offers the best custom mounting options on the market. Edge Products dash mounts offer a unique solution for CS or CTS owners that are looking to add a factory-finish look to their truck. -
Page 63: Trouble Shooting/Tips
Tip: Keep in mind that the CTS/CS is a high performance product and that not all vehicles deliver the exact same power output when programmed with the CTS/CS. It is recommended that you select a program that will best fit your needs. Whether... -
Page 64: Commonly.used.acronyms
CMP = Cam Position Sensor PSPS = Power Steering Pressure Switch RPM = Revolutions Per Minute CPS = Crankshaft Position Sensor CS = Color Screen SES = Service Engine Soon SIL = Shift Indicator Light CTS= Color Touch Screen DPF = Diesel Particulate Filter...
Need help?
Do you have a question about the CS and is the answer not in the manual?
Questions and answers