
Related Manuals for Canon FAX-PHONE B60


Summary of Contents for Canon FAX-PHONE B60
- Page 1 Canon FMPHONE,*B B U B B L E - J E T F A C S I M I L E Instruction Book I7IGilrJ!'...
- Page 2 Canron FAXPHONE'"B B U B B L E - J E T F A C S I M I L E Instruction Book...
- Page 3 Copyright c o p y r i g h t o l g g 2 b y c a n o n , l n c . A l l r i g h t s r e s e r v e d . N o p a r t o f t h i s p u b l i c a u o n m a y b e r e p r o d u c e d , t r a n s m i t t e d , t r a n s c r i b e d , s t o r e d i n a r e t r i e v a l s y s t e m , o r t r a n s l a t e d i n t o a n y l a n g u a g e o r c o m p u t e r l a n g u a g e i n a n y f o r m o r b y a n y m e a n s , e l €...
- Page 4 tiris facsimile combines the functions of a facsimile and quality printer. lts compact, vertical design means less wasted space in your work area. The bubUe_jet printer uses cut-sheet plain paper to deliver sharp reproductions of your fax documents and copies. you no longer have to bother with specially treated rolls of recording paper that cud after coming out of the fax.
- Page 5 U s e r s i n t h e U . S . A . P R E - I N S T A L L A T I O N R E O U I R E M E N T S F O R C A N O N F A C S I M I L E E Q U I P M E N T A .
- Page 6 Users should contact their local authorized Canon Facsrmile Service Dealer for servicing of equipment.
- Page 7 I M P O R T A N T S A F E T Y I N S T R U C T I O N S 1 . R e a d a l l o f t h e s e i n s t r u c t i o n s . 2 .
- Page 8 D. lf the producl does nol operate normally when lhe operating instructions are followed. Adlust only those controls lhal are covered by the operating instructions since improper adjustment of other conlrols may resull in damage and will often require enensive work by a qualified lechnician to restore the product to normal ooeration.
- Page 9 DDD (Direct Distance Diat) tine -or- IDDD (rnternationar Direct Distance diar) rine if you communicate overseas Note: canon recommends an individuar rine foilowing industry standards as the 25OO (t"u!l tone) or 5OO (rotary/putse dial) tetephones. A luch dedicated e>rlension off a pBX without camp on srgnats is arso permitted with a FAX unit.
- Page 10 I l t o L o a d N u r n b o r ( L N ) a s s i g n c . d t o e a c h t e r n l n a l d e v i c e d e n o t e s t h e p o r c o n t a g e o f t h e t o t a l l o a d t o t l e c o n n e c t e d l o a t e l e p h o n e l o o p w h i c h i s u s o c l b y l h e d e v i c o , t o p i e v e n t o v o r l o a d i n g .
-
Page 11: Table Of Contents
Table of Contents How to use this instruction book 894 1: GETT|NG SET UT Check list: Do you have everything? A Quick Look at the Fax Front View Rear View Left View T h e H a n d s e t R i g h t V i e w Control panel summary Setting Up the Fax... - Page 12 PaTt 2: BEFoRE YoU USE THETAX * R e g i s t e r i n g y o u r n u m b e r a n d name (TTt) . 2 5 b e f o r e y o u r e g i s t g r . . . R e g i s t e r i n g t h e d a t e a n d t i m e R e g i s t e r i n g y o u r t e l e p h o n e n u m b e r R e g i s t e r i n g y o u r n a m e...
- Page 13 Receiving documents . 5 0 What the fax doesn'l see when receivino Getting ready to. receive documents Receiving when you're in thd office lr%gy,lp fl^ol:.,?:it. and documents automarrcaily (r/{A/ I trL aulo Swttcn over) . R e c e i v i n g p h o n e c a | | s a n d d o c U m e n t s m a n u a | | y ( m a n u a | r e c e p t i o n ) .
- Page 14 P art 4: A D V A NCED F EATURES One-touch dialing Registeiing numbers and n a m e s f o r O n e { o u c h d i a l i n g A d j u s t i n g t h e p a u s e t i m e U s i n g O n e - t o u c h d i a l i n g .
- Page 15 Troubleshooting . . 1 1 6 Troubleshooting summary table . . 1 1 6 Displ.ay,nteso€lg{?s and errror codes . l 1 8 B e f o r e c a l l i n g f o r s e r v i c e . . . 1 1 4 M a i n t e n a n c e .
- Page 16 F AXP HON E@ 860 Quick Reference How to set up the fax ( f o r m o r e d e t a i l s s e e p a g e s g _ 1 5 ) . Handsel cradls connecllon Connect to 6.
- Page 17 FAXPHONE @ A60 Quick Referenc 1 . O p e n t h e p r i n t e r 2 . P u l l t h e c a r t r i d g e 3 . R e m o v e t h e p r i n t cover.
- Page 18 F A X P H O N F @ A 6 0 Quick Referenc, Loading letter-size paper o ^ " o ) ^ v o 1. Insert the paper 2. Press down on the 3. Pick up a small support tray. paper feeder plate stack of paper and fan the paper.
- Page 19 FAX P H O N E G ) A6 0 Quick Referent clearing paper jams with the paper nait retease rever (For details, see page 61) 1 . O p e n t h e p a p e r 2, Press the paper bail release cover bail release lever...
- Page 20 F A XP H ON E( ) iJ 60 Quick Referer S e n d i n g a d o c u m e n t w i t h m a n u a l d i a l i r (for details, see I Setting reproduction quality Follow this procedure to set the quality of the reproduction for...
- Page 21 F A XP H ON F@ A6 0 Quick Reference Receiving phone messages and fax transmissions Using Al.tro FAXfTEL switchover with@ connected (for details, see pages 63_64) When you have an answering machine connected O ruro to the middle jack, press the ANS HOOK Up key .^t;us,voor //p until the lamp is lit.
- Page 22 How lo usa lhis instruction book A few simple notations are used to help you read faster and find the information you need. Beiore you use this instruction book, glance over this list of soecial notations and be sure you understand what they mean. document A document is the sheet of paper you send or receive with the facsimile, or copy.
- Page 23 How to u.so fhi.s instruc(iorr book This manual is designed to help you get set up and start using your fax in as short a time as possible. y< will find this instruction book easier to use if you reac through it in the order the material is presented.
- Page 24 Citock /ls{: Do you hava avoryltilnq.? P a r t 1 : G E T T T N G S E T U p Urrpack your fax and make sure you have everything listed below. 1 FAXPHONE 860 main unit 1 H a n d s e l 1 Handset cradle 2 Screws for the handset cradle...
-
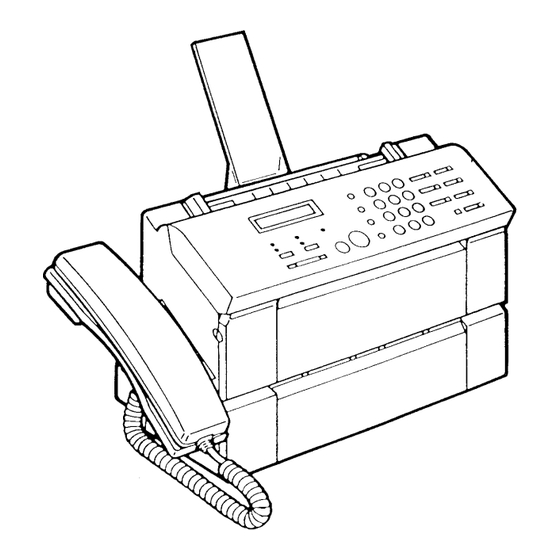
Page 25: Front View
A Quick Look at tlto Fax fake a few minutes to look over your new fax so you know how it should look when it is set uD. r Front View Pap6r aupport lr A u t o m a l l c d o c u m e n l loodor (ADF) Prlnior papor foodor lammso paper... -
Page 26: Left View
A Q u i c k L o o k a t t l t o F a x r Left View Jack for extenslon phone aneworlng machlns r The Handset Hook button Rlnger volume swltch Adjusts the volume of the ringer for three settinas: OFF, LOW. - Page 27 C t s r i l r o l p a n c l s u r n n t a r y Before you register user data or use the facsimile, take a few minutes to familiarize yourself with the keys and indlcators on the control oanel.
-
Page 28: Control Panel Summary
Control panol summary S Y M B O L S k e y Enlers symbols nor- m a l l y f o u n d o n typing keyboards l i k e p a r e n t h e s e s , brackets, and so on SEARCH keYs Press to search... -
Page 29: Finding The Right Location I
Setling Up ttro Fax Fin d in g th e r ig h t l o ca ti o n . Find a place that is out of direct sunlight. . The fax requires a telephone line, so place it near an existing telephone outlet. -
Page 30: Operating And Storing Environment I
Sellingy Up llte F;tx Operating and storing environment Make sure tlre plage where you set up the fax satisfies t l r c l o l l o w i n g c o n d i t i o n s : . - Page 31 Settrng Up tho Fax . Do not subject the fax to strong physical shock or vibration. . Place the fax on a level surface. . Keep the fax clean. Dust accumulation can prevent the fax from operating properly. . Never remove the bubble-jet cartridge from the printer until it has to be replaced.
- Page 32 )otting Up tha Fax Here are some other general precautions when Vou are using the fax or workinq around it. CAUTION! . Avold lnstalling your f ax in places exposed to dlrect sunllght, dust, vlbratlon, hlgh temperature or humldlty, or on unstable surfaces. .
-
Page 33: Fastening The Handset Cradle
Sotting Up llto Fat: Fastening the handset cradle Follow this procedure to aftachJ.he handset cradle to, hold the handset provided with the fax. Fit the handset cradle over the holes. Fasten the handset cradle to the fax with the two screws provided. Connecting the handset cord The connectors for the handset, telephone line, and e)dension phone are together on... -
Page 34: Connecting The Telephone Line
S c f t i n q U p l l t o F ; t x C o n n e c t i n g t h e t e l e p h o n e l i n e lf you do not have an existing R.J1.{ -rC wail jzrck, contact your local telephone company for installation. -
Page 35: The Standby Mode
Seltlng Up tlta Fax T h e st andb y mod e When you see the date and time in the one_line display, the fax is in the standby mode. L 2 / 3 I / 9 2 0 9 : 4 lf a document is already in the document feeder when you turn the fax on, an alarm will sound and the display will show:... -
Page 36: Tone/Pulse Setting
Sofling Up tha Fax Tone/pulse setting Follow this procedure to set the fax for use on ybur telephone line. There are two types of dialing used on telephone lines: touch-tone and pulse. you have to set the fax according to the type of line that you are using. The fax is set for touch-tone at the factory before shipping, so if you are using a touch-tone line, you won't have to change this setting. -
Page 37: Cartridge Handlin G Precalrtions
S o t t i r r g u p t h o p r i n t e r Befcre you can receive documents or rnake copies, you must have the paper loaded and a cartridge installed in the fax printer. Cartridge handling precautions . - Page 38 Softing up tlto printor . Do not attempt to re{ill a bubble_jet cartridge. clear printout cannot be obtained. . Never disassemble a bubble-let cartridge. may spill on your hands or clothing. . Never remove the bubble.jet cartridge, except when replacing it. This prevents the cartridge from drying out.
-
Page 39: Installing An Ink Cartridqe
S o l { / / r g l u p t l r o p r i n t a r Installing an ink cartridge Follow this procedure to install or replace the bubble-jet cartridge. Before you install or replace the bubble-jet printer cartridge, make sure the power ii on. - Page 40 )attirtg up tlto printor Hold the label side of the cartridge toward you so you can read it, then turn it up side d o w n . lnsert the cartridge into the machine so that the yellow plastic guide is visible through the cartridge slot.
-
Page 41: Recommended Paper Specifications
Soltlrtg up llro printor Recommended paper specifications This section explains the recommended paper specifications. To ensure the best print quality and efficient printer operation, use only paper that meets the specifications described below. Paper that does not meet these specifications may be used in the printer, but the results cannot be guaranteed. - Page 42 Setting up tha Prtnter Loading PaPer in the Pq!.t Follow this procedure to load paper in the printer' The fax is set to load and print on letter-size paper' Make sure the paper suppoft tray is installed in the holes provided on the printer paper feeder.
- Page 43 Sotling up tha printor Tap the edge to align the edge of the stack. . Aligning the edge of tha stack before you inserl it helps to prevent paper jams. Slide the paper into the tray until it stops. Tap the paper so it is flush with the right side of the feeder.
-
Page 44: Cleaning The Print Head
Sefting up the printer Cleaning the print head When you open or close the printer cover, the print head is cleaned automatically. However, if you cannot get good quality printing, do the following procedure to clean the print head. Load paper in the printer paper feeder. Press fFTN-erTor-I. - Page 45 Solfingy up tho printar CAUTION . Never turn ths system olf when the MEMORY lamp ls on. lt you turn the fax off durlng copylng.or prlntlng, the cartrldgs may stop where ft ls and remaln there. tl left too long out ol posftlon, the cartrldge may dry out. .
- Page 46 Rogistoring your numbar and name QTI) Part 2: BEFORE YOU USE THE FAX ... In accordance with recent amendments to the FCC rules governing the use of facsimile equipment, you are now required to include your fax number, your name or company name, the date and time of the fax that you are sending each and every time that you send a fax.
- Page 47 Registering your numbor and namo (TTI) Before you register... Before you register data on the fax, move the REGISTRATION switch to the ON position. 1 The REGtsrRAloN switch is on the right rear corner of the unit. 2 Move the necrsrRATtoN switch to or{.
- Page 48 Rogistoring your number and name QTI) .lf there is a previously registered date and tima, simply enter the new date and time over the old one. . Ehtar the month, the day, and the /ast fwo digits of the year. .lf tho day or month ls a single-digit, pracede it with a zero (0).
- Page 49 Rogistering your number and name (Tfl) Registering your telephone number Follow this procedure to register your telephone number. The number you register here will print at the top of every document you send so the person who receives the document will know immediately where it came from.
- Page 50 Registering your numbar and name Q-ll) 6 Press tstrT-I. DATA ENTRY OK E N T E R N A M E 7 lf you want to continue with your name registration, go on to step 5 in the next section. -or- lf you want to end the registration, press fs-TOF-l and turn the neclsrRATtoN switch oFF.
- Page 51 Ragistorinq your numbor and name (Tft) Registering your name Follow this procedure to register your name or your company's name. The name you register here will be printed at the top of every document sent to another facsimile unit. Make sure that the REG/SIRAI/ON swltch is ON betoro you enter your name.
- Page 52 Reqistaringl your number and name (TT!) 8 Press the right search key ' to move the cursor to the next character position. . Pross t-Sf A-Fa-ctrl to enter spaces between words. . You can also enter the following symbols as paft of the name: t l Y _ i l ) : ;...
- Page 53 Roglislarinq your number and name (TTt) When you are finished registering ... Move the RecrsrRATloN switch to orr. . Tho seftings you have registerod, including the current date and time, will now be sayed, even if tho power is turnad off and turned on agaln. f/P REGIS\RATPil T P O N O F F To check the number and name you have...
- Page 54 Using the tolaphono PaTt 3: GETTING STARTED WITH BASICS In this section we will show you how to use the regular dialing features of your fax to make telephone calls. The features described in this section include: . Dialing the telephone manually .
- Page 55 t / s i n g f / r o t o l a p l r c n e Using regular dialing with numeric keys Follow this procedure to use regular dialing to make a local or long distance telephone call. Regular dialing is just like using a telephone.
- Page 56 Using tlte lalaphonB R e d i a l i n g Follow this procedure to redial the number previously ciialed. 1 P ic k up th e ha nd s et . L 2 / 3 L / 9 2 L 2 z 3 2 Press tilE-prlTt.
-
Page 57: Dialing Through A Switchboard (Pbx)
Spocl:r/ dialing In this section we describe important features you should know about dialing as soon as you get your fax set up and ready to use. These features include: . Switching to tone dialing if your fax is set for rotary pulse dialing. - Page 58 Spocial dialinq Dialing through a switchboard (pBX) A PBX (private branch exchange) ls an on_site telephone switchboard. lt you set up the fax in an office where you have to go through a switchboard to dial an outside number, just dial thl fax's numeric keys as you would a regular telephone.
-
Page 59: Paper Size
B a l o r o s c n , I i r t ( l d o c u t n o t i l s This section shows you how to check documents and prepare them before sending through the fax. For the best reproduction quality and to prevent iams, read this section carefully. - Page 60 Bo{oro sendino documenls What the receiving fax doesn't see Before sending a document, check the margins. For best reproduction, documents you send should have left and right margins wider than the shaded portions shown in the illustration below. 0 . 0 4 i n . l l 8 .
- Page 61 Boloro sanding docurnonts Preparing documents before sending Before sending a document, check and prepare documents for sending by following these guidelines. . To prevent a paper jam, do not feed the following types of paper into the fax. lf you have to send a document on such paper, copy it first then send the copy through the fax.
- Page 62 Boforo sendino documorils Setting document density Follow this procedure to set the density for documents that you send or copy. There are three seftings: STANOARD, L|GHTER, and DARKER. The sefting you select remains in effect for all documents you send or copy until you change the setting again.
- Page 63 B c f o r a s t : n d i n g d o c t r m a n t s Setting reproduction quality Follow this procedure to set the quality of the reproduction for transmission or copy according to th contents of your document.
-
Page 64: Inserting A Document
B a l o r o s o n d i n 9 1 d o c u m o n t s Inserting a document After you have prepared the document and made the appropriate seftings described in the previous sections, follow this procedure to feed the document into the fax. - Page 65 Sonc/irrrJ a d oc urttonl In this section we will show you how to send a document. These important tasks are described below: . Dialing and sending manually . Redialing when the other party does not answer . Clearing document jams Feed the document into the automatic documentfeeder.
-
Page 66: Sending A Document
S c r r r i i r r o a d o c u n t o n t Dialing a number and sending a document . There are two ways to dial a number ancl send a fax. . - Page 67 S o n d i n q a d o c r t n r o n t The display tells you when transmitting begins. T R A N S M I T T I N G After a few moments the display will begin alternating every 2 seconds.
- Page 68 S e n d i n o a d o c u m e n t r Automatic dialing to send a document Follow this procedure to dial a number and send the documeht without talking to the other party on the telephone.
-
Page 69: Redialing A Facsimile Number . 4
Sonding a docuntont Redialing a facsimile number .{ - .. r. r lf the facsimile line is busy or if there is no answer, thel the fax will make two more attempts to dial at two minute intervals. You can also redial a facsimile number manuallv. - Page 70 S e n d i n g a d o c u m o n t Clearing document feed jams Jf ar.lccurnBnljams or stops halfway while it is being sent, the fax will alert you of a problem by alternate low and high pitch beeping.
- Page 71 R o c o i v i n q d o c r t r n o n t s Ttvse ,*e a variety of ways you can set your fax to f j ' . receive documents. The proper setting depends on whether or not you use your fax for both facsimile and voice communication, and if there is an answering machine connected to the fax.
- Page 72 R o c e i v i n o d o c u n e n t s What the fax doesn't see when receiving The shad.ed poltions"of the document shown in the diagram are not recorded by your fax. Ink footprlnt** The small black square marked with a double asterisk in the diagram (**) is the rnk footprint.
- Page 73 R oc a ivi n g docrrrrronls Getting ready to receive documents TO yeqeive a document, the fax should be in the standby mode (the date and time should be displayed). L 2 / 3 L / 9 2 L 3 : 4 lf there is a document in the document feeder, the display reads DOCU},TENT READY...
- Page 74 Receivino documortts Receiving when you're in the office lf you have onl.y one.{ine sorr,ir' ^into'your office, follow this procedure to use the unit as both a fax and t e l e p h o n e . Note that you cannot receive documents in the following cases.' .
- Page 75 Ro c o ivi n q cl o c u ttt o n ts 4 To receive the fax, press fsrTFT-/rc-eoF-n. 5 Hang up the haitdset. After the received document is printed. the fax returns automatically to standby. l 3 : 5 L 2 / 3 L / 9 2 .
- Page 76 R e c o i v i n g d o c u m a n t s r Receiving phone calls and documents manually (manual reception) Check the nuro and ANS HooK up lamps. They should both be off. lf either lamp is on, p r e s s t h e m k e y u n t i l they are both off.
- Page 77 R o c o i v i n g d o c u n t e n t s r Receiving a fax from an exlension phone connected to your fax Follow this procedure to receive a document when the fax is set for manual receiving, but you are too far from the fax to pressfsft-T AnTTeb-fVl Check and make sure that your extension...
- Page 78 R e c e i v i n q d o c u m e n l s r Receiving on a dedicated tax line (automatic receiving) Follow this procedure if you have one line in your office that is used only for receiving and sending documents. You can receive documents at any time, whether you are in or out of the office.
- Page 79 Rocoiving docurrronts 7 Press ts€-al. DATA ENTRY OK REMoTE RX 8 Press fsJ-ToF-l and turn the necrsrRATtoN switch oFF to return to standby. 9 Press m until theAuro lamp is on. . Use this seftlng whan the fax is connected to a line that you intend to use only for facsimile communication.
- Page 80 R o c o i v i n q d o c u m a n t s Receiving when you're not in the office lf you have only one line for telephone and fax transmissions coming into your office, follow this procedure to receive documents sent to you when you are not in the office.
- Page 81 Rocaiving cJocurnonls 8 Press tseil. DATA ENTRY OK REMOTE RX 9 Press fs.r-T-o-trl and turn the RecrsrRAnoN switch oFF to return to standby. 10 Press m until theAuro lamp is on. . When the AUTO lamp is on, if someone sends you a document, no fufther operation is required.
- Page 82 R e c e i v i r t o d o c u n e n t s r Receiving through an answering machine Follow this procedure when you want to leavg the fax unattended with your answering machine connected- This will allow you to receive documents automatically and record messages on the answering machine when it is connected to the middle iack on the fax.
- Page 83 R o c a i v i rt y1 cJocr/rnon(s P r e s s m k e y u n t i l t h e ANS HooK up lamp lights. The fax is now set to receive through the answering machine. Hore's what happens when you get a call: .
- Page 84 R o c o i v i n q d o c u m o n t s r Adiusting the fax lor use with different types of answering machines When you the fax is set to answer through an answering machine, first the answering machine will answer the call.
- Page 85 Rocoiving clocurnents 4 P r e ss t l. F. wr;'';;*rn--------, 5 Press tsr-trT]. 6 Use the numeric keys to enter a number to set the time. . The time can be set from 4 to 12 seconds. 7 Press fs-trT-l to register the time setting. DATA ENTRY F , / T R ' I N G...
- Page 86 R o c e iv i rt o d o c u nt o rtts 4 Press the search keys (. ') to display the ANS/FAX SWITCH. S W I T C H A N s / F A X 5 Press fSE=il.
-
Page 87: Changing The Ring Time
Ro c c ivt r t q <7 o c u r n a rtl s r Changing the ring time When the fax is set up in FAVTEL auto switch over, ( + 53), it will ring to alert you to pick up the phone when the call is from another person. -
Page 88: Receiving Documents In Memory
R o c e i v i n e d o c u m e n t s Receiving documents in memory The fax will stop printing and record the remainder ot the document in the memory when: - The printer runs out of paper . -
Page 89: Lf A Power Failure Occurs
R e c a i v i n g d o c u m e n t s 3 Press fsJ-TTETIToFy l. Printing begins. ( : C P : I I ! { E M O R Y 4 The MEMoRy lamp goes off and all documents are printed. - Page 90 Receiving documants Clearing printer iams Follow this procedure to clear printer paper jams. Open the paper bail release cover on the bottom left corner on the front of the fax. Press the paper bail release lever down to release the paper. 3 Open the printer cover.
- Page 91 Rocoiving <locumants 5 Close the printer cover. 6 Raise the paper bail release lever. 7 Close the paper bail release lever cover. I Remove the paper from the printer paper feeder. 9 Press t-sr-Fl. PROGRESS Rri*rG...
- Page 92 Roceiving docurnanls 10 Use your thumbs to press down on the paper feeder plate so it locks in the open position. 11 lf any paper remains in the printer, remove it. 12 Fan the paper and stack it. (*21) 13 lnsert the paper in the printer paper feeder. .
- Page 93 Racoiving documonts Cleanlng a dirty ptaten When a jam occurs and4he,pap*rdses not feed correctly to the printer, the bubble-jet cartridge may print directly on the platen. This ink on the platen may stain the back of your paper. Follow this procedure to clean ink stains from the printer platen.
- Page 94 M a k i t r g c o p i o s Foilow this procedure to copy documents with the fax- - t - Set the print density for the documents that you want to copy. (.r41) Feed the document in the automatic document feeder.
- Page 95 Printing an activity managotnonl repod lf you want to see a record of your tratisac.ions, iollovi this procedure to print an activity management report. The activity management repon is a record of the documents you have sent and received. Check the display and make sure the fax is in standby.
- Page 96 Ona touch dialirtgl Part 4: ADVANCED FEATURES One-touch dialing allows you to register a phone number or facsimile number under a One-touch key and then all you have to do to dialthe number is iust press one key. Here's how One-touch dialing works: .
- Page 97 Ono-touch dialingl Registering numbers and names for One-touch dialing Follow this procedure to register names and numbr f o r O n e - t o u c h d i a l i n g . Make sure that the REG/SIRAilON switch is ON before' enter your telephona number.
-
Page 98: Coded Speed Dialing 8
;.:lephone system. lf you experience problems with long distance dialing of numbers registered for One-touch or Coded speed dialing, contact your Canon authorized dealer. To insert a pause in the number, press tp AnsEl. Pauses are shown in the display A S A P . - Page 99 ( O ) = o N ( r ) S I I 'Outuas e aX€LU ol noA Jol ]teM pue A1;ecrieruolne oOueqc ute6e lltm Aeldslp aq1 Z S C O H X J T S S 'apouj uotssil.usueJl aLll ]os ol poldurotd ale no^ puocas L lnoqe laUV Lt{JNg vJvo 'tI-lE ssaJd...
- Page 100 Ono-lortch diating 9 The rx MoDE is for transmission of documents from the fax to another fax machine. press 6 if the number you are registering is for facsimile transmission. you press O go on to the next step. -or- Press g if the number you are registering for dialing a regular telephone call.
- Page 101 Ono-touclt dialinq lf the facsimile number you are registering i not a long distance number, set to 0. -or- For a long distance number, select 1,2, or First, try setting '1. lf you have a problem sending or receiving due to poor telephon lines, register the number again and try settings 2 or 3 until you correct the problen When the setting you want is displayed,...
- Page 102 Ono-touclt diating Adjusting the pause time " Follow this procedure to adjust the length of pause time for your switchboard or telephone system. . Pauses entered within numbers are set for 2 seconds. . Pauses entered at the end of numbers are set for 10 seconds.
- Page 103 Otta-tottclt dialing Using One-touch dialing F.-ollow this procedure to use One-touch dialing for telephone and lacsimile transmission" Before you attempt to use One-touch dialing be sure you have registered the number for telephone or facsimile transmission. (+ 76) r One-touch dialing the telephone Follow this procedure to dial a telephone number wi a One{ouch dialing key.
- Page 104 Ona-touch diating r One-touch sending a document Follow this procedure to use One_touch dialing when you want to send a document. The number registered under the One-touch key must be set iorlne document transmission mode. (+ 76) Feed the document into the automatic document feeder.
- Page 105 Ona-touclt clialin.r1 r Printing a list of registered numbers Follow this procedure to print a list of the numbers th '*afe registered lUr Orib-touch dialing. 1 Press [FTNer-Ta-N]. D I A I , S E T U P 2 Press fs-ETt. I - T O U C H D I A L Press fR Er-ETOFI to print the list of numbers...
- Page 106 Codad spae<l diating Coded speed dialing altows you to dial a facsimile nrTbgr^by pressing only three keys. you can register up to 10 numbers for Codes speed dialinq. Each you register can be up to 38 digiG lumDer long, including spaces. Registering names and numbers fo r C od ed spe ed di a l i ng Make sure that the REGTSTRATTON...
- Page 107 Coctod spoad clialinq 6 Use the keys in the table below to enter the facsimile number. ffittllrr Koys to prosa What happons O to @ Types a number. rcFA-efl Enters a space. Spaces are optional. Enters a pause. Within a numbor a fPi- US-trI pause equals 2 sec.
- Page 108 Cocled speecl ctiatino U.se the keys in the table below to enter other party's name. . The name you enter ," printed in your own fax repotts !:r: and is displayad in the one-line disptay inin yo, dial the numbor. .
- Page 109 Codod spoecl dialinq . The next Coded speod dial number is displayad. Repe this procedure to enter another number and name for Coded speod dialing, or press ISTOFI to return to standby. The display waits for you to enter the tra nsm is sion spe ed.
- Page 110 Codecl spood dialing When the setting you want is displayed, press rc€-il. DATA ENTRY OK . After about 1 second,.the next Codod speed dialing number is displayed for your next entry'. * 0 6 = lf you want to enter another number and name for Coded speed dialing, repeat this procedure.
- Page 111 Cocled speetd diating Using Coded speed diating Follow this procedure to use Coded speed dialing for telephone and facsimile transmission. Beiore you attempt to use Coded speed dialing, make sure you have registered the number for telephone or facsimile transmission. ( + 85) r Coded speed dialing the telephone Follow this procedure to dial a telephone number usin Coded speed dialing.
- Page 112 Codod spood dialing r Coded speed dialing to send a document Follow this procedure to use Coded speed dialing wnen you want to send a document. The numbei registered under the Coded speed dialing key must be set for the document transmission model 1"...
- Page 113 This allows you to take advantage of lower late night long-distance telephone rates given by some telephone companies. Ask your Canon authorized dealer for more information about rates in your area. While pre-set timing is set up and waiting to send a document: .
- Page 114 U s i n g d e I aya d lransmissron Use the numeric keys to set the sending time. ..:el ti le llrne usrrg the 24-hour syslem. . lf the hour or minuteis a single digit number, precede it with a 0.
- Page 115 U s i n g d e I ay o d lr:rnsnrt.sr^lon *or- lf you want to enter the number manually, use tfle keys in tite table below to enter the number. Koys to progs What happons O to @l Types a number.
-
Page 116: Registering Your Polling Ld 9
Using polling Polling is when one fax requests another to send document. Polling works two ways. your fax can poll other faxes to receive documents, and your fax in turn can be polled to send documents. Thijfeature is useful when the party who has to send the document not in the office. - Page 117 Using pollirtg Registering your polling lD F o l l o w t h i s p r o c e d u r e t o r e g i s t e r y o u r p o l l i n g l D . Make sure that the REG/SIRAI/ON swilch is ON befora you register your polling lD.
- Page 118 Using polling B Press Eail and turn the necrsrnATtoN switch oFF to return to standby. . Notify all friends, clients, and customers of your polting tD. Sending a document in response to p o l l i n g Follow this procedure to set up your fax to send a document in response to a polling request from another fax.
- Page 119 Using polling Manually polling another fax to receive your document Follow this procedure to polt dnothbi 6i dn?-rediilve its document. 1 Pick up the handset. 2 Dial the facsimile number. . You can dial the number manually with the numeric keys a One-touch key, or Coded speed dialing.
- Page 120 Selling tha printor data Followthese pro.:-edures to change the operation of the printer. Entering the printer setting mode (BJ DArA) Make sure that the REG/SIRAI/ON switch is ON before you register. Turn it OFF after you complete registration. Press [-FnxdT-rbTt D I A L S E T U P 2 Press E.
- Page 121 Softrng tlto prinlor data Setting slower speed lor printing grapha Follow this procedure to switch trST Fi:{!t%tpQ{,lo printing. unidirectional Enter the printer setting mode. (.99) Press the search keys (. ' ) to display B I D I R E C T I O N P R T . B I D I R E C T I O N P R T 3 Press tsE-T-1.
- Page 122 Scllinq tho printar data ggl,ng for hatftone printing Followthis 6arocpJure{or better quality printing in the HALFTONE printing mode. photographs print much better with halftone printing. 1 Enter the printer setting mode. (, gg) 2 Press the search keys (. , ) to display LIGHT/STD PRT.
- Page 123 Printing ropotTs This section describes how to print the following type of reports to help you keep track of your fax transactions. Activity report Prints after each transaction (receiving or sending a document). Activity management report Prints the last 20 incoming/outgoing transactions. You can print one whenever you need it, or print one automatically after every 20 transactions or at the san time every day.
- Page 124 Printinq rcpotls Printing activity reports Activity reports keepltr.a6k of ,the,docut.r.ients you send and receive. Each activity report shows: . Date and time of transaction - Name and telephone number of the party sending or receiving the document . Whether the transaction was successfully completed.
- Page 125 Printing raporTs . RX REPORI moans recoiving roport. To print a receiving transaction activity repoft avery time you rocoivo a document, sel the RX REPORT item on tho user switch menu to OUTPUT YES- Press ts E-Tl. O U T P U T N O Press the search keys (.
- Page 126 Printing ropotTs Printing activity management reports Activity management reports reccrcl the !ast 20 sending/receiving transactions. Activity management reports can be printed in the following ways: . Manually whenever you need one. . Automatically after every 20 transactions. . Automatically at the same time every day. r Printing I repon manually Follow this procedure to print an activity management report whenever you need one.
- Page 127 Prirt0ng repods r Printing a report after 20 transactions Follow this procedure to print an activity management report automatically after every 20 transactions. Make sure that tho REG/SIRAI/ON swltch is ON bef ore you reglster. Turn it OFF after you complete registration. -l Press trnr.rer'r-oTl.
- Page 128 P r i r t i r t r l r e p o d s r Printing a report every day at the same time Follow this procedure to print an activity managemenr report automatically at the same time every day, regardless of the number of transactions.
- Page 129 P r i n t i n g r o p o r l s r Printing send/receive transactions separately Normally when the activity management report prints, inr,oming/outgoing transmissions are listed together. { a o o l 6 r o o t l l r a a t a .
- Page 130 P r i n t i n g 1 r e p o r T s 4 Press the search keys (. ') to display rx RX R E P O R T T Y P . T X R X R E P O R T T Y P 5 Press tsETt.
- Page 131 Printinq reporls r Printing error transmission reports The fax can automatically print an error transmission repolt '[ it fails:o serrd.a -i:cument because the other party did not answer or an error occurred. An error transmission report tells you the facsimile number of the party you are sending to so you can try again later.
- Page 132 P r i n t i n g r e P o d s 6 Press the search keys (. ') until the setting you want is displayed. '!r': \ rY OUTPUT NO A transmission error report does not print when an error occurs.
- Page 133 Srtnrntztry ol user -sefling.s The fax has a number of featrrres calleC usrr.seftings that you can turn on or off to fit your own needs. For example, you can set the fax to prrnt out an activity report every time you send or receive a document. lf technicians install the fax for you, they should make the initial user settings for you.
- Page 134 Sunrmary of user seftings Changing the user settings Follow this procedure to change the user seftings. Make sure that the REG/SIRAnON switch is ON before you roglster. Turn it OFF after you complete registration. 1 Press trnxdT-lonl. D I A L S E T U P 2 P r es s g .
- Page 135 Sttrnntary ol tlsor srtft/ngf-s 8 lf you want to make more settings, press one of the se arc h keys (. ' ) to se arc h fo r another item to change, then repeat.th'is ' pr o ced ure . 9 When you are finished making settings, press fs-TOF-l and turn the nectsrRArloN switch oFF to return to standby.
- Page 136 This section is included to help you solve problems you might have to deal with over the years. Canon's interest in you did not stop when you bought this equipment. Our sales and service representatives are always ready to answer questions you may have about operation of the fax.
- Page 137 T r o u l t l e s l r o o t i n q T r o ublesh oot in g s um ma ry ta ble T r o u b l e s h o o t l n g t a b l e - T h e A N S H O O K U P l a m p s h o u l d b e A n s w e r l n g m a c h l n e Can't use the answ6ring machine.
- Page 138 T r o u b l e s l t o o t i r t g Can't recoive documants automatically. ' Make sure tho fax is set to receive automatically. The AUTO lamP s h o u l d b o o n . r Checkitlro ;,x:lntdri:ay and mako sure p a p €...
- Page 139 Tro t tb I o s I t c'; oti r t <1 Display messages and error codes D l s p l a y M e s s a g e s a n d E r r o r C o d e T a b l e C o d o Causs W h a t t o d o...
- Page 140 Make sure the fax you are trying to communicate with is a G3 compatible fax. lf you still cannot solve the probtem, contact your Canon authorized dealer as indicated in the information included with the machine. 1 1 9...
- Page 141 M a i n t o n a n c o Cle a ning th e f ax r Cleaning the fax exterior Lightly wipe the fax with a soft cloth moistened slightly with water or a dilute solution of dish detergent. To prevent discoloration and malfunctions, never use thinner, benzene, alcohol, or any other kind of organic solvent.
- Page 142 M i t n l a n i t n c o r C l e a n i n g t h e p r i n t e r a r e a C l e a n t h e p r i n t e r r e g u l a d y t o a v o i d p r i n t p r o b l e m s . C A U T I O N .
- Page 143 Spocitr/c;r ti ons S h e e t s l z e : M a x w i d t h 8 . 5 i n . ( 2 1 6 m m ) M i n . w i d t h 8 . 3 i n . ( 2 1 0 m m ) Effectlve lmage wldth: 8 .
- Page 144 {aster than unidirectional p r i n t i n g . Stands for blts per second. Canon's patented ink iet technology which uses an ink cartridge bubble-lot prlntlng system containing 64 nozzles that shoot ink onto th€ paper about 30OO times per second.
- Page 145 G/os.sary dolaull sotting Avaluo ussd in the absonce of one s€t by you. Tho user settings can bo used to chango preset default values. d e s t i n a t l o n l a b e l A t t a c h a b l e l a b e l u s e d t o l a b e l s p e e d d i a l k e y s .
- Page 146 G/os-sarv A g e n e r a l t e r m a p p l t e d t o a n u m b e r o f p r o b l e m s t h a t a d v e r s e l y n o i s e atfect the operation of telephone lines used for modem and fax c o m m u n i c a t i o n .
- Page 147 G/o:^s.lry S t a n d s { o r r o c o i v i n g . e e a r c h k e y s ( < > ) P r e s s t o s e a r c h f o r m e n u s a n d e n l r i e s o r t o m o v e t h e c u r s o r r d i s p l a y e d .
- Page 148 o o c u m e n t a c t i v i t y m a n a g € m e n t r e p o r t b e f o r e s e n d i n g , 4 0 t o r m a t , 1 0 9 d e n s i t y , 4 1 p r i n t i n g , z 4 , 1 0 2 , 1 0 5...
- Page 149 y o u r n a m e , 3 0 p a p e r y o u r n a m e a n d n u m b e r , 2 5 g u i d o s , 4 3 y o u r p h o n o n u m b o r , 2 8 l o a d i n g , 2 1 R E G I S T R A T I O N s w i t c h...
- Page 150 TI II] AU'I-I IORIZI]D SERVICE FACILITY. Information regarding authorized scrvice facility locations can bc obtained by calling the nearest Canon U-S.A. C-onsumer Information and Servicc C-cnter below, or you may refer to the enclosed A.S.F. List for a choice of seMcc locations.
- Page 151 HBT tA5 T e l e p h o n e : 5 1 4 _ 6 3 1 € 8 2 1 CENTRE D'INFORMATION CANON AU CANADA SERVICE POUR FAXPHONE AU CANADA si vous avez besoin de services, composez I'un des num6ros de t6l6phone suivants pour obtenir tous les renseignements sur le centre de service apras-vente agr6e pour pour FMPHoNE de votre localit6, ou r6l6rez-vous a la liste s.A.v.
- Page 152 Canon C A N O N I N C . 7 - 1 . N r s h i - s h i n j u k u , 2 - c h o m e , S h r n j u k u - k u . T o k y o 1 6 3 - 0 7 , J a p a n C A N O N U .
Need help?
Do you have a question about the FAX-PHONE B60 and is the answer not in the manual?
Questions and answers