Harman Kardon AVR 155 Owner's Manual
Audio/video receiver
Hide thumbs
Also See for AVR 155:
- Service manual (92 pages) ,
- Handleiding (52 pages) ,
- Features & specifications (2 pages)
Table of Contents
Advertisement
Quick Links
Advertisement
Table of Contents

Subscribe to Our Youtube Channel
Related Manuals for Harman Kardon AVR 155


Summary of Contents for Harman Kardon AVR 155
- Page 1 AVR 155 Audio/VideoReceiver OWNER’S MANUAL...
-
Page 2: Table Of Contents
Table of Contents Introduction Direct Code Entry Troubleshooting Guide Safety Information Auto Search Method Processor Reset Unpacking Code Readout Technical Specifications Front Panel Controls Macro Programming Appendix - Settings Worksheet Rear Panel Connections Programmed Device Functions Main Remote Control Functions Volume Punch-Through Installation and Connections Channel Control Punch-Through... -
Page 3: Introduction
Dolby* Digital, Dolby Pro Logic* II Thank you for choosing Harman Kardon! AVR 155 provides A/V sync delay so that the lip With the purchase of a Harman Kardon AVR 155 sync errors – commonly seen when digital video Decoding, and DTS ®... -
Page 4: Safety Information
YOUR UNIT extension cords be used with this product. As with n Due to the weight of the AVR 155 and the heat all electrical devices, do not run power cords Do not install this equipment in a confined space... -
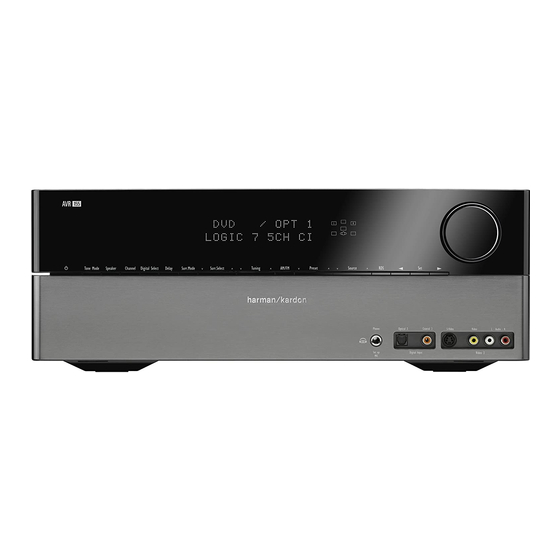
Page 5: Front Panel Controls
Front Panel Controls Volume Control Tuner Band Selector Ô Video 3 input jacks System Power Control OK Button Digital Input Selector Ò Main Information Display Power Indicator Preset Stations Selector Headphone Jack Speaker/Channel Input Indicator Ú Remote Sensor Window Surround Mode Group Selector Input Source Selector Speaker Select Button... - Page 6 Front Panel Controls ) Tuning Selector: Press the left side of the ^ RDS Select Button: Press this button to button to tune lower frequency stations and the display the various messages that are part of the right side of the button to tune higher frequency RDS data system of the AVR’s tuner.
-
Page 7: Rear Panel Connections
Rear Panel Connections O P Q C AM Antenna Video Monitor Outputs Video 2 Audio Inputs FM Antenna DVD Video Inputs Coaxial Digital Inputs Front Speaker Outputs Video 2 Video Inputs Tape Inputs Tape Outputs Center Speaker Outputs Video 1 Video Outputs Subwoofer Output Surround Speaker Outputs Video 1 Video Inputs... - Page 8 Do not connect the RF digital out- terminal on the Surround Left speaker with older the AVR 155, you may use either a composite or put of an LD player to these jacks. color coding, while the Gray terminal should be S-video connection, but not both.
-
Page 9: Main Remote Control Functions
Main Remote Control Functions Power Off Button 2 1 0 IR Transmitter Window Program Indicator Power On Button Input Selectors AVR Selector AM/FM Tuner Select 6-Channel Direct Input Test Button Sleep Button and Program Up Button Surround Mode Select and Program Down Night Mode Channel Select Button Buttons... - Page 10 Main Remote Control Functions IMPORTANT NOTE: The AVR 155’s remote may Input Selectors: Pressing one of these Night Mode: Press this button to activate be programmed to control up to seven devices, buttons will perform three actions at the same the Night mode.
- Page 11 Main Remote Control Functions ‹ Button: This button is used to change OSD Button: Press this button to activate Stereo Mode Selector: Press this button the On Screen Display (OSD) system used to set to select a stereo playback mode. When the the menu selection or setting during some of the up or adjust the AVR’s parameters.
- Page 12 Main Remote Control Functions Memory Button: Press this button to TV/Video Button: This button does not enter a radio station into the AVR ’s preset have a direct function on the AVR, but when memory. Two underline indicators will flash at used with a compatibly programmed VCR, DVD the right side of the Main Information or satellite receiver that has a “TV/Video”...
-
Page 13: Installation And Connections
When a variable audio outputs it is best to use the fixed as well as on the AVR 155. If a fixed Line Out passive subwoofer is used, the connection first output unless you find that the input to the... -
Page 14: Video Connections
• HiFi VCRs need an adapter from Scart to 6 RCA puts of that device to the Front Panel Inputs when the AVR 155 is used with HDMI sources: plugs, see fig. 2 (normal video), or from Scart *ÓÔ. A device connected to the Video 3 •... -
Page 15: Power Connections
Once the power cord is connected, you are With any adapter cable, these control signals will AC Power Connections almost ready to enjoy the AVR 155’s incredible be lost and the appropriate setting of the TV must This unit is equipped with one accessory AC out- power and fidelity! be made manually. -
Page 16: Speaker Selection
Installation and Connections Speaker Selection Subwoofers produce largely nondirectional sound, so they may be placed almost anywhere No matter which type or brand of speakers is in a room. Actual placement should be based on used, the same model or brand of speaker room size and shape and the type of subwoofer should be used for the front-left, center and used. -
Page 17: System Configuration
Digital Select Button Û these settings are made manually. You are now and then any of to view the AVR’s displays, the correct video input 7 or ready to power up the AVR 155 to begin these the Selector buttons ‹ › ⁄... -
Page 18: Input Setup
System Configuration speaker settings will automatically default to To change the Component Video assignment, first make certain that the fi cursor is pointing to the “Small” at all positions with the subwoofer set to “LFE.” The default setting for the surround modes line on the menu screen, COMPONENT IN is Logic 7 Music, although Dolby Digital or DTS... -
Page 19: Surround Setup
System Configuration The next lines in the Input Setup menu control selected and playing, the AVR will select the channel sound more broadly into the left and whether or not the bass/treble tone controls are appropriate surround mode automatically, no right channels. -
Page 20: Configuring The Surround Off
The factory default setting is to have the available when either Dolby Digital or DTS Digital subwoofer turned off for this mode, but you may The AVR 155 is one of the first receivers in its soundtracks are in use. change that setting by following these steps:... - Page 21 System Configuration rival those achieved with expensive test equip- If you do not wish to continue with the EzSet+ ment and time-consuming procedures. The end process, press the Navigation Buttons ‹ › result is a system calibration profile that enables for the arrow to point to NO and then your new receiver to deliver the best possible press the OK Button...
- Page 22 System Configuration listing. When the EzSet/EQ screen first appears, it This is an essential element of ensuring that message will TEST DONE UNPLUG MIC contains a series of dashes, but as the test and surround sound fields are properly reproduced. appear in the second line of the on-screen menu measurement proceeds, you will see the If desired, you may use the results of the auto-...
-
Page 23: Manual Setup
Setup menu indicates whether you have run that the cursor is on the MANUAL SETUP AVR 155. For those situations where you may EzSet/EQ and whether the settings obtained by line. wish to make a change to the settings entered by... - Page 24 System Configuration default setting of will be appropriate, front left and right bass information may also be line in this menu (see below). GLOBAL SUBWOOFER as most listeners do not need to have directed to the subwoofer. This mode is needed if no Center speaker is used. individualized speaker settings.
- Page 25 System Configuration when the AVR is being used with a digital Navigation Buttons to choose the ‹ › source that contains a dedicated Low appropriate setting. Frequency Effects, or LFE soundtrack. This Note that the crossover point for the surround allows you to use both your main and sub- speakers and the surround back speakers will be woofer speakers to take advantage of the spe-...
-
Page 26: Delay Settings
System Configuration Note: These icons are available only when most channels, they need not be entered again speakers installed and Dolby Digital chosen as making setup changes without the use of the full for a version of that mode with fewer channels. the surround mode. -
Page 27: Output Level Adjustment
System Configuration The delay settings may be adjusted at any time Output Level Adjustment Before beginning the output level adjustment using the remote control and while viewing an Output level adjustment is a key part of the process, make certain that all speaker connec- on-screen image by pressing the Delay Select configuration of any surround-sound product. - Page 28 System Configuration When the menu first 6. After checking for speaker placement, let the If you are using a sound-pressure level (SPL) CHANNEL ADJUST appears, the test tone is off. Use the test noise circulate again, and listen to see meter for precise level adjustment with the test ⁄...
- Page 29 System Configuration Later, it is recommended that you adjust the out- After one input has been adjusted for analog or put levels while listening to various sources, as digital input, speaker type and surround mode, opposed to the test tone. See page 37 for more return to the line on the INPUT SETUP...
-
Page 30: Operation
Logic 7 Cinema Exclusive to Harman Kardon for AV receivers, Logic 7 is an advanced mode that extracts the Logic 7 Music maximum surround information from either surround-encoded programs or conventional stereo material. - Page 31 Operation Surround Mode Chart MODE FEATURES DTS Neo:6 Cinema These two modes are available when any analog source is playing to create a multi-channel DTS Neo:6 Music surround presentation from conventional Matrix-encoded and traditional Stereo sources. Select the Cinema version of Neo:6 when a program with any type of analog Matrix surround encoding is present.
-
Page 32: Basic Operation
Operation Basic Operation When the programmed sleep time has elapsed, 6-Channel Direct Input the unit will automatically turn off (to Standby should be used 6 CH DIRECT INPUT Once you have completed the setup and configu- mode). Note that the front panel display will dim when the input source device has its own internal ration of the AVR, it is simple to operate and to one half brightness when the Sleep function is... -
Page 33: Surround Mode Selection
One of the most important features of the However, for stereo programs without any ically improved dynamic range and significant AVR 155 is its ability to reproduce a full multi- surround information the Theater, Hall and 5CH improvements to signal-to-noise ratios. In addi-... -
Page 34: Pcm Audio Playback
Operation DVDs. This does not indicate a problem with the recording. When the digital input associated with Surround Mode Types AVR, as some players cannot pass the DTS signal the input selected (e.g. “DVD”) is not selected For Dolby Digital and DTS sources, a three digit through to the digital outputs. -
Page 35: Surround Mode Post Processing
CD playback, and other non- Surround Mode Post Processing Dolby Digital and non-DTS digital sources such as Thanks to the power of the AVR 155’s DSP Mini-Disc. When a PCM signal is detected, the processor, a variety of surround mode options are Main Information Display Ò... -
Page 36: Night Mode
Operation For incoming DTS signals, the following modes are available: Incoming Bitstream Available Surround Modes DTS 1/0/.0, 1/0/.1, 2/0/.0, 2/0/.1, 3/0/.0, 3/0/.1, 3/1/.0 or 3/1/.1 DTS, DTS Stereo DTS 2/2/.0, 2/2/.1, 3/2/.0 or 3/2/.1 DTS, DTS Stereo DTS 96/24 DTS 96/24, DTS Stereo DTS-ES Matrix DTS, DTS Stereo DTS-ES Discrete... -
Page 37: Tape Recording
Operation Tape Recording next output channel location that you wish to to the line and press the CHANNEL RESET adjust. To adjust the subwoofer level, press the Buttons so that the word ‹ › In normal operation, the audio or video source Selector buttons 7 or the buttons highlighted. -
Page 38: Dim Function
Operation Dim Function Since the AVR will often be used when movies or other video programming is viewed unde low- light conditions, you may wish to lower the brightness of the front-panel displays and indica- tors so that they do not distract from the video presentation. -
Page 39: System Setup
System Setup The AVR 155 is equipped with a number of ad - Turn On Volume Level Semi-OSD Settings vanced features that add extra flexibility to the As is the case with most audio/video receivers, The semi-OSD system places one line messages unit’s operation. -
Page 40: Full-Osd Time Out Adjustment
This setting will be retained even when the data flags that are encoded on the DVD disc or AVR 155 is turned off to the Standby mode. in the digital video broadcast. In most cases, this is the correct mode, but you may have a If you wish to make other adjustments, press the until the on-screen ›... -
Page 41: Tuner Operation
NOTE: When the FM reception of a stereo station is weak, audio quality will be increased The AVR 155’s tuner is capable of tuning AM, FM by switching to Mono mode by pressing the and FM Stereo broadcast stations and receiving... -
Page 42: Rds Operation
Some RDS stations may not include some of • : Country Music COUNTRY these additional features. If the data required for The AVR 155 is equipped with RDS (Radio Data • : National Music NATIONAL the selected mode is not being transmitted, the System), which brings a wide range of informa- Main Information Display Ò... -
Page 43: Programming The Remote
Programming the Remote The AVR 155 is equipped with a powerful remote 5. If the Power function of the unit to be pro- 3. To find out if the code for your unit is pre-pro- control that will control not only the receiver’s... -
Page 44: Macro Programming
Programming the Remote Example: One blink, followed by a one-second • Press the Macro 1 button and Mute For some products, however, the function of a buttons at the same time and then release them. pause, followed by six blinks, followed by a one- particular button does not follow the command second pause, followed by four blinks indicates printed on the remote. -
Page 45: Resetting The Remote Memory
Programming the Remote To program the remote for Volume Punch- 3. Press and release the AVR or Input Resetting the Remote Memory for the device that will be Through, follow these steps: Selector button As you add components to your home-theater used to change the channels. -
Page 46: Function List
Function List Button Name AVR Function Tape Power On Power On Power On Power On Power On Power Off Power Off Power Off Power Off Power Off Mute Mute Mute Mute Mute AVR Select AVR Select AVR Select AVR Select DVD/ DVD Input Select DVD Input Select... - Page 47 Function List Button Name VCR (VID 3) TiVo (VID 1) CBL (VID 2) SAT (VID 2) TV (VID 1) HDMI 1/2/3 Power On Power On Power On Power On Power On Power Off Power Off Power Off Power Off Power Off Power Off Mute Mute...
-
Page 48: Troubleshooting Guide
"PROTECT", and there is no sound. due to possible short and speaker ends • Amplifier is in protection mode • Contact your local Harman Kardon service depot due to internal problems No sound from surround or • Incorrect surround mode •... -
Page 49: Technical Specifications
Depth measurement includes knobs, buttons and terminal connections. Height measurement includes feet and chassis. All features and specifications are subject to change without notice. Harman Kardon, and Logic 7 are registered trademarks of Harman International Industries, Incorporated. is a trademark of Harman International Industries, Inc. -
Page 50: Appendix - Settings Worksheet
APPENDIX – SETTINGS WORKSHEET Appendix – Default settings, worksheets, remote product codes Table A1 – Source Input Setting Defaults Source HDMI 1 HDMI 2 Video 1 Video 2 Video 3 AUX In/ Tape Tuner 6-Channel Title INT.TUNER Video Input Comp V 1 HDMI 1 HDMI 2 Comp V 2 Comp V 3... - Page 51 APPENDIX – SETTINGS WORKSHEET Table A4 – Source Input Settings Source HDMI 1 HDMI 2 Video 1 Video 2 Video 3 AUX In/DMP Tape Tuner 6-Channel Title Video Input Audio Input AUX In/DMP Tuner 6-Channel Auto Poll Surround Mode Tone Mode Bass Treble Table A5 –...
-
Page 52: 2, Route De Tours
250 Crossways Park Drive, Woodbury, New York 11797 www.harmankardon.com Harman Consumer Group, Inc.: 2, route de Tours, 72500 Château-du-Loir, France © 2008 Harman Kardon, Incorporated Part No.: OM P/N CQX1A1317Y...
Need help?
Do you have a question about the AVR 155 and is the answer not in the manual?
Questions and answers