Palm TREO 700W User Manual
Windows mobile platform
Hide thumbs
Also See for TREO 700W:
- Using manual (290 pages) ,
- User manual (126 pages) ,
- Addendum (14 pages)
Table of Contents
Advertisement
Quick Links
Advertisement
Table of Contents

Related Manuals for Palm TREO 700W


Summary of Contents for Palm TREO 700W
- Page 1 ® Using Your Palm Treo™ 700w Smartphone...
-
Page 2: Disclaimer And Limitation Of Liability
Copyright © 2005 Palm, Inc. All rights reserved. Palm, Treo, the Palm and Treo logos, and Palm Powered are among the trademarks or registered trademarks owned by or licensed to Palm, Inc. A portion of this software includes software modules developed by the Independent JPEG group. - Page 3 Microsoft makes no representations, warranties or other determinations that ANY use of the Software Product is legal, safe, or in any manner recommended or intended while driving or otherwise operating a motor vehicle. General Operation Voice Command Control: Many of the functions of the Device Software can be accomplished using only voice commands.
-
Page 5: Table Of Contents
Welcome....................1 What’s in the box?.......................2 What you need to use your smartphone..............3 Chapter 1: Getting Started..............5 ® Palm Treo™ 700w smartphone overview...............5 Installing the battery ....................8 Charging the battery ....................9 Turning your smartphone on/off ................11 Making your first call ....................12 Setting up your computer ..................14... - Page 6 Table of Contents Chapter 3: Using Your Phone............... 33 Phone overview......................33 Making calls .......................37 Receiving calls ......................42 Using voicemail......................43 Managing active calls ....................44 More ways to manage calls..................47 Defining speed dial buttons ..................50 Using a phone headset .....................53 Chapter 4: Staying Organized.............. 55 Contacts ........................55 Calendar ........................57 Tasks ..........................64...
- Page 7 Table of Contents Chapter 6: Playing Media Files ............105 Pictures & Videos ....................105 Windows Media Player Mobile ................114 Chapter 7: Staying Productive............121 Word Mobile ......................121 PowerPoint Mobile....................128 Excel Mobile ......................130 Chapter 8: Managing Files and Applications ........143 Finding information ....................143 Installing applications .....................145 Removing applications ..................147...
- Page 8 Table of Contents Chapter 10: Finding Help..............195 Transferring info from another device ..............195 Trouble installing the desktop software? ..............196 Resetting your smartphone..................197 Performance ......................200 Screen ........................201 Network connection ....................202 ® Synchronization (ActiveSync software) ..............206 Email.........................212 Web ..........................216 Camera ........................217 Third-party applications..................219 Making room on your smartphone................221 Voice quality ......................222...
-
Page 9: Welcome
• Microsoft Office Mobile suite includes a camera. This guide helps you set up your Treo 700w smartphone and quickly learn to use it. [ * ] NOTE Phone and text messaging service require a service contract with Verizon Wireless. Web, email, and messaging services require a service contract and high-speed data service from Verizon Wireless. -
Page 10: What's In The Box
Welcome What’s in the box? You should have received all of the following items in the Treo 700w smartphone box: Hardware • Treo 700w smartphone • Rechargeable battery • AC charger • USB sync cable • Headset Documentation and software •... -
Page 11: What You Need To Use Your Smartphone
What you need to use your smartphone As you work through the instructions in this guide, you need all the items that came in the Treo 700w smartphone box (see “What’s in the box?” on page 2) as well as the following: •... - Page 12 Welcome Using Your Treo 700w Smartphone...
-
Page 13: Chapter 1: Getting Started
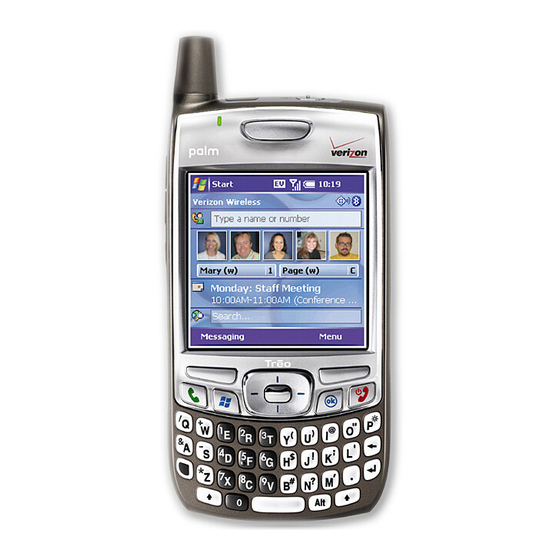
CHAPTER 1 Getting Started ® Palm Treo™ 700w smartphone Did You Know The ringer switch overview silences all sounds when you need quiet—no need to navigate menus. Top view Expansion Stylus Antenna card slot Infrared (IR) port Ringer switch... - Page 14 OK button www.palm.com/ mytreo700wVerizon to find a variety of useful Power/End button accessories, including carrying cases that protect the screen. Volume button Side button Action keys Start Microphone button Phone/Send button Multi- connector Headset jack Using Your Treo 700w Smartphone...
-
Page 15: Back View
(camera smartphone only) Speaker [ ! ] IMPORTANT The Treo 700w smartphone speaker includes a large magnet, so be sure not to store your smartphone near credit cards or other items that could be demagnetized. Using Your Treo 700w Smartphone... -
Page 16: Installing The Battery
Be sure to use instructions to set up your smartphone. batteries from Palm only. Battery contacts Battery door release Phone contacts Notch Using Your Treo 700w Smartphone... -
Page 17: Charging The Battery
CHAPTER 1 Charging the battery If the indicator light Before using your Palm Treo 700w smartphone, you need to charge the does not turn on battery. We recommend 3.5 hours for a full charge, or until the indicator when you connect light is solid green. - Page 18 An exclamation point ( ) indicates the battery needs charging stored safely on your immediately. smartphone until you recharge the battery or connect your Battery smartphone to a icon power source. Using Your Treo 700w Smartphone...
-
Page 19: Turning Your Smartphone On/Off
Turning your smartphone on/off Did You Know The indicator light You can use the organizer features of your Palm Treo 700w smartphone flashes green when independently of the wireless features and applications. In other words, your phone is on and the screen and phone are designed to be turned off and on separately. -
Page 20: Making Your First Call
[ ! ] Before You Begin Make sure your phone We recommend that you charge your Palm Treo 700w smartphone for a is on (see “Turning full 3.5 hours (or until the indicator light is solid green) before using it your phone on and off”... -
Page 21: Adjusting Call Volume
2. If you do not see your Today screen, press Phone/Send 3. Press Menu 4. Select Preferences > Phone Settings. 5. On the Phone tab, look for your phone number below the title bar. 6. Press OK Using Your Treo 700w Smartphone... -
Page 22: Setting Up Your Computer
Treo 700w smartphone. • 32MB of available memory (RAM) • 170MB of free hard disk space • CD drive • Available USB port • USB sync cable (included with your Palm Treo 700w smartphone) Using Your Treo 700w Smartphone... -
Page 23: Installing The Desktop Synchronization Software
[ ! ] IMPORTANT If you’re transferring from previous a Windows desktop software?” on ® page 196. Mobile device or from a Palm Powered device, follow the steps at www.palm.com/us/support/Treo700wVerizon before you set up your [ ! ] Before You Begin computer for your new smartphone. - Page 24 If your computer has USB ports on both the front and back, we suggest using the back port. If you use a USB hub, make sure it is a powered hub. USB sync cable Using Your Treo 700w Smartphone...
-
Page 25: Chapter 2: Learning The Basics
Learning the Basics Moving around the screen Some third-party ® To move around the Palm Treo™ 700w smartphone screen, you can applications may not work with the 5-way use the 5-way navigator or you can tap items on the screen with the navigator, and you stylus. -
Page 26: Scrolling Through Screens
• When inside a list, press and hold or Down to rapidly scroll through the list. Scroll arrows • Tap an onscreen scroll arrow. • Tap and drag the slider of an onscreen scroll bar. Using Your Treo 700w Smartphone... - Page 27 After highlighting an item with the 5-way, you can select or activate it by pressing Center, or by tapping the item with the stylus. Using Your Treo 700w Smartphone...
- Page 28 Remember that action key functions vary from screen to screen, so be sure to check the onscreen label before pressing the action keys. Left action key Right action key activates this activates this command command Left action key Right action key Using Your Treo 700w Smartphone...
-
Page 29: Selecting Menu Items
To return to the main menu without making a selection, press Left 4. Press Center to select the menu item, or press Left or Menu to close the menu and cancel your selection. Using Your Treo 700w Smartphone... - Page 30 2. Press and hold Center to open the shortcut menu. 3. Press Up or Down to highlight a menu item. 4. Press Center to select the menu item or press Left to cancel your selection. Using Your Treo 700w Smartphone...
- Page 31 Use your stylus to tap the arrow, and tap the arrow with then tap the item in the list. the stylus to expand the field. • To exit the list and cancel your selection, press Left Using Your Treo 700w Smartphone...
-
Page 32: Using The Keyboard
To enter other uppercase letters, do one of the following: • Press Shift , and then enter a letter. You don’t need to press and hold Shift while entering a letter. Using Your Treo 700w Smartphone... -
Page 33: Entering Other Symbols And Accented Characters
3. Press Up or Down to highlight the desired character. 4. Press Center to insert the character. Using Your Treo 700w Smartphone... - Page 34 : & _ • % = ÷ ^ - * / # ( or £ ¥ ¢ [ ] { } < > « » ° Ñ © ® ~ \ Ø µ | Ÿ Using Your Treo 700w Smartphone...
-
Page 35: Opening And Closing Applications
You can also open to close it. Memory Settings from • Select Stop All to close all of your open applications. the Start menu. Press Start, select Settings, select the System tab, and then Memory. Using Your Treo 700w Smartphone... -
Page 36: Using Your Today Screen
Center to begin the search (data services connection features. required). • Speed dial entries: Select the picture or button you want to dial. See “Defining speed dial buttons” on page 50 to create your own. Using Your Treo 700w Smartphone... -
Page 37: Synchronizing Contacts And Other Info
• If you have any problems synchronizing, see “Synchronization and it protects your ® (ActiveSync software)” on page 206 for troubleshooting data during a hard suggestions. reset. Using Your Treo 700w Smartphone... -
Page 38: Battery Life
48). To see if your smartphone is in Flight Mode tap the phone- off icon ® • Turn off your smartphone’s Bluetooth wireless technology feature when you do not need to make a Bluetooth connection. Using Your Treo 700w Smartphone... -
Page 39: Where To Learn More
Help: Many of the built-in applications include on-device Help, so that you can learn about the tasks you can perform in that application. To access Help, go to the application or screen you want help with, press Start , and select Help. Using Your Treo 700w Smartphone... -
Page 40: If You Need More Information
(look in the computers section), or visit www.palm.com/mytreo700wVerizon. • Online forums: Consult online Treo 700w smartphone user discussion groups to swap information and learn about topics you may find nowhere else. Visit www.palm.com/us/support/Treo700wVerizon for details. -
Page 41: Chapter 3: Using Your Phone
CHAPTER 3 Using Your Phone Phone overview If you press You can make and receive calls and store speed dial entries right from Phone/Send while a number is your Today screen. Be sure you know how to turn on your phone before highlighted, your reading this section (see “Turning your phone on and off”... -
Page 42: What Are All Those Icons
A voice call is in progress. 156Kbps. You are in an area that supports NationalAccess (1xRTT) data services. You are in an area that supports BroadbandAccess (EVDO) data services. Using Your Treo 700w Smartphone... - Page 43 Your phone is on and you are in a Verizon Wireless name coverage area. If you are outside a coverage area, No service or Roaming appears instead. When you turn off your phone, Phone Off appears instead. Using Your Treo 700w Smartphone...
- Page 44 Bluetooth device. A call is in progress and your smartphone is connected to a Bluetooth headset or car kit. Using Your Treo 700w Smartphone...
-
Page 45: Making Calls
Before you can dial a call by contact name, you must create some contacts (see “Adding a contact” on page 55) or import them by synchronizing (see “Synchronizing contacts and other info” on page 29). Using Your Treo 700w Smartphone... - Page 46 3. Select the number you want to dial. select a number from 4. Press Phone/Send to dial. the shortcut menu. You can customize the default speed dial buttons. See “Editing a speed dial button” on page 52. Using Your Treo 700w Smartphone...
- Page 47 3. Press Phone/Send to go to your Today screen. 4. Using the keyboard, begin entering the first few letters of the company name. 5. Select the number you want to dial. 6. Press Phone/Send to dial. Using Your Treo 700w Smartphone...
-
Page 48: Dialing From A Web Page Or Message
• To select from a chronological list of calls: Go to your Today screen, press Phone/Send , and then select Call Log. Highlight the number you want to call, and then press Call to dial. Using Your Treo 700w Smartphone... -
Page 49: Dialing Using The Onscreen Dial Pad
4. Press Phone/Send to dial. Make sure a number is not highlighted before you press Phone/Send. If you press Phone/Send while a number is highlighted, your device will dial the number. Using Your Treo 700w Smartphone... -
Page 50: Receiving Calls
. All sounds remain off until your call. you slide the ringer switch back to Sound On When you silence the ringer, you can either answer the call or let it ring through to voicemail. Using Your Treo 700w Smartphone... -
Page 51: Using Voicemail
3. Enter your voicemail password using the keyboard, or press Extra Digits if you defined this option (see “Creating a speed dial button” on page 50 for details). 4. Select Play to listen to your messages. Using Your Treo 700w Smartphone... -
Page 52: Managing Active Calls
Mute the microphone so you can’t be heard: Press Menu and select Mute. To turn the microphone back on, press Menu again and select Cancel Mute. • Switch to another application: Press Start and select the application. Using Your Treo 700w Smartphone... -
Page 53: Ending A Call
To add this number to an existing contact, select Copy and Add, and then select a contact name. • To decline adding the number, press Dismiss • To permanently disable the Add Contact prompt, select Don’t show this again. Using Your Treo 700w Smartphone... - Page 54 40). 2. Highlight the number you want to save. 3. Press and hold Center to open the shortcut menu, and then select Save to Contacts. 4. Enter the information for the entry. 5. Press OK Using Your Treo 700w Smartphone...
-
Page 55: More Ways To Manage Calls
CHAPTER 3 More ways to manage calls Did You Know When the second call Your Treo 700w smartphone offers many advanced telephone features, is outgoing, you can including call waiting, three-way calling, and call forwarding. conference the two calls, but you cannot Making a second call swap between them. -
Page 56: Making A Conference Call
72 followed by the number where you want to forward your calls. For example: 72 415-555-1234. 3. Press Phone/Send to dial. 4. When you’re ready to turn off call forwarding, dial *73, and then press Phone/Send Using Your Treo 700w Smartphone... -
Page 57: Viewing Minutes Usage
Data Log to view data minutes. onscreen. Usage is charged based on 3. (Optional) To reset the counters to zero, select Reset. your calling plan, and 4. Press OK calling plans vary. Using Your Treo 700w Smartphone... -
Page 58: Defining Speed Dial Buttons
Text Speed Dial or Picture Speed Dial to indicate which type of button you want to create. If this button is not linked to a contact or the contact doesn’t have a picture, the Picture Speed Dial option is not available. Using Your Treo 700w Smartphone... - Page 59 Plays the previous message. Saves the current message. Plays the current message. Deletes the current message. Repeats the current message. Plays the next message. Press OK Using Your Treo 700w Smartphone...
- Page 60 1. Go to your Today screen. 2. Press Menu and select Speed Dial Options. 3. Highlight the button you want to move. 4. Press Option + Left or Right move the button in that direction. Using Your Treo 700w Smartphone...
-
Page 61: Using A Phone Headset
The headset button is context sensitive and it performs different actions based on the situation. You can press the headset button to perform any of the following tasks: • Answer an incoming call • Answer a call waiting call • Hang up all calls Using Your Treo 700w Smartphone... - Page 62 (such connector. When in doubt, ask the third-party headset manufacturer as music), you need if the product is compatible with Palm Treo 700w smartphones. If you to use a stereo hear a headset buzz or poor microphone performance, your headset adapter or other may be incompatible with your smartphone.
-
Page 63: Chapter 4: Staying Organized
CHAPTER 4 Staying Organized [ ! ] Before You Begin Contacts If you have many contacts to enter, it’s best to enter them in Adding a contact Microsoft Office Outlook on your 1. Press Start and select Contacts. computer and then 2. -
Page 64: Viewing Or Changing Contact Information
• Show contact names only: Lets you fit more names on the Contacts list by hiding everything but the contact’s name. • Area code: Sets the default area code for new contact entries. 4. Press OK Using Your Treo 700w Smartphone... -
Page 65: Calendar
There are both morning and evening appointments. An all day event. • Year: Shows a calendar for a 6-month period. 4. Use the 5-way to move to another day, week, month, or year (based on the current view). Using Your Treo 700w Smartphone... -
Page 66: Creating An Appointment
1. Press Start and select Calendar. 2. Press Menu and select New Appointment. 3. Enter a Subject (description). 4. Select the starting and ending dates. 5. Select All Day, and then select Yes. 6. Press OK Using Your Treo 700w Smartphone... - Page 67 3. Select Reminder, and then select Remind Me. 4. Enter the number of minutes, hours, days, or weeks before the event you would like to receive the alarm. 5. Press OK Type of time units Number of time units Using Your Treo 700w Smartphone...
-
Page 68: Sending A Meeting Request
Private” near the top of an open appointment. If you sync with Exchange Server, other users who can access your folders can’t see your private events, they see private events as unavailable time slots. Using Your Treo 700w Smartphone... -
Page 69: Deleting An Event
Menu and select Filter. 6. Select the type of events you want to view. Deleting an event 1. Highlight the event you want to delete. 2. Press Menu and select Delete Appointment. 3. Select Yes. Using Your Treo 700w Smartphone... - Page 70 • Set reminders for new items: Sets whether a reminder is automatically added to new events and how long before the event the reminder appears. You can override this setting for individual events. Using Your Treo 700w Smartphone...
- Page 71 A location has been assigned to the event. The event is a meeting. The event is marked private. • Send meeting requests via: Sets the Messaging method used to send meeting requests: email, MMS, or SMS. 4. Press OK Using Your Treo 700w Smartphone...
-
Page 72: Tasks
• Categories: Assigns the task to one or more categories. • Sensitivity: Marks this task as Normal, Personal, Private, or Confidential. • Notes: Lets you enter additional text for the task. 6. Press OK Using Your Treo 700w Smartphone... - Page 73 No Categories, Active Tasks, Completed Tasks, or a specific category, such as Business or Personal. 3. Press Menu and select Sort By. 4. Select the sort method: Status, Priority, Subject, Start Date, or Due Date. Using Your Treo 700w Smartphone...
-
Page 74: Deleting A Task
• Show start and due dates: Displays task start and due dates in the Tasks list. • Show Tasks entry bar: Displays the Tasks entry bar at the top of the Tasks list. 4. Press OK Using Your Treo 700w Smartphone... -
Page 75: Notes
CHAPTER 4 Notes To quickly create a Notes are a great way to capture thoughts, questions, and meeting recording, press the notes on your Palm Treo 700w smartphone. Side button. When you hear the beep, begin your recording. Creating a note Release the button 1. - Page 76 3. Select Name, and then enter a new name for the note. 4. Select Folder, and then select the folder you want to store the note. 5. Select Location, and then select Main memory or Storage Card. 6. Press OK Using Your Treo 700w Smartphone...
-
Page 77: Deleting A Note
• Default template: Sets the default template for new notes. • Save to: Sets the default location where new notes are stored. • Record button action: Sets whether the Side button opens the Notes application or stays in the current application. 4. Press OK Using Your Treo 700w Smartphone... -
Page 78: Calculator
• To add the displayed number to the number stored in memory, “Excel Mobile” on select page 130 for details. • To display the number stored in memory, select • To clear the memory, select Using Your Treo 700w Smartphone... -
Page 79: Chapter 5: Staying In Touch
CHAPTER 5 Staying in Touch [ ! ] Sending and receiving messages Before You Begin Make sure your phone is on (see “Turning and email your phone on and off” on page 11) You can use the Messaging application to exchange email, brief text before you send or messages (SMS), and multimedia messages (MMS) with other mobile receive messages. -
Page 80: Creating And Sending A Multimedia Message
Even if your smartphone does not include a camera, you can still send, receive, and view pictures and videos. You can include any of the following items: Ringtones • MIDI Sound clips • WAV • QCELP Using Your Treo 700w Smartphone... - Page 81 • If you want to upload a picture or video to your Verizon Wireless PIX Place account, press Center, and then select PixPlace. 6. Select Subject and enter a title for the message. Select New Slide. Using Your Treo 700w Smartphone...
-
Page 82: Setting Up An Email Account
You can use your smartphone to access several types of email accounts. Before you set up your email account on your smartphone, you must determine which type of account you want to access, as the steps vary for each of the following account types: Using Your Treo 700w Smartphone... - Page 83 Internet service provider (ISP). • Hotmail: Enables you to send and receive email messages with an MSN Hotmail account. See“Using Pocket MSN” on page 91 for information on setting up an MSN Hotmail account. Using Your Treo 700w Smartphone...
- Page 84 Save password box. If you want your OK to store your password entered automatically, check this box. corporate email password on your smartphone. You may need to enter your password each time you access your email for increased security. Using Your Treo 700w Smartphone...
- Page 85 E-mail in step 9 www.vtext.com and increase the KB setting. If you don’t increase this setting, you can password) manually download the rest of the message at your convenience. Using Your Treo 700w Smartphone...
- Page 86 Push/ Have you created your Wireless Sync account yet?, select Yes. ReadySync. 6. Select Sync near the top of the screen. When the Authentication dialog box appears, enter the password for your Wireless Sync account. Using Your Treo 700w Smartphone...
-
Page 87: Setting Up An Imap Or Pop Email Account
6. Enter your name, username, and password. If you want to enter your password each time you access this account, do not check the Save password box. If you want your password entered automatically, check this box. Using Your Treo 700w Smartphone... - Page 88 Center, and then select your company’s name. Delete. 11. Enter the name of the Incoming mail and Outgoing mail servers and the Domain. 12. (Optional) Select Options to select download settings for this account. 13. Press Finish Using Your Treo 700w Smartphone...
-
Page 89: Creating And Sending An Email Message
• Press Menu and select Spell Check. • Press Menu and select Message Options. Select the Priority list, select a setting for the message, and then press OK 9. Press Send Using Your Treo 700w Smartphone... -
Page 90: Using An Online Address Book
Outlook E-mail enable this directory service. account, disable your online address books 8. Select OK. to avoid errors. Press Menu and select Tools > Options. Select Address and uncheck the Check name against this server box. Using Your Treo 700w Smartphone... -
Page 91: Receiving Text And Multimedia Messages
• Menu: Opens a menu where you can select other options. Viewing/playing a multimedia message 1. Go to your Today screen. 2. Press Messaging 3. Press Left until you see MMS in the title bar. Using Your Treo 700w Smartphone... - Page 92 To send and receive messages for your default email account, simply synchronize your smartphone with your computer. See “Setting the synchronization schedule” on page 150 for details. During synchronization, new messages are copied to your smartphone’s Inbox, and messages in the smartphone’s Outbox are sent. Using Your Treo 700w Smartphone...
-
Page 93: Receiving Attachments
1. Press Start and select Programs. 2. Select ActiveSync 3. Press Menu and select Options. 4. Select E-mail, and then select Settings. 5. Check the Include file attachments box. 6. Press OK Using Your Treo 700w Smartphone... -
Page 94: Using Links In Messages
Forwarding a message 1. Open the message you want to forward. 2. Press Menu and select Forward. 3. Address the message and enter any text you want to add. 4. Press Send Using Your Treo 700w Smartphone... -
Page 95: Managing Your Messages
2. Highlight the message(s) you want to delete. To select multiple messages, tap and drag the stylus across the messages. 3. Press Menu and select Delete. 4. Select Yes to move the items to the Deleted Items folder. Using Your Treo 700w Smartphone... -
Page 96: Customizing Your Messaging Settings
3. Select the Message tab and set any of the following options: • When replying to e-mail, include body: Indicates if the body of a message you received appears in your response to that message. Using Your Treo 700w Smartphone... - Page 97 Indicates whether you want to automatically store email attachments on an expansion card. • Empty deleted items: Indicates whether you want to automatically empty the Deleted folder, and when you want this to occur. 6. Press OK Using Your Treo 700w Smartphone...
- Page 98 3. Press Menu and select Tools > Options. 4. On the Accounts tab, select Text Messages. 5. If you want to receive a notification when your text messages are delivered, check this box. 6. Press OK Using Your Treo 700w Smartphone...
-
Page 99: Using Pocket Msn
Hotmail account. your instant messages, use the • To create a Passport (IM) account, MSN application or go to www.passport.com. the MSN plug-in on • To create a Hotmail account, go to the Today screen. www.hotmail.com. Using Your Treo 700w Smartphone... -
Page 100: Browsing The Web
• Default: Maintains a layout similar to what you see on a desktop computer, but it makes items smaller and arranges the content so that you can see most of it without scrolling horizontally. Using Your Treo 700w Smartphone... - Page 101 • To adjust the size of the text on web pages, press Menu select Zoom, and then select the size you want. • To view a web page’s properties, press Menu and select Tools > Properties. 6. Press OK to close Internet Explorer Mobile. Using Your Treo 700w Smartphone...
-
Page 102: Creating A Favorite
Delete. Viewing a favorite Select Yes to confirm deletion, and then 1. Press Start and select Internet Explorer. press OK. 2. Press Favorites 3. Select the page you want to view in the list. Using Your Treo 700w Smartphone... - Page 103 5. Select the Folder list, and then select the folder where you want to save the file. 6. Select the Location list, and then select where you want to store the file: Main memory or Storage card. Press OK Using Your Treo 700w Smartphone...
-
Page 104: Using The History List
Explorer Mobile. To use the page you were on when you opened the menu, select Use Current. To select the original home page, select Use Default. • Encoding: Sets the character set for the web pages you view. Using Your Treo 700w Smartphone... - Page 105 • Warn when page content is blocked due to security settings: Sets whether a message appears when you attempt to open a page that does not meet your smartphone’s security standards. 5. Press OK Using Your Treo 700w Smartphone...
-
Page 106: Connecting To Devices With Bluetooth Wireless Technology
Check the device’s with A2DP devices, such as stereo documentation for details. headsets. 2. Go to your Today screen, and then tap Bluetooth 3. Check the Turn on Bluetooth box to turn on your smartphone’s Bluetooth feature. Using Your Treo 700w Smartphone... - Page 107 11. Press OK 12. If you’re connecting to a GPS device, enter your GPS Settings (see “Setting up a GPS device” on page 182). Be sure to select the same port you selected in step 10. Using Your Treo 700w Smartphone...
- Page 108 4. When your smartphone is receiving info, a notification tells you that a transmission is in progress. To stop the transmission, press Cancel ; to close the notification, press Dismiss Using Your Treo 700w Smartphone...
- Page 109 10. When synchronization is finished, press Menu and select connection. Disconnect Bluetooth. 11. (Optional) Go to your Today screen, tap Bluetooth , and then uncheck the Turn on Bluetooth box to conserve power by turning off your smartphone’s Bluetooth feature. Using Your Treo 700w Smartphone...
-
Page 110: Beaming Information With Ir
The type of information you can beam depends on the type of device you are beaming to. Windows mobile devices are always compatible with the Treo 700w smartphone. Using Your Treo 700w Smartphone... -
Page 111: Beaming A Record
Receiving beamed information 1. Turn on your screen. 2. Point your smartphone’s IR port directly at the IR port of the transmitting device. 3. When the Receiving Data message appears, select Yes to receive the beam. Using Your Treo 700w Smartphone... - Page 112 4. Select ActiveSync all incoming beams box is checked. If you 5. Press Menu and select Connect via IR. still can’t receive info, 6. Select Sync. try a soft reset (see “Resetting your smartphone” on page 197). Using Your Treo 700w Smartphone...
-
Page 113: Chapter 6: Playing Media Files
Playing Media Files Pictures & Videos Did You Know Pictures are captured ® Your Palm Treo™ 700w smartphone comes with an easy-to-use, built- and stored in 16-bit in, 1.3-megapixel camera with 2x digital zoom (camera not included with color, JPG format. -
Page 114: Recording A Video
“Customizing your Camera settings” on page 111 to change where video” on page 110 for videos are stored. For information on accessing your videos on your details. computer, see “Viewing pictures and videos on your computer” on page 113. Using Your Treo 700w Smartphone... -
Page 115: Viewing A Picture Or Video
2. Select the picture or video you want to view. For more info on viewing videos, see “Playing media files on your smartphone” on page 115. 3. Press OK to return to the Thumbnail View. Using Your Treo 700w Smartphone... -
Page 116: Viewing A Slide Show
Pictures & Videos. 2. Highlight the video you want to use as a ringtone. 3. Press Menu and select Save to Contact Ring Tone. 4. Select the contact you want to assign the ringtone to. Using Your Treo 700w Smartphone... -
Page 117: Organizing Pictures And Videos
2. Select the Show list in the upper-left, and then select the folder you want to view. 3. Select the Sort By list in the upper-right, and then select the sort method: Name, Date, or Size. Using Your Treo 700w Smartphone... -
Page 118: Using A Picture As The Today Screen Background
AutoCorrect. Deleting a picture or video 1. Press Start and select Pictures & Videos. 2. Highlight the picture or video you want to delete. 3. Press Menu and select Delete. 4. Select Yes. Using Your Treo 700w Smartphone... -
Page 119: Customizing Your Camera Settings
PC and idle for 2 minutes: Sets whether the pictures in your My Pictures folder are used as a screensaver when your smartphone is connected to your computer and ® ActiveSync software is not running. Using Your Treo 700w Smartphone... - Page 120 • Time limit for videos: Limits the length of videos you record. You can also select the No limit option. Press OK to return to the Thumbnail View. Using Your Treo 700w Smartphone...
-
Page 121: Viewing Pictures And Videos On Your Computer
BMP , and PNG format and videos in 3G2 and WMV format. You can also them in Internet send them to friends using your desktop email application. Explorer Mobile. • To find all synchronized pictures & videos, look in C:\Documents and Settings\<Username>\My Documents\Treo My Documents Using Your Treo 700w Smartphone... -
Page 122: Windows Media Player Mobile
3. Connect your smartphone to your computer with the USB sync cable. 4. When the Device Setup Wizard opens on your computer, click Automatic. 5. Check the Customize the playlists that will be synchronized box. Using Your Treo 700w Smartphone... - Page 123 Volume button or Decreases the volume level. select Repeat Song. Turns the sound on or off. Displays a video using the full screen. Displays a website where you can find music and videos to play. Using Your Treo 700w Smartphone...
-
Page 124: Working With Libraries
My Storage Card library. 1. Press Start and select Windows Media. 2. Press Menu and select Library. 3. Press Menu and select Update Library. 4. Wait for the files to be added, and then select Done. Using Your Treo 700w Smartphone... -
Page 125: Working With Playlists
Move or Move Down • To add a file, select Add , press Menu , and then select Queue Up. • To delete a file from the playlist, highlight the file, and then select Remove Using Your Treo 700w Smartphone... -
Page 126: Customizing Windows Media Player Mobile
4. Select the Video tab and set any of the following options: • Play video in full screen: Sets whether videos automatically play in full screen format. • Shrink to fit window: Sets whether videos are automatically scaled to fit the Playback screen. Using Your Treo 700w Smartphone... - Page 127 • To restore an item’s factory setting, highlight the item and select Reset. • To unassign an item, highlight the item and select None. 9. Press OK Using Your Treo 700w Smartphone...
- Page 128 CHAPTER 6 Playing Media Files Using Your Treo 700w Smartphone...
-
Page 129: Chapter 7: Staying Productive
CHAPTER 7 Staying Productive Word Mobile To copy a file from You can create and edit documents and templates and save them as your computer to ® ® DOC, RTF , TXT, and DOT files. You can also edit Microsoft Office Word your smartphone, documents and templates that you create on your computer. -
Page 130: Creating A Document
Creating a document 1. Press Start and select Programs. 2. Select Word Mobile 3. Press New 4. Enter the text of the document. 5. Press OK to save the file. Using Your Treo 700w Smartphone... - Page 131 Select Next to find the next instance of the text, or select Replace to replace it. To replace all instances of the text, select Replace All. 8. When you see a message that the search is done, press OK Using Your Treo 700w Smartphone...
- Page 132 Select Save. Formatting text 1. Open the document you want to format. 2. Highlight the text you want to format. 3. Press Menu and select Format > Font. Using Your Treo 700w Smartphone...
- Page 133 • List: Creates a bulleted or numbered list. • Indentation: Changes the paragraph margins. — Left: Sets the left margin for the entire paragraph. — Right: Sets the right margin for the entire paragraph. Using Your Treo 700w Smartphone...
- Page 134 3. Select Name, and then enter a new name for the document. 4. Select the Folder list, and then select the folder you want to move the document to. 5. Select the Location list, and then select Main memory or Storage card. 6. Press OK Using Your Treo 700w Smartphone...
-
Page 135: Deleting A Document
• Default template: Sets the default template for new documents. • Save to: Sets the default location where new documents are stored. • Display in list view: Sets the types of files that appear in the documents list. 4. Press OK Using Your Treo 700w Smartphone... -
Page 136: Powerpoint Mobile
, select Zoom In, and then select to zoom in to zoom out. To scroll within the current slide, tap and drag the slide. To return to the slide show, select • Press Menu and select End Show. Using Your Treo 700w Smartphone... - Page 137 • Use slide timings, if present: Enables the timings recorded presentations with each slide in a presentation. through an LCD projector. • Loop continuously: Advances to the first slide after playing the last slide in a presentation. 6. Press OK Using Your Treo 700w Smartphone...
-
Page 138: Excel Mobile
Protection settings: Most protection features are disabled but not removed. However, password protection is removed. You must ® ® remove the password protection in Microsoft Office Excel your computer before opening the file on your smartphone. Using Your Treo 700w Smartphone... - Page 139 • Hidden, dialog, and macro sheets • VBA modules • Text boxes • Drawing objects and pictures • Lists • Conditional formats and controls • Pivot table data (is converted to values) Using Your Treo 700w Smartphone...
-
Page 140: Creating A Workbook
3. In the workbook list, select the workbook you want to view. 4. Press View , and then select any of the following: • Full Screen: Shows as much data as possible on the screen. To return to the normal view, select Restore in the upper-right. Using Your Treo 700w Smartphone... - Page 141 Entering a formula 1. Highlight the cell where you want to enter the formula. 2. Enter an = sign followed by any values, cell references, name references, operators, and functions. Example: =(B4/25)+100=Revenue-Expenses 3. Press Enter Using Your Treo 700w Smartphone...
- Page 142 4. Select the Fill type list, and then select Series. 5. Select the Series type list, and then select the type of series you want. If you select Date or Number, enter a Step value increment. 6. Select OK. Using Your Treo 700w Smartphone...
- Page 143 • Size: Sets the row height and column width. • Number: Sets the type of information the cells contain. • Align: Sets whether text wraps within the highlighted cells, and sets horizontal and vertical alignment position. Using Your Treo 700w Smartphone...
- Page 144 2. Press Menu and select Format > Modify Sheets. 3. In the Sheets list, highlight the worksheet you want to rename. 4. Select Rename, enter a new name for the worksheet, and then press twice. Using Your Treo 700w Smartphone...
- Page 145 1. Open the workbook you want to create a chart from. 2. Highlight the cells you want to include in the chart. 3. Press Menu and select Insert > Chart. 4. Select the type of chart, and then press Next Using Your Treo 700w Smartphone...
- Page 146 • Type: Sets the chart style. You can use this setting to convert your chart to a different format. • Series: Lets you add, modify, format, or delete related data points without affecting the info in your worksheet. 5. Press OK Using Your Treo 700w Smartphone...
- Page 147 3. Select Name, and then enter a new name for the workbook. 4. Select the Folder list, and then select the folder you want to move the workbook to. 5. Select the Location list, and then select Main memory or Storage card. 6. Press OK Using Your Treo 700w Smartphone...
- Page 148 • Entire column: Deletes the entire column in which the highlighted cells are located, and moves all columns on their right one column to the left. 5. Select OK. Using Your Treo 700w Smartphone...
- Page 149 #REF! error value. • Save new workbooks to: Specifies where new workbooks are stored. • Files to display in list view: Sets which types of files appear in the workbook list. 4. Press OK Using Your Treo 700w Smartphone...
- Page 150 CHAPTER 7 Staying Productive Using Your Treo 700w Smartphone...
-
Page 151: Chapter 8: Managing Files And Applications
CHAPTER 8 Managing Files and Applications Finding information With the built-in search features on your smartphone, you can find information quickly: • Lookup: Helps you find and dial your contacts by name or phone number. See “Dialing by contact name” on page 37 for details. •... - Page 152 • To highlight multiple items, tap and drag the stylus. [ ! ] IMPORTANT Do not delete any files that you cannot identify. These files may be required for your smartphone to function properly. Using Your Treo 700w Smartphone...
-
Page 153: Installing Applications
3. Go to the page that contains the link to the application you want to download. 4. Press Left or Right to highlight the link to the file, and then press Center to start the download process. Using Your Treo 700w Smartphone... - Page 154 Getting help with third-party applications If a you encounter a problem with a third-party application (such as an error message), contact the application’s author or vendor. For general troubleshooting of third-party applications, see “Third-party applications” on page 219. Using Your Treo 700w Smartphone...
-
Page 155: Removing Applications
1. Press Start and select Settings. Remove Programs list. 2. Select the System tab, and then select Remove Programs 3. Highlight the application that you want to remove. 4. Select Remove. 5. Select Yes to confirm deletion. Using Your Treo 700w Smartphone... -
Page 156: Setting Synchronization Options
Configure Server. If you have not yet set up sync with Exchange Server, this says Add Server Source. 4. Select Server address, enter the name of the server running Exchange Server, and then press Next Using Your Treo 700w Smartphone... -
Page 157: Synchronizing With Multiple Computers
The contacts and calendar appointments that were on C2 are now also on C1. • The contacts and calendar appointments from both computers are on your device. ® ® [ * ] NOTE Microsoft Office Outlook E-mail can synchronize with only one computer. Using Your Treo 700w Smartphone... -
Page 158: Starting And Stopping Synchronization
15). If you are only select Stop. synchronizing wirelessly with Exchange Server, you do not have to connect the device. 2. Press Start and select Programs. 3. Select ActiveSync 4. Press Menu and select Schedule. Using Your Treo 700w Smartphone... - Page 159 • Send outgoing items immediately: Sets whether items are Decreasing the sync frequency settings sent as soon as you select Send in the Messaging application, conserves battery or whether they are held until the next synchronization. power. 6. Press OK Using Your Treo 700w Smartphone...
-
Page 160: Using Expansion Cards
Expansion cards are sold separately. Your smartphone comes with a dummy card inside the expansion card slot, to protect the slot. When you do not have a functioning card inside the slot, reinsert the dummy card to protect the slot opening. Using Your Treo 700w Smartphone... - Page 161 The notch on the card should be in the lower-left corner next to the antenna. 4. Insert the card into the expansion card slot until you feel it lock into place and hear the confirmation tone. Using Your Treo 700w Smartphone...
- Page 162 1. Insert the expansion card into the expansion card slot. 2. Press Start and select Programs. 3. Select File Explorer. 4. Select the Show list in the upper-left, and then select Storage Card. 5. Select the application you want to open. Using Your Treo 700w Smartphone...
- Page 163 3. Go to the list view. 4. Press Menu and select Rename/Move. 5. Select the Location list, and then select where you want to move the info: Storage Card or Main Memory. 6. Press OK Using Your Treo 700w Smartphone...
- Page 164 1. Insert the expansion card into the expansion card slot. 2. Press Start and select Settings. 3. Select the System tab, and then select Memory 4. Select the Storage Card tab. 5. Press OK Using Your Treo 700w Smartphone...
-
Page 165: Renaming An Expansion Card
4. Select the Show list in the upper-left, and then select My Device. 5. Highlight the current expansion card name (Storage Card by default). 6. Press Menu and select Rename. Enter a new name for the card. 8. Press OK Using Your Treo 700w Smartphone... - Page 166 CHAPTER 8 Managing Files and Applications Using Your Treo 700w Smartphone...
-
Page 167: Chapter 9: Customizing Your Smartphone
2. On the Personal tab, select Today MP3 players, weather guides, and much 3. On the Appearance tab, check the Use this more, visit picture as the background box. www.palm.com/ 4. Select Browse. mytreo700wVerizon. 5. Select the picture you want to use. 6. Press OK... - Page 168 Today screen and uncheck any items that you want to hide. 5. (Optional) Select Options (if available) to configure the settings for the current item. Press OK to return to Today Settings. 6. Press OK Using Your Treo 700w Smartphone...
-
Page 169: Phone Settings
5. Select the Ring type list, and then select the ring style for the selected type of call. 6. Select the Ring tone list, and then select the sound for the selected type of call. Using Your Treo 700w Smartphone... -
Page 170: Adjusting Volume Settings
5. Select Camera to take a picture and add it to this contact entry (if your smartphone includes a camera), or select an existing picture for this contact entry. 6. Select Ring tone and select a tone for this contact entry. Using Your Treo 700w Smartphone... - Page 171 • After calls from numbers that are not in Contacts, ask if I want to add them: Indicates whether you are prompted to add contact entries for numbers that are not already in your Contacts list. 4. Press OK to finish. Using Your Treo 700w Smartphone...
- Page 172 Verizon Wireless network. • Location Privacy: Indicates whether your smartphone broadcasts your location at all times, or only during a 911 call. 4. Press OK to return to Phone Settings. 5. Press OK to finish. Using Your Treo 700w Smartphone...
- Page 173 2. On the Personal tab, select Phone 3. Select the Network tab. 4. Select the Band selection list, and then select the band you want your smartphone to use to connect to the Verizon Wireless network. 5. Press OK to finish. Using Your Treo 700w Smartphone...
-
Page 174: System Sound Settings
Sound Mode Off, you do not hear the smartphone ring. When you move the ringer switch back to Sound Mode On, the smartphone ring volume is still set to the loudest setting. Sound Sound Mode On Mode Off Using Your Treo 700w Smartphone... -
Page 175: Press Start And Select Settings
• Hardware buttons: Turns sounds associated with pressing buttons on/off, and sets the volume level when this sound is turned on. Using Your Treo 700w Smartphone... - Page 176 Send Sound. • Display message on screen: Indicates whether a notification message appears onscreen for the selected event. • Vibrate: Indicates whether your smartphone vibrates to notify you about the selected event. 5. Press OK Using Your Treo 700w Smartphone...
-
Page 177: Display And Appearance Settings
4. (Optional) Select any of the following tabs to customize the format settings: • Number: Sets the decimal symbol and number of decimal places, the digit grouping symbol and group size, list separators, negative Using Your Treo 700w Smartphone... -
Page 178: Aligning The Screen
5. Press OK Changing the system color scheme 1. Press Start and select Settings. 2. On the Personal tab, and then select Today 3. On the Appearance tab, select a theme in the list. 4. Press OK Using Your Treo 700w Smartphone... -
Page 179: Application Settings
2. On the Personal tab, select Buttons 3. On the Program Buttons tab, highlight the button or key combination you want to change in the Buttons list. The hardware buttons are mapped to the following button numbers: Using Your Treo 700w Smartphone... -
Page 180: Using Voice Commands
“General” to access general Help topics. Setting input options 1. Press Start and select Settings. 2. On the Personal tab, select Input 3. Select the Word Completion tab and set any of the following options: Using Your Treo 700w Smartphone... - Page 181 Shift keys. • Scroll upon reaching the last line: Sets whether the display automatically scrolls when you select the last line of visible info. 5. Press OK Using Your Treo 700w Smartphone...
-
Page 182: Locking Your Smartphone And Info
• To disable Keyguard, press Center. • To manually turn on Keyguard when your smartphone screen on, press Option and Power/End to enable Keyguard. Using Your Treo 700w Smartphone... -
Page 183: Using Auto-Keyguard And Touchscreen Lockout
You can lock your smartphone to prevent unauthorized use of your your password to mobile account. When your smartphone is locked, you must enter a lock answer a call. code to place calls, except for emergency numbers. Using Your Treo 700w Smartphone... -
Page 184: On The Personal Tab, Select Phone
Performing a hard reset deletes all the entries in your smartphone. However, you can restore all previously synchronized info the next time you sync (see “Synchronizing contacts and other info” on page 29). Using Your Treo 700w Smartphone... -
Page 185: Entering Owner Information
You can also set whether you want this information to appear when you turn on your smartphone. If you lose your smartphone, this feature can help the person who finds it return it to you. Using Your Treo 700w Smartphone... - Page 186 160 for details. 5. Select the Options tab and check the boxes to indicate which info (if any) you want to appear on the screen when you turn on your smartphone. 6. Press OK Using Your Treo 700w Smartphone...
-
Page 187: System Settings
6. (Optional) Select Visiting and set the info format for the date for a location that you visit often. and time, see “Setting Press OK display formats” on page 169. 8. If prompted, select Yes to accept your changes. Using Your Treo 700w Smartphone... -
Page 188: To Finish
Select the time you want the alarm to go off, and then press OK 8. Select , check the boxes to select how you want the alarm to go off, and then press OK 9. Press OK to finish. 10. If prompted, select Yes to accept your changes. Using Your Treo 700w Smartphone... -
Page 189: Enabling Error Reporting
No documents (or any info contained in them) are intentionally sent with the report. To ensure further security, the report is transmitted via a secure connection and is kept confidential and anonymous in a limited-access database. Using Your Treo 700w Smartphone... - Page 190 4 as your program port. 6. Select the Access tab and check the Manage GPS automatically box. This setting lets more than one application simultaneously access your GPS info. Press OK to finish. Using Your Treo 700w Smartphone...
- Page 191 • Running Programs: Lists the applications that are in use on your smartphone. To switch to an application, highlight it and select Activate. To close an application, highlight it and select Stop. To close all open applications, select Stop All. 4. Press OK to finish. Using Your Treo 700w Smartphone...
- Page 192 Backlight. On the 5. Press OK to finish. Battery Power tab, set whether the display backlight turns off automatically after a period of inactivity. Using Your Treo 700w Smartphone...
- Page 193 Phone off. If you turn Flight Mode on, then all Wireless services are turned off. If you turn Flight Mode off, then the Wireless services that you checked on the Wireless tab are enabled. Using Your Treo 700w Smartphone...
-
Page 194: Connection Settings
SSID from the system administrator [ * ] NOTE See “Regulatory Information” on page 227 for additional in order to connect to the network. guidance on using a Wi-Fi card with your Treo 700w smartphone. Using Your Treo 700w Smartphone... - Page 195 You can also use these steps to manually create a connection with an open network. Using Your Treo 700w Smartphone...
- Page 196 Select the Network Key tab, and then set the following: • Authentication: Sets the method used to identify devices that connect to the network. — Open: Indicates the network uses open authentication. — Shared: Indicates the network uses shared authentication. Using Your Treo 700w Smartphone...
- Page 197 • Use IEEE 802.1x network access controls: Lets you set these parameters if required by the network. • EAP type: Specifies the extensible authentication protocol type. 9. Press OK Using Your Treo 700w Smartphone...
-
Page 198: Managing Isp Settings
(RAS), you can set up another connection. Before you begin, obtain the following information from your ISP or system administrator: • ISP server phone number or access point • Username • Password Using Your Treo 700w Smartphone... -
Page 199: Connecting To A Vpn
Check with your company's system administrator to see if a VPN is required to access the corporate network. If you need a VPN, you must purchase and install a third-party VPN client to use this feature. Using Your Treo 700w Smartphone... - Page 200 3. On the Tasks tab, select Set up my proxy server. 4. Check both the boxes near the top of the screen. 5. Select Proxy server and enter the proxy server name. 6. Press OK Using Your Treo 700w Smartphone...
-
Page 201: Ending A Data Connection
1. Use the stylus to tap the data arrows on the title bar. 2. Select Disconnect from the shortcut menu. Using Your Treo 700w Smartphone... - Page 202 CHAPTER 9 Customizing Your Smartphone Using Your Treo 700w Smartphone...
-
Page 203: Chapter 10: Finding Help
You can purchase For information on transferring your info from a previous Windows a third-party ® ® Mobile device or from a Palm Powered device to your new Palm application that lets ® Treo™ 700w smartphone, visit www.palm.com/us/support/ you run Palm applications on Treo700wVerizon for instructions. -
Page 204: Trouble Installing The Desktop Software
(PIM), you must install a third-party solution. Contact the PIM’s author or vendor to learn if software is available for your Treo 700w smartphone. 1. Shut down your computer, and then turn it on again. 2. On your computer, click Start > Control Panel > Add or Remove Programs. -
Page 205: Resetting Your Smartphone
2. Use the stylus tip to gently press the reset button on the back of reset, these signals your smartphone. automatically turn on 3. Wait for the progress bar on the Treo logo screen to fill before after the reset. continuing to use your smartphone. Using Your Treo 700w Smartphone... - Page 206 (Optional) Sync your smartphone with your computer to restore your previously synchronized info. If you use a backup utility, you may also need to restore a backup to recover additional info and settings. Using Your Treo 700w Smartphone...
-
Page 207: Replacing The Battery
Replacing the battery Be sure to dispose of Your smartphone comes with a replaceable battery. Be sure to use a your old battery in an replacement battery from Palm that is compatible with Palm Treo 700w evironmentally smartphones. responsible and legal way. -
Page 208: Performance
Voice Command setting, if it is enabled: 1. Press Start and select Settings. 2. Select Personal, and then select Voice Command 3. Uncheck the Enabled box. 4. Press OK Using Your Treo 700w Smartphone... -
Page 209: Screen
1. Make sure there is no debris trapped under the edges of the screen. 2. Start and select Settings. 3. Select the System tab, and then select Screen 4. On the General tab, select Align Screen. 5. Follow the onscreen instructions to align the screen. 6. Press OK Using Your Treo 700w Smartphone... -
Page 210: Network Connection
However, if your smartphone can’t determine if your phone was on before the reset, it does not automatically turn on the phone (see “Turning your phone on and off” on page 11). Using Your Treo 700w Smartphone... - Page 211 Your smartphone is connected to a computer or network to1.8Mbps, and upload which providing a data connection. speeds up to 156Kbps. A data connection is not available or phone is turned off (the wireless connection is off). Using Your Treo 700w Smartphone...
- Page 212 Contact Verizon Wireless to verify that your plan includes messaging services, that these services have been correctly activated, and that they are available at your location (Verizon Wireless should be able to tell you if messaging services have been experiencing transmission delays). Using Your Treo 700w Smartphone...
- Page 213 The Bluetooth Settings screen is closed. • Move away from other devices using the 2.4 GHz radio frequency, ® such as cordless phones, microwaves, and Wi-Fi equipment. • Check the device specifications to ensure it is compatible with your smartphone. Using Your Treo 700w Smartphone...
-
Page 214: Synchronization (Activesync ® Software)
Connection Settings. Make sure the Allow USB connections box is checked, and then click Connect. 4. Perform a soft reset (see “Performing a soft reset” on page 197). 5. Restart your computer and make sure ActiveSync is running. Using Your Treo 700w Smartphone... - Page 215 You may wish to use a third- party solution instead. • If you’re trying to sync offline, be sure to set your Microsoft Office Outlook Calendar, Contacts, Notes, and Tasks to be available offline. Using Your Treo 700w Smartphone...
- Page 216 3. Manually enter any information you've added to your smartphone since the last time you synchronized. 4. Synchronize your phone and your computer. You should now be able to assign time zones to your events without encountering this problem. Using Your Treo 700w Smartphone...
- Page 217 1. Go to Memory Settings and close all running programs. See “Closing applications” on page 27 for details. 2. If the problem persists, see “Making room on your smartphone” on page 221 for suggestions on other ways to free up space on your smartphone. Using Your Treo 700w Smartphone...
- Page 218 An alert tells me the device timed out while waiting for credentials. The Exchange Server credentials screen was left open too long. Re-enter the Exchange Server credentials, and try to sync again. Using Your Treo 700w Smartphone...
- Page 219 If you use a backup utility, you may be able to restore a backup to recover your Today screen setting and other additional info. Using Your Treo 700w Smartphone...
-
Page 220: Email
• Service provider settings frequently change. If your email account was working but you are currently experiencing problems, check with your service provider to see if any of the account settings have changed. Using Your Treo 700w Smartphone... - Page 221 Some providers do not offer this option at all; other providers require an upgrade to access email on a smartphone. • Turn on ESMTP . Many services require authenticated access, or ESMTP , to use their SMTP servers. Using Your Treo 700w Smartphone...
- Page 222 Follow these steps to check the settings: 1. Click Start on your computer, and then select Settings. 2. Select Control Panel. 3. Select Internet Options, and then click the Programs tab. Using Your Treo 700w Smartphone...
- Page 223 ActiveSync to synchronize with the Exchange Server. You can also check the following setting: 1. Press Start and select Programs. 2. Select ActiveSync 3. Press Menu and select Configure Server. 4. Make sure the SSL box is checked. Using Your Treo 700w Smartphone...
-
Page 224: Web
VBScript, WML script, and other plug-ins. Some websites use a redirector to their true home page (for example, if you enter the address http://www.palm.com/support it may resolve to http://www.palm.com/us/support). If Internet Explorer Mobile can’t follow the redirect, try using a desktop browser to see the landing page of the redirector, and enter that address in Internet Explorer Mobile. -
Page 225: Camera
Remember, when you synchronize, your Camera images are stored in the C:\Documents and Settings\<Username>\My Documents\Treo My Documents folder on your hard drive (see “Viewing pictures and videos on your computer” on page 113). Using Your Treo 700w Smartphone... - Page 226 The Camera preview image looks strange Some third-party applications overwrite your smartphone’s color settings with their own 8-bit color settings. This can affect the Camera Preview Mode. Delete third-party applications one by one until the preview image improves. Using Your Treo 700w Smartphone...
-
Page 227: Third-Party Applications
4. If the problem persists, perform another soft reset. 5. If possible, synchronize or use a backup utility to back up your most recent info. 6. Perform a hard reset (see “Performing a hard reset” on page 198). Using Your Treo 700w Smartphone... -
Page 228: Getting More Help
9. If the problem recurs, delete the last application you installed and report the problem to its developer. Getting more help Contact the author or vendor of any third-party software if you require further assistance. Using Your Treo 700w Smartphone... -
Page 229: Making Room On Your Smartphone
Also, remember that your smartphone includes an expansion card slot, and that you can store applications and information on expansion cards. However, you still need free memory on the smartphone itself to run applications from an expansion card. Using Your Treo 700w Smartphone... -
Page 230: Voice Quality
Be sure to hold the bottom of the smartphone, or the hands-free microphone, close to your mouth. Check the signal strength indicator. If the signal is weak, try to find an area with better coverage. Using Your Treo 700w Smartphone... -
Page 231: Glossary
Glossary 1xRTT (Single carrier [1x] radio transmission technology): A wireless technology that can provide fast data transfer and Internet access with average speeds of 60–80Kbps and bursts up to 144Kbps. Also called NationalAccess. ® ActiveSync : The technology that exchanges and updates the information on your smartphone with the information on your computer. - Page 232 Infrared (IR): A way of transmitting information using light waves. The IR port on your smartphone lets you transfer information between other IR devices within a short radius. Lithium Ion (Li-Ion): The rechargeable battery technology used in Treo 700w smartphones. MMS (Multimedia Messaging System): An enhanced form of messaging that lets you send pictures, animations, and ringtones almost instantly.
- Page 233 SMS (Short Messaging Service): The service that exchanges short text messages almost instantly between mobile devices. These messages can usually include up to 160 characters. Treo 700w smartphones can send and receive text messages while you are on a voice call.
- Page 234 Glossary Using Your Treo 700w Smartphone...
-
Page 235: Regulatory Information
The unit of measurement for human 700w smartphone. For a list of SDIO Wi-Fi cards approved by the exposure to RF energy is “Specific Absorption Rate” (SAR). FCC for use with the Treo 700w smartphone, please go to The Federal Communications Commission (FCC), Industrie www.palm.com/us/support/Treo700wVerizon. - Page 236 Palm declares that the above model of Treo 700w smartphone is enabled. Please check with the manufacturer of your TTY device compliant with the regulations below.
-
Page 237: Fcc
Wireless Technology Research. syndrome, or other musculoskeletal disorder, make sure to take necessary breaks from use, take longer rests (such as several hours) if discomfort or tiring begins, and see a doctor if discomfort persists. Using Your Treo 700w Smartphone... - Page 238 5. Do not take notes or look up phone numbers while driving. Using Your Treo 700w Smartphone...
- Page 239 Then the base station sends out radio waves that are detected by a receiver in your telephone, where the signals are changed back into the sound of a voice. Using Your Treo 700w Smartphone...
- Page 240 National Environmental Policy Act of 1969 (NEPA) and the Telecommunications Act of 1996 http://www.fcc.gov/telecom.html]. Updated 7/16/2003 Hands-Free Capability All CTIA Certified portable products provide the consumer with a toll-free number for the purchase of a compatible hands-free device. 1-800-881-7256 Using Your Treo 700w Smartphone...
-
Page 241: Specifications
Specifications Radio • CDMA 800 (Digital Cellular), 1900 (PCS), and 1400(GPS) • EVDO and 1XRTT Phone features • Personal speakerphone • Microphone mute option • Hands-free headset jack • TTY compatible (2.5 mm, 3-barrel connector) • 3-way calling Processor • Intel XScale™ processor, 312MHz technology Expansion •... - Page 242 • Terminal Services System • Windows 2000 or XP with USB port requirements • Later versions may also be supported Operating and • 32°F to 104°F (0°C to 40°C) storage • 5% to 90% RH temperature range Using Your Treo 700w Smartphone...
-
Page 243: Index
191, a second call use of 175, Dial Pad accessories setting up email 74–80 field lists applications to Start synchronizing File Explorer 144, 146, menu troubleshooting Using Your Treo 700w Smartphone... - Page 244 25, phone conversations and running 44, messaging options for alternate phone numbers reinstalling multiple recipients animated images running from expansion selecting email animation 128, cards 154, adjusting screen brightness anniversaries storing Answer button Using Your Treo 700w Smartphone...
- Page 245 100, 102–104, 144, adding 81, back view (Treo™ 700 downloading smartphone) birthdays embedded objects in backgrounds 105, 110, 119, Bluetooth devices freeing internal memory compatibility with backing up information connecting to 98–100, opening backlight (keyboard) 24, Using Your Treo 700w Smartphone...
- Page 246 See phone calls browsing adding meeting requests camera built-in applications 31, 147, See also pictures adding special events battery life and built-in camera. See camera displaying capturing videos with bulleted lists removing events 106–107 Using Your Treo 700w Smartphone...
- Page 247 Clear Type setting changing Configure Server command Clock & Alarms Settings alarm sounds page 179, connections Configure Wireless Network closed networks 186, page contacts closing configuring date and time settings applications 15, 27, data services Using Your Treo 700w Smartphone...
- Page 248 186–193 coverage area 11, selecting communication ending creating method for manually starting appointments 58, sending meeting removing Bluetooth bulleted or numbered requests to synchronizing lists synchronizing information and caller ID pictures Using Your Treo 700w Smartphone...
- Page 249 147, check box data formats Bluetooth connections customizing data service providers 190, certificates applications 171–173 contacts Calendar 62–63 data services 3, 35, directory services camera 111–112 data transfer 203, 223, documents connections 186–193 date formats Using Your Treo 700w Smartphone...
- Page 250 100, organizing contacts 37, setting up GPS saving 122, 124, daily schedules troubleshooting setting margins for documents diagnostic information spell-checking events 58, Dial Lookup list documents list Flight Mode settings Dial Pad 40, Using Your Treo 700w Smartphone...
- Page 251 End Show command reminders for 59, ending active calls 12, 45, addressing 55, 81, Events check box ending data connections creating messages for Excel applications ending playback dialing from Excel Mobile application endnotes entering contact customizing Using Your Treo 700w Smartphone...
- Page 252 56, footers searching on 143, filtering tasks footnotes storing attachments on Find/Replace command 123, forgetting passwords 176, transferring to 114, finding formatting types supported information 28, 139, charts extensible authentication text protocol paragraphs and lists Using Your Treo 700w Smartphone...
- Page 253 Indentation setting multiple items indented lists text 20, indenting text Hands Free check box high-speed data transfer indicator light 6, 10, hands-free car kit 53, 223, information hands-free devices 53, 98, hints (passwords) accessing 28, Using Your Treo 700w Smartphone...
- Page 254 Left button (navigator) Legacy Pocket Word files VPN clients Key index setting libraries (media) Windows drivers keyboard Library command 115, instant messages 71, 91, accessing alternate Library list characters on interference Library screen 115, Using Your Treo 700w Smartphone...
- Page 255 Location Privacy icon 36, notes Manage existing Location Privacy setting Menu button connections setting location-specific information menu items, selecting 21, Manage GPS automatically 164, 169, 179, menus 21, check box lock codes 174, 175, Menus page Using Your Treo 700w Smartphone...
- Page 256 72, documents to folders overview troubleshooting information 155, messaging applications Multimedia Messaging pictures and videos Messaging icon System. See MMS speed dial buttons messaging Messaging list Using Your Treo 700w Smartphone...
- Page 257 See help notification screens 43, 47, templates online address book 82, workbooks 132, online forums notifications worksheets online support Bluetooth devices and NationalAccess data open networks 186, networks displaying on screen NationalAccess icons Using Your Treo 700w Smartphone...
- Page 258 Options page patterns in workbooks specifications for organizer features 11, PCS phones. See wireless turning off phones orientation (slides) turning on and off PCs. See computers Orientation page viewing minutes usage Peak times setting Outbox 74, Using Your Treo 700w Smartphone...
- Page 259 40, voicemail messages organizing dialing 12, 37–41, 47, playlist files previewing entering manually playlists 114, saving redialing most recent plug-ins sending saving 45–46 PNG files setting default size selecting Pocket MSN application Using Your Treo 700w Smartphone...
- Page 260 Programs check box remote synchronization email Programs page (GPS Remove Programs icon meeting requests Settings) Remove Programs page multimedia messages 72, Programs screen removing programs. See applications; applications 147, notifications software Bluetooth connections text messages 72, Using Your Treo 700w Smartphone...
- Page 261 42, phone numbers 45–46 worksheets ringtone files pictures and videos Repeat check box ringtone IDs workbooks 130, 132, Repeat command ringtone managers Schedule command repeat patterns ringtones repeating appointments assigning to contacts 50, Using Your Treo 700w Smartphone...
- Page 262 11, waking up 11, copyrighted items signatures Screen taps check box email 81, silencing all sounds screens, returning to meeting requests 60, previous silencing ringer 42, multimedia messages 72, screensavers silent alarm 166, Using Your Treo 700w Smartphone...
- Page 263 34–36 playing 112, displaying 130, not responding 197, previewing 162, entering data in 132, not turning on recording filtering in operational precautions selecting searching setting Dialpad Using Your Treo 700w Smartphone...
- Page 264 206–208, stopping synchronization synchronization icons tables in documents synchronization software 14, tabs, scrolling through Storage Card page 156, taking pictures 105–106, Storage Card setting 154, synchronizing tapping 17, 20, 167, dates and time Using Your Treo 700w Smartphone...
- Page 265 (TKIP) Text Speed Dial button touch-sensitive feature tentative appointments text speed dial buttons 39, transferring text themes 160, information 195, aligning third-party applications media files 114, changing 5-way navigator and 17, transition effects (slides) copying Using Your Treo 700w Smartphone...
- Page 266 Use above settings while synchronizing roaming setting turning on alarms uploading user discussion groups turning on indicator light viewing 107, usernames turning phone on and off View Recording Toolbar Typing mode command Using Your Treo 700w Smartphone...
- Page 267 See Internet Wi-Fi routers Voice mail setting Explorer Mobile Wi-Fi SDIO cards voice notes 67, 74, web browsing 1, 92, Windows Media Player. See voice privacy icon web links. See links Media Player Mobile Using Your Treo 700w Smartphone...
- Page 268 See also spreadsheets; workbooks workbooks See also Excel Mobile WPA networks application; WPA-PSK connections spreadsheets Writing mode adding calculations adding cells, rows, and columns Year View (calendar) adding charts 137, adjusting column and row size Using Your Treo 700w Smartphone...
Need help?
Do you have a question about the TREO 700W and is the answer not in the manual?
Questions and answers