Polycom SpectraLink 6020 User Manual
Wireless telephone and accessories
Hide thumbs
Also See for SpectraLink 6020:
- Administration manual (32 pages) ,
- Troubleshooting tips (6 pages) ,
- Quick reference manual (2 pages)
Table of Contents
Advertisement
Advertisement
Table of Contents

Subscribe to Our Youtube Channel
Related Manuals for Polycom SpectraLink 6020


Summary of Contents for Polycom SpectraLink 6020
- Page 1 SpectraLink 6020 Wireless Telephone and Accessories...
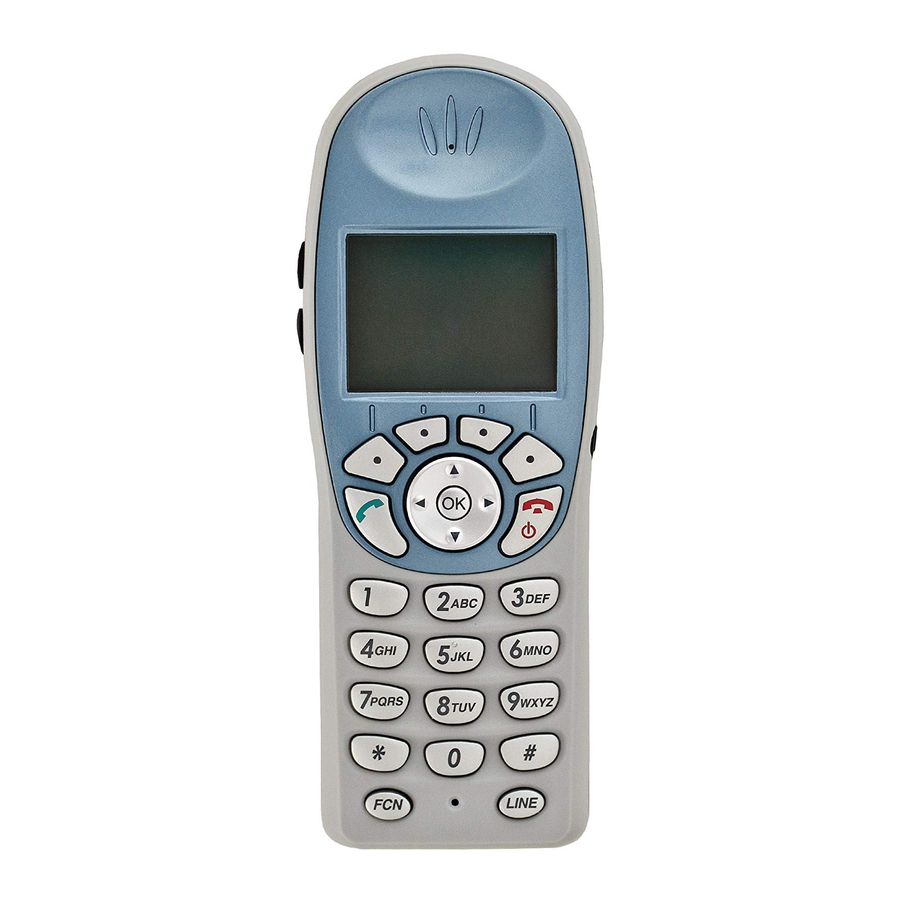
- Page 2 SpectraLink 6020 Wireless Telephone SpectraLink 6020 Volume Up Volume Down Softkeys Headset Jack START Nav keys Keypad PQRS WXYZ Left/Up For messaging # > < * Right/Down applications For messaging LINE applications LINE Microphone...
-
Page 3: About This Guide
INTRODUCTION Your SpectraLink 6020 Wireless Telephone is a state–of-the-art commu- nication device that utilizes radio wave technology to send and receive voice transmissions. It is designed to operate like a cell phone. How- ever, the handset utilizes the private telephone system installed in your facility and will not operate outside the area covered by this system. -
Page 4: Patent Information
Polycom and shall be neither reproduced in whole or in part without the prior written approval of Polycom, nor be implied to grant any license to make, use, or sell equipment manufactured in accordance herewith. -
Page 5: Table Of Contents
TABLE OF CONTENTS THE HANDSET ................7 Modes of Operation ................7 Menu Navigation .................7 Handset Displays ..................8 Shortcut Keys ..................9 Status Bar Indicators ................10 Softkey Labels ...................11 GETTING STARTED ..............13 Basic Handset Operation Summary ...........13 ADVANCED FEATURES ............18 Facility-Specific Features ..............18 Message Alert Feature ...............18 Data Entry and Editing ................18... - Page 6 Carrying Options .................32 Headsets ....................32 HANDSET ADMINISTRATION ..........33 FAQs ....................33 SAFETY INFORMATION ............36 Chargers and Battery Packs ...............36 Wireless Telephones ................37 Operational Warnings ..............37 Electromagnetic Interference and Compatibility ......38 Use While Driving ................39 INFORMATIONS CONCERNANT LA SÉCURITÉ ........39 Chargeurs et batteries ................39 Téléphones sans fil ................41 Avertissements concernant le fonctionnement ........41...
-
Page 7: The Handset
THE HANDSET Modes of Operation Your handset has four modes of operation: Mode Description Standby The handset is not in a call or messaging. Active A call is coming in, a call is being dialed or the handset is in a call or messaging. Config Menu User preferences are being accessed in the Config Menu... -
Page 8: Handset Displays
Handset Displays The top row of the display provides status indicators for various handset conditions. It is referred to as the status bar. The middle lines display information about the handset identity, user profile, calls in progress, menu options, and data from the telephone system. -
Page 9: Shortcut Keys
Shortcut Keys When a menu is displayed, a shortcut key may be displayed on the right edge of the menu line. Press the corresponding number on the keypad to activate the corresponding menu option. Shortcut Config Menu Menu Line Info Line Ring/Tone Settings Lock Keys User Profiles... -
Page 10: Status Bar Indicators
Status Bar Indicators Indicator Function The signal-strength icon indicates the strength of the signal and can assist the user in determining if the handset is moving out of range. If voicemail is available the voicemail icon will appear when a new voicemail message is received. -
Page 11: Softkey Labels
Indicator Function Locked Locked indicates that the keypad is locked to Unlk prevent accidental activation. Press the softkey and then the key to unlock it. The download icon indicates that the handset is downloading code. This icon only appears while the handset is running the over-the-air downloader. - Page 12 Label Description Action Clear Deletes the entry. Cncl Cancel Returns to the previous menu display without saving any data that might have been entered. Delete Deletes the character to the left of the cursor. Exit Exits out of the menus. Exit Hold Hold...
-
Page 13: Getting Started
GETTING STARTED Your Link 6020 Wireless Telephone is designed for full mobility within the workplace and operates much like a cell phone. It also interfaces with the telephone system at your workplace and incorporates advanced telephony features. This section covers the basic functions available in every facility. - Page 14 If you want to Then Turn handset off Press and hold the key. One chirp will sound. If you are in a call, hang up first, then turn off the handset. Unlk Unlock the keypad Press the softkey, then , to unlock the keypad.
- Page 15 If you want to Then Answer a call The handset will ring or vibrate to alert you of an incoming call. Additionally, a line indicator on the display may flash and the display may show information about the call, such as the caller’s name and extension.
- Page 16 If you want to Then Hold Place a call on hold Press the softkey. LINE Resume a held call Press the key followed by the line number key. Mute Mute the Press the softkey. microphone End the call Press the key.
- Page 17 If you want to Then Use message alerts If programmed in your facility, message alerts may be activated by pressing the key and then a menu option assigned by the system administrator. < * The asterisk ( ) key is used for left and up # >...
-
Page 18: Advanced Features
ADVANCED FEATURES Facility-Specific Features Press the key while off-hook or in a call to display the the menu options programmed for advanced telephony features such as transfer, conference, and voicemail. Contact your system administrator for more information about custom features available in your facility. Message Alert Feature Custom applications may allow you to read and respond to text mes- sages. - Page 19 softkey to delete the character to the left. Insert new data by pressing the buttons on the keypad. Alphanumeric entries: caps CAPS 2 a b c 2 A B C 3 d e f 3 D E F 4 g h i 4 G H I 5 j k l 5 J K L...
-
Page 20: The Config Menu
The Config Menu When the handset is in standby mode, press the softkey to enter the Config Menu Con- . The handset cannot make or receive calls while in the fig Menu . This menu allows you to set user preferences. Refer to the diagrams on pages 24-25. -
Page 21: Profiles
Profiles Silent Your handset ring behavior is established by five User Profiles: Vibrate Loud Soft Custom , and . The currently-active user profile is shown on the standby display. The ring behavior can easily be changed Prof by pressing the softkey and selecting a new profile from the list when the handset is in standby mode. - Page 22 Telephone Ring Settings Message Alert 1 Message Alert 2 Ring Cadence Continuous Short Pulse Long Pulse Ring Tone Tones 1-10 Ring Volume Volume Vibrate Cadence Continuous Short Pulse Long Pulse No Delay 5 Second Delay Ring Delay 10 Second Delay...
-
Page 23: Default Profile Settings
Default Profile Settings Setting/Profile Silent Vibrate Soft Loud Custom Ring Cadence Telephone Telephone Telephone Ring Tone Tone 1 Tone 1 Tone 1 Tone 1 Tone 1 Ring Volume Vibrate Cadence Telephone Telephone Ring Delay Noise Mode Normal Normal Normal Normal Normal Headset/Speaker Speaker... -
Page 24: Config Menu Options
Config Menu Options Lock Keys User Profiles Silent Vibrate Set as Active Telephone Loud Ring Settings Message Alert 1 Soft Noise Mode Message Alert 2 Custom Ring in Headset Ring Cadence Ring in Speaker Ring Tone Key Tones Ring Volume Vibrate Cadence Ring Delay See Changing Ring... - Page 25 continued from previous page Disable Phone Settings 5 Seconds Keypad Autolock 10 Seconds 20 Seconds English Language French Spanish Enter Number Set Extension Set User Name Enter Name Display Contrast Set Contrast Use Hearing Aid Use No Hearing Aid Startup Song Play/Inhibit Admin Settings Enter New...
-
Page 26: Accessories
ACCESSORIES Accessories for the SpectraLink 6020 Wireless Telephone include three different charger models, three different Battery Pack models, headsets and several carrying options. Battery Packs The Battery Packs must be recharged periodically. Each type of Battery Pack requires a different amount of time to achieve a fully charged state from a fully depleted state. -
Page 27: Charger Models
Charger Models Three charger models are available for the SpectraLink 6020 Wireless Telephone. The Single Charger will charge a single handset with an installed Battery Pack. The Dual Charger will charge the handset and a spare Battery Pack. - Page 28 Handset/LED Charging Status Charging… The Battery Pack in the handset is charging. LED Solid On Note that in the Dual Charger, the handset’s Battery Pack takes charging precedence, and when it is finished charging, the single Battery Pack in the rear slot will charge. Charge Complete The Battery Pack in the handset has finished charging.
-
Page 29: Single Charger
Single Charger The Single Charger is designed to allow the handset to remain opera- tional through speakerphone or headset use while the handset's Battery Pack is being charged. The handset may also be charged while it is in standby mode or turned off. Place the handset in the Single Charger facing forward. -
Page 30: Dual Charger
Dual Charger LED indicator The Dual Charger is designed to charge the Battery Pack in the handset while it remains operational and also charge an additional Battery Pack in the rear charging bay. The handset has charging priority when both slots are occupied. -
Page 31: Quad Charger
Quad Charger The Quad Charger is designed to simultaneously charge four Battery Packs. It may be mounted on a horizontal or vertical surface. The Battery Pack snaps into the charging slot. The LED above the occu- pied bay indicates the charging status of the Battery Pack in the bay. A flashing LED may indicate a Battery Pack failure. -
Page 32: Carrying Options
Coiled lanyard: Plastic coiled lanyard with clothing clip. Headsets Polycom offers optional headsets for use in noisy environments or if you need to have your hands free while talking on the handset. To use the headset, simply plug it into the jack on the right side of the handset. -
Page 33: Handset Administration
HANDSET ADMINISTRATION FAQs How does the handset power off and power on? key is the power on/power off key. Press and hold it to turn the handset on. Turn the handset off from the standby mode by pressing and holding the key. - Page 34 What is the range of the wireless telephone? As barriers affect radio transmission, there is no single answer for this question. Normally, you can expect the same range as with any other wireless device. However, if your facility has metal walls or other mate- rials that inhibit radio waves, the range will be reduced.
- Page 35 grammed feature. Contact your phone system administrator for detailed information on how to access these features in your facility. Can I use the wireless telephone at home? Access points installed in your facility transmit the radio waves emitted by your wireless telephone to the telephone system in your facility which links the handsets to each other and to the rest of the world.
-
Page 36: Safety Information
SAFETY INFORMATION Chargers and Battery Packs It is normal for the Battery Pack to become warm when charging. Chargers operate in a 50° to 85° F (10° to 30° C) environment. Do not expose them to freezing temperatures or direct sunlight. Do not place anything in the charger other than the handset or single Battery Pack as appropriate, to avoid bending the contacts. -
Page 37: Wireless Telephones
Wireless Telephones WARNING: Changes or modifications to this equip- ment that are not approved by Polycom may cause this equipment to fail to comply with part 15 of the FCC rules, voiding the user’s authority to operate this equipment. WARNING: Polycom products contain no user-service- able parts inside. -
Page 38: Electromagnetic Interference And Compatibility
Electromagnetic Interference and Compatibility Nearly every electronic device is susceptible to electro- magnetic interference (EMI) if inadequately shielded, designed, or otherwise configured for electromagnetic compatibility. Facilities To avoid electromagnetic interference and/or compatibility conflicts, turn off your handset in any facility where posted notices instruct you to do so. Hospitals or health care facilities may be using equipment that is sensitive to external RF energy. -
Page 39: Use While Driving
Use While Driving Campus installations and warehouse facilities that use vehicles such as forklifts or golf carts should abide by these guidelines when using wireless telephones: • Give full attention to driving and to the road, aisle, or path. • Use hands-free operation, if available. - Page 40 Ne plongez pas la batterie dans l'eau et ne la jetez pas au feu. Ne jetez pas la batterie avec vos ordures ménagères. Déposez les batteries usagées à un point de recyclage ou renvoyez-les à votre fournisseur ou agent de main- tenance.
-
Page 41: Téléphones Sans Fil
Téléphones sans fil AVERTISSEMENT : Toute modification apportée à cet équipement qui n'a pas été expressément approuvée par Polycom peut altérer la conformité de l'appareil à la section 15 des normes de la FCC, annulant alors votre droit d'utiliser cet appareil. -
Page 42: Interférences Électromagnétiques Et Compatibilité
explosive, des étincelles peuvent provoquer une explosion ou un incendie, entraînant des blessures corporelles, voire la mort. Les zones à atmosphère potentiellement explosive auxquelles il est fait référence ci-dessus comprennent les zones de ravitaillement en carburant, par exemple les ponts inférieurs de bateaux, les installations de transvasement ou d'entreposage de carburant ou de produits chimiques, les zones où... -
Page 43: Utilisation Au Volant
• TOUJOURS maintenir le combiné, lorsqu’il est sous tension, à une distance minimale de 15 cm de leur stimulateur cardiaque ; • ne pas porter le combiné dans une poche proche de leur cœur ; • utiliser l’oreille du côté opposé à celui du stimulateur cardiaque pour mini- miser les interférences potentielles ;... - Page 44 INDEX Options diagram 24–25 Profiles 21 Accessories Config menu Battery Packs 26 Options diagram 24 Carrying options 32 Chargers 27 Headset 32 Data entry 18 Active mode 7 Data entry table 19 Administration Dial call Care of handset 47 Outgoing calls 14, 33 FAQs 33 Displays, handset 8 Handset Operation Summary 13–17...
- Page 45 Cleaning 35, 47 Active 11–12 Cover 32 Labels 11–12 Illustration 2 Speakerphone Lock 11, 14 Answer with 15 Unlock 12, 14 Icon 10 Softkey label 12 Use of 33 Menu navigation 7 Volume with 33 Message alert 7, 17, 18 While charging 27, 29 Modes of operation 7 Specifications 46...
-
Page 46: Specifications
SPECIFICATIONS Radio frequency 902–928 MHz Transmission type Frequency Hopping Spread Spectrum (FHSS) FCC certification Part 15.247 Voice encoding ADPCM (Proprietary) Transmit power Up to 100 mW peak, < 10 mW average Display Up to six lines of text plus one icon status row and one row for softkey labels. -
Page 47: Care Of Your Handset
CARE OF YOUR HANDSET • Avoid dropping the handset or knocking it against hard surfaces. Carrying the handset in a holster or carrying case will help protect it. • There are no serviceable parts in the handset or chargers. You should not open the handset case or disassemble the chargers. -
Page 48: Contact Information
Every effort has been made to ensure that the information in this document is accurate. Polycom, Inc. is not responsible for printing or clerical errors. Information in this document is subject to change without notice and does not represent a commitment on the part of Polycom, Inc.
Need help?
Do you have a question about the SpectraLink 6020 and is the answer not in the manual?
Questions and answers
My name is Daniel, and I am a vendor currently working in collaboration with the government. I am reaching out to express my interest in renting the following equipment: Item 001: Spectralink 620 Cordless Handset – 100 units Item 002: Spectralink Battery Ultra-Extended 6000/8000 – 100 units Item 003: Dual Charger with PSF for Spectralink 6020 – 50 units Item 004: Transformer Quad Charger for BPL Battery with PS – 10 units Thank you for your time and assistance. I look forward to your prompt response.