Table of Contents
Advertisement
Quick Links
Advertisement
Table of Contents

Related Manuals for AEG C81700K


Summary of Contents for AEG C81700K
- Page 1 C81700K Glaskeramik-Kochfeld Glaskeramische kookplaat Taque de cuisson vitrocéramique Ceramic glass hob Montage- und Gebrauchsanweisung Montage- en gebruikshandleiding Instructions de montage et mode d’emploi Installation and Operating Instructions...
-
Page 2: Dear Customer
Dear Customer, Please read these operating instructions carefully. Above all, please observe the “safety” section on the first few pages. Please retain these operating instructions for future reference. Pass them on to any subsequent owners of the appliance. The warning triangle and/or key words (Warning!, Caution!, Important!) are used to highlight instructions that are important for your safety or for the function of the appliance. -
Page 3: Table Of Contents
CONTENTS Operating Instructions ........98 Safety . -
Page 4: Operating Instructions
Repairs carried out by inexperienced persons may cause injury or serious malfunctioning. If your appliance needs repairing, please contact your local AEG Service Force Centre or your dealer. Please follow these instructions, otherwise the warranty is void in the event of damages. -
Page 5: Safety When Cleaning
Operating Instructions Safety Whilst Using • This appliance may only be used for boiling and frying food in the home. • Do not use the hob to heat the room. • Take care when connecting electric appliances to sockets nearby. Connection cables must not make contact with hot cooking rings. -
Page 6: To Avoid Damaging Your Appliance
Operating Instructions To Avoid Damaging your Appliance • Do not use the hob as a work surface or for storage. • Do not operate the cooking zones when there is no pan or the pans are empty. • Glass ceramic is resistant to changes in temperature and very robust; however it is not unbreakable. -
Page 7: Disposal
Operating Instructions Disposal Disposing of the packaging material • All parts of the packaging can be fully recycled; foil and expanded polyurethane parts are appropriately identified. Please dispose of packaging material and, if appropriate, your old appliance properly. • Please follow the national and regional regulations and material identification (material separation, refuse collection, waste disposal sites). -
Page 8: The Key Features Of Your Appliance
Operating Instructions The Key Features of Your Appliance • Glass ceramic cooking surface: The appliance has a glass ceramic cooking surface and 4 rapid response cooking zones. The particularly powerful radiant heater elements significantly shorten the amount of time taken for the zones to heat up. •... -
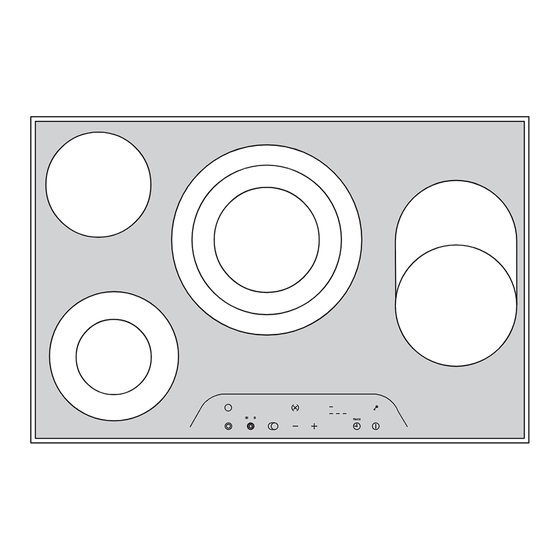
Page 9: Discription Of The Hob
Operating Instructions Discription of the hob Hob Surface and Control Panel Features... -
Page 10: Digital Displays
Operating Instructions Digital Displays The four display fields that are assigned to the four cooking zones dis- play: – j, after being switched on and when the safety function causes an automatic cut-out, – = when a cooking zone is selected, –... -
Page 11: Operating The Hob
Operating Instructions Operating the Hob When a cooking zone is switched on, it may hum briefly. This is a char- acteristic of all glass ceramic cooking zones and does not impair either the function or the life of the appliance. TOUCH CONTROL Sensor Field To operate the TOUCH CONTROL sensor field place your finger from above flat onto the required field until the appropriate displays come... -
Page 12: Cooking Zone Selection
Operating Instructions Touch the “On/Off” sensor field for approx. 1 second. When an individual cooking zone or the entire hob is switched off, any residual heat is shown with an h (for “Hot”) in the digital display for the appropriate cooking zones. Cooking Zone Selection To select the required cooking zone touch the corresponding sensor field for approx. -
Page 13: Heat Setting Selection + And
Operating Instructions Heat Setting Selection For setting and adjusting the heat setting (! to )) for the selected cooking zone. Use sensor field + to increase the heat setting. Lower the heat setting with sensor field -. If several cooking zones are being used simultaneously, the required cooking zone must be selected by touching the appropriate sensor field before adjusting the heat setting. -
Page 14: Switching The Double And Triple Ring Cooking Zone On And Off
Operating Instructions Switching the Double and Triple Ring Cooking Zone On and Off Depending on the size of the pot or pan it is possible when using the double or triple ring cooking zone to activiate the larger heating ring in addition to the smaller one using the “booster”... - Page 15 Operating Instructions The middle ring is switched on. The control indicator under the symbol II is illuminated. 4. Pressing the “booster” sensor field again activates the outer heating ring. The control indicator under symbol III is illuminated. 5. To switch off the outer heating ring touch the “booster” sensor field; the corresponding heating ring is switched off.
-
Page 16: Switching The Casserole Zone On And Off
Operating Instructions Switching the Casserole Zone On and Off 1. Select the appropriate cooking zone. 2. Set the required heat setting. 3. To switch the casserole zone on or off place your finger flat on the “booster” (X) touch control sensor field, until the control indicator comes on or goes off. -
Page 17: Switching Off A Cooking Zone
Operating Instructions Switching off a Cooking Zone 1. Select the required cooking zone with the cooking zone sensor fields. 2. Touch sensor fields + and - simultaneously to switch off or turn sen- sor field - back to zero. A cooking zone may only be switched off when the decimal point is on in the cooking zone display. -
Page 18: Residual Heat Indicator
Operating Instructions Residual Heat Indicator When an individual cooking zone or the entire hob is switched off, any residual heat is shown with an h (for “Hot”) in the digital display for the appropriate cooking zones. Even after the cooking zone has been switched off, the residual heat indicator only goes out when the cooking zone is cold. -
Page 19: Cooking With The Automatic Warm Up Function
Operating Instructions Cooking with the Automatic Warm up Function All four of the hob's cooking zones can be controlled in nine stages and have an automatic warm up function: – !, lowest heat setting – ), highest heat setting – a, automatic warm up function When you select the required heat setting using the + sensor field, the cooking zone will work for a specific time on full power and then switch automatically to the set heat setting. -
Page 20: Cooking Without The Automatic Warm Up Function
Operating Instructions If you start cooking again on a cooking zone that is still warm, the automatic warm up function uses the residual heat. This saves time and energy. If you again wish to switch on a cooking zone on which hot items are already standing, you should always select the required heat setting with the - sensor field. -
Page 21: Locking/Unlocking The Control Panel
Operating Instructions Locking/Unlocking the Control Panel With the exception of the “On/Off” sensor field the control panel can be locked at any required time during cooking in order to prevent adjusting the settings such as when wiping over with a cloth. This function is also suitable as a child safety feature. -
Page 22: Timer
Operating Instructions Timer A cooking duration can be set with the integrated timer for all cooking zones. When the end of the cooking duration is reached, the cooking zone switches itself off automatically. 1. Using the cooking zone sensor field, select the required cooking zone and set the required heat setting. - Page 23 Operating Instructions To set the timer more quickly, leave your finger on the + or - sensor field until the required time is reached. If the - sensor field is operated first, the time setting will begin at 99 minutes; if the + sensor field is operated first, the time setting will begin at 1 minute.
-
Page 24: Uses, Tables And Tips
Operating Instructions Uses, Tables and Tips Pans The better the pan, the better the results. • You can recognise good pans by their bases. The base should be as thick and flat as possible. • Pay particular attention when buying new pans to the diameter of the base. -
Page 25: Advice On Cooking With And Without Automatic Warm Up
Operating Instructions Advice on Cooking with and without Automatic Warm up The automatic warm up function is suitable for: • dishes that start off cold, are heated up at high power and do not need to be continually watched when cooking on the selected heat setting, •... - Page 26 Operating Instructions Indicative Figures for Cooking with the Rings The information given in the following tables is for guidance. The switch setting required for cooking depends on the quality of the pans and on the type and quantity of food Automatic Warm Up Switch...
-
Page 27: Cleaning And Care
Operating Instructions Cleaning and Care Important: Cleaning agents must not come into contact with the hot glass ceramic surface! All cleaning agents must be removed with plenty of clean water after cleaning because they can have a caustic effect when the rings are next heated! Do not use any aggressive cleaners such as grill or oven sprays, coarse scourers or abrasive pan cleaners. -
Page 28: Hob Frame
Operating Instructions Problem Dirt 1. Remove burnt-on sugar, melted plas- tic, aluminium foil or other meltable materials with a glass scraper imme- diately and while still hot. Important: There is a risk of burning yourself when the glass scraper is used on a hot cooking zone! 2. -
Page 29: What Do I Do If
Operating Instructions What do I do if ... Rectifying Malfunctions It is possible that any malfunction has been caused by a minor error, which you can correct yourself with the help of the following instruc- tions. Do not attempt any further repairs if the following instructions do not help in each specific case. - Page 30 Check whether – the cooking zone was only used for a short period and is therefore not hot enough. If the cooking zone is hot, call AEG customer service..a cooking zone cannot be switched off? Check whether – the touch switches are partially covered by a damp cloth or liquid.
-
Page 31: Service
Service SERVICE In the “What to do if …” section a number of malfunctions are listed that you can rectify yourself Look there first if a fault occurs. Is it a technical fault? If so, please contact your customer service centre. (You will find addresses and telephone numbers in the section “Customer Service Centres”.) Always prepare in advance for the discussion. -
Page 32: Assembly
Montage/Assembly... - Page 33 min. 25 mm min. 5 mm Ausbau / Demontage / Démontage / Removal...
Need help?
Do you have a question about the C81700K and is the answer not in the manual?
Questions and answers