
Related Manuals for GMC LS8B


Summary of Contents for GMC LS8B
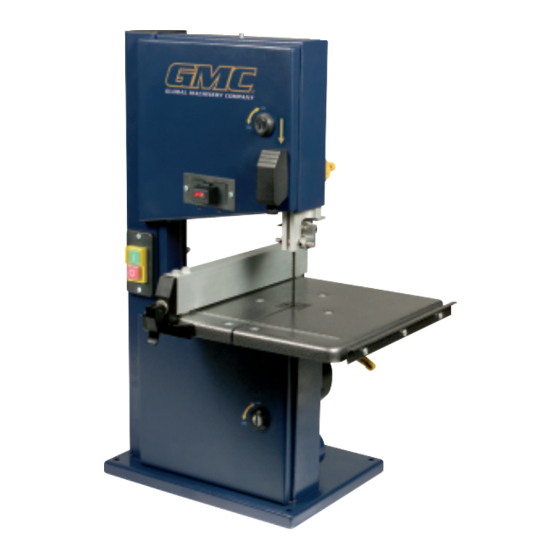
- Page 1 I N S T R U C T I O N M A N UA L REDEYE 250W 200mm Band Saw with Laser Line Generator • Melbourne • Perth • Auckland • Hong Kong • Shanghai • Taipei • New York • Verona • London • Paris ® LS8B 030710 MW ED7...
-
Page 2: Table Of Contents
Adjusting the saw blade tension Adjusting the blade tracking Setting the table square with the blade Dust collector connection Turning on and off Installing and removing band saw blades Operation Using the REDEYE® system Changing the batteries Maintenance General inspection... -
Page 3: Dear Customer
Throat length: 200mm Bevel angle: 0° to 45° Cutting capacity: 80mm Saw blade length: 1400mm Saw blade width*: 3–12.7mm Teeth per inch: 6 TPI * Supplied with a 1400 x 0.35 x 6.35mm general purpose blade Safety rules for laser lights The laser light/laser radiation used in the GMC REDEYE®... -
Page 4: Safety Instructions
LASER LIGHT LASER RADIATION Do not stare into beam. Only turn laser beam on when tool is on work piece. Class 1 laser product. • Never aim the beam at any person or an object other than the work piece. •... -
Page 5: Additional Safety Rules For Band Saws
Ensure that the lighting is adequate. • Keep the area free of tripping hazards. • Do not let anyone under 18 years operate this saw. Always check that the • Always stand to one side when operating the saw. •... -
Page 6: Unpacking
If you find anything wrong, do not operate the tool until the parts have been replaced or the fault has been rectified. Failure to do so could result in serious personal injury. Accessories The GMC Laser Band Saw is supplied with the following accessories: • Work table •... -
Page 7: Know Your Product
Know your product 1. Saw blade 2. Upper housing locking screw 3. Lower housing locking screw 4. Upper housing door 5. Lower housing door 6. Laser assembly 7. Laser on/off switch 8. Blade tension knob 9. On/Off switch 10. Work table trunnion 11. -
Page 8: Assembly
Mounting 1. It is best to attach the band saw to a firm, stable surface at a convenient working height. A workbench is ideal. 2. Drill four holes in the workbench to match the four holes in the base of the saw. -
Page 9: Lower Blade Guide Adjustment
10. Press the guide pins together against the band saw blade. 11. Turn the band saw wheel by hand in a clockwise direction several times to bring the guide pins into the correct position. Both guide pins should just touch the saw blade. -
Page 10: Housing Doors
The right guide pin is accessed through the slot in the lower housing. 10. Turn the band saw wheel by hand in a clockwise direction several times to bring the guide pins into the correct position. Both guide pins should just touch the saw blade. -
Page 11: Adjusting The Bevel Angle
The blade tracking adjustment knob (18) is used to adjust the upper band saw wheel to have the blade run dead centre on the rubber tyres of the band saw wheels 1. Loosen the blade tracking... -
Page 12: Setting The Table Square With The Blade
4. Unplug the tool from the power point to prevent unauthorised use. NOTE. The saw is automatically turned off in the event of a power failure. You will need to press the 'ON' button again to restart the saw. Installing and removing band saw blades WARNING. -
Page 13: Operation
2. Ensure that the table insert is in place and flush with the table. 3. To start the saw, press the green 'ON' button. 4. To begin the cut guide the wood into the moving saw blade. 5. Use only enough pressure to keep the saw cutting. Do not force the cutting, allow the blade and the saw to do the work. -
Page 14: Using The Redeye Laser Line Generator
11. When cutting boards vertically, use a suitable push block to feed the workpiece into the saw. 12. Once finished turn off the laser light, turn off the tool by pressing the red 'OFF' button and unplug the tool from the power point to prevent unauthorised use. -
Page 15: Power Cord Maintenance
5. Never use caustic agents to clean plastic parts. Caution. Do not use cleaning agents to clean the plastic parts of the saw. A mild detergent on a damp cloth is recommended. Water must never come into contact with the saw. - Page 16 Carefully read the entire Instruction Manual Before returning this product for a Warranty Claim or any other reason Please Call 1300 880 001 (Australia) or 0800 445 721 (New Zealand) When you make your call, please have the following information at hand: •...
Need help?
Do you have a question about the LS8B and is the answer not in the manual?
Questions and answers