
Related Manuals for GMC 040521 ED8 PR


Summary of Contents for GMC 040521 ED8 PR
- Page 1 INSTRUCTION MANUAL Tile Cutting Saw with Laser Line Generator* • Melbourne • Perth • Auckland • Hong Kong • Shanghai • Taipei • New York • Verona • London • Paris LSTSAW 040521 ED8 PR...
-
Page 2: Table Of Contents
Introduction Environmental protection Description of symbols Specifications Safety rules for laser lights General safety instructions Additional safety rules for tile cutting saws Position of tile saw Accessories Required tools Unpacking Know your product Attaching the laser light assembly Rip fence... -
Page 3: Dear Customer
Dear Customer If you require any help with your product, whether it is a Warranty claim, spare part or user information, please phone our Help Line for an immediate response. Phone 1300 880 001 in Australia or 0800 445 721 in New Zealand. -
Page 4: Safety Rules For Laser Lights
Safety rules for laser lights The laser light/laser radiation used in the GMC REDEYE® system is Class 2 with maximum 1mW power and 400- 700nm wavelengths. These lasers do not normally present an optical hazard, although staring at the beam may cause flash blindness. -
Page 5: Additional Safety Rules For Tile Cutting Saws
Always check that the • Use top blade guard for every operation for which it can be used. • Disconnect saw before servicing, when changing cutting wheels, and cleaning. When a tool • Use tool only with smooth edge cutting wheels free of openings and grooves. -
Page 6: Position Of Tile Saw
Ensure that the table and surrounding area are clear with the exception of the tile to be cut. • Before cutting a piece of tile let the saw blade run freely for a few seconds. If it makes an unfamiliar sound or vibrates excessively switch it off immediately and disconnect from the power supply. -
Page 7: Required Tools
Failure to do so could result in serious personal injury. 1. Remove all loose parts from the carton. 2. Remove the packing materials from around the saw. 3. Carefully lift the saw from the carton and place it on a level work surface. -
Page 8: Know Your Product
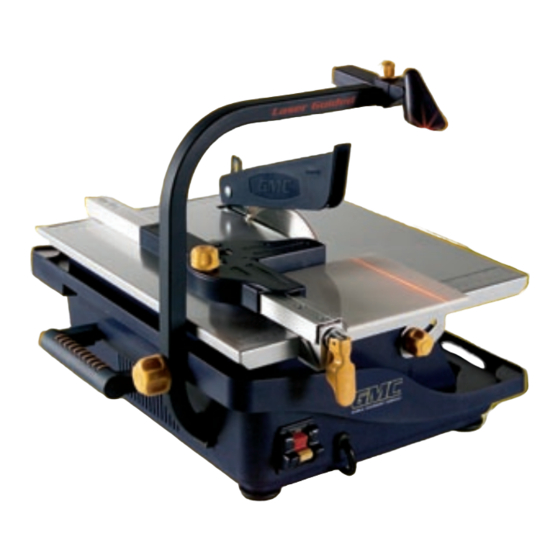
Know your product Before using the saw, familiarize yourself with all the operating features and safety requirements. 1. Housing 2. Carry handle 3. On/off switch 4. Front bevel scale 5. Front bevel lock knob 6. Rear bevel scale 7. Rear bevel lock knob 8. -
Page 9: Attaching The Laser Light Assembly
Attaching the laser light assembly Take the laser light arm (19) and position it on the left hand side of the saw. Fit the laser light arm locking knob (20) through the arm and into the saw. Tighten the knob to securely fasten the arm onto the saw. -
Page 10: Blade Guard
Turning on and off 1. To start the saw insert the switch disabling insert and move the switch (3) up to the ‘ON’ position. 2. Move the switch (3) down to the ‘OFF’... -
Page 11: Filling The Water Compartment
Run the saw without loading it to ensure the blade runs true and there are no extraneous noises. Filling the water compartment 1. -
Page 12: Operation
Operation Making a straight cut 1. Adjust the rip fence (15) to the desired width from the blade using the scale (12) on top of the table for reference. 2. Secure the rip fence to the table by lowering the rip fence locking lever (16). -
Page 13: Using The Redeye Laser Line Generator System
Making a bevel cut 1. Loosen the front and rear bevel locking knobs (5 & 7). 2. Tilt the table to the desired bevel angle using the bevel scales (4 & 6) as a guide. 3. Tighten the front and rear bevel locking knobs before making the cut. -
Page 14: Changing The Batteries
4. Never use caustic agents to clean plastic parts. CAUTION. Do not use cleaning agents to clean the plastic parts of the saw. A mild detergent on a damp cloth is recommended. General inspection Regularly check that all the fixing screws are tight. They may vibrate loose over time. - Page 16 Carefully read the entire Instruction Manual Before returning this product for a Warranty Claim or any other reason Please Call 1300 880 001 (Australia) or 0800 445 721 (New Zealand) When you make your call, please have the following information at hand: •...
Need help?
Do you have a question about the 040521 ED8 PR and is the answer not in the manual?
Questions and answers