Table of Contents
Advertisement
Quick Links
Advertisement
Table of Contents

Related Manuals for Electrolux FM 4500 GR-A


Summary of Contents for Electrolux FM 4500 GR-A
- Page 1 FM 4500 GR-A User manual Grill...
- Page 2 Dear Customer Thank you for choosing one of our high-quality products. With this appliance you will experience the perfect combination of functional design and cutting edge technology. Convince yourself that our appliances are engineered to deliver the best per- formance and control - indeed we are setting the highest standards of excel- lence.
-
Page 3: Table Of Contents
Contents Contents Operating Instructions Safety instructions Description of the Appliance Grill layout Control panel layout Touch Control sensor fields Displays Residual heat indicator Preparation of the appliance Using grilling Operating the appliance Switching the appliance on and off Setting the grill setting Using the child safety device Using the timer Automatic switch off... -
Page 4: Operating Instructions
Operating Instructions Operating Instructions Safety instructions Please comply with these instructions. If you do not, any damage resulting is not covered by the warranty. Correct use • This appliance is not intended for use by children or other persons whose physical, sensory or mental capabilities or lack of experience and knowledge prevents them from using the appliance safely without supervision or instruc- tion by a responsible person to ensure that they can use the appliance safely. - Page 5 Safety instructions Safety during use • Remove stickers and film from the glass ceramic. • There is the risk of burns from the appliance if used carelessly. • Cables from electrical appliances must not touch the hot surface of the appli- ance.
-
Page 6: Description Of The Appliance
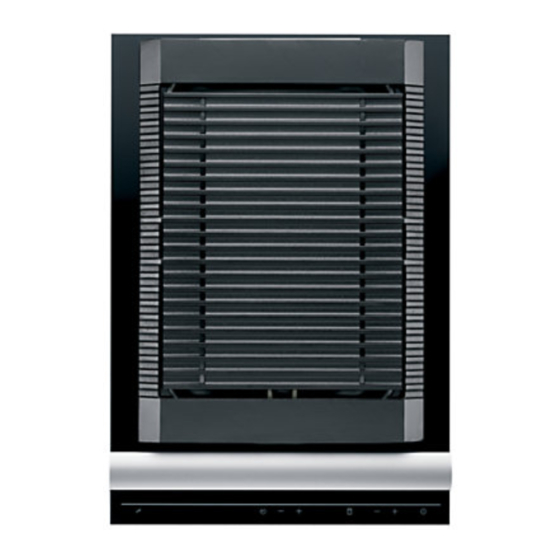
Description of the Appliance Description of the Appliance Grill layout Grill shelf Grill insert Protective plug Heating element with lava stones Oil cavity Frontline strip Socket Control panel Control panel layout Child lock pilot Grill setting light indicator Timer indicator Grill power indicator On/Off pilot light Timer selection... -
Page 7: Touch Control Sensor Fields
Description of the Appliance Touch Control sensor fields The appliance is operated using Touch Control sensor fields. Functions are con- trolled by touching sensor fields and confirmed by displays and acoustic signals. Touch the sensor fields from above, without covering other sensor fields. Sensor field Function On / Off... -
Page 8: Preparation Of The Appliance
Preparation of the appliance Preparation of the appliance Using grilling The grill may only be used with the grill insert inserted. 1. Insert grill insert with lava stones in the grill. The lava stones absorb fat that comes out of the food when grilling. 2. -
Page 9: Operating The Appliance
Operating the appliance Operating the appliance Switching the appliance on and off Control panel Display Pilot light Switch on Touch for 2 seconds lights up Switch off Touch for 1 second / none goes out Important: Socket has live parts. Only operate appliance with dry socket. -
Page 10: Using The Child Safety Device
Operating the appliance Using the child safety device The child safety device prevents unintentional use of the appliance. Activating the child safety device Step Control panel Indicator/Signal Switch on the appliance (Do not set a heat setting) Touch Appliance switches off. The child safety device is activated. Deactivating the child safety device Step Control panel... -
Page 11: Using The Timer
Operating the appliance Using the timer Two functions are possible: Function Prerequisite Result after Short-time timer touch once Acoustic signal Upper pilot lamp lights up Automatic tripping touch twice Acoustic signal equipment lights up Lower pilot lamp Grill switches off Both functions can be used simultaneously. -
Page 12: Automatic Switch Off
Operating the appliance Changing the time Step Control panel Indicator Touch Power indicator flashes more quickly. Remaining time is displayed Touch minutes After a few seconds the power indicator flashes more slowly. The time is set. The time counts down. Displaying the time remaining Step Control panel field... -
Page 13: Tips On Cooking And Frying
Tips on Cooking and Frying Tips on Cooking and Frying Information on acrylamides According to the latest scientific knowledge, intensive browning of food, espe- cially in products containing starch, can constitute a health risk due to acryla- mides. Therefore we recommend cooking at the lowest possible temperatures and not browning foods too much. -
Page 14: Cleaning And Care
Cleaning and Care Cleaning and Care Take care! During cleaning the appliance must be switched off. Let the appli- ance cool down until all parts can safely be touched. Important: Sharp objects and abrasive cleaning materials will damage the ap- pliance. -
Page 15: Grill
Cleaning and Care Grill Grill shelf and grill insert Clean grill shelf and grill insert after each use. The heating element can be removed for the cleaning of the grill shelf. Important: The heating element's plug must not be immersed in water. Hole Centring pin Removing heating element... -
Page 16: What To Do If
What to do if … What to do if … Problem Possible cause Remedy The appliance cannot be More than 10 seconds have Switch the appliance on again. switched on or is not operat- passed since the appliance was switched on The child safety device is Deactivate child safety device switched on... -
Page 17: Disposal
Disposal Disposal Packaging material The packaging materials are environmentally friendly and can be recycled. The plastic components are identified by markings, e.g. >PE<, >PS<, etc. Please dis- pose of the packaging materials in the appropriate container at the community waste disposal facilities. Old appliance The symbol on the product or on its packaging indicates that this product... -
Page 18: Installation Instructions
Installation Instructions Installation Instructions Safety instructions Warning! This must be read! The laws, ordinances, directives and standards in force in the country of use are to be followed (safety regulations, proper recycling in accordance with the regu- lations, etc.) Installation may only be carried out by a qualified electrician. The minimum distances to other appliances and units are to be observed. -
Page 19: Assembly
Assembly Assembly... - Page 20 Assembly...
-
Page 21: Installing More Than One Frontline Hob
Installing more than one Frontline hob Installing more than one Frontline hob Additional parts: cross bar(s), heat resistant silicon, rubber block, shaving blade. Only use special heat-resistant silicon. Cut-out section Distance from the wall: at least 50 mm Depth:490 mm Width: The widths of all appliances to be built-in are added together, minus 20 mm (see also “Overview of all appliance widths”) Example:... - Page 22 Installing more than one Frontline hob 5. Place first appliance in the cut-out. Lay connecting cross bar in the cut-out and push up halfway against the appliance. 6. Put silicon on the appliance corners that will touch one another. Put silicon on the end of the cross bar.
- Page 23 Installing more than one Frontline hob 8. Place Frontline strips on the appliances. Check that the Frontline strips are in line with one another. 9. Tighten the fixing plate / retaining grip screws. 10. Inject a line of silicon into the gap between the appliances. 11.
- Page 24 Installing more than one Frontline hob Overview of all appliance widths 180 mm Worktop-mounted cooker hood 360 mm Glass ceramic cooking surface with 2 radiation cooking zones Glass ceramic cooking surface with 2 induction cooking zones Gas hob with 2 burners Grill Grill/Deep fat fryer 580 mm...
-
Page 25: Rating Plate
Rating Plate 941 177 721 AEG-ELECTROLUX 2,0 kW 220 - 240 V 50 Hz FM4500GR-A 59 GED 23 KO... -
Page 26: Garantie/Kundendienst,Garantie/Service-Clientèle, Garanzia/Servizio Clienti, Guarantee/Customer Service Centres
Garantie/Kundendienst,Garantie/service-clientèle, Garanzia/ Servizio clienti, Guarantee/Customer Service Centres Points de Service Servicestellen Servizio dopo vendita Point of Service 3018 Bern 5506 Mägenwil/Zürich 1028 Préverenges 6916 Grancia Morgenstrasse 131 Industriestrasse 10 Le Trési 6 Zona Industriale E 9000 St. Gallen Zürcherstrasse 204 e 4127 Birsfelden Hauptstrasse 52 6020 Emmenbrücke... -
Page 27: Service
Service Service In the event of technical faults, please first check whether you can remedy the problem yourself with the help of the operating instructions (section “What to do if…”). If you were not able to remedy the problem yourself, please contact the Cus- tomer Care Department or one of our service partners. - Page 28 www.electrolux.com...
Need help?
Do you have a question about the FM 4500 GR-A and is the answer not in the manual?
Questions and answers