
Related Manuals for AirLive WN250R


Summary of Contents for AirLive WN250R
- Page 1 1. Product Information WN250R Wireless b/g/n 1T1R 150 Mbps Router User’s Manual AirLive WN-250R User’s Manual...
- Page 2 Further, this company reserves the right to revise this publication and to make changes from time to time in the contents thereof without obligation to notify any person of such revision or changes. AirLive WN-250R User’s Manual...
- Page 3 (1) this device may not cause harmful interference, and (2) this device must accept any interference received, including interference that may cause undesired operation. Any changes or modifications not expressly approved by the party responsible for compliance could void the authority to operate equipment. AirLive WN-250R User’s Manual...
-
Page 4: Radiation Exposure Statement
However, special attention must be paid to the dangers of electric shock and static electricity when working with electrical equipment. All guidelines of this and of the computer manufacture must therefore be allowed at all times to ensure the safe use of the equipment. AirLive WN-250R User’s Manual... - Page 5 Denmark, Finland, France, Germany, Greece, Ireland, Italy, Luxembourg, the Netherlands, Portugal, Spain, Sweden, and the United Kingdom. The ETSI version of this device is also authorized for use in EFTA member states: Iceland, Liechtenstein, Norway, and Switzerland. EU Countries Not intended for use None. AirLive WN-250R User’s Manual...
-
Page 6: Table Of Contents
2-3-1 Setup procedure for ‘Cable Modem’ ............26 2-3-2 Setup procedure for ‘Fixed-IP xDSL’:............27 2-3-3 Setup procedure for ‘PPPoE xDSL’: ............28 2-3-4 Setup procedure for ‘PPTP xDSL’:............30 2-3-5 Setup procedure for ‘L2TP xDSL’:............32 2-3-6 Setup procedure for ‘Telstra Big Pond’: ...........34 AirLive WN-250R User’s Manual... - Page 7 2-6-1 LAN IP section: ..................64 2-6-2 DHCP Server: ..................65 2-6-3 Static DHCP Leases Table:..............66 Wireless LAN Configurations ................68 2-7-1 Basic Wireless Settings ................69 2-7-2 Advanced Wireless Settings ..............80 2-7-3 Wireless Security..................83 2-7-4 Wireless Access Control ................90 AirLive WN-250R User’s Manual...
- Page 8 3-3-1 Access Control ..................116 3-3-2 URL Blocking ..................122 3-3-3 DoS Attack Prevention................124 3-3-4 Demilitarized Zone (DMZ)..............128 3-4 System Status ....................131 3-4-1 System information and firmware version..........131 3-4-2 Internet Connection Status ..............132 3-4-3 Device Status..................133 3-4-4 System Log....................133 AirLive WN-250R User’s Manual...
- Page 9 Table of Content 3-4-5 Security Log...................135 3-4-5 Active DHCP client list ................136 3-4-6 Statistics ....................137 Configuration Backup and Restore ..............138 Firmware Upgrade ..................139 System Reset....................141 4. Appendix........................142 Hardware Specification ..................142 Troubleshooting .....................143 Glossary ......................147 AirLive WN-250R User’s Manual...
-
Page 10: Product Information
When the number of your computers and network-enabled devices grow, you can also expand the number of network slot by simple attach a hub or switch, to extend the scope of your network! AirLive WN-250R User’s Manual... - Page 11 • Easy to use Web-based GUI for network configuration and management purposes • Remote management function allows configuration and upgrades from a remote computer (over the Internet) • Auto MDI / MDI-X function for all wired Ethernet ports. AirLive WN-250R User’s Manual...
-
Page 12: Safety Information
8. If the router falls into water when it’s powered, DO NOT use your hand to pick it up. Switch the electrical power off before you do anything, or contact an experienced technician for help. AirLive WN-250R User’s Manual... -
Page 13: System Requirements
□ Broadband router (main body, 1 pcs)…………………….……...….. □ Quick installation guide and User manual CDROM (1 pcs) ……… □ A/C power adapter (1 pcs) ………………………………………..AirLive WN-250R User’s Manual... -
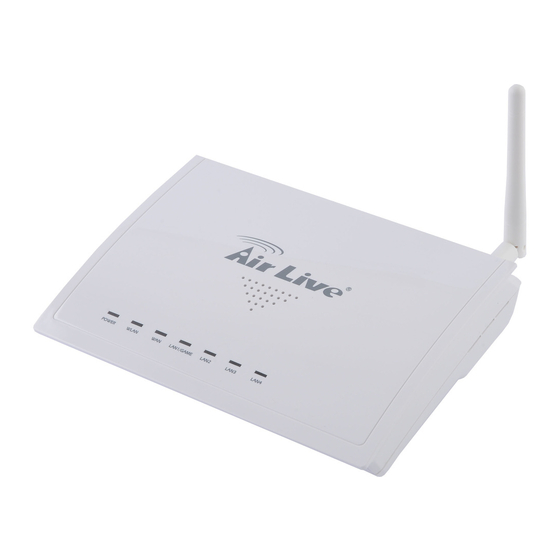
Page 14: Familiar With Your New Wireless Broadband Router
WAN port is connected. WAN port is not connected. LNK/ACT Flashing WAN activity (transferring or receiving data). LAN port is connected. LAN 1-4 LAN port is not connected. LNK/ACT Flashing LAN activity (transferring or receiving data). AirLive WN-250R User’s Manual... - Page 15 5 seconds to start WPS function. 1 - 4 Local Area Network (LAN) ports 1 to 4. Wide Area Network (WAN / Internet) port. Power Power connector, connects to A/C power adapter. AirLive WN-250R User’s Manual...
-
Page 16: System And Network Setup
Please follow the following instruction to build the network connection between your new WIRELESS router and your computers, network devices: 1. Connect your xDSL / cable modem to the WAN port of router by Ethernet cable. AirLive WN-250R User’s Manual... - Page 17 / hub) to the LAN port of the router. 3. 4Connect the A/C power adapter to the wall socket, and then connect it to the ‘Power’ socket of the router. AirLive WN-250R User’s Manual...
-
Page 18: Connecting To Wireless Broadband Router By Web Browser
If the operating system of your computer is…. Windows 95/98/Me - please go to section 2-2-1 Windows 2000 - please go to section 2-2-2 Windows XP - please go to section 2-2-3 Windows Vista - please go to section 2-2-4 AirLive WN-250R User’s Manual... -
Page 19: Windows 95/98/Me Ip Address Setup
2-2-1 Windows 95/98/Me IP address setup: 1. Click ‘Start’ button (it should be located at lower-left corner of your computer), then click control panel. Double-click Network icon, and Network window will appear. Select ‘TCP/IP’, then click ‘Properties’. AirLive WN-250R User’s Manual... - Page 20 2. System and Network Setup 2. Select ‘Obtain an IP address from a DHCP server’ and then click ‘OK’. AirLive WN-250R User’s Manual...
-
Page 21: Windows 2000 Ip Address Setup
1. Click ‘Start’ button (it should be located at lower-left corner of your computer), then click control panel. Double-click Network and Dial-up Connections icon; click Local Area Connection, and Local Area Connection Properties window will appear. Select ‘Internet Protocol (TCP/IP)’ and then click ‘Properties’ AirLive WN-250R User’s Manual... - Page 22 2. System and Network Setup 2. Select ‘Obtain an IP address automatically’ and ‘Obtain DNS server address automatically’, then click ‘OK’. AirLive WN-250R User’s Manual...
-
Page 23: Windows Xp Ip Address Setup
1. Click ‘Start’ button (it should be located at lower-left corner of your computer), then click control panel. Double-click Network and Internet Connections icon, click Network Connections, then double-click Local Area Connection, Local Area Connection Status window will appear, and then click ‘Properties’ AirLive WN-250R User’s Manual... - Page 24 2. System and Network Setup Select ‘Obtain an IP address automatically’ and ‘Obtain DNS server address automatically’, then click ‘OK’. AirLive WN-250R User’s Manual...
-
Page 25: Windows Vista Ip Address Setup
Click View Network Status and Tasks, and then click Manage Network Connections. Right-click Local Area Network, then select ‘Properties’. Local Area Connection Properties window will appear, select ‘Internet Protocol Version 4 (TCP / IPv4), and then click ‘Properties’ AirLive WN-250R User’s Manual... - Page 26 2. System and Network Setup 2. Select ‘Obtain an IP address automatically’ and ‘Obtain DNS server address automatically’, then click ‘OK’. AirLive WN-250R User’s Manual...
-
Page 27: Router Ip Address Lookup
2. System and Network Setup 2-2-5 Router IP Address Lookup After the IP address setup is complete, please click ‘start’ -> ‘run’ at the bottom-lower corner of your desktop: AirLive WN-250R User’s Manual... - Page 28 NOTE: If the IP address of Gateway is not displayed, or the address followed by ‘IP Address’ begins with ‘169’, please recheck network connection between your computer and router, and / or go to the beginning of this chapter, to recheck every step of network setup procedure. AirLive WN-250R User’s Manual...
- Page 29 IP address of router in address bar. The following message should be shown: Please input user name and password in the field respectively, default user name is ‘admin’, and default password is ‘airlive’, then press ‘OK’ button, and you can see the web management interface of this router:...
- Page 30 General Setup, Status, and Tools. You can find the shortcut which leads to these setting categories at the upper-right corner of every page, and you can jump to another category directly by clicking the link, and don’t have to go back to the first page. AirLive WN-250R User’s Manual...
-
Page 31: Using 'Quick Setup
This router provides a ‘Quick Setup’ procedure, which will help you to complete all required settings you need to access the Internet in very short time. Please follow the following instructions to complete the ‘Quick Setup’: Please go to Quick Setup menu by clicking ‘Quick Setup’ button. HERE! AirLive WN-250R User’s Manual... - Page 32 After you finish with all settings, please click ‘Apply’ (4) button. NOTE: There are several time servers available on internet: 129.6.15.28 (time-a.nist.gov) 132.163.4.101 (time-a.timefreq.bldrdoc.gov) 131.107.1.10 (time-nw.nist.gov) If you found that the time of router is incorrect, try another time server. AirLive WN-250R User’s Manual...
- Page 33 - Please go to section 2-3-2 PPPoE xDSL - Please go to section 2-3-3 PPTP xDSL - Please go to section 2-3-4 L2TP xDSL - Please go to section 2-3-5 Telstra Big Pond - Please go to section 2-3-6 AirLive WN-250R User’s Manual...
- Page 34 ‘Cable Modem’ as Internet connection type, even you’re using another connection type, like xDSL. Also, some cable modem uses PPPoE, so you can choose ‘PPPoE xDSL’ for such cable modem connection, even you’re using a cable modem. AirLive WN-250R User’s Manual...
-
Page 35: Setup Procedure For 'Cable Modem
MAC address field with the MAC address of your computer. After you finish with all settings, please click ‘OK’ (3) button; if you want to go back to previous menu, click ‘Back’. AirLive WN-250R User’s Manual... -
Page 36: Setup Procedure For 'Fixed-Ip Xdsl
Service Provider Please input the IP address of DNS server provided by your Gateway Address (4): service provider. You must use the addresses provided by your Internet service provider, wrong setting value will cause connection problem. AirLive WN-250R User’s Manual... -
Page 37: Setup Procedure For 'Pppoe Xdsl
Service Name (3): Please give a name to this Internet service, this is optional MTU (4): Please input the MTU value of your network connection here. If you don’t know, you can use default value. AirLive WN-250R User’s Manual... - Page 38 ‘Disconnect button is pressed. Idle Time Out: Specify the time to shutdown internet connect after no internet activity is detected by minute. This option is only available when connection type is ‘Connect on Demand’. AirLive WN-250R User’s Manual...
-
Page 39: Setup Procedure For 'Pptp Xdsl
WAN interface settings must be correctly set, or the Internet connection will fail even those settings of PPTP settings are correct. Please contact your Internet service provider if you don’t know what you should fill in these fields. Now please go to PPTP settings section: AirLive WN-250R User’s Manual... - Page 40 Please input the idle time out of Internet connection you wish Out (8): to use, and refer to last section for detailed descriptions. When you finish with all settings, please click ‘OK (9); if you want to go back to previous menu, click ‘Back’. AirLive WN-250R User’s Manual...
-
Page 41: Setup Procedure For 'L2Tp Xdsl
WAN interface settings must be correctly set, or the Internet connection will fail even those settings of PPTP settings are correct. Please contact your Internet service provider if you don’t know what you should fill in these fields. Now please go to L2TP settings section: AirLive WN-250R User’s Manual... - Page 42 Please input the idle time out of Internet connection you wish Out (6): to use, and refer to last section for detailed descriptions. When you finish with all settings, please click ‘OK (7); if you want to go back to previous menu, click ‘Back’. AirLive WN-250R User’s Manual...
-
Page 43: Setup Procedure For 'Telstra Big Pond
Check this box to choose login server by server manually (3): yourself. Login Server(4): Please input the IP address of login server here. When you finish with all settings, click ‘OK (5); if you want to go back to previous menu, click ‘Back’. AirLive WN-250R User’s Manual... - Page 44 Please click ‘Apply’ button to prepare to restart the router, and you’ll see this message: Please wait for about 30 seconds, then click ‘OK!’ button. You’ll be back to router management interface again, and the router is ready with new settings. AirLive WN-250R User’s Manual...
-
Page 45: Basic Setup
‘General Setup’ button on the left, or click ‘General Setup’ link at the upper-right corner of web management interface. HERE! 2-4-1 Time zone and time auto-synchronization Please follow the following instructions to set time zone and time auto-synchronization parameters: AirLive WN-250R User’s Manual... - Page 46 ‘Apply’ to save the settings made and restart the router so the settings will take effect after it reboots. NOTE: You can refer to the instructions given in last chapter: ‘Using Quick Setup’, for detailed descriptions on time zone settings. AirLive WN-250R User’s Manual...
-
Page 47: Change Management Password
2. System and Network Setup 2-4-2 Change management password Default password of this router is airlive, and it’s displayed on the login prompt when accessed from web browser. There’s a security risk if you don’t change the default password, since everyone can see it. This is very important when you have wireless function enabled. - Page 48 Please retype the new password again when you see above message. If you see the following message: It means the content in ‘Current Password’ field is wrong, please click ‘OK’ to go back to previous menu, and try to input current password again. AirLive WN-250R User’s Manual...
-
Page 49: Remote Management
This router does not allow management access from Internet, to prevent possible security risks (especially when you defined a weak password, or didn’t change default password). However, you can still management this router from a specific IP address by enabling the ‘Remote Management’ Function. AirLive WN-250R User’s Manual... - Page 50 ‘8080’, or something like ‘32245’ or ‘1429’. (Any integer between 1 and 65534) Enabled (3): Select the field to start the configuration. When you finish with all settings, click ‘Apply’, and you’ll see the following message displayed on web browser: AirLive WN-250R User’s Manual...
- Page 51 For example, if the IP address of this router is 1.2.3.4, and the port number you set is 8888, you have to input following address in the address bar of web browser: http://1.2.3.4:8888 AirLive WN-250R User’s Manual...
-
Page 52: Setup Internet Connection (Wan Setup)
Please select an Internet connection method depend on the type of connection you’re using. You can either click the connection method on the left (1) or right (2). If you select the connection method on the right, please click ‘More Configuration’ button after a method is selected. AirLive WN-250R User’s Manual... - Page 53 L2TP - Please go to section 2-5-5 Telstra Big Pond - Please go to section 2-5-6 - Please go to section 2-5-7 DDNS - Please go to section 2-5-8 WISP - Please go to section 2-5-9 AirLive WN-250R User’s Manual...
-
Page 54: Setup Procedure For 'Dynamic Ip
‘Clone Mac address’ button to fill the MAC address field with the MAC address of your computer, After you finish with all settings, please click ‘Apply’ (3); if you want to remove and value you entered, please click ‘Cancel’. AirLive WN-250R User’s Manual... - Page 55 Please click ‘Continue’ (1) to back to previous setup menu; to continue on router setup, or click ‘Apply’ to reboot the router so the settings will take effect (Please wait for about 30 seconds while router is rebooting). AirLive WN-250R User’s Manual...
-
Page 56: Setup Procedure For 'Static Ip
Please input the IP address of DNS server provided Gateway Address (3): by your service provider. After you finish with all settings, please click ‘Apply’ (4) button and the following message will be displayed on your web browser: AirLive WN-250R User’s Manual... -
Page 57: Setup Procedure For 'Pppoe
2-5-3 Setup procedure for ‘PPPoE’: Here are descriptions of every setup items: User Name (1): Please input user name assigned by your Internet service provider here. Password (2): Please input the password assigned by your Internet service provider here. AirLive WN-250R User’s Manual... - Page 58 If you have selected the connection type to “Connect-On-Demand”, please input the idle time out. After you finish with all settings, please click ‘Apply’ (7) button and the following message will be displayed on your web browser: AirLive WN-250R User’s Manual...
-
Page 59: Setup Procedure For 'Pptp
If you want to reset all settings in this page back to previously-saved value, please click ‘Cancel’ button. 2-5-4 Setup procedure for ‘PPTP’: PPTP requires two kinds of setting: WAN interface setting (setup IP address) and PPTP setting (PPTP user name and password). Here we start from WAN interface setting: AirLive WN-250R User’s Manual... - Page 60 Please input user ID (user name) assigned by your Internet service provider here. Password (2): Please input the password assigned by your Internet service provider here. PPTP Gateway (3): Please input the IP address of PPTP gateway assigned by your Internet service provider here. AirLive WN-250R User’s Manual...
- Page 61 ‘Apply’ to reboot the router so the settings will take effect (Please wait for about 30 seconds while router is rebooting). If you want to reset all settings in this page back to previously-saved value, please click ‘Cancel’ button. AirLive WN-250R User’s Manual...
-
Page 62: Setup Procedure For 'L2Tp
Please input user ID (user name) assigned by your Internet service provider here. Password (2): Please input the password assigned by your Internet service provider here. L2TP Please input the IP address of PPTP gateway assigned by your Internet Gateway (3): service provider here. AirLive WN-250R User’s Manual... - Page 63 ‘Apply’ to reboot the router so the settings will take effect (Please wait for about 30 seconds while router is rebooting). If you want to reset all settings in this page back to previously-saved value, please click ‘Cancel’ button. AirLive WN-250R User’s Manual...
-
Page 64: Setup Procedure For 'Telstra Big Pond
Server IP Address (4): Please input the IP address of login server here. When you finish with all settings, click ‘Apply’ (5) button and the following message will be displayed on your web browser: AirLive WN-250R User’s Manual... -
Page 65: Setup Procedure For 'Dns
IP address should be assigned automatically. However, if you have preferred DNS server, or your service provider didn’t assign the IP address of DNS server because of any reason, you can input the IP address of DNS server here. AirLive WN-250R User’s Manual... - Page 66 ‘Apply’ to reboot the router so the settings will take effect (Please wait for about 30 seconds while router is rebooting). If you want to reset all settings in this page back to previously-saved value, please click ‘Cancel’ button. AirLive WN-250R User’s Manual...
-
Page 67: Setup Procedure For 'Ddns
This router supports DDNS service of several service providers, for example: DynDNS (http://www.dyndns.org) TZO (http://www.tzo.com) Please go to one of DDNS service provider’s webpage listed above, and get a free DDNS account by the instructions given on their webpage. AirLive WN-250R User’s Manual... - Page 68 ‘Apply’ to reboot the router so the settings will take effect (Please wait for about 30 seconds while router is rebooting). If you want to reset all settings in this page back to previously-saved value, please click ‘Cancel’ button. AirLive WN-250R User’s Manual...
-
Page 69: Setup Procedure For 'Wisp
There are three selections for disable or disable staEnable (1): wireless ISP functions. Disable: disable this function. Enable: enable this function and the router can connect to the access points installed by your wireless service provider. Any clients AirLive WN-250R User’s Manual... - Page 70 Security Settings (5): If the access point enables wireless security, you have to follow the same settings in order to access the access point. Click to set security settings for this connection (Please go to section ‘2-7-3 Wireless Security’ for detailed instructions). AirLive WN-250R User’s Manual...
-
Page 71: Wired Lan Configurations
There are two ways to assign IP addresses to computers: static IP address (set the IP address for every computer manually), and dynamic IP address (IP address of computers will be assigned by router automatically. It’s recommended for most of computers to use AirLive WN-250R User’s Manual... - Page 72 4. For computers which are not dedicated to provide specific service to others, they should use dynamic IP address. If you don’t really understand the descriptions listed above, don’t worry! We will provide recommended setup values below. AirLive WN-250R User’s Manual...
-
Page 73: Lan Ip Section
If you want to activate DHCP server function of this router, select ‘Enabled’, or set it to ‘Disabled’. Recommended Value if you don’t know what to fill: IP Address: 192.168.1.254 Subnet Mask: 255.255.255.0 802.1d Spanning Tree: Disabled DHCP Server: Enabled AirLive WN-250R User’s Manual... -
Page 74: Dhcp Server
2. The former three fields of IP address of ‘Start IP’, ‘End IP’, and ‘IP Address of LAN IP’ section (mentioned ‘a’, ‘b’, and ‘c’ field) should be the same. 3. These settings will affect wireless clients too. AirLive WN-250R User’s Manual... -
Page 75: Static Dhcp Leases Table
‘Add’ (4): After you inputted MAC address and IP address pair, click this button to add the pair to static DHCP leases table. If you want to remove all characters you just entered, click ‘Clear’. AirLive WN-250R User’s Manual... - Page 76 Please click ‘Continue’ to back to previous setup menu; to continue on router setup, or click ‘Apply’ to reboot the router so the settings will take effect (Please wait for about 30 seconds while router is rebooting). AirLive WN-250R User’s Manual...
-
Page 77: Wireless Lan Configurations
Please select ‘Enable’ (1), then click ‘Apply’ (2) button. If you’re coming here because you want to disable wireless function, please select ‘Disable’ (3), then click ‘Apply’ (2) button. AirLive WN-250R User’s Manual... -
Page 78: Basic Wireless Settings
30 seconds while router is rebooting). 2-7-1 Basic Wireless Settings Please click ‘Wireless’ menu on the left of web management interface, then click ‘Basic Settings’, and the following message will be displayed on your web browser: AirLive WN-250R User’s Manual... - Page 79 – wireless router is only used to expand the scope of network, and no wireless clients will be accepted. If you want to use your wireless router to expand the scope of network, and also accept wireless clients, please select ‘AP Bridge-WDS’ or ‘Universal Repeater‘ mode. AirLive WN-250R User’s Manual...
- Page 80 - Please go to section 2-7-1-5 Universal Repeater - Please go to section 2-7-1-6 2-7-1-1 Setup procedure for ‘Access Point’: Please select the radio band you want to use from ‘Band’ dropdown menu (2), and the following message will be displayed: AirLive WN-250R User’s Manual...
- Page 81 1 (The antenna in the right side of the rear panel). For 802.11n mode: The router is operating in a 1T2R Spatial Multiplexing MIMO configuration. 1 antenna is for signal transmitting and 2 antennas are for signal receiving. AirLive WN-250R User’s Manual...
- Page 82 TIPS: You can try to change channel number to another one if you think the data transfer rate is too slow. There could be some other wireless routers using the same channel, which will disturb the radio communication between wireless client and the wireless router. AirLive WN-250R User’s Manual...
- Page 83 Click ‘Select Site Survey’ button, then a “Wireless Site Survey Table” will pop up. It will list all available access points near by. You can select one access point in the table and it will join wireless LAN through this access point. AirLive WN-250R User’s Manual...
- Page 84 Number (3): the same setting. MAC address 1(4): Input the MAC address of another wireless router. Security Click to setting security for this connection (Please go to Settings (5): section ‘2-7-3 Wireless Security’ for detailed instructions). AirLive WN-250R User’s Manual...
- Page 85 MAC address Input the MAC address of other wireless routers. 1 to 4 (4 - 7): Security Click to set security settings for this connection (Please go to Setting (8): section ‘2-7-3 Wireless Security’ for detailed instructions). AirLive WN-250R User’s Manual...
- Page 86 Input the SSID of your wireless router, the setting should be the same with other wireless routers for the convenience of roaming. Channel Select the channel you want to use, all the wireless Number (4): routers must use the same setting. AirLive WN-250R User’s Manual...
- Page 87 The output power of this mode is the same as that of WDS and normal AP mode. AirLive WN-250R User’s Manual...
- Page 88 LAN through this access point. After you finish the wireless setting, please click ‘Apply’ button, after you click ‘Apply’, the following message will be displayed on your web browser: AirLive WN-250R User’s Manual...
-
Page 89: Advanced Wireless Settings
This router provides some advanced control of wireless parameters, if you want to configure these settings, please click ‘Wireless’ menu on the left of web management interface, then click ‘Advanced Settings’, and the following message will be displayed on your web browser: AirLive WN-250R User’s Manual... - Page 90 ‘Auto 20/40 MHz’. Preamble Type (8): Set the type of preamble, do not modify default value if you don’t know what it is, default setting is ‘Short Preamble’. AirLive WN-250R User’s Manual...
- Page 91 Please click ‘Continue’ to back to previous setup menu; to continue on router setup, or click ‘Apply’ to reboot the router so the settings will take effect (Please wait for about 30 seconds while router is rebooting). AirLive WN-250R User’s Manual...
-
Page 92: Wireless Security
2-7-3-2 WEP - Wired Equivalent Privacy When you select this mode, the wireless router will use WEP encryption, and the following setup menu will be shown on your web browser: AirLive WN-250R User’s Manual... - Page 93 ‘ASCII’ key format, and if you select ‘Hex’ as key format, you can use characters 0-9, a-f, and A-F. You must enter at least one encryption key here, and if you entered multiple WEP keys, they should not be same with each other. AirLive WN-250R User’s Manual...
- Page 94 Please input the IP address of radius IP address (8): server here RADIUS Server Please input the port number of radius Port (9): server here. RADIUS Server Please input the port number of radius Password (10): password here. AirLive WN-250R User’s Manual...
- Page 95 Please click ‘Continue’ to back to previous setup menu; to continue on other setup procedures, or click ‘Apply’ to reboot the router so the settings will take effect (Please wait for about 30 seconds while router is rebooting). AirLive WN-250R User’s Manual...
- Page 96 It’s not recommended to use a word that can be found in a dictionary due to security reason. After you finish WPA Pre-shared key setting, please click ‘Apply’ button (5) and the following message will be displayed on your web browser: AirLive WN-250R User’s Manual...
- Page 97 2003) only support WEP or WPA (TKIP) cipher. A driver upgrade would be needed for those clients to use WPA and WPA2 encryption. 2-7-3-4 WPA RADIUS: If you have a RADIUS server, this router can work with it and provide safer wireless authentication. AirLive WN-250R User’s Manual...
- Page 98 Please click ‘Continue’ to back to previous setup menu; to continue on other setup procedures, or click ‘Apply’ to reboot the router so the settings will take effect (Please wait for about 30 seconds while router is rebooting). AirLive WN-250R User’s Manual...
-
Page 99: Wireless Access Control
Delete Selected (2): If you want to delete a specific MAC address entry, check the ‘select’ box of the MAC address you want to delete, then click ‘Delete Selected’ button. (You can select more than one MAC addresses). AirLive WN-250R User’s Manual... - Page 100 Click ‘Clear’ to remove the value you inputted in MAC address and comment field. After you finish with all settings, please click ‘Apply’ (9) button and the following message will be displayed on your web browser: AirLive WN-250R User’s Manual...
-
Page 101: Wi-Fi Protected Setup (Wps)
PIN code, you have to know the PIN code of wireless client and switch it to WPS mode, then provide the PIN code of the wireless client you wish to connect to this wireless router. The detailed instructions are listed follow: AirLive WN-250R User’s Manual... - Page 102 If wireless security function has not been set, you’ll see ‘unConfigured’. PinCode Self: This is the WPS PIN code of this wireless router. This code is useful when you need to build wireless connection by WPS with other WPS-enabled wireless devices. AirLive WN-250R User’s Manual...
- Page 103 Please input the PIN code of the wireless client you by client wish to connect, and click ‘Start PIN’ button. PinCode (4): The ‘WLAN’ LED on the wireless router will be steady on when this wireless router is waiting for incoming WPS request. AirLive WN-250R User’s Manual...
-
Page 104: Security Tips For Wireless Network
4. Use ‘Access Control’ function described in section 2-7-4, so those people who are not in your list will not be able to connect to your network. AirLive WN-250R User’s Manual... -
Page 105: Advanced Functions
/ audio transfer. With this function, you can limit the maximum bandwidth or give a guaranteed bandwidth for a specific computer, to avoid said unpleasing result from happening. AirLive WN-250R User’s Manual... -
Page 106: Basic Qos Settings
‘0’ here. Total Upload You can set the limit of total upload bandwidth in kbits. To disable Bandwidth (3): upload bandwidth limitation, input ‘0’ here. Current QoS All existing QoS rules will be displayed here. Table (4): AirLive WN-250R User’s Manual... - Page 107 You can lower the priority of the QoS rule you selected by clicking this button. After you finish with all settings, please click ‘Apply’ (11) button and the following message will be displayed on your web browser: AirLive WN-250R User’s Manual...
-
Page 108: Add A New Qos Rule
‘Cancel’ button. 3-1-2 Add a new QoS rule fter you click ‘Add’ button in QoS menu, the following message will appear: AirLive WN-250R User’s Manual... - Page 109 Please input the starting IP address in the left field, and input the end IP address in the right field to define a range of IP addresses, or just input the IP address in the left field to define a single IP address. AirLive WN-250R User’s Manual...
- Page 110 QoS table; if you did anyt hing wrong, you’ll get an error message when you click ‘Save’ button, please correct your input by the instructions given by the error message. you want to erase all values you just entered. Click ‘Reset’ AirLive WN-250R User’s Manual...
-
Page 111: Network Address Translation (Nat)
Please follow the following instructions to set NAT parameters: 3-2-1 Basic NAT Settings (Enable or disable NAT function) Please click ‘NAT’ menu on the left of web management interface, and the following message will be displayed on your web browser: AirLive WN-250R User’s Manual... - Page 112 Please click ‘Continue’ to back to previous setup menu; to continue on other setup procedures, or click ‘Apply’ to reboot the router so the settings will take effect (Please wait for about 30 seconds while router is rebooting). AirLive WN-250R User’s Manual...
-
Page 113: Port Forwarding
Enable Port Check this box to enable port mapping, and uncheck this box Forwarding (1): to disable port mapping. Private IP (2): Input the IP address of the computer on local network which provides internet service. AirLive WN-250R User’s Manual... - Page 114 ‘Delete Selected’ button to remove the mapping. If there’s no existing mapping, this button will be grayed out. Delete All (11): Delete all mappings existed in virtual server table. Reset (12): Unselect all mappings. AirLive WN-250R User’s Manual...
-
Page 115: Virtual Server
Internet services on different local computers via a single Internet IP address. Please click ‘NAT’ menu on the left of web management interface, then click ‘Virtual Server’, and the following message will be displayed on your web browser: AirLive WN-250R User’s Manual... - Page 116 IP address of the computer. Private Port (4): Input the port number of the IP address which provides Internet service. Type (5): Select the type of connection, TCP or UDP. If you’re not sure, please select ‘Both’. AirLive WN-250R User’s Manual...
- Page 117 Delete All (12): Delete all mappings existed in virtual server table. Reset (13): Unselect all mappings. After you finish with all settings, please click ‘Apply’ (14) button and the following message will be displayed on your web browser: AirLive WN-250R User’s Manual...
-
Page 118: Port Mapping For Special Applications
Here are descriptions of every setup items: Enable (1): Check this box to enable special applications and uncheck this box to disable virtual server. IP Address (2): Input the IP address of the computer which you want to open the ports. AirLive WN-250R User’s Manual... - Page 119 Delete (11): Please select a special application by clicking the ‘Select’ box of the mapping, then click ‘Delete Selected’ button to remove the setting. If there’s no setting here, this button will be grayed out. AirLive WN-250R User’s Manual...
-
Page 120: Upnp Setting
This function enables network auto-configuration for peer-to-peer communications, with this function, network devices will be able to communicate with other devices directly, and learn about information about other devices. Many network device and applications rely on UPnP function nowadays. AirLive WN-250R User’s Manual... - Page 121 ‘Apply’ to reboot the router so the settings will take effect (Please wait for about 30 seconds while router is rebooting). If you want to reset all settings in this page back to previously-saved value, please click ‘Cancel’ button. AirLive WN-250R User’s Manual...
-
Page 122: Alg Settings
NAT architecture. Please click ‘NAT’ menu on the left of web management interface, then click ‘ALG Settings’, and the following message will be displayed on your web browser: AirLive WN-250R User’s Manual... -
Page 123: Firewall
URLs which have pre-defined keywords. Please follow the following instructions to enable or disable firewall function: Please click ‘Firewall’ menu on the left of web management interface, and the following message will be displayed on your web browser: AirLive WN-250R User’s Manual... - Page 124 Please click ‘Continue’ to back to previous setup menu; to continue on other setup procedures, or click ‘Apply’ to reboot the router so the settings will take effect (Please wait for about 30 seconds while router is rebooting). AirLive WN-250R User’s Manual...
-
Page 125: Access Control
MAC filtering table. If you select deny, all MAC addresses listed in filtering table will be denied from connecting to the network; if you select allow, only MAC addresses listed in filtering table will be able to connect to the network, and rejecting all other network devices. AirLive WN-250R User’s Manual... - Page 126 MAC address you want to delete, then click ‘Delete Selected’ button. (You can select more than one MAC addresses). Delete All (9): If you want to delete all MAC addresses listed here, please click ‘Delete All’ button. AirLive WN-250R User’s Manual...
- Page 127 If you want to delete all IP addresses listed here, Please click ‘Delete All’ button. After you finish with all settings, please click ‘Apply’ (16) button and the following message will be displayed on your web browser: AirLive WN-250R User’s Manual...
- Page 128 ‘Apply’ to reboot the router so the settings will take effect (Please wait for about 30 seconds while router is rebooting). If you want to reset all settings in this page back to previously-saved value, please click ‘Cancel’ button. AirLive WN-250R User’s Manual...
- Page 129 3. Advanced Functions 3-3-1-1 Add PC After button is clicked, the following message will be displayed on your web browser: AirLive WN-250R User’s Manual...
- Page 130 When you finish with all settings, please click ‘Add’ to save settings, you’ll be brought back to previous menu, and the rule you just set will appear in current IP filtering table. If you want to remove all settings in this page, click ‘Reset’ button. AirLive WN-250R User’s Manual...
-
Page 131: Url Blocking
Please follow the following instructions to set URL blocking parameters: Please click ‘Firewall’ menu on the left of web management interface, then click ‘URL Blocking’, and the following message will be displayed on your web browser: AirLive WN-250R User’s Manual... - Page 132 ‘Delete All’ button. Reset (8): You can also click ‘Reset’ button to unselect all URL/Keywords. After you finish with all settings, please click ‘Apply’ (9) button, and the following message will be displayed on your web browser: AirLive WN-250R User’s Manual...
-
Page 133: Dos Attack Prevention
DoS attack for you. Please follow the following instructions to set DoS prevention parameters: Please click ‘Firewall’ menu on the left of web management interface, then click ‘DoS’, and the following message will be displayed on your web browser: AirLive WN-250R User’s Manual... - Page 134 Check this box and the router will filter this kind of traffic out. Advanced Click this button and you can set advanced settings of the Settings (5): DoS prevention method listed above, please see section 3-3-3-1 ‘DoS – Advanced Settings’ below. AirLive WN-250R User’s Manual...
- Page 135 ‘Apply’ to reboot the router so the settings will take effect (Please wait for about 30 seconds while router is rebooting). If you want to reset all settings in this page back to previously-saved value, please click ‘Cancel’ button. AirLive WN-250R User’s Manual...
- Page 136 ‘Burst’ value, which means when this number of ‘Ping of Death’ packet is received in very short time, this DoS prevention mechanism will be activated. Discard Ping Check the box to activate this DoS prevention mechanism. From WAN (b): AirLive WN-250R User’s Manual...
-
Page 137: Demilitarized Zone (Dmz)
IP address, too. But these private IP addresses are mapped to a certain Internet IP address, so other people on Internet can fully access those computers in DMZ. AirLive WN-250R User’s Manual... - Page 138 ‘Static IP’, please input the IP address that you want to map to a specific private IP address. Client PC IP Please input the private IP address that the Internet IP address address (3): will be mapped to. AirLive WN-250R User’s Manual...
- Page 139 All’ button. Reset (10): You can also click ‘Reset’ button to unselect all DMZ entries. After you finish with all settings, please click ‘Apply’ (11) button and the following message will be displayed on your web browser: AirLive WN-250R User’s Manual...
-
Page 140: System Status
You can use this function to know the system information and firmware version of this router. Please click ‘Status’ link located at the upper-right corner of web management interface, and the following message will be displayed on your web browser AirLive WN-250R User’s Manual... -
Page 141: Internet Connection Status
You can use this function to know the status of current Internet connection. Please click ‘Internet Connection’ menu on the left of web management interface, and the following message will be displayed on your web browser: This information will vary depending on the connection status. AirLive WN-250R User’s Manual... -
Page 142: Device Status
All important system events are logged. You can use this function to check the event log of your router. Please click ‘System Log’ menu on the left of web management interface, and the following message will be displayed on your web browser: AirLive WN-250R User’s Manual... - Page 143 The system events will be displayed in this page, and here are descriptions of every buttons: Save (1): Save current event log to a text file. Clear (2): Delete all event logs displayed here. Refresh (3): Refresh the event log display. AirLive WN-250R User’s Manual...
-
Page 144: Security Log
The system events will be displayed in this page, and here are descriptions of every buttons: Save (1): Save current event log to a text file. Clear (2): Delete all event logs displayed here. Refresh (3): Refresh the event log display. AirLive WN-250R User’s Manual... -
Page 145: Active Dhcp Client List
Please click ‘Active DHCP client’ menu on the left of web management interface, and the following message will be displayed on your web browser: All information about active DHCP leases issued by this router will be displayed here. You can click ‘Refresh’ button to display latest information. AirLive WN-250R User’s Manual... -
Page 146: Statistics
You can use this function to check the statistics of wireless, LAN, and WAN interface of this router. Please click ‘Statistics’ menu on the left of web management interface, and the following message will be displayed on your web browser: You can click ‘Refresh’ button to display latest information. AirLive WN-250R User’s Manual... -
Page 147: Configuration Backup And Restore
Press ‘Browse…’ to pick a previously-saved Settings (2): configuration file from your computer, and then click ‘Upload’ to transfer the configuration file to router. After the configuration is uploaded, the router’s configuration will be replaced by the file you just uploaded. AirLive WN-250R User’s Manual... -
Page 148: Firmware Upgrade
Please click ‘Tool’ located at the upper-right corner of web management interface, then click ‘Firmware Upgrade’ on the left of web management interface, then the following message will be displayed on your web browser: Please click ‘Next’, and the following message will be displayed: AirLive WN-250R User’s Manual... - Page 149 If the firmware you uploaded is corrupt, the firmware upgrade will fail, and you may have to return this router to the dealer of purchase to ask for help. (Warranty voids if you interrupted the upgrade procedure). AirLive WN-250R User’s Manual...
-
Page 150: System Reset
‘Reset’ on the left of web management interface, then the following message will be displayed on your web browser: Please click ‘Apply’ to reset your router, and it will be available again after few minutes, please be patient. AirLive WN-250R User’s Manual... -
Page 151: Appendix
Power: 5VDC, 1A Switching Power Adapter Dimension: 30(H) x 157(W) x 127(D) mm Transmit Power : 11n: 13dBm±1.5dBm, 11g: 14dBm±1.5dBm, 11b: 17dBm±1.5dBm Temperature: 32~104°F (0 ~ 40°C) Humidity: 10-90% (NonCondensing) Certification: FCC, CE AirLive WN-250R User’s Manual... -
Page 152: Troubleshooting
IP address. f. If you did a firmware upgrade and this happens, contact your dealer of purchase for help. g. If all above solutions don’t work, contact the dealer of purchase for help. AirLive WN-250R User’s Manual... - Page 153 Reset the device provided by your Internet service provider too. i. Try to use IP address instead of hostname. If you can use IP address to communicate with a remote server, but can’t use hostname, please check DNS setting. AirLive WN-250R User’s Manual...
- Page 154 Make sure you’re connecting to the correct IP management interface: address of the router! password is wrong b. Password is case-sensitive. Make sure the ‘Caps Lock’ light is not illuminated. c. If you really forget the password, do a hard reset. AirLive WN-250R User’s Manual...
- Page 155 (make sure it’s safe before you’re doing this!), and call your dealer of purchase for help. The date and time of all a. Adjust the internal clock of router. event logs are wrong AirLive WN-250R User’s Manual...
-
Page 156: Glossary
Internet computer host in an IP network. Example: 192.168.1.254. It consists of 2 portions: the IP network address, and the host identifier. AirLive WN-250R User’s Manual... - Page 157 Internet for individuals and other businesses or organizations. LAN: Local Area Network. A LAN is a group of computers and devices connected together in a relatively small area (such as a house or an office). Your home network is considered a LAN. AirLive WN-250R User’s Manual...
- Page 158 Below is a list of common applications and protocol/port numbers: Application Protocol Port Number Telnet SMTP POP3 H.323 1720 SNMP SNMP Trap HTTP PPTP 1723 PC Anywhere TCP 5631 PC Anywhere UDP 5632 AirLive WN-250R User’s Manual...
- Page 159 They both run on top of the IP (Internet Protocol), a network layer protocol. WAN: Wide Area Network. A network that connects computers located in geographically separate areas (e.g. different buildings, cities, countries). The Internet is a wide area network. AirLive WN-250R User’s Manual...
- Page 160 Web-based management Graphical User Interface (GUI): Many devices support a graphical user interface that is based on the web browser. This means the user can use the familiar Netscape or Microsoft Internet Explorer to Control/configure or monitor the device being managed. AirLive WN-250R User’s Manual...
Need help?
Do you have a question about the WN250R and is the answer not in the manual?
Questions and answers