
Subscribe to Our Youtube Channel
Related Manuals for Jura IMPRESSA J7


Summary of Contents for Jura IMPRESSA J7
-
Page 1: The Impressa J7 Manual
The IMPRESSA J7 Manual The ‘IMPRESSA Manual’ has been awarded the seal of approval by the independent German Technical Inspection Agency, TÜV SÜD, due to its easy-to-understand style, its thoroughness and coverage of safety aspects. -
Page 2: Table Of Contents
Table of contents Your IMPRESSA J7 IMPORTANT SAFEGUARDS Control elements Proper Use For your safety The IMPRESSA J7 Manual Symbol description ............................13 IMPRESSA J7 © Connector System ............................15 JURA on the internet ............................15 Knowledge Builder ............................15 Preparing and using for the first time Supplied as standard ...........................16... - Page 3 Dismantling and rinsing the Easy Cappuccino Frother .................51 Cleaning the bean container ........................51 Descaling the water tank ...........................52 Display messages Troubleshooting Transport and environmentally neutral disposal Transport / Emptying the system ......................57 Disposal ................................. 57 10 Technical data Index JURA contact details / Legal information...
-
Page 4: Important Safeguards
Important Safeguards IMPORTANT SAFEGUARDS These safeguards apply for machines with UL safety test (see rating plate and chapter 10, ‘Technical data’). Follow the basic safety Follow the basic safety When using electrical appliances, basic safety precautions should precautions precautions always be followed, to reduce the risk of fire, electric shock, and/or injury to persons, including the following: Read all instructions. - Page 5 Important Safeguards Special cord set instructions Special cord set instructions a. A short power supply cord is provided to reduce the risk resulting from becoming entangled in or tripping over a long cord. Your IMPRESSA has a 3-pin grounded plug. b.
- Page 6 Important Safeguards Keep your hands and the cord away from hot parts of the appliance during operation. Never clean with scouring powders or hard implements. NEVER DO NEVER DO Never fill instant coffee, chocolate mix etc. into the grinder or (or you will void your (or you will void your ground coffee funnel (grinder by-pass).
- Page 7 Important Safeguards...
-
Page 8: Control Elements
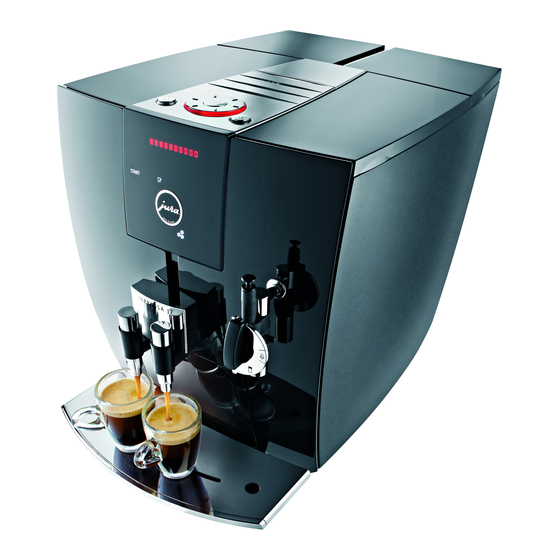
Control elements Control elements Figure: IMPRESSA J7 Piano Black Bean container cover Filler funnel for pre-ground coffee Water tank cover Grinder adjustment switch Bean container with aroma preservation Storage compartment cover cover Storage compartment with measuring Water tank spoon for pre-ground coffee and... - Page 9 Control elements Surface of the machine: Front: On/off button Display . Start symbol Rotary Switch Maintenance button Ristretto symbol Espresso symbol Coffee symbol Mild Normal Strong Hot water symbol Steam symbol © The Connector System permits the use of different frothers and nozzles. These are available from stockists.
-
Page 10: Proper Use
The machine is designed and intended for private domestic use. It should only be used for coffee preparation and to heat milk and water. Use for any other purpose will be deemed improper. JURA Elektroapparate AG cannot accept any responsibility for the conse- quences of improper use. - Page 11 The rating plate is located on the underside of your IMPRESSA. Further technical data is given in Chapter 10 ‘Technical Data’. Please only use original JURA maintenance products. Use of products that are not explicitly recommended by JURA could damage the IMPRESSA.
- Page 12 Important information People, including children, who do not have the physical, sensory or mental capabilities to use the machine safely or are inexperienced or lack knowledge in how to use the machine safely must be supervised by a responsible person when using it, or must be instructed in how to use it correctly.
-
Page 13: The Impressa J7 Manual
The IMPRESSA J7 Manual The IMPRESSA J7 Manual You are holding the manual for your IMPRESSA J7 in your hand. It will help you to familiarise yourself with your IMPRESSA safely and quickly and teach you the full range of facilities it offers: Chapter 2, ‘Preparing and using for the first time’, explains... -
Page 14: Impressa J7
J series. All details have been exactly thought out and come together to form an aesthetic whole that impresses in every way. This makes the IMPRESSA J7 a true design feature in the home, which, thanks to its compact design, can easily be placed anywhere. -
Page 15: Connector System
Height- and width-adjustable coffee spout: The height- and width-adjustable coffee spout is another JURA innovation. It allows precise adaptation to cups of different heights and diameters. This prevents the coffee from splashing and pro- duces a delicious crema with the ideal consistency. -
Page 16: Preparing And Using For The First Time
Supplied as standard Supplied as standard The following items are supplied as standard: Your JURA IMPRESSA J7 automatic coffee machine The Welcome Pack, which includes: The IMPRESSA J7 Manual JURA cleaning tablets... -
Page 17: Filling The Bean Container
2 Preparing and using for the first time Filling the bean Filling the bean The bean container has an aroma preservation cover. This will ensure container container that your coffee beans retain their aroma for longer. CAUTION CAUTION Coffee beans which have been treated with additives (e.g. sugar), pre-ground coffee or freeze-dried coffee will damage the grinder. -
Page 18: Inserting And Activating The Filter
Blue filter cartridges. You can also try out the ‘Inserting the filter’ operation online. Visit the Knowledge Builder at www.jura.com. Perform the ‘Inserting the filter’ operation without interrup- tions. This will ensure that your IMPRESSA always produces its best. -
Page 19: Determining And Adjusting The Water Hardness
2 Preparing and using for the first time Fill the water tank with fresh, cold water and reinsert the tank. Place a receptacle (at least 500 ml) under the frother. If you are using the Professional Cappuccino Frother, set the selector switch of the frother to the steam position n. -
Page 20: Adjusting The Grinder
2 Preparing and using for the first time Adjusting the water Adjusting the water Example: Proceed as follows to change the water hardness from hardness hardness 16°dH 25°dH Precondition: is displayed. READY k T Keep the Rotary Switch pressed until appears on RINSE the display. -
Page 21: Switching On
2 Preparing and using for the first time Select a coarse setting for a darker roast. If the consistency of grind is too coarse, the coffee flows too quickly from the coffee spout. Example: Proceed as follows to change the consistency of grind during the preparation of an espresso. -
Page 22: Switching Off
2 Preparing and using for the first time Switching off Switching off When you switch your IMPRESSA off, the coffee spout is only rinsed if you have prepared a speciality coffee. Place a receptacle under the coffee spout. Q T Press the on/off button. , the coffee spout is rinsed. -
Page 23: Familiarising Yourself With The Control Options
If you prefer to familiarise yourself with your IMPRESSA in a fun way on the computer, the interactive Knowledge Builder tutorial program can be found on the Internet at www.jura.com. Preparation at the Preparation at the Prepare your favourite speciality coffee at the touch of a button. -
Page 24: One-Off Settings Before And During Preparation
3 Familiarising yourself with the control options Preparing a speciality coffee Preparing a speciality coffee Example: Proceed as follows to prepare one espresso. at the touch of a button at the touch of a button Precondition: is displayed. READY Place an espresso cup under the coffee spout. i T Touch the Espresso symbol. - Page 25 3 Familiarising yourself with the control options One-off settings before and during preparation always follow this model. Changing the coffee Changing the coffee Example: Proceed as follows to prepare a strong cup of coffee. strength before preparation strength before preparation Precondition: is displayed.
-
Page 26: Setting The Water For The Cup Size
3 Familiarising yourself with the control options Setting the water for Setting the water for It is easy to make permanent settings for the amount of water for all the cup size the cup size speciality coffees as well as hot water and steam according to the cup size. - Page 27 3 Familiarising yourself with the control options You can make the following settings with the Rotary Switch: Programme item Sub-item Explanation Select the desired maintenance programme. RINSE RINSE If no action is taken, programming mode is CLEAN (only if filter exited automatically after approximately five FILTER is activated),...
- Page 28 3 Familiarising yourself with the control options Settings in programming mode always follow the same model. Example: Proceed as follows to change the aroma of one espresso from INTENSIVE STANDARD Precondition: is displayed. READY k T Keep the Rotary Switch pressed until appears.
-
Page 29: Preparation At The Touch Of A Button
During preparation, you can change the pre-set amount of water by turning the Rotary Switch. You can also try out the preparation of speciality coffees online. Visit the Knowledge Builder at www.jura.com. Ristretto, espresso Ristretto, espresso All speciality coffees (ristretto u, espresso i and coffee o) are pre-... -
Page 30: Cappuccino
4 Preparation at the touch of a button Preparing two speciality Preparing two speciality To prepare two cups of coffee: Place two cups under the coffee spout and touch the Coffee symbol o twice (within two seconds). Touch coffees at the touch of coffees at the touch of the Start symbol . -
Page 31: Pre-Ground Coffee
4 Preparation at the touch of a button Place the cup under the coffee spout. i T Touch the Espresso symbol. is displayed for about two seconds. The 1 ESPRESSO Espresso symbol is active. READY . T Touch the Start symbol. Preparation will now begin. -
Page 32: Foaming And Heating Milk With The Professional Cappuccino Frother
4 Preparation at the touch of a button Open the cover of the filler funnel for pre-ground coffee. FILL PRE-GROUND Place one level measuring spoon of pre-ground coffee into the filler funnel. Close the cover of the filler funnel for pre-ground coffee. SELECT BUTTON o T Touch the Coffee symbol. -
Page 33: Foaming Milk With The Easy Cappuccino Frother
4 Preparation at the touch of a button Preparation stops automatically when the pre-set amount of steam is reached. The milk foam preparation can be interrupted at any time. To do this, press the Rotary Switch or the maintenance button or touch the Start symbol. -
Page 34: Hot Water
4 Preparation at the touch of a button To make sure the cappuccino frother always works properly, rinse and clean it regularly (see Chapter 6, ‘Maintenance – Cappuccino frother’). Hot water Hot water To obtain a perfect water flow, use the removable hot water nozzle. You can find the hot water nozzle under the cover of the storage compartment. -
Page 35: Permanent Settings In Programming Mode
5 Permanent settings in programming mode 5 Permanent settings in programming mode 5 Permanent settings in programming mode Products Products With the programme item you can enter individual BUTTONS settings for all speciality coffees, hot water and steam. The following permanent settings can be made: Product Amount Strength... -
Page 36: Energy Save Mode
5 Permanent settings in programming mode o T Touch the Coffee symbol. is displayed for about two seconds. 1 COFFEE WATER k T Press the Rotary Switch to enter the programme item. (example) 100 ML g T Turn the Rotary Switch until is displayed. -
Page 37: Automatic Switch-Off
5 Permanent settings in programming mode Example: Proceed as follows to change the energy saving mode from SAVE - SAVE w k T Keep the Rotary Switch pressed until appears. RINSE g T Turn the Rotary Switch until is displayed. ENERGY - k T Press the Rotary Switch to enter the programme item. -
Page 38: Rinsing
5 Permanent settings in programming mode Rinsing Rinsing You can set whether the switch-on rinse should be started manually or automatically. Example: Proceed as follows to specify that the switch-on rinse should be started automatically after switching on. k T Keep the Rotary Switch pressed until appears. -
Page 39: Viewing Information And Maintenance Status
5 Permanent settings in programming mode i T Touch the Espresso symbol. appears briefly on the display, the settings for ‘Espresso’ are restored to the factory settings. PRODUCT g T Turn the Rotary Switch until is displayed. EXIT k T Press the Rotary Switch to exit the programme item. RESET g T Turn the Rotary Switch until is displayed. -
Page 40: Unit, Amount Of Water
5 Permanent settings in programming mode Continue turning the Rotary Switch to switch to the per- formed descaling and filter change operations. k T Press the Rotary Switch to enter the programme item. The number of performed cleaning operations appears on the display. -
Page 41: Language
5 Permanent settings in programming mode Language Language The language of your IMPRESSA is set with this programme item. Example: Proceed as follows to change the language from ENGLISH DEUTSCH Precondition: is displayed. READY k T Keep the Rotary Switch pressed until appears. -
Page 42: Maintenance
6 Maintenance 6 Maintenance 6 Maintenance Your IMPRESSA has the following integrated maintenance pro- grammes: Rinsing the machine Changing the filter Cleaning the machine Descaling the machine Clean or descale the machine or change the filter when you are prompted to do so. Maintenance tips Maintenance tips To ensure that you get many years of reliable service out of your... -
Page 43: Changing The Filter
If the CLARIS Blue filter cartridge is not activated, you will not be prompted to change the filter. You can also try out the ‘changing the filter’ operation online. Visit the Knowledge Builder at www.jura.com. Proceed as follows to change the CLARIS Blue filter cartridge when Changing after a prompt Changing after a prompt prompted to do so by your IMPRESSA. - Page 44 6 Maintenance Insert the filter cartridge into the water tank, exerting slight pressure. Close the cartridge holder. It will click into place audibly. Fill the water tank with fresh, cold water and reinsert the tank. Place a receptacle (at least 500 ml) under the frother. If you are using the Professional Cappuccino Frother, set the selector switch of the frother to the steam position n.
-
Page 45: Cleaning The Machine
The operation is interrupted, ADD TABLET Open the cover of the filler funnel for pre-ground coffee. Insert a JURA cleaning tablet into the filler funnel. Close the cover of the filler funnel. , the maintenance button c lights up. PRESS RINSE c T Press the maintenance button. -
Page 46: Descaling The Machine
If the wrong descaling agent is used, the machine could be dam- CAUTION CAUTION aged and/or traces of detergent could be left behind in the water. Use only original JURA maintenance products. If the descaling operation is interrupted, there may be damage to CAUTION CAUTION the machine. - Page 47 AGENT IN TANK Remove and empty the water tank. Completely dissolve the contents of one blister (three JURA descaling tablets) in a container that holds 500 ml of water. This may take several minutes. Pour the solution into the empty water tank and insert it in the machine.
-
Page 48: Rinsing The Cappuccino Frother
6 Maintenance Fill the water tank with fresh, cold water and reinsert the tank. , the maintenance button c lights up. PRESS RINSE Replace the cappuccino frother. Place a receptacle under the frother and another under the coffee spout. c T Press the maintenance button. , water flows out of the frother and the DE-SCALING coffee spout. -
Page 49: Cleaning The Cappuccino Frother
Use only original JURA maintenance products. JURA Cappuccino Cleaner is available from stockists. You can also try out the ‘Cleaning the cappuccino frother’ operation online. Visit the Knowledge Builder at... - Page 50 6 Maintenance Precondition: is displayed. READY Remove the milk pipe from the milk carton/bottle or the milk container. Pour 250 ml of fresh water into a receptacle and add one capful (max. 15 ml) of Cappuccino Cleaner. Immerse the milk pipe in the receptacle. Place another receptacle under the frother.
-
Page 51: Dismantling And Rinsing The Professional Cappuccino Frother
6 Maintenance Dismantling Dismantling and rinsing the and rinsing the Professional Professional Carefully remove the frother from the Connector System © Cappuccino Frother Cappuccino Frother by twisting slightly. Dismantle the frother completely. Rinse all frother parts thoroughly under running water. Re-assemble the frother. -
Page 52: Descaling The Water Tank
6 Maintenance Loosen the screw in the bean container and lift up the finger protection. Remove the remaining beans with a vacuum cleaner. Clean the bean container with a soft, dry cloth. Put the finger protection down again and screw it back tightly in place. -
Page 53: Display Messages
7 Display messages 7 Display messages Message Cause/Result Action The water tank is empty. Fill the water tank (See Chapter 2, FILL WATER TANK You cannot prepare any speciality ‘Preparing and using for the coffee or hot water or steam. first time –... - Page 54 7 Display messages Message Cause/Result Action There is too little pre-ground coffee The next time you prepare coffee NOT ENOUGH PRE-GROUND in the machine; the IMPRESSA stops use more pre-ground coffee (see the operation. Chapter 4 ‘Preparation at the touch of a button –...
-
Page 55: Troubleshooting
Chapter 6, ‘Maintenance – Descaling water tank is full. the water tank’). Grinder is making a very There are foreign objects Contact Customer Support in your loud noise. in the grinder. country (see Chapter ‘JURA contact details / Legal information’). - Page 56 Contact Customer Support in your country (see Chapter ‘JURA contact details / Legal information’). If you were unable to solve the problem, contact Customer Support in your country (see Chapter ‘JURA contact details / Legal information’).
-
Page 57: Transport And Environmentally Neutral Disposal
9 Transport and environmentally neutral disposal 9 Transport and environmentally neutral disposal 9 Transport and environmentally neutral disposal Transport / Emptying Transport / Emptying Keep the packaging for your IMPRESSA. It should be used to protect the system the system the machine during transport. -
Page 58: Technical Data
10 Technical data 10 Technical data Voltage 220 –240 V ~, 50 Hz 120 V ~, 60 Hz 220 –240 V ~, 50 Hz 220 V ~, 50 Hz Power 1450 W S D F G Safety test Power consumption 12 Wh ENERGY SAVE - Power consumption... -
Page 59: Index
Index Descaling Machine 46 Water tank 52 Amount Display Changing the amount of water during Messages 53 preparation 25 Display messages 53 Entering a permanent setting for the Disposal 57 amount of water for the cup size 26 Drip tray 8 Amount of coffee Changing the amount of water during preparation 25... - Page 60 Hot water 34 Pre-ground coffee 31 Inserting Ristretto 29 Water tank 16 Problems Internet 15 Troubleshooting 55 Professional Cappuccino Frother 15 Knowledge Builder 15 Dismantling and rinsing 51 Programming mode 35 Automatic switch-off 37 Language 41 Language 41 Permanent settings in programming Machine mode 26 Cleaning 45...
-
Page 64: Jura Contact Details / Legal Information
2004/108/EG – Electromagnetic Compatibility 2005/32/EG – Energy Directive Technical changes Technical changes We reserve the right to make technical changes. The illustrations used in the IMPRESSA J7 Manual show the IMPRESSA J7 Piano Black. Your IMPRESSA could incorporate minor changes. Feedback Feedback Your opinion is important to us! Use the contact link at www.jura.com.
Need help?
Do you have a question about the IMPRESSA J7 and is the answer not in the manual?
Questions and answers