Table of Contents
Advertisement
Quick Links
Advertisement
Table of Contents

Related Manuals for Gaggenau VG 442


Summary of Contents for Gaggenau VG 442
- Page 1 Operation, Maintenance and Installation Manual VG 442 Gas Cooktop...
-
Page 3: Table Of Contents
VG 442 1. Important Notes Page 3-4 For Your Safety Page 3 Operating for the First Time Page 3 About Use Page 4 2. Features Page 5 Features of the Appliance Page 5 Control Knob Page 5 Burner Parts Page 5 3. - Page 4 Congratulations on buying your new “Vario” appliance. Before switching your appliance on for the first time, we would like you to familiarize yourself with your new appliance. In this manual you will find important notes on safety and operation. These will serve to ensure your personal safety and the lasting value of your appliance.
-
Page 5: Important Notes
1. Important Notes For Your Safety Operating for the First Time You must not operate the appliance if it is damaged. Remove the packaging from the appliance and dispose of it according to local regulations. Be When connecting electrical appliances in the proxi - careful to remove all accessories from the mity of the appliance, make sure that connec ting packaging. -
Page 6: About Use
Use In the event of malfunctions, please inform your pots and pans with thicker bottoms because heat specialist dealer or your nearest Gaggenau after- distribution is particularly improved in the low sales service. -
Page 7: Features
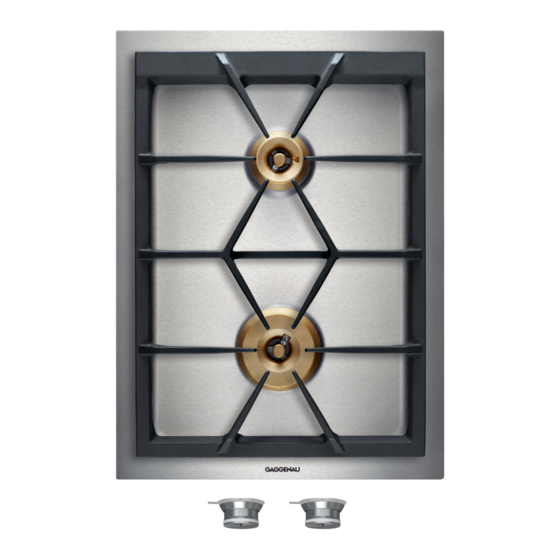
2. Features Features of the Appliance 1 Appliance cover 2 Ventilation openings 3 Normal burner 2 kW 4 Large burner 4 kW 5 Pot grid 6 Control knob for front cooking zone 7 Control knob for rear cooking zone Control Knobs Simmering Cooking levels 1 - 12 Burner Parts... -
Page 8: Operating Principle
3. Operating Principle The appliance features one-hand operation, flame detection and automatic re-ignition. The ignition is activated when the control knob is turned. Should the flame go out during operation, the appliance will automatically re-ignite the burner. 0 - OFF During a disturbance, the appliance will cut off the gas supply as a safety measure, to prevent unburned gas escaping. -
Page 9: Operation
4. Operation Switching on Only light the burner if all burner parts are dry, and • Place a suitable pot or a pan on the cooking assembled correctly. Otherwise, malfunctions may position. occur or the appliance may switch off. • Press down the control knob and turn it to the required position. -
Page 10: Settings Table
5. Settings Table Cooking Cooking method Examples level Heating Water, clear soup Blanching Vegetables Deep frying French fries, pastries 10 – 12 Searing Meat Roasting at high temperature Meat, potatoes 7 – 10 Boiling in open pot Liquids, pasta 6 – 8 Baking Pancakes Roasting at medium temperature... -
Page 11: Cookware Recommendations
6. Cookware Recommendations Pots with a diameter of less than 90 mm or more VG 442 Recommended Minimum than 280 mm should not be used. When using large pot diameter pot diameter pots, pay attention to keeping to a minimum... -
Page 12: Cleaning And Care
7. Cleaning and Care The burners (burner head cover, burner ring and burner assembly burner head) will change their color during operation and become darker. This change in color will not influence the use-value. burner head Please thoroughly clean the appliance before cover operating it for the first time and after every use. - Page 13 (Order and polish the whole cooktop after cleaning No. 310631) from your Gaggenau to get an even stainless steel surface. dealer. Never allow food stains or salt to remain Caution: no liquid should enter on stainless steel for any length of time.
-
Page 14: Maintenance
13 to see, if you can rectify the problem yourself. If your appliance still does not work, please contact your dealer or your local Gaggenau customer service agency. Specify the appliance type (see rating plate). Repairs may only be carried out by authorised technicians, in order to guarantee the safety of the appliance. -
Page 15: Visual Signals
9. Visual Signals Luminous disc Signification Cause / Remedy behind the control knob lights OFF appliance is OFF lights constantly appliance is ON normal use slow flashing residual heat The appliance is too hot to be touched display safely. fast flashing of one safety deactivation Turn control knob to 0 and then switch control knob... -
Page 16: Technical Data / Nozzle Table
10. Technical Data / Nozzle Table Technical data (gas) Gas connection: R 1/2’’ union nut for R 1/2’’ bracket to DIN 1999, conical-cylindrical Burners: Normal burner Full burning 2 kW Low burning 0.165 kW Technical data (electrical) Simmering 0.080 kW Starkbrenner 15 W Rated consumption... - Page 17 Nozzle table large burner Countries AT BE CH CZ BE CH CZ DK AT CH DE DE DK ES FI ES FI FR GB FR GB GR HU GR HU IE IS IE IS IT LU NL IT LU NO PL PL PT RU SE PT RU Gas family...
-
Page 18: Installation Instructions
11. Installation Instructions Important Notes This appliance can be combined with all Gaggenau The appliance may be installed in kitchen Vario 400 Series appliances. combinations made of wood or similar combustible materials without taking additional measures. Please observe the general safety notes and the The rear wall must consist of non-combustible important information in chapter 1. -
Page 19: Connecting The Appliance
Connecting the Appliance Gas connection The gas connection must be in a location that permits access to the shut-off valve and which, if applicable, is visible after opening the door of the cabinet. By means of the included R 1/2“ connection bracket (on the appliance end) with the affiliated washer, the appliance must be connected to a fixed con - nec ting line or a gas safety hose to DIN 3383... -
Page 20: Preparing The Cabinet
Preparing the Cabinet • Cut out the recess for the hob in your worktop. Proceed as indicated on the installation sketch. The installation sketch contains the measurements of the space required for the trim between the appliances. Several appliances can also be installed in individual recesses, as long as a minimum clearance of 50 mm is kept to between the appliances. -
Page 21: Installing The Control Panel
Installing the Control Panel Note: only install control panel with appliance of the corresponding type. Before connecting the appliance, make sure the electricity is switched off at fuse point! • Before installation, remove all styrofoam packaging from the control knobs and peel off the protective film behind the luminous discs. -
Page 22: Installing The Cooker
• Turn the clamping screws to the side. Insert the hob with the Gaggenau logo on the front into the cut-out and align it. Note: do not stick the hob onto the worktop with silicone. -
Page 23: Nozzle Replacement
Nozzle Replacement Changing over to a different gas type Only an authorised Gaggenau after-sales service technician is permitted to change this appliance over to a different gas type. The nozzles needed for the gas type to be set are available as a conversion kit. Please specify the appliance type and the required gas type. - Page 24 Replacing the main burner nozzles of the normal burner and large burner • Detach the safety spring on the supply lines. Leave the electrode connected. Unscrew the burners from the trough (Torx T20) and pull off the inner main nozzle burner from both supply lines.
-
Page 25: Fitting The Appliance Cover
Fitting the Appliance Cover • The securing brackets are already fitted on the base. • Place the appliance cover on the brackets in upright position and screw it down using the pre-mounted grub screws. • Close the appliance cover. It must lie evenly on the appliance. - Page 28 GAGGENAU HAUSGERÄTE GMBH CARL-WERY-STR. 34 · D - 81739 MÜNCHEN Y (0 89) 45 90 - 03 FAX (0 89) 45 90 - 23 47 www.gaggenau.com...
Need help?
Do you have a question about the VG 442 and is the answer not in the manual?
Questions and answers