
Subscribe to Our Youtube Channel
Related Manuals for Gaggenau CK 483


Summary of Contents for Gaggenau CK 483
- Page 1 Operating and Assembly Instructions CK 483 / SP 483 Electronic Glass-Ceramic Hob with Control Panel...
-
Page 2: Table Of Contents
CK 483 / SP 483 1. Important notes Page 3-4 For your safety Page 3 Operating for the first time Page 4 About use Page 4 2. Features Page 5 Features of the appliance Page 5 Allocation of the control knobs... - Page 3 Cooking with your new glass-ceramic hob will be even more fun than before. The appliance offers you the following advantages: – A generous cooking area. – Cooking zones for large pans and oval shaped roasters – the cooking zone size can be adjusted individually using the extension feature.
-
Page 4: Important Notes
1. Important notes For your safety Do not operate the appliance if it is damaged. Do not store any substances that are sensitive to high temperatures, or which pose a fire hazard The appliance must only be connected by (e.g. cleaning agents or spray cans), in drawers or an authorised specialist, paying attention to cupboards under the appliance. -
Page 5: Operating For The First Time
“Cleaning and care”). In the event of malfunction, first check your household fuses. If the power supply is in proper working order, but the appliance is still not functioning, please inform your specialist dealer or your nearest Gaggenau after-sales service. -
Page 6: Features
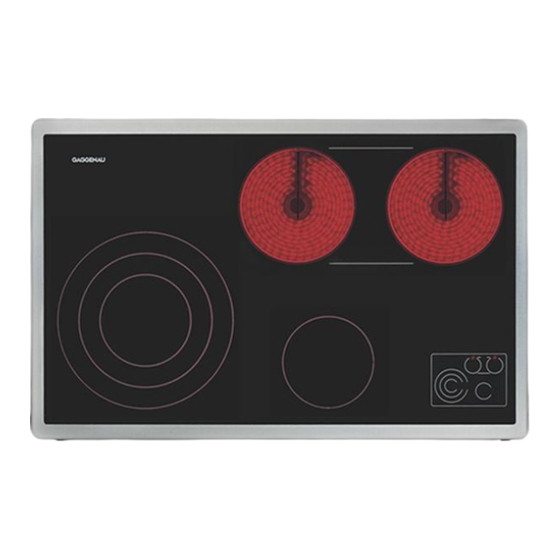
2. Features Features of the appliance 1 SuperQuick cooking zone Ø 140 mm (1050 W), converts to Ø 210 mm (2200 W) or to Ø 280 mm (3080 W) 2 SuperQuick cooking zone Ø 180 mm (1800 W) 3 SuperQuick cooking zone Ø 180 mm (1800 W) cooking zones 2 and 3 plus additional zone 800 W convert to oval roasting zone 180 x 415 mm (4400 W) -
Page 7: Operation
3. Operation Switching on Switching on Press down the control knob for the corresponding cooking position and turn it left or right to the required position (1 - 12). The luminous disc behind the control knob and the corresponding indicator light on the display panel light up, as long as the corresponding cooking zone is switched on. -
Page 8: Cooking Zone Extension
Cooking zone extension front left Activating extension The front left cooking zone can be extended to a middle or large diameter. Activating extension to a middle size (210 mm) Turn the corresponding control knob to the right to the extension symbol. An audible signal is sounded and the middle extension is activated. -
Page 9: Holiday Safeguard
Cooking zone extension rear to oval roaster zone Activating extension Both rear cooking zones convert together with an additional zone, to create an oval cooking zone especially suitable for roasters. When the extension is activated, both rear cooking zones and the additional zone operate as one single cooking zone. -
Page 10: Settings Table
4. Settings table Settings table Cooking Cooking method Examples level Boiling Water Searing Meat Heating Fat, liquids Boiling Soup, sauce Blanching Vegetables 11 - 8 Roasting Meat, fish, potatoes 7 - 6 Browning Flour, onions Roasting Almonds, breadcrumbs Baking Pancakes, egg dishes Boiling in open pot Liquids 6 - 5... -
Page 11: Energy Saving Tips
5. Energy saving tips Pots and saucepans should always be covered by a matching lid. The cooking time is shortened and the energy use reduced. Pay attention to the right size when choosing pots and pans. The diameters of pots and pans should correspond to that of the hotplate. -
Page 12: Cleaning And Care
Do not use the blade casing as it may scratch the glass-ceramic. Clean the hob with a damp, soft cloth or kitchen paper and the Gaggenau glass ceramic cleaner or similar cleaner suitable for glass ceramic cooktops. Polish with a soft, dry cloth. -
Page 13: Maintenance
If the power supply is functioning correctly, but your appliance still does not work, please contact your dealer or your local Gaggenau customer service agency. Specify the appliance type. The serial number and type of the appliance can be found on the quality control slip which is included with these instructions. -
Page 14: Remedying Slight Malfunctions Yourself
If your appliance should not function properly, search for the fault in the list below. If you are not successful in remedying the fault with the aid of the list below, then contact your Gaggenau after-sales service. Fault... -
Page 15: Installation
9. Installation Technical Data Electrical connection The appliance must only be connected by an Total connected load: 8680 W authorised specialist. Important notes on installation All corresponding regulations must be observed. The mains connecting cable must at least Pay attention to the “Important notes" on page correspond to type H 05 VV-F . -
Page 16: Preparing The Cabinet
Preparing the cabinet The appliance is installed in a base cabinet with a width of more than 900 mm. • Cut out the recess for the hob in your worktop. Proceed as indicated on the installation sketch. • As shown in the installation sketch, drill the Ø... -
Page 17: Installing The Control Panel
Installing the control panel Note: only install control panel and hob of the corresponding type. • Hold the support plate from the rear against the cabinet front, insert control knobs into the holes, secure from the rear with the nuts. Take care to install control knobs in the correct order. -
Page 18: Installing The Hob
Installing the hob • Before connecting the hob, make sure the electricity is switched off at fuse point! • Open the lid of the connecting terminal on the hob. Secure the mains connecting lead as shown in the connection diagram. Secure the connecting lead with the pull relief. - Page 19 GAGGENAU HAUSGERÄTE GMBH CARL-WERY-STR. 34 · D - 81739 MÜNCHEN Y (0 89) 45 90 - 03 FAX (0 89) 45 90 - 23 47 www.gaggenau.com...
Need help?
Do you have a question about the CK 483 and is the answer not in the manual?
Questions and answers