Advertisement
Advertisement
Table of Contents

Related Manuals for QSC PLX 1104


Summary of Contents for QSC PLX 1104
- Page 1 PLX Series Professional Audio Amplifiers User Manual ® 4-ohm minimum impedance models with Speakon output terminals: PLX 1104 PLX 1804 2-ohm minimum impedance models with Speakon and binding post terminals: PLX 1802 PLX 2502 PLX 3102 PLX 3602 *TD-000214-00* TD-000214-00 Rev.B...
- Page 2 11- Use only attachments/accessories specified by QSC Audio Products, Inc. 12- Use only with hardware, brackets, stands, and components sold with the apparatus or by QSC Audio Products, Inc. 13- Unplug the apparatus during lightning storms or when unused for long periods of time.
-
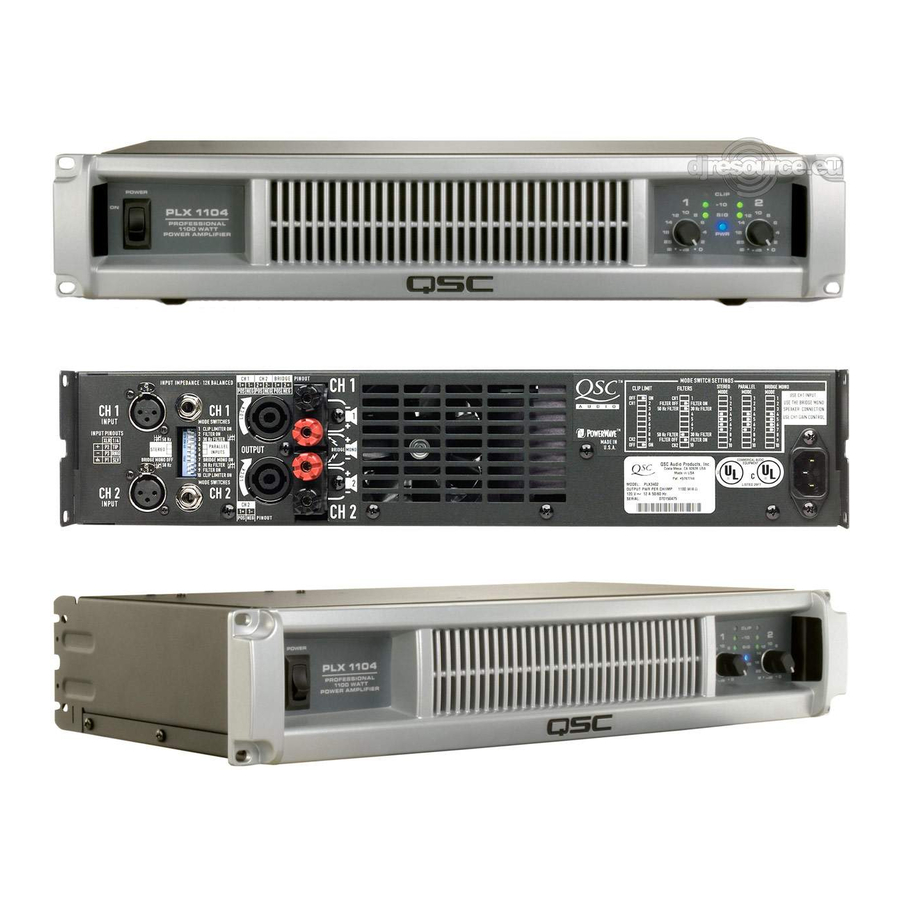
Page 3: Front Panel
Thank you for purchasing this QSC power amplifier. Please read the following directions to obtain the best results. This manual covers all models of the PLX series. Illustrations show the PLX 1804 to be representative of the PLX 1104 and 1804 models, while the PLX 3602 illus- tration is representative of the PLX 1802, PLX 2502, PLX 3102, and PLX 3602 models. -
Page 4: Rear Panel
A rear rack ear kit is available from QSC’s Technical Services Group. The cast front panel includes finger grips at each end, mak- ing lifting and setting into the rack more comfortable. -
Page 5: Ac Mains Connection
Cooling Air flow in QSC amplifiers: Cool air is drawn into the rear of the amplifier by the cooling fan. Warm air exits Air flows from the rack, into the back of the amplifier, and out the the front of the amplifier. - Page 6 Input Configuration Switch (PLX 1802/2502/3102/3602 models only) Input Configuration selector switch Select the input configuration by sliding the switch to the position which corresponds with the desired input configuration. •Bridge- upper position •Stereo- middle position •Parallel- lower position Stereo Mode: Each channel remains independent, and each may be used for a different signal. Parallel Mode: This setting connects both inputs together.
- Page 7 The signal's source impedance should be less than 600 ohms. Input Pinouts Balanced inputs: Connect to the plug as shown. PLX 1104 and PLX 1804 models can parallel the input signal to both channels by using a jumper from one channel to the next: •Connect the input signal to either of Channel 1’s...
- Page 8 Outputs not use less than 4 ohm impedance loads The PLX 1104 and PLX 1804 models are equipped with Speakon output with PLX 1104 and PLX 1804 models. connectors for each channel. PLX 1802, PLX 2502, PLX 3102, and PLX 3602 models are equipped with Speakon and binding post output connectors.
-
Page 9: Led Indicators
LED Indicators The LED indicators can be used to monitor system operation and identify common problems. LED indicators on PLX 1104 and PLX POWER (PWR): BLUE 1804 models Normal indication: •AC switch ON: LED will illuminate. If no indication: •Check AC power cord and AC outlet. -
Page 10: Gain Controls
Gain Controls Gain controls and LED cluster on PLX 1104 and PLX 1804 models Turn the GAIN controls clockwise to increase gain and counter clockwise to decrease gain. The GAIN controls are marked in dB of attenuation. There are 21 detents for repeatable adjustments. The upper 14 steps are about 1 dB each, and settings should normally be made within this range. -
Page 11: Protection Systems
•If the amplifier overheats due to prolonged overload or high external temperature, it will mute for about 30 seconds with the fan running at full speed for maximum cooling. Make sure the rear intake is getting a free flow of cool air. PLX 1104/1804 models: •These models have completely automatic internal protection that maintains operation even under extreme conditions. - Page 12 Specifications PLX 1104, PLX 1804 PLX 1104 PLX 1804 OUTPUT POWER (Watts) 20 - 20k Hz, 0.05% THD, 8 ohms/Ch. 1k Hz, 0.1% THD (EIA), 8 ohms/Ch. 20 - 20k Hz, 0.05% THD, 4 ohms/Ch. 1k Hz, 0.1% THD (EIA), 4 ohms/Ch.
- Page 13 Specifications PLX 1802, PLX 2502, PLX 3102, PLX 3602 PLX 1802 PLX 2502 PLX 3102 PLX 3602 OUTPUT POWER (Watts) 20 - 20k Hz, 0.05% THD, 8 ohms/Ch. 1k Hz, 0.1% THD (EIA), 8 ohms/Ch. 20 - 20k Hz, 0.05% THD, 4 ohms/Ch. 1100 1k Hz, 0.1% THD (EIA), 4 ohms/Ch.
-
Page 14: Appendix A: Speakon Wiring Reference
Appendix A: Speakon Wiring Reference Amplifier connection To loudspeaker Two-wire, single-channel connection Four-wire, two-channel connection NOTE! Ensure proper polarity when connecting bridge mode output! Bridge mode connection... -
Page 16: How To Contact Qsc Audio Products
(714) 754-6174 Customer Service FAX (714) 754-6173 World Wide Web: www.qscaudio.com E-mail: info@qscaudio.com service@qscaudio.com QSC Audio Products, Inc. 1675 MacArthur Boulevard Costa Mesa, California 92626 USA ©2006 “QSC” and the QSC logo are registered with the U.S. Patent and Trademark Office.
Need help?
Do you have a question about the PLX 1104 and is the answer not in the manual?
Questions and answers