Table of Contents
Advertisement
Advertisement
Table of Contents

Related Manuals for Electrolux EW 643 F


Summary of Contents for Electrolux EW 643 F
- Page 1 WASHING MACHINE OTOMATIK ÇAMASIR MAKINAÇI SKALBIMO MASINA VE˜AS MAZGÅJAMÅ MASŒNA PESUMASIN INSTALLATION AND INSTRUCTION MANUAL MONTAJ VE KULLANIM EL KITABI NAUDOJIMOSI TAISYKL6S EKSPLUATÅCIJAS INSTRUKCJIA KASUTUSJUHEND E W 6 43 F 124 974 481...
-
Page 2: Your New Washing Machine
YOUR NEW WASHING MACHINE This new washing machine meets all requirements for a modern washing of laundry Protection of the environment with reduced consumption of water, energy and Materials marked with the symbol are detergent. recyclable. To enable them to be recycled, they must be The temperature selector dial allows you to placed in the appropriate collection areas (or choose personally the suitable washing... -
Page 3: Table Of Contents
CONTENTS Important information Description of the appliance Maintenance Bodywork Installation Detergent and dispenser drawer Unpacking Drain filter Positioning Water inlet filter Water inlet The dangers of freezing Water drainage Electrical connection Something not working 17-18 Before washing Technical specifications Control panel Description of the controls Washing hints Sorting the laundry... -
Page 4: Important Information
IMPORTANT INFORMATION It is important that this instruction book be kept with the appliance for future reference. If you sell or give the appliance away, make sure that the book is passed to the new owners so that they can familiarise themselves with its operation and relevant warnings. -
Page 5: Description Of The Appliance
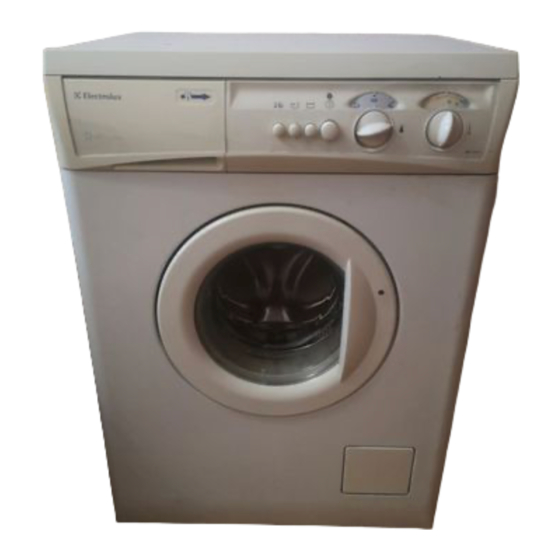
DESCRIPTION OF THE APPLIANCE 01 Detergent dispenser drawer 02 Programme chart 03 Option buttons 04 ON/OFF button 05 Operating pilot light 06 Temperature selector dial 07 Programme selector dial 08 Door handle 09 Drain filter 10 Adjustable feet Detergent dispenser drawer Prewash Main wash Fabric softener... -
Page 6: Installation
INSTALLATION Unpacking All transit bolts and packing must be removed before using the appliance. You are advised to keep all transit devices so that they can be refitted if the machine ever has to be transported again. Using a spanner, unscrew and remove the rear right-hand bolt and lay the machine on its back, taking care not to squash the hoses. -
Page 7: Water Inlet
Water inlet Connect the water inlet hose to a tap with a 3/4" thread after having inserted the small filter “A” supplied with the machine. The inlet hose must not be lengthened. If it is too short and you do not wish to move the tap, you will have to purchase a new, longer hose specially designed for this type of use. -
Page 8: Use
Control panel 2 3 4 5 6 1 Programme chart 5 ON/OFF button 2 No spin button 6 Operating pilot light 3 “Half load” button 7 Temperature selector dial 4 Rinse hold (Anti-crease) button 8 Programme selector dial Description of the controls 1 Programme chart 5 On/Off button There is a programme guide inside the handle of... -
Page 9: Washing Hints
Washing hints Washing a maximum load makes the most efficient use of water and energy. For heavily soiled laundry, reduce the load size. Sorting the laundry Follow the wash code symbols on each garment Laundry weights label and the manufacturer’s washing instructions. The following weights are indicative: Sort the laundry as follows: bathrobe... -
Page 10: Detergents And Additives
Red wine: soak in water and detergent, rinse Quantity of detergent to be used and treat with acetic or citric acid, then rinse. The type and quantity of detergent will depend Treat any residual marks with bleach. on the type of fabric, load size, degree of soiling Ink: depending on the type of ink, moisten the and hardness of the water used. -
Page 11: International Wash Code Symbols
Wash code symbols These symbols appear on fabric labels, in order to help you choose the best way to treat your laundry. Energetic wash Max. wash Max. wash Max. wash Max. wash temperature temperature temperature temperature 95°C 60°C 40°C 30°C Hand wash Do not wash... -
Page 12: Washing Programmes
Energetic programmes for cotton and linen Maximum load: 5 kg Possible Progr. Temp. Type of laundry Cycle description options Prewash Whites Wash at 60°-95°C 60°-95° with prewash Rinses (heavy soiled) Spin Whites Wash at 60°-95°C B(•) 60°-95° without prewash Rinses (normally soiled) Spin Coloureds... - Page 13 Gentle programmes for synthetics, mixed fibres, delicates and woollens Maximum load: 2 kg, woollens: 1kg Possible Progr. Temp. Type of laundry Cycle description option Prewash Synthetics Wash at 40°-60°C 40°-60° with prewash Rinses (heavy soiled) Short spin Synthetics Wash at 40°-60°C 40°-60°...
-
Page 14: Operating Sequence
Operating sequence 1 Place the laundry in the drum Open the door. Place the laundry in the drum, one item at a time, shaking them out as much as possible. Close the door. 2 Measure out the detergent Pull out the dispenser drawer until it stops. Measure out the amount of detergent recommended by the manufacturer in a graduated cup and pour it into the main wash... -
Page 15: Maintenance
MAINTENANCE Bodywork Clean the outside of the machine with warm water and a neutral, non-abrasive household detergent. Rinse with clean water and dry with a soft cloth. Important: do not use methylated spirits, solvents or similar products to clean the bodywork. -
Page 16: Water Inlet Filter
Water inlet filter If you notice that the machine is taking longer to fill, check that the filter in the water inlet hose is not blocked. Turn off the water tap. Unscrew the hose from the tap and remove the filter. -
Page 17: Something Not Working
SOMETHING NOT WORKING PROBLEM SOLUTION The machine does not start up: Check that the door is firmly closed. Check that the machine is plugged in and that there is power at the socket. Check that the main fuse has not blown. Check that the programme selector dial is positioned correctly and that the on/off button has been depressed. -
Page 18: The Door Will Not Open
There is water on the floor: Too much detergent or unsuitable detergent (creates too much foam) has been used. Check whether there are any leaks from one of the inlet hose fittings. It is not always easy to see this as the water runs down the hose; check to see if it is damp.
Need help?
Do you have a question about the EW 643 F and is the answer not in the manual?
Questions and answers
Have you motor for EW 643 F