Electrolux EHH6540FOK User Manual
Hide thumbs
Also See for EHH6540FOK:
- User manual (20 pages) ,
- User manual (24 pages) ,
- User manual (44 pages)
Table of Contents
Advertisement
Quick Links
Download this manual
See also:
User Manual
Advertisement
Table of Contents

Related Manuals for Electrolux EHH6540FOK


Summary of Contents for Electrolux EHH6540FOK
- Page 1 ....................EHH6540FOK Induction Hob User manual...
-
Page 2: Table Of Contents
CONTENTS 4 SAFETY INFORMATION 6 PRODUCT DESCRIPTION 8 OPERATING INSTRUCTIONS 11 HELPFUL HINTS AND TIPS 13 CARE AND CLEANING 14 TROUBLESHOOTING 15 TECHNICAL INFORMATION 17 INSTALLATION INSTRUCTIONS ENVIRONMENT CONCERNS Recycle the materials with the symbol . Put the packaging in applicable containers to recycle it. - Page 3 ENGLISH WE’RE THINKING OF YOU Thank you for purchasing an Electrolux appliance. You’ve chosen a product that brings with it decades of professional experience and innovation. Ingenious and stylish, it has been designed with you in mind. So whenever you use it, you can be safe in the knowledge that you’ll get great results every time.
-
Page 4: Safety Information
SAFETY INFORMATION Before the installation and use of the appli- • If the appliance is installed above draw- ance, carefully read the supplied instruc- ers make sure that the space, between tions. The manufacturer is not responsible the bottom of the appliance and the up- if an incorrect installation and use causes per drawer, is sufficient for air circulation. - Page 5 ENGLISH • Use this appliance in a household envi- lift these objects up when you have to ronment. move them on the cooking surface. • Do not change the specification of this appliance. CARE AND CLEANING • Do not let the appliance stay unattended WARNING! during operation.
-
Page 6: Product Description
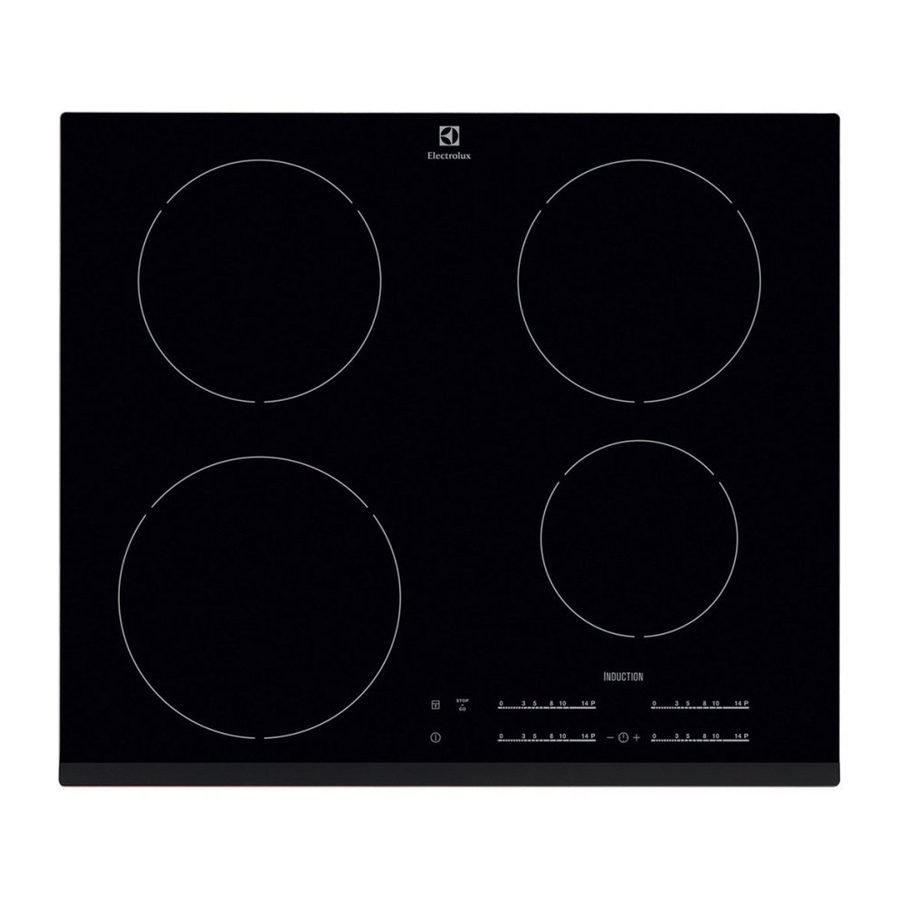
PRODUCT DESCRIPTION GENERAL OVERVIEW 180 mm 180 mm Induction cooking zone Induction cooking zone Induction cooking zone 145 mm 210 mm Control panel Induction cooking zone CONTROL PANEL LAYOUT Use the sensor fields to operate the appliance. The displays, indicators and sounds tell which functions operate. -
Page 7: Heat Setting Displays
ENGLISH sensor field function To activate and deactivate the STOP+GO function. HEAT SETTING DISPLAYS Display Description The cooking zone is deactivated. The cooking zone operates. function operates. The Automatic Heat Up function operates. Power function operates. There is a malfunction. + digit OptiHeat Control (3 step Residual heat indicator) : continue cook / stay warm / residual heat. -
Page 8: Operating Instructions
OPERATING INSTRUCTIONS ACTIVATION AND DEACTIVATION Touch for 1 second to activate or deac- tivate the appliance. AUTOMATIC SWITCH OFF AUTOMATIC HEAT UP The function deactivates the appliance automatically if: You can get a necessary heat setting in a shorter time if you activate the Automatic •... -
Page 9: Power Management
ENGLISH POWER MANAGEMENT indicator of the cooking zone goes out. To deactivate you can also touch The power management divides the power at the same time. between two cooking zones in a pair (see the illustration). The power function increa- When the countdown comes to an end, ses the power to the maximum level for the sound operates and... -
Page 10: The Child Safety Device
• To activate this function touch OFFSOUND CONTROL . The symbol comes on. (DEACTIVATION AND • To deactivate this function touch ACTIVATION OF THE SOUNDS) The heat setting that you set before comes on. Deactivation of the sounds LOCK Deactivate the appliance. Touch for 3 seconds. -
Page 11: Helpful Hints And Tips
ENGLISH HELPFUL HINTS AND TIPS INDUCTION COOKING ZONES The noises are normal and do not refer to appliance malfunction. For induction cooking zones a strong elec- ENERGY SAVING tro-magnetic field creates the heat in the cookware very quickly. How to save energy COOKWARE FOR INDUCTION •... - Page 12 Use to: Time Hints Nominal power con- sumption Keep warm the food as required Put a lid on a cook- you cooked ware Hollandaise sauce, 5 - 25 min Mix from time to time 3 – 8 % melt: butter, chocolate, gelatine Solidify: fluffy omelettes, 10 - 40 min...
-
Page 13: Care And Cleaning
ENGLISH CARE AND CLEANING Clean the appliance after each use. Always use cookware with clean bottom. Scratches or dark stains on the glass-ceramic cause no effect on how the appliance operates. To remove the dirt: – Remove immediately: melted plastic, plastic foil, and food with sugar. -
Page 14: Troubleshooting
TROUBLESHOOTING Problem Possible Remedy You cannot activate the Activate the appliance appliance or operate it. again and set the heat set- ting in less than 10 sec- onds. You touched 2 or more Touch only one sensor sensor fields at the same field. -
Page 15: Technical Information
TECHNICAL INFORMATION Modell EHH6540FOK Prod.Nr. 949 596 046 00 Typ 58 GAD D5 AU 220-240 V 50-60 Hz Induction 7.4 kW Made in Germany Ser.Nr. - Page 16 Cooking zones power Cooking zone Nominal Power Func- Power func- Minimum Power (Max tion activated tion maxi- cookware di- heat setting) mum dura- ameter [mm] tion [min] Right rear — 1800 W 2800 W 180 mm Right front — 1400 W 2500 W 145 mm Left rear —...
-
Page 17: Installation Instructions
ENGLISH INSTALLATION INSTRUCTIONS WARNING! built-in units and work surfaces that align Refer to "Safety information" chap- to the standards. ter. CONNECTION CABLE Before the installation • Use the correct mains cable of type H05BB-F Tmax 90°C (or higher) for a •... - Page 18 min. min. 38 mm 25 mm min. min. 5 mm min. 5 mm 20 mm If you use a protection box (an additional accessory ), the front airflow space of 5 mm and protective floor directly below the appliance are not necessary. You can not use the protection box if you install the appliance above an oven.
- Page 19 ENGLISH...
- Page 20 www.electrolux.com/shop 892951694-A-402011...
Need help?
Do you have a question about the EHH6540FOK and is the answer not in the manual?
Questions and answers