
Subscribe to Our Youtube Channel
Related Manuals for Aaeon 7” TFT LCD MONITOR


Summary of Contents for Aaeon 7” TFT LCD MONITOR
- Page 1 Thank you for purchasing our product. Please read this User’s Manual before using the product. Change without Notice 7” TFT LCD MONITOR USER MANUAL...
-
Page 2: Safety Precaution
Safety Precautions Federal Communications Commission (FCC) Statement This Equipment has been tested and found to comply with the limits for a Class B digital device, pursuant to Part 15 of the FCC rules. These limits are designed to provide reasonable protection against harmful interference in a residential installation. -
Page 3: Table Of Contents
Content Table Safety Precaution.……..……………………………………………………………… 2 Content Table….….…………………………………………………………………… 3 Feature….……………………………………………………………………………… 4 1. Package Contents…….…………………………………………………………. 5 2. TFT Installation…………………………………………………………………… 6 3. Signal Cable Description……..…………………………………………………. 7 4. Control Cable Description……..………………………………………………… 9 5. Front Panel Control.……………………………………………………………… 10 OSD Menu ………………………..…..………………………………………….. 11 Picture…..………………………………………………………………….………. 12 Function…………………………………………………………………………… 13 Recall………………………………………………………………………………. -
Page 4: Feature
Feature Support up to 2 CCD Camera Inputs (Mini din Connector) Extra RCA Input for Multimedia (VCD, DVD, Game Device) Provide 1 Video / 1 Audio Signal Output Auto Detection for NTSC / PAL System Support Trigger : 3 (Back / Door / AV) Auto Brightness Adjustment by CDS Back Mirror Status Selection via OSD Video Output Select via OSD (Back / Door / AV) -
Page 5: Package Contents
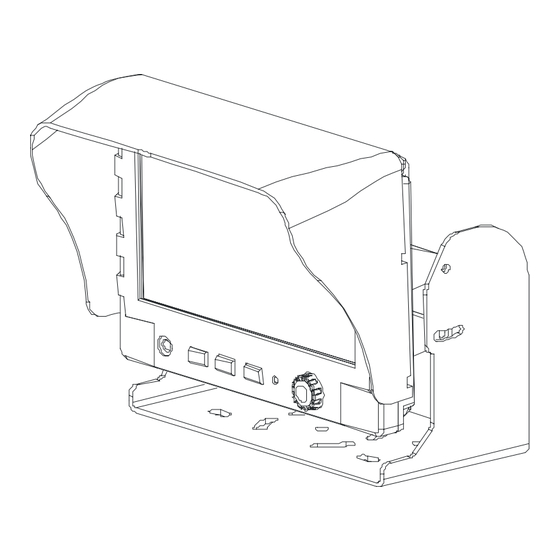
1. Package Contents Item Qty. 1. 7” LCD Monitor 2. Sun-hood 3. Mounting Bracket 4. Accessories 5. Control Cable 6. User Manual... -
Page 6: Tft Installation
2. TFT Installation Step 1 Check the package and make sure all parts are included Step 2 Clip the sun-hood on to the monitor Step 3 Make sure it is installed properly Step 4 Install the monitor on to the bracket Step 5 Adjust the monitor to an appropriate / comfortable viewing angle before tightening the screws... -
Page 7: Signal Cable Description
3. Signal Cable Description BACK DOOR AV VID EO IN Gr ay co lor lin e LIV E V IDEO OU T Whit e col o r li ne LIVE AU DI O O UT Blac k co lo r li ne AV AU DIO I N Re d color l ine 1. - Page 8 Mini Din Pin Assignment * Type 1 (Standard): 1. ----- 4. GND 2. ----- 5. +12V 3. Audio 6. Video (Optional) *Type 2 1. GND 4. +12V 2. ------ 5. ------- 3. Video 6. Audio...
-
Page 9: Control Cable Description
4. Control cable Description WH IT E ( DOOR .,e tc) 6 BL ACK ( GND ) Fuse 5A B LU E (R EVE R S E) 2 Re d OR AN GE C OL OR 4 RE D (AC C POWE R) 1. -
Page 10: Front Panel Control
5. Front Panel Control POWER Press the power button to activate the monitor or to keep the monitor under stand by mode. Red light for stand by, Green light is turn on. SOURCE Press this button to select Back or Door image, it can select AV / BACK / DOOR image when the hand park is working. -
Page 11: Osd Menu
OSD MENU 1. Press the MENU button to enter to the OSD Menu 2. Turn the MENU button left or right to select the setting you wish to proceed. The color of the content will turn YELLOW to identify your selection. 3. -
Page 12: Picture
PICTURE The PICTURE set up contains different setting for the TFT: BRIGHTN ESS CON TRAST COL OR HU E CAMER A TIMER STEP VIDEO TIMER STEP RETUR N Menu Ju m p S ou rce P ower BRIGHTNESS Provide adjustment for the overall picture shade and brightness of TFT display. -
Page 13: Function
FUNCTION The FUNCTION set up contains the on screen identification and the activation of the distance gage. BAC K MIRROR STATUS DISTANCE GAGE VIDEO OU T SEL EC T AUTO BRIGH T AD JU ST RETUR N Menu Ju mp S ourc e P o wer BACK MIRROR STATUS... -
Page 14: Vehicle Installation
6. Vehicle Installation Camera Yellow Green a. Install Camera R (for rear view) b. Use a measuring tool to mark out the distance behind the vehicle. c. Adjust the viewing angle of the camera so that the distance gage shown from the TFT match to the distance marks behind the vehicle. -
Page 15: Specification
7. Specification Screen size 7 inch ( diagonal ) Active area 154.08(W) x 86.58(H) Pixel configuration 0.107(W) x 0.370(H) Resolution 1440(W) x 234 (H) Viewing angle UP:60° / Down:60° / Left: 60° / Right:60° Power source: DC9.6V ~DC32V Contrast ratio 300:1 Brightness 400 cd/m... -
Page 16: Attachment
8. Attachment Attachment 1: Dimension Chart...
Need help?
Do you have a question about the 7” TFT LCD MONITOR and is the answer not in the manual?
Questions and answers