Table of Contents
Advertisement
Advertisement
Table of Contents

Related Manuals for Electrolux Wine Cooler / Beverage Center


Summary of Contents for Electrolux Wine Cooler / Beverage Center
- Page 1 Use & Care Guide Wine Cooler / Beverage Center 241888400 October 2007...
-
Page 2: Finding Information
Guide your product registration information. Warranty Thank you for choosing Electrolux, the new coverage begins at the time your Electrolux wine premium brand in home appliances. This Use & cooler / beverage center was purchased. Care Guide is part of our commitment to customer... -
Page 3: Table Of Contents
Important Safety Instructions .................... 4 Safety Precautions ......................4 Definitions ........................4 General Precautions ....................... 4 Installation ................... 5 Installing the Wine Cooler / Beverage Center ..............5 Site Preparation ......................... 6 Leveling ....................7 Leveling the Unit ........................ 7 Door Reversal ..................8 Reversing the Door ...................... -
Page 4: Safety
CAUTION CAUTION • Use only genuine Electrolux replacement CAUTION indicates a potentially hazardous parts. Imitation parts can damage the unit situation which, if not avoided, may result in and may void the warranty. -
Page 5: Installation
Installing the Wine Cooler / Beverage Center Your Electrolux wine cooler / beverage center has been designed for either free-standing or built-in installation. When built-in, your wine cooler does not require additional air space for top, sides or rear. In either case, the front grille must NOT be obstructed. -
Page 6: Site Preparation
Installation 6 Wipe out inside of unit with a damp cloth. Site Preparation 7 Be sure to install the Anti-Tip bracket. Follow 1 Position the unit on a flat, level surface the instructions provided with the Anti-Tip capable of supporting the entire weight of the bracket kit. -
Page 7: Leveling
Leveling Leveling the Unit Position the unit on a flat, level surface capable of supporting the entire weight of the unit when full. This unit contains four (4) adjustable leveling legs. Turn the legs clockwise to raise and counterclockwise to lower. -
Page 8: Door Reversal
Door Reversal 4 Remove upper right-hand (RH) hinge bracket Reversing the Door by loosening four (4) Torx screws. Be careful To reverse the door: to support the door while loosening and removing the upper hinge bracket. 1 Disconnect power to the wine cooler / beverage center. - Page 9 Door Reversal 6 Remove access cover by removing two (2) 9 Install metal left-hand (LH) door stop by Philips screws. installing hex head screw. 7 Shift door harness from one side to the other. 10 Install plastic LH door stop by installing hex Replace access cover.
- Page 10 Door Reversal 14 Remove button plugs from left side of cabinet 16 Route door harness behind lower front panel. and place in right side of cabinet. Remove Reconnect door harness to bracket. button plug from upper left side of door and place in upper right side of door.
-
Page 11: Start-Up And Temperature Control
Start-Up and Temperature Control Starting the Unit Your wine cooler / beverage center is shipped in the ON position; however, you may turn it ON or OFF by pressing and holding the ON/OFF for three (3) seconds. Adjusting the Temperature To accurately check the temperature, insert a reliable thermometer into a plastic (non-breakable) bottle, partially filled with water. -
Page 12: Operation
Operation Description of Features Alarms door ajar If the door has been left open for five (5) min- vacation mode Conserves energy by disabling interior utes, an audible alarm will sound and the door lights and keypad inputs. ajar indicator will illuminate on the right side of mute sounds Tones emitted by each keypress can be the display. -
Page 13: Storage
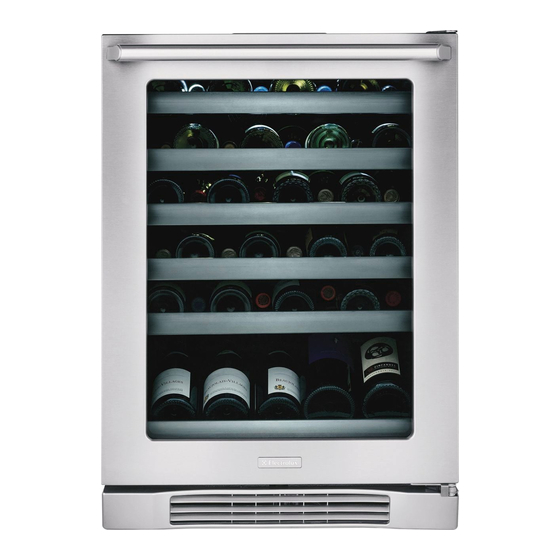
Storage Proper Storage The wine cooler will accommodate 46 bottles (750 ml size). There are five (5) upper racks that will hold eight (8) bottles each and one lower display rack that will hold six (6) bottles. Specially designed wine racks allow for proper horizontal storage of the wine. -
Page 14: Maintenance
Maintenance Interior Cleaning - as Required Maintaining Your Wine Cooler/ 1 Disconnect power to the wine cooler / Beverage Center beverage center. Periodic cleaning and proper maintenance will 2 Remove racks if desired, see “WINE RACK ensure efficiency, top performance, and long REMOVAL/INSTALLATION”... -
Page 15: Glass Shelf Removal/Installation (Beverage Center Only)
Maintenance Glass Shelf Removal/Installation (Beverage Center Only) 1 Open door fully. 2 Method 1 - removal of entire shelf assembly: a. Lift up on front edge and rear portion of shelf. Cantilever brackets will disengage from ladder. b. To reinstall, slide shelf into cabinet ensuring the cantilever brackets engage fully in the proper holes. -
Page 16: Troubleshooting
Adjust temperatures (see “Adjusting stabilize. the Temperature” in the “Start-Up and Temperature Control” section). • Failed LED assembly. • Contact a qualified Electrolux No interior light. Service Technician. • Manual light control is ON. • Turn off manual light control. See Light will not go out when door is closed. -
Page 17: Warranty Information
Major Appliance Warranty Information Your appliance is covered by a one year limited warranty. For one year from your original date of purchase, Electrolux will repair or replace any parts of this appliance that prove to be defective in materials or workmanship when such appliance is installed, used, and maintained in accordance with the provided instructions.
Need help?
Do you have a question about the Wine Cooler / Beverage Center and is the answer not in the manual?
Questions and answers